background image

102

Removing and Attaching the Projector Lens Unit

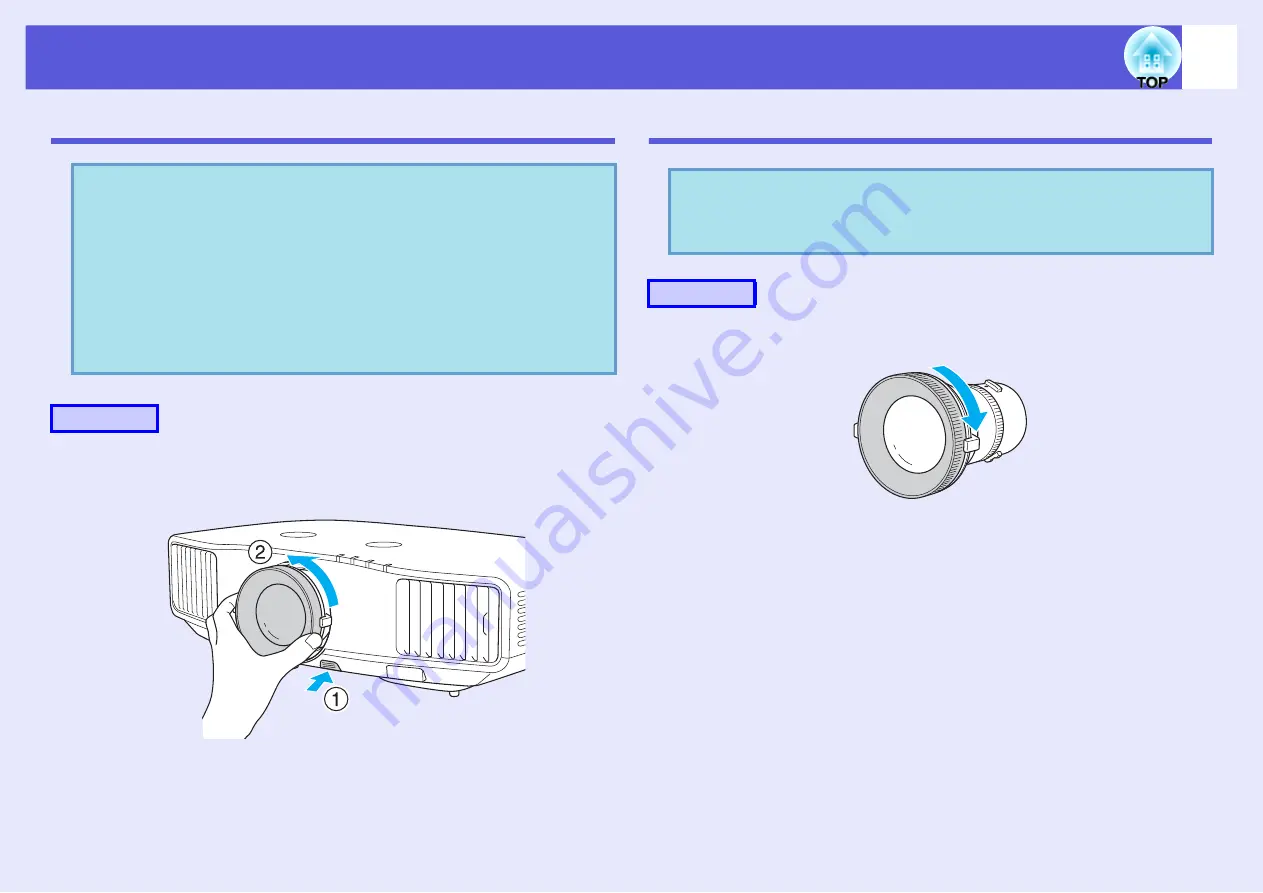
Removing

A

Hold down the lens unit removal button and turn the 
lens anti-clockwise until you hear it click.

B

Remove the lens unit by pulling it straight out.

Attaching

A

Turn clockwise until the focus ring stops moving.

Attention

• Only remove the lens unit when necessary. If dust or garbage 

enter the projector, projection quality deteriorates and it could 
cause a malfunction.

• Try not to touch the lens section with your hand or fingers.

If fingerprints or oils are left on the surface of the lens, projection 
quality deteriorates.

• If it is fixed in place, remove the Screw to fix the lens unit removal 

button.

Procedure

Keep pressed

Attention

Do not attach the lens unit when the projector's lens insertion 
section is facing up. Dust or garbage could enter the projector.

Procedure

Содержание EB-G5100

Страница 1: ...1 User s Guide ...

Страница 2: ...rsonal injury or physical damage due to incorrect handling Attention Indicates procedures which may result in damage or injury if sufficient care is not taken q Indicates additional information and points which may be useful to know regarding a topic s Indicates a page where detailed information regarding a topic can be found g Indicates that an explanation of the underlined word or words in front...

Страница 3: ...ultiple Projectors Multi Screen Color Adjustment 32 Summary of Correction Procedure 32 Correction Method 32 Security Functions 34 Managing Users Password Protect 34 Restricting Operation Control Panel Lock 36 Anti Theft Lock 37 Configuration Menu Using the Configuration Menu 40 List of Functions 41 Image Menu 41 Signal Menu 42 Settings Menu 44 Extended Menu 46 Network Menu EB G5300 G5200W G5100 on...

Страница 4: ...ing SD Cards EB G5350 G5150 only 105 Inserting 105 Reading the SD Card Access Lamp 105 Removing 106 Connecting a LAN Cable 107 Connecting with a USB Cable and Projecting USB Display EB G5350 G5150 only 108 Connecting 108 Reading Problem Mail Notification Function 111 ESC VP21 Commands 112 Command List 112 Cable Layouts 113 Regarding Network Projector EB G5350 G5150 only 114 About PJLink 115 List o...

Страница 5: ...rojector and pulling it out horizontally You can also replace the air filter by simply sliding it out of or into the front of the projector As well as Color Mode you can also adjust the image s absolute color temperature and the strength of each RGB color Also because you can adjust the hue saturation and brightness of each RGBCMY the image can be projected with depth and a color matching in super...

Страница 6: ...AN s EasyMP Operation Guide f Connection with Windows Vista s Network Projector By connecting the projector to a network and using the Network Projector function in Windows Vista multiple users on the network can share the projector f Connect using a USB cable USB display Simply by connecting a commercially available USB cable to a Windows computer you can project images from the computer s screen...

Страница 7: ...en the projector is placed on a surface such as a desk s Quick Start Guide D Foot adjust lever Pull out the foot lever to extend and retract the front foot s Quick Start Guide E Zoom ring Adjusts the image size s Quick Start Guide F Projection lens Images are projected through here G Lens unit removal button Press this button to remove the lens unit when replacing lens units H Remote Receiver Rece...

Страница 8: ...ctor to rise and this can lead to problems with operation and shorten the optical engine s service life Clean the air filter regularly s p 81 M Vertical lens shift dial Turn the dial to move the position of the projected image up or down s Quick Start Guide N Horizontal lens shift dial Turn the dial to move the position of the projected image left or right s Quick Start Guide Name Function ...

Страница 9: ...se this screw hole to fix the unit in place to avoid loss and so on D Rear foot When setup on a desk turn to extend and retract to adjust the horizontal tilt s Quick Start Guide E Security cable installation point Pass a commercially available anti theft wire lock through here when you want to secure the projector to a fixed object s p 37 F Handle Use this handle when carrying the projector G Scre...

Страница 10: ... input port Connects to the audio out port when you want to output audio from the projector from equipment connected to the S Video input port or the Video1 2 input port s Quick Start Guide E Power inlet Connects to the power cable s Quick Start Guide F Security slot j The security slot is compatible with the Microsaver Security System manufactured by Kensington s p 37 G Speaker H USB port Type A ...

Страница 11: ... port When you are using USB display and want to output sound from the projector you must make a connection to your computer s audio output EB G5350 G5150 only s Quick Start Guide P Monitor Out port Outputs to an external monitor the image signal from the computer connected to the Computer1 2 input port or the BNC input port This is not available for component video signals or other signals being ...

Страница 12: ...rk connection When the PC Free function is being used for projection If pressed when a configuration menu or a help screen is displayed these buttons select menu items and setting values s Quick Start Guide p 40 E Help button Displays and closes the help screen which shows you how to deal with problems if they occur s p 66 F Esc button Stops the current function If pressed when a configuration men...

Страница 13: ...ges from the S video input port s p 20 F Menu button Displays and closes the configuration menu s p 40 G h button When a configuration menu or help screen is displayed it selects menu items and setting values s p 40 p 66 When using the optional wireless mouse receiver tilting this button moves the pointer in the direction eight possible directions tilted H Enter button When a configuration menu or...

Страница 14: ...ote receiver is disabled Q Num button Use this button to enter passwords IP addresses from the Network and so on s p 34 Name Function R Numeric buttons Use this button to enter passwords remote control IP settings IP addresses from the Network and so on s p 34 p 31 S Color Mode button Each time the button is pressed the color mode changes s p 21 T Freeze button Images are paused or unpaused s p 22...

Страница 15: ... button Changes to images from the HDMI input port s p 20 Source Search button Changes to the next input source that is connected to the projector and is sending an image s p 19 Indicators A light is emitted when outputting remote control signals Remote control light emitting area Outputs remote control signals Name Function ...

Страница 16: ...spect for video equipment images 23 Changing the aspect for computer images HDMI images For EB G5350 G5300 G5150 G5100 only 24 Changing the aspect for computer images HDMI images For EB G5200W 25 Pointer Function Pointer 27 Enlarging Part of the Image E Zoom 28 Restrictions in the Target Projector when Using Multiple Projectors 29 Setting the Projector ID 30 Checking the Projector ID 30 Setting th...

Страница 17: ...ected from the Configuration menu the correction method you choose is assigned to the control panel and buttons The default setting for Keystone is set to H V Keystone when and buttons are pressed H V Keystone correction is carried out Because Quick Corner and H V Keystone correction can be carried out while projecting a test pattern you do not need to make preparations by connecting a computer or...

Страница 18: ...rners F When you are done press the Esc button to exit the correction menu Because the correction method was changed to Quick Corner from Keystone in the Configuration menu when and buttons are pressed later the screen for selecting the corner in procedure 2 is displayed Change Keystone from the Configuration menu to H V Keystone if you want to correct H V Keystone when pressing the and buttons on...

Страница 19: ...rch button Only EB G5350 G5150 changes to EasyMP When your video equipment is connected start playback before beginning this operation When two or more pieces of equipment are connected press the Source Search button until the target image is projected Computer1 Video1 The input port where no image signal is being input is skipped S video Computer2 Video2 HDMI EasyMP BNC Procedure Using the remote...

Страница 20: ...images from the Computer1 or Computer2 input ports Changes to images from the Video1 or Video2 input ports Changes to images from the HDMI input port Remote control Changes to images from the BNC input port Changes to images from the S video input port Changes to the EasyMP image EB G5350 G5150 only When using EB G5300 G5200W G5100 this does not function even if the button is pressed ...

Страница 21: ...r making presentations using color materials in a bright room Text Ideal for making presentations using black and white materials in a bright room Theatre Ideal for watching films in a dark room Gives images a natural tone Photo When computer images are input Ideal for projecting still pictures such as photos in a bright room The images are vivid and brought into contrast Sports When component vid...

Страница 22: ...the freeze function is activated beforehand Each time you press the button Freeze turns on or off Procedure Remote control q If you use this function when projecting moving images the images and sound continue to be played back by the source and you cannot return to the point where A V Mute was activated You can choose to display black blue or logo as the A V mute display using the Extended Displa...

Страница 23: ...llows f Changing methods Each time you press the button the aspect name is displayed on the screen and the aspect changes If you press the button while the aspect name is displayed on the screen it changes to the next aspect mode f Changing the aspect for video equipment images EB G5350 G5300 G5150 G5100 only When 720p 1080i 1080p signals are input the display is zoomed to a 4 3 ratio For EB G5200...

Страница 24: ...iate aspect based on information from the signal being input 4 3 Projects to the full projection size at an aspect of 4 3 This is ideal for when you want to project images at an aspect of 5 4 1280 1024 to the full projection size When a 1280 1024 signal is input 16 9 Projects at a 16 9 aspect This is ideal for projecting at full screen size when using a 16 9 screen When a 1280 1024 signal is input...

Страница 25: ...are missing or it cannot project everything set Wide or Normal in Resolution from the configuration menu depending on the size of the computer panel s p 42 Set Values Operation Projection example Normal When images are input from the Computer1 2 or BNC input ports Projects to the full projection size retaining the aspect of the input image When a 1024 768 signal is input Auto When images are input...

Страница 26: ...ution of the input image size to the center of the screen This is ideal for projecting clear images If the image resolution exceeds 1280 800 the edges of the image are not projected When an 800 600 signal is input When a 1400 1050 signal is input q When projecting computer images if parts of the image are missing or it cannot project everything set Wide or Normal in Resolution from the configurati...

Страница 27: ...you draw attention to the area you are talking about A Display the pointer Each time you press the button the pointer appears or disappears B Move the pointer icon Procedure Remote control q You can choose from three different kinds of pointer icon in Settings Pointer Shape from the configuration menu s p 44 Pointer icon Remote control ...

Страница 28: ... is expanded You can expand quickly by holding the button down You can reduce the enlarged image by pressing the x button Press the Esc button to cancel Procedure Remote control Remote control q The enlargement ratio appears on the screen The selected area can be enlarged to between 1 to 4 times in 25 incremental steps Tilt the h button to scroll the image If E Zoom is selected when Progressive or...

Страница 29: ...his switch is set to Off you can operate all projectors by remote control regardless of the ID setting for the projector or the remote control Can operate remote control Cannot operate remote control Can operate remote control Can operate remote control Can operate remote control Example when projector ID and remote control ID match and remote control switch is On Example when projector ID and rem...

Страница 30: ...nfiguration Menu p 40 B Choose the ID you want to set and press the Enter button C Press the Menu button to close the configuration menu Checking the Projector ID Use the following procedure to check the projector ID During projection while holding the ID button press the Help button to display the current projector ID on the screen Procedure Using the remote control Using the control panel Proced...

Страница 31: ...gs for the remote control ID with the ID switch set to On A Set the remote control ID switch to On B While holding the ID button press a number button to select a number to match the ID of the projector you want to operate Once this setting has been made the projector that can be operated by remote control is limited Procedure Keep pressed q The remote control ID setting is saved in the remote con...

Страница 32: ...ghtness You can correct the image brightness to make them all equal Correcting color You can adjust the image color to make them match more closely by using Color Correct G R and Color Correct B Y Correction Method After setting up the projectors correct the brightness and tone for each projector to reduce the differences A Press the Menu button and select Extended Multi screen from the configurat...

Страница 33: ...e the Enter button is pressed the image displayed changes between the pattern display and the actual image and you can check the correction results and make corrections in the actual image E Repeat procedures 2 to 4 until corrections are finished F When all corrections are finished press the Menu button to close the configuration menu ...

Страница 34: ...urned on after it has been disconnected from the power supply it was connected to the last time the password was entered If the correct password is not entered projection does not start 2 User s logo protect Even if someone tries to change the user s logo set by the owner of the projector it cannot be changed When User s Logo Protect is set to On the following setting changes for the user s logo a...

Страница 35: ...sword 1 Select Password and then press the Enter button 2 The message Change the password is displayed select Yes and then press the Enter button The default setting for the password is 0000 Change this to your own desired password If you select No the screen shown in step 1 is displayed again 3 While holding down the Num button enter a four digit number using the numeric buttons The number entere...

Страница 36: ...ngs Control Panel Lock from the configuration menu s Using the Configuration Menu p 40 Procedure Attention If an incorrect password is entered three times in succession the message The projector s operation will be locked is displayed for about five minutes and then the projector switches to standby mode If this happens disconnect the power plug from the electrical outlet and then reinsert it and ...

Страница 37: ...sington com Security cable installation point A commercially available theft prevention wire lock can be passed through the installation point to secure the projector to a desk or pillar Screw to fix the lens unit removal button The lens removal button can be locked so that the projection lens cannot be removed immediately with the screw supplied f Installing the wire lock Pass an anti theft wire ...

Страница 38: ...rojection lens The bayonet type allows you to simply and easily exchange the projector s lens If you are concerned about security this is a useful anti theft device as once it is locked with the screw supplied it cannot be quickly removed ...

Страница 39: ...twork Menu EB G5300 G5200W G5100 only 48 Network Menu EB G5350 G5150 only 50 Notes on operating the network menu 51 Soft keyboard operations 51 Basic Menu 52 Wireless LAN menu only when the optional wireless LAN unit is installed 53 Security menu Only available when the optional wireless LAN unit is installed 55 Wired LAN Menu 59 Mail menu 60 Others menu 61 Reset Menu 62 Info Menu Display Only 63 ...

Страница 40: ...n Menu A Selecting from the top menu C Changing the selected item B Selecting from the sub menu Top menu Sub menu Settings Guide Select the setting to change Using the remote control Using the control panel Buttons used D Exit ...

Страница 41: ...ected as the Color Mode setting from the Image menu You can adjust the overall tint of the image You can adjust tints in 10 stages from 5000 K to 10000 K When a high value is selected the image becomes tinged with blue when a low value is selected the image becomes tinged with red Color Adjustment You can make adjustments by choosing one of the following This item cannot be selected if sRGBg is se...

Страница 42: ...gg You can adjust computer images when vertical stripes appear in the images s p 73 Sync g You can adjust computer images when flickering fuzziness or interference appear in the images s p 73 Position You can adjust the display position up down left and right when a part of the image is missing so that all of the image is projected Progressiveg Signals from the HDMI input port excluding digital RG...

Страница 43: ...appear correctly when set to Auto select the appropriate signal according to the connected equipment Video Signal You can select the input signal from Video1 2 input port If set to Auto video signals are recognized automatically If interference appears in the image or a problem occurs such as no image is being projected when set to Auto select the appropriate signal according to the connected equi...

Страница 44: ...t the lamp brightness to one of two settings Select Low if the images being projected are too bright such as when projecting images in a dark room or onto a small screen When Low is selected the amount of electricity consumed and the lamp s operating life are changed as follows and fan rotation noise during projection is reduced Electrical consumption about a 14 decrease lamp life about 1 5 times ...

Страница 45: ...sive Test Pattern Multi screen or Resolution Test Pattern When the projector is setup a test pattern is displayed so that you can adjust the projection without connecting other equipment While the test pattern is displayed zoom focus adjustments and keystone correction can be performed To cancel the test pattern press the Esc button on the remote control or the control panel Reset You can reset al...

Страница 46: ...ojected when starting the projector is displayed A V Mute You can set the screen displayed during A V Mute as Black Blue or Logo User s Logo You can change the user s logo that is displayed as a background and displayed during A V Mute s p 93 Projection You can set from the following according to the way the projector is setup s p 80 Front Front Ceiling Rear Rear Ceiling You can change the setting...

Страница 47: ...hen this is set to Network On You can use SNMPg to monitor and control the status of the projector over the network or by using the EMP Monitor software supplied with this product Projector ID Set the ID within a range of 1 to 9 Off indicates that no ID is set s p 30 Multi screen You can adjust the hue and brightness of each projected image when multiple projectors are lined up and projecting s p ...

Страница 48: ...55 in each field of the address However the following subnet masks cannot be used 0 0 0 0 255 255 255 255 Gateway Address You can input the IP address for the gateway for the projector 1 You can enter a number from 0 to 255 in each field of the address However the following gateway addresses cannot be used 0 0 0 0 127 x x x 224 0 0 0 to 255 255 255 255 where x is a number from 0 to 255 MAC Address...

Страница 49: ...ch field of the address However the following IP addresses cannot be used 127 x x x 224 0 0 0 to 255 255 255 255 where x is a number from 0 to 255 Port Number You can display the SMTP server s port number The default value is 25 When editing settings from WEB control you can change the port number by entering a valid number from 1 to 65535 Address 1 Setting Address 2 Setting Address 3 Setting You ...

Страница 50: ...ing menus are available for setting network items Basic Wireless LAN Security Wired LAN Mail Others Reset and Setup complete q By using the Web browser of a computer connected to the projector on a network you can set the projector s functions and control the projector This function is called Web control You can easily enter text using a keyboard to make settings for Web control such as security s...

Страница 51: ...ton on the remote control or and on the projector to move the cursor to the desired key and then press the Enter button to enter the alphanumeric Enter figures by holding down the Num button on the remote control and pressing the numeric buttons After inputting press Finish on the keyboard to confirm your input Press Cancel on the keyboard to cancel your input Yes Saves the settings and exits the ...

Страница 52: ...llows you to set up and control the projector by using the Web browser on a computer connected on a network s EasyMP Operation Guide Changing Settings Using a Web Browser Web Control Projector keyword When set to On you have to enter the keyword when you try to connect the projector to a computer on a network As a result you can prevent presentations from being interrupted by unscheduled connectio...

Страница 53: ...eric characters DHCPg You can set whether or not On Off to use DHCP If this is set to On you cannot set any more addresses IP Addressg You can input the IP address assigned to the projector You can input a number from 0 to 255 in each field of the address However the following IP addresses cannot be used 0 0 0 0 127 x x x 224 0 0 0 to 255 255 255 255 where x is a number from 0 to 255 Subnet Maskg ...

Страница 54: ...ID Display To prevent the SSID from being displayed on the EasyMP Standby screen set this to Off IP Address Display To prevent the IP address from being displayed on the EasyMP Standby screen set this to Off Sub Menu Function ...

Страница 55: ...y to automatically update the encryption key at regular fixed intervals which makes it harder to break compared to WEP which uses a constant encryption key WPA also includes user authentication functions WPA authentication provides two methods using an authentication server or authenticating between a computer and an access point without a server This projector supports the latter method without a...

Страница 56: ...irections from the network administrator of your network If using EAP you need to make settings at the projector that match the authentication server settings Check with your network administrator for details on RADIUS settings Register an electronic certificate and a CA certificate to the projector Only one set of an electronic certificate and a CA certificate can be registered to the projector T...

Страница 57: ...key 3 Encryption key 4 You can enter the key used for WEP encryption Enter the key in single byte characters following instructions from the network administrator for the network in which the projector participates The type of character and the number that can be entered differ according to the WEP encryption and Format settings If the number of characters you enter is shorter than the required ch...

Страница 58: ...n Issued to Issued by Validity period Information in the certificate is displayed You cannot enter Sub Menu Function User name You can enter a user name to be used for authentication in single byte alphanumeric characters no spaces You can enter up to 64 characters You cannot enter more than 32 characters on the configuration menu When setting from Web Control you can enter more than 32 characters...

Страница 59: ...ubnet Maskg You can input the subnet mask for the projector You can input a number from 0 to 255 in each field of the address However the following subnet masks cannot be used 0 0 0 0 255 255 255 255 Gateway Addressg You can input the IP address for the gateway for the projector You can input a number from 0 to 255 in each field of the address However the following gateway addresses cannot be used...

Страница 60: ... 255 255 255 where x is a number from 0 to 255 Port Number You can input the port number for the SMTP server The default value is 25 You can input numbers between 1 to 65535 Email Address 1 Email Address 2 Email Address 3 You can input the e mail address of the destination to send the notification e mail to You can register up to three destinations You can enter up to 32 single byte alphanumeric c...

Страница 61: ... 255 where x is a number from 0 to 255 To use SNMP to monitor the projector you need to install the SNMP manager program on your computer SNMP should be managed by a network administrator Gateway Setup For the priority gateway select either wireless or wired AMX Device Discoveryg When the projector is connected to a network set this to On to allow the projector to be detected by AMX Device Discove...

Страница 62: ...f Functions 62 f Reset Menu Resets all of the network settings Sub Menu Function Reset network settings To reset all of the network settings select Yes After you reset all the settings the Basic menu appears ...

Страница 63: ... in yellow Source You can display the input port name for the connected equipment currently being projected Input Signal You can display the content of Input Signal set in the Signal menu according to the Source Resolution You can display the input resolution Video Signal You can display the content of Video Signal set in the Signal menu Refresh Rateg You can display the refresh rate Syncg Info Yo...

Страница 64: ... menus to their default settings The following items are not reset to their defaults Input Signal User s Logo Multi screen all items for Network menus Lamp Hours and Language Reset Lamp Hours You can clear the cumulative lamp hours use time and return it to 0H Reset when you replace the lamp ...

Страница 65: ...f a problem is found Using the Help 66 Problem Solving 67 Reading the Indicators 67 t Power indicator lights red 68 m o Indicator is lit or flashing orange 69 When the Indicators Provide No Help 70 Problems relating to images 71 Problems when projection starts 75 Other problems 76 ...

Страница 66: ...screen is displayed B Select a menu item C Confirm the selection Questions and solutions are displayed as shown on the screen below Press the Help button to exit Help Procedure Using the remote control Using the control panel Using the remote control Using the control panel Using the remote control Using the control panel q If Help does not provide a solution to the problem refer to Problem Solvin...

Страница 67: ...able is connected correctly and that the power is being supplied normally Sometimes when the power cable is unplugged the t indicator remains lit for a short period this is not a fault Indicates the operating status Orange Standby condition When the t button is pressed in this condition projection starts Green Warm up in progress Warm up time is about 30 seconds After warm up is complete the indic...

Страница 68: ...from the electrical outlet and contact your local dealer or the nearest address provided in the Support and Service Guide s Epson Projector Contact List When using at an altitude of 1500 m or more set High Altitude Mode to On s p 47 Red Red Lamp Error Lamp Failure Lamp Cover Open Check the following two points Take out the lamp and check if it is cracked s p 85 Clean the air filter s p 81 If it is...

Страница 69: ... 88 Replace Lamp Replace it with a new lamp s p 85 If you continue to use the lamp after the replacement period has passed the possibility that the lamp may explode increases Replace it with a new lamp as soon as possible q If the projector is not operating properly even though the indicators are all showing normal refer to When the Indicators Provide No Help s p 70 If the error is not indicated i...

Страница 70: ...e checked patterns appear f The image is truncated large or small or the aspect is not suitable s p 73 Only part of the image is displayed or the height and width ratios of the image are not correct and so on f Image colors are not right s p 74 The whole image appears purplish or greenish images are black white colors appear dull and so on Computer monitors and LCD screens have different color rep...

Страница 71: ...t all of the settings s Reset Reset All p 64 Is the projected image completely black Some input images such as screen savers may be completely black Is the image signal format setting correct Change the setting according to the signal for the connected equipment s Signal Video Signal p 43 Check Remedy Is the computer s image signal being output to the LCD and the monitor Change the image signal to...

Страница 72: ... computer s LCD monitor or to the accessory monitor you need to change the output to an external destination as well as the computer s own monitor For some computer models when the image signals are output externally they no longer appear on the LCD monitor or accessory monitor s Computer s documentation under a title such as External output or Connecting an external monitor If the connection is m...

Страница 73: ...h the projector s List of Supported Monitor Displays p 116 s Computer documentation Are the Sync g and Trackingg settings adjusted correctly Press the Auto button on the remote control or the Enter button on the control panel to perform automatic adjustment If the images are not adjusted correctly after using automatic adjustment you can make the adjustments using Sync and Tracking from the config...

Страница 74: ...guration menu s Image Brightness p 41 Are the cables connected correctly Check that all the cables required for projection are securely connected s Quick Start Guide Is the Contrastg setting adjusted correctly Adjust the Contrast setting from the configuration menu s Image Contrast p 41 Is the color adjusted correctly Adjust the Color Adjustment setting from the configuration menu s Image Color Ad...

Страница 75: ...hed There is probably a poor contact in the power cable or the power cable may be defective Reinsert the power cable If this does not solve the problem stop using the projector disconnect the power cable from the electrical outlet and contact your local dealer or the nearest address provided in the Support and Service Guide s Epson Projector Contact List Is the Control Panel Lock set to Full Lock ...

Страница 76: ...t sunlight or strong light from fluorescent lamps shining onto the remote receiver Set the projector up in a location where strong light does not shine onto the remote receiver Or set the remote receiver to Off from Remote Receiver in the configuration menu s Settings Remote Receiver p 44 Is the correct setting for the remote receiver selected Check the Remote Receiver from the configuration menu ...

Страница 77: ... your local dealer or the nearest address provided in the Support and Service Guide s Epson Projector Contact List Is power being supplied to the projector Check that your electrical outlet or power source is functioning correctly Is the LAN cable connected correctly Check that the LAN cable is connected correctly Reconnect it if it is not connected or it is not connected correctly s p 107 Is Mail...

Страница 78: ...Accessories and Consumables 90 Optional accessories 90 Consumables 91 Notes on Transportation 92 Moving Nearby 92 When Transporting 92 Preparing packaging 92 Notes when packing and transporting 92 Saving a User s Logo 93 Making a WPS Wi Fi Protected Setup Connection with a Wireless LAN Access Point EB G5350 G5150 only 95 Connection Setup Method 95 Making a Connection Using the Push Button Method 9...

Страница 79: ...ommands 112 Command List 112 Cable Layouts 113 Serial connection 113 Communications protocol 113 Regarding Network Projector EB G5350 G5150 only 114 About PJLink 115 List of Supported Monitor Displays 116 Supported Monitor Displays for EB G5350 G5300 G5150 G5100 116 Computer signals analog RGB 116 Component Video 117 Composite video S video 117 Input signal from the HDMI input port 118 Supported M...

Страница 80: ...nstalling or adjusting the ceiling mount do not use adhesives to prevent the screws from loosening and do not use oils or lubricants and so on Attention Do not use the projector on its side This may cause malfunctions to occur Project images from in front of the screen Front projection Project images from behind a translucent screen Rear projection Suspend the projector from the ceiling and projec...

Страница 81: ...lace the air filter A Remove the air filter cover Grip the air filter cover tab between your fingers and pull it straight out Attention Do not use volatile substances such as wax alcohol or thinner to clean the projector s surface The quality of the case may change or become discolored Attention Do not rub the lens with harsh materials or subject the lens to shocks as it can easily become damaged ...

Страница 82: ...Turn it over and tap the other side in the same way to shake off the dust D Remove any dust remaining on the air filter by using a vacuum cleaner to clean the front E Insert the air filter back into the air filter cover Insert the projections on the air filter into the holes in the cover and press it firmly into place Air filter front Attention If the air filter is hit too hard it may become unusa...

Страница 83: ...age is frequently displayed even after cleaning it is time to replace the air filter Replace it with a new air filter s p 88 It is recommended that you clean these parts at least once every three months Clean them more often than this if using the projector in a particularly dusty environment ...

Страница 84: ...re AA size alkali batteries ready to use when required You can only use AA size alkali batteries A Remove the battery cover While pushing the battery compartment cover catch lift the cover up B Replace the old batteries with new batteries Caution Check the positions of the and marks inside the battery holder to ensure the batteries are inserted the correct way C Replace the battery cover Press the...

Страница 85: ...hen used continually at low brightness About 2900 hours If you continue to use the lamp after the replacement period has passed the possibility that the lamp may explode increases When the lamp replacement message appears replace the lamp with a new one as soon as possible even if it is still working Depending on the characteristics of the lamp and the way it has been used the lamp may become dark...

Страница 86: ...tached to the lamp cover to prevent it from falling it should never fall even when replacing the lamp in a projector installed on the ceiling C Loosen the two lamp fixing screws D Take out the old lamp If the lamp is cracked replace it with a new lamp or contact your local dealer for further advice s Epson Projector Contact List Caution Wait until the lamp has cooled down sufficiently before remov...

Страница 87: ...amp After replacing the lamp make sure you reset the lamp hours from the configuration menu s p 64 Attention Make sure you install the lamp securely If the lamp cover is removed the lamp turns off automatically as a safety precaution If the lamp or the lamp cover is not installed correctly the lamp does not turn on This product includes a lamp component that contains mercury Hg Please consult your...

Страница 88: ...r filter can be replaced even when the projector is suspended from a ceiling A Remove the air filter cover Grip the air filter cover tab between your fingers and pull it straight out B Remove the air filter Remove the air filter by placing your finger into the groove as shown in the following illustration C Insert the new air filter into the air filter cover Insert the projections on the air filte...

Страница 89: ...air filter cover Press it in until you feel resistance q Dispose of used air filters properly in accordance with your local regulations Material quality of the frame section Polypropylene Material quality of the filter section Polypropylene ...

Страница 90: ...to guarantee operation from the remote control from a distance Wireless mouse receiver ELPST16 Use this to operate a computer s mouse pointer using the projector s remote control or to operate page Up Down while projecting a PowerPoint file Wireless LAN unit ELPAP03 for EB G5350 G5150 Use this to connect the projector to a computer by a wireless LAN and then project images Hard carrying case ELPKS...

Страница 91: ...thod s Epson Projector Contact List f Consumables Ceiling mount ELPMB13 Use when installing the projector on a ceiling Ceiling plate ELPFC03 Pipe 370 370 mm silver ELPFP04 Pipe 570 570 mm silver ELPFP05 Pipe770 770 mm silver ELPFP06 Use when installing the projector on a ceiling Spare lamp ELPLP46 EB G5350 G5300 G5200W Spare lamp ELPLP47 EB G5150 G5100 Use as a replacement for used lamps Air filte...

Страница 92: ...he projector Set the vertical lens shift to the lowest position Fit the protective lens pads that were used at the time of purchase f Notes when packing and transporting When packing use the original packaging materials that were used at the time of purchase or use a similar box and packing material If you no longer have the packaging enclose the projector securely in insulation material to protec...

Страница 93: ...the previous user s logo is erased Procedure Using the remote control Using the control panel q If User s Logo Protect from Password Protect is set to On a message is displayed and the user s logo cannot be changed You can make changes after setting User s Logo Protect to Off s p 34 If User s Logo is selected when Keystone E Zoom Aspect or Progressive are being performed the function currently bei...

Страница 94: ...go is displayed select Yes The image is saved After the image has been saved the message Completed is displayed Using the remote control Using the control panel q You can save at up to 400 300 dots in size q Saving the user s logo may take approximately 15 seconds Do not use the projector or any connected equipment while it is saving otherwise malfunctions may occur Once a user s logo has been sav...

Страница 95: ... computer to the access point in advance Make connection settings between the computer and the access point in advance For details on how to make this connection refer to the manual provided with the access point This method is recommended when the projector is mounted on the ceiling Connection Setup Method A Press the Menu button on the projector and then select Network Network Configuration from...

Страница 96: ...n Method The Push Button Method screen is displayed B Press the Enter button on the projector s control panel when prompted by the screen Then the Push Button Method screen is displayed C Press the button on the access point when prompted by the screen This completes the setup D Press the Enter button or the Esc button It returns to the Wireless LAN menu screen Procedure ...

Страница 97: ...nection between the projector and the access point Press the Menu button to close the configuration menu f Making a connection using the PIN Code Method A Select PIN Code Method The PIN Code Method screen is displayed q Before you can make a connection using the PIN Code Method a connection must have already been setup between the computer and the access point Procedure ...

Страница 98: ...r to the access point and then select Start Setup The progress is displayed C The message Setup by WPS complete is displayed Press the Enter button or the Esc button It returns to the Wireless LAN menu screen D Select Yes from Setup complete This completes the setup of the connection between the projector and the access point Press the Menu button to close the configuration menu ...

Страница 99: ... 50 110 62 43 24 143 to 261 56 to 103 10 to 73 4 to 28 6 60 120 90 47 35 158 to 288 62 to 113 0 to 91 0 to 36 0 60 130 75 51 25 172 to 314 68 to 123 12 to 87 5 to 34 3 80 160 120 63 47 212 to 385 84 to 152 0 to 122 0 to 48 0 80 180 100 71 39 231 to 420 91 to 165 17 to 116 7 to 45 8 100 200 150 79 59 266 to 483 105 to 190 0 to 152 0 to 60 0 100 220 120 87 47 290 to 526 114 to 207 21 to 145 8 to 57 ...

Страница 100: ... to 459 100 to 181 12 to 134 4 6 to 52 6 80 180 100 71 39 230 to 417 90 to 164 16 to 116 6 3 to 45 5 80 180 110 71 43 224 to 405 88 to 160 10 to 118 4 0 to 46 4 100 200 150 79 59 318 to 575 125 to 226 15 to 167 5 7 to 65 7 100 220 120 87 47 288 to 522 114 to 205 20 to 145 7 9 to 56 9 100 220 130 87 51 281 to 508 110 to 200 13 to 147 5 0 to 58 0 120 240 180 94 71 382 to 691 150 to 272 17 to 200 6 9...

Страница 101: ...ercially available audio cable pin plug W 3 5 mm stereo mini plug and so on Use an audio cable compatible with the connector on the external speakers q Component video signals and equipment connected to the Video1 2 S Video and HDMI input ports cannot be output to an external monitor Setting gauges such as Keystone the configuration menu and help screens are not output to an external monitor Cable...

Страница 102: ...necessary If dust or garbage enter the projector projection quality deteriorates and it could cause a malfunction Try not to touch the lens section with your hand or fingers If fingerprints or oils are left on the surface of the lens projection quality deteriorates If it is fixed in place remove the Screw to fix the lens unit removal button Procedure Keep pressed Attention Do not attach the lens u...

Страница 103: ...03 B Insert the lens unit straight into the lens insertion section with the white circle on the lens on top and then turn clockwise until you hear it click into place C Check that the lens cannot be detached by turning it anti clockwise White circle ...

Страница 104: ... are lit as follows to indicate the status of the USB device connected to the projector Removing USB Devices After finishing projecting use the following procedure to remove USB devices from the projector A Turn off power for the digital camera or USB storage device B Remove from the projector s USB port Type A q Use a USB cable less than 3m in length If the cable exceeds 3m PC Free may not functi...

Страница 105: ...rting Insert the SD card into the card slot with its top surface facing up Firmly insert the card as far as it can go Reading the SD Card Access Lamp The SD card access lamp is lit or flashing as follows to indicate the access status of the SD card Attention Insert the SD card so that it faces the correct direction Inserting a card in the wrong direction may result in malfunction or damage Procedu...

Страница 106: ...y 106 Removing A Gently press the SD card The SD card springs out B Remove the SD card by pulling it straight out Attention Do not remove the card while its indicator light is flashing You may damage the card or projector Procedure SD card access lamp ...

Страница 107: ...le The following illustration shows an example of the EB G5350 5150 Depending on the model you are using the interface may differ for example there may not be an SD card slot Attention To prevent malfunctions use a category 5 shielded LAN cable To LAN port To LAN port LAN cable commercially available ...

Страница 108: ... USB cable images from the computer can be displayed Connecting Attention Connect the projector directly to the computer and not via a USB hub Procedure Connects to the power cable supplied Turn the projector on Remove the lens cover Connects to the USB cable Connect an audio cable when outputting audio from the projector s speaker Turn the computer on s Connecting for the first time p 109 s From ...

Страница 109: ...t B Click Agree If the driver is not installed you cannot start USB Display Select Agree If you want to cancel installation click Disagree C Computer images are projected It may take a while before computer images are projected Until computer images are projected leave the equipment as it is and do not disconnect the USB cable or turn off the power to the projector q If for some reason nothing is ...

Страница 110: ...Connecting with a USB Cable and Projecting USB Display EB G5350 G5150 only 110 f From the second time Computer images are projected It may take a while before computer images are projected Please wait ...

Страница 111: ...ch item To deal with problems warnings see Reading the Indicators s p 67 Message Cause Internal error Internal Error Fan related error Fan Error Sensor error Sensor Error Lamp cover is open Lamp Cover Open Lamp timer failure Lamp Failure Lamp out Lamp Error Power Err Ballast Power Err Ballast Internal temperature error High Temp Error Overheating High speed cooling in progress High Temp Warning La...

Страница 112: ... error message is output and a is returned Add a Carriage Return CR code 0Dh to the end of each command and transmit Item Command Power ON OFF ON PWR ON OFF PWR OFF Signal selection Computer1 Auto SOURCE 1F RGB SOURCE 11 Component SOURCE 14 Computer2 Auto SOURCE 2F RGB SOURCE 21 Component SOURCE 24 BNC Auto SOURCE BF RGB SOURCE B1 Component SOURCE B4 Video1 SOURCE 45 Video2 SOURCE 41 S video SOURC...

Страница 113: ...C At the projector PC serial cable At the computer Signal Function GND 5 5 GND GND Signal wire ground RD 2 3 TD TD Transmit data TD 3 2 RD RD Receive data DTR 4 6 DSR DSR Data set ready DSR 6 4 DTR DTR Data terminal ready Default baud rate setting 9600bps Data length 8bit Parity None Stop bit 1bit Flow control None At the projector At the computer ...

Страница 114: ...ck that the projector and computer are connected to the network and carry out the following operations A Turn the projector on and then press the EasyMP button on the remote control B On the computer start Windows and then click Start All programs Accessories Network projector The connection setting screen is displayed The projector is identified by inputting its IP address or by allowing the OS t...

Страница 115: ...tandard adaptability verification URLhttp pjlink jbmia or jp english f Non compatible commands f Input names defined by PJLink and corresponding projector connectors f Manufacturer name displayed for Manufacture name information query EPSON f Model name displayed for Product name information query EB G5350 EB G5300 EB G5200W EB G5150 EB G5100 Function PJLink Command Mute settings Image muting set ...

Страница 116: ...4 576 800 600 XGA 60 70 75 85 iMac 1 1024 768 1024 576 2 1024 768 1024 768 1024 576 1024 768 WXGA 60 1280 768 1024 614 1024 768 1024 576 1024 768 60 1360 768 1024 578 1024 768 1024 576 1024 768 60 75 85 1280 800 1024 640 1024 768 1024 576 1024 768 WXGA 60 75 85 1440 900 1024 640 1024 768 1024 576 1024 768 SXGA 70 75 85 1152 864 1024 768 1024 768 1024 576 1024 768 60 75 85 1280 1024 960 768 1024 76...

Страница 117: ... 1024 576 SDTV 576i 50 720 576 720 432 1024 768 1024 576 SDTV 480p 60 720 480 720 360 1024 768 1024 576 SDTV 576p 50 720 576 720 432 1024 768 1024 576 HDTV 720p 50 60 1280 720 1024 768 1024 576 HDTV 1080i 50 60 1920 1080 1024 768 1024 576 HDTV 1080p 50 60 1920 1080 1024 768 1024 576 Signal Refresh rate Hz Resolution Aspect mode 4 3 16 9 TV NTSC 60 720 480 720 360 1024 768 1024 576 TV PAL SECAM 50 ...

Страница 118: ...60 1280 960 1024 768 1024 576 1024 768 60 1280 1024 1024 768 1024 576 1024 768 SXGA 60 1400 1050 1024 768 1024 576 1024 768 UXGA 60 1600 1200 1024 768 1024 576 1024 768 SDTV 480i 60 720 480 720 360 1 1024 768 1024 576 640 480 SDTV 480p 60 720 480 720 360 1 1024 768 1024 576 640 480 SDTV 576i 50 720 576 720 432 1 1024 768 1024 576 768 576 SDTV 576p 50 720 576 720 432 1 1024 768 1024 576 768 576 HDT...

Страница 119: ...024 576 2 1066 800 1280 720 1280 800 1280 800 1024 768 WXGA 60 1280 768 1280 768 1280 720 1280 800 1280 768 1280 768 60 1360 768 1280 722 1280 720 1280 800 1280 722 1280 768 60 75 85 1280 800 1280 800 1280 720 1280 800 1280 800 1280 800 WXGA 60 75 85 1440 900 1280 800 1280 720 1280 800 1280 800 1280 800 WSXGA 3 60 1680 1050 1280 800 1280 720 1280 800 1280 800 1280 800 SXGA 70 75 85 1152 864 1066 8...

Страница 120: ...60 720 480 720 360 1066 800 1280 720 1280 800 1280 800 640 480 SDTV 576p 50 720 576 720 432 1066 800 1280 720 1280 800 1280 800 768 576 HDTV 720p 50 60 1280 720 1280 720 1280 720 1280 800 1280 720 1280 720 HDTV 1080i 50 60 1920 1080 1280 720 1280 720 1280 800 1280 720 1280 800 HDTV 1080p 50 60 1920 1080 1280 720 1280 720 1280 800 1280 720 1280 800 Signal Refresh rate Hz Resolution Aspect mode Norm...

Страница 121: ... 1280 800 1280 800 60 1280 1024 1280 720 1280 800 1280 800 1280 800 SXGA 60 1400 1050 1280 800 1280 800 1280 800 1280 800 UXGA 60 1600 1200 1280 720 1280 800 1280 800 1280 800 SDTV 480i 60 720 480 720 360 1 1280 720 1280 800 1280 800 640 480 SDTV 480p 60 720 480 720 360 1 1280 720 1280 800 1280 800 640 480 SDTV 576i 50 720 576 720 432 1 1280 720 1280 800 1280 800 768 576 SDTV 576p 50 720 576 720 4...

Страница 122: ...umption network invalid 0 4 W Standby power consumption network valid 10 W Operating 423 W Standby power consumption network invalid 0 4 W Standbypowerconsumption network valid 10 W 220 to 240 V area Operating 398 W Standby power consumption network invalid 0 6 W Standby power consumption network valid 12 W Operating 327 W Standby power consumption network invalid 0 6 W Standby power consumption n...

Страница 123: ...ly supported by PCM Monitor Out port 1 Mini D Sub15 pin female black Audio Out port 1 Stereo mini jack LAN port 1 RJ 45 USB port Type A 3 1 USB connector Type A USB connector Type A USB port Type B 3 1 USB connector Type B USB connector Type B Card slot 1 SD card 1 SD card 1 RS 232C port 1 Mini D Sub 9 pin male Remote port 1 Stereo mini jack 3 This supports USB2 0 USB ports are not guaranteed to o...

Страница 124: ...ter Windows 2000 SP4 XP XP SP1 XP SP2 Vista CPU Mobile Pentium III 1 2 GHz or faster Power PC G3 900 MHz or faster Recommended Pentium M 1 6 GHz or faster Core Duo 1 5GHz or faster Celeron 300 MHz or faster Recommended Celeron 400 MHz or faster Pentium MMX 166 MHz or faster Recommended Pentium II 233 MHz or faster Mobile Pentium III 1 2 GHz or faster Recommended Pentium M 1 6 GHz or faster Amount ...

Страница 125: ...radio or television reception However there is no guarantee that interference will not occur in a particular installation If this equipment does cause interference to radio and television reception which can be determined by turning the equipment off and on the user is encouraged to try to correct the interference by one or more of the following measures Reorient or relocate the receiving antenna ...

Страница 126: ...126 Appearance Units mm Distance from center of lens to suspension bracket fixing point Center of lens ...

Страница 127: ... and dark areas of an image can be increased or decreased to make text and graphics stand out more clearly or to make them appear softer Adjusting this particular property of an image is called contrast adjustment DHCP An abbreviation of Dynamic Host Configuration Protocol this protocol automatically assigns an IP addressg to equipment connected to a network Dolby Digital A sound format developed ...

Страница 128: ...fines the number of bits used for the network address on a divided network subnet from the IP address SVGA A type of video signal with a resolution of 800 horizontal 600 vertical dots that is used by IBM PC AT compatible computers S Video A video signal which has the luminance component and color component separated to provide better image quality Refers to images that consist of two independent s...

Страница 129: ...er On 47 Display 46 Display background 46 E Email Address 1 2 3 60 Email Address 1 2 3 setting 49 ESC VP21 112 Extended menu 46 External dimension diagram 126 External monitor 101 External speakers 101 E zoom 28 F Freeze 22 Front 46 Front adjustable foot 7 Full lock 36 G Game 21 Gateway address 48 53 59 H HDMI input port 11 Help function 66 High altitude mode 47 How to replace the air filter 88 Ho...

Страница 130: ...ting time 64 87 Resolution 63 116 S Screen size 99 SD card slot 10 SD memory card 105 Security Menu 55 Security slot 10 Settings menu 44 Sharpness 41 Signal menu 42 Sleep mode 47 SMTP server 49 60 SNMP 49 SNMP Menu 61 SNMP Trap IP address 61 Software keyboard 49 51 Source 63 Source search 12 19 Speaker 101 Specifications 122 Sports 21 sRGB 21 SSID 53 Standby mode 47 Startup screen 46 Storage tempe...

Страница 131: ...is guide may be changed or updated without further notice Illustrations in this guide and the actual projector may differ General Notice IBM DOS V and XGA are trademarks or registered trademarks of International Business Machines Corporation Macintosh Mac and iMac are registered trademarks of Apple Inc Windows WindowsNT Windows Vista and PowerPoint are trademarks or registered trademarks of Micros...

Отзывы: