background image

Using Multiple Projectors

90

e

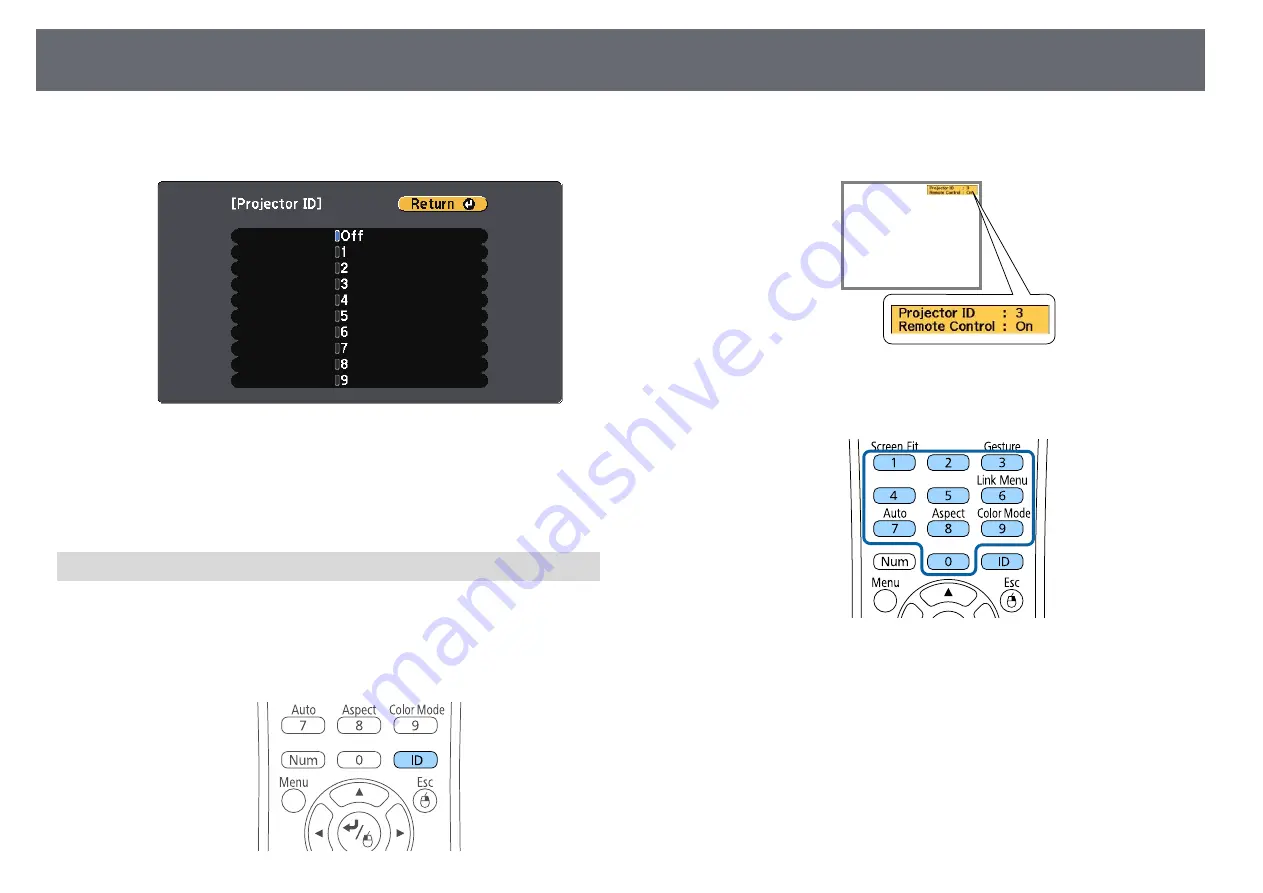
Use the arrow buttons to select the identification number you want to

use for the projector. Then press [Enter].

f

Press [Menu] or [Esc] to exit the menus.

Repeat these steps for all the other projectors you want to operate from one

remote control.

Selecting the Projector You want to Operate

After setting the projector's ID, select the ID for the projector you want to

operate using the remote control.

a

Aim the remote control at the target projector and press the [ID]

button.

The current Projector ID is displayed on the projected screen. It

disappears after about 3 seconds.

b

While holding the [ID] button, press the number button that matches

the ID of the projector you want to operate.

The projector you want to operate is selected.

c

Press the [ID] button to check if the ID-setting process worked.
You see a message displayed by the projector.
• If the remote control is listed as

On

, you can operate the projector

from the remote control.

• If the remote control is listed as

Off

, you cannot operate the projector

from the remote control. Repeat the steps above to enable the remote

control.

Содержание EB-2040

Страница 1: ...User s Guide ...

Страница 2: ...Connecting to a Component to VGA Video Source 27 Connecting to a Composite Video Source 28 Connecting to External USB Devices 28 USB Device Projection 29 Connecting to a USB Device 29 Disconnecting a USB Device 29 Connecting to a Document Camera 29 Connecting to an HDBaseT Transmitter 30 Connecting to External Output Devices 30 Connecting to a VGA Monitor 30 Connecting to External Speakers 31 Inst...

Страница 3: ...ay Options 76 Controlling a Presentation with Your Hands 78 Gesture Presenter Restrictions 79 Shutting Off the Image and Sound Temporarily 81 Stopping Video Action Temporarily 82 Zooming Images 83 Using the Remote Control as a Wireless Mouse 84 Using the Remote Control as a Pointer 86 Saving a User s Logo Image 87 Using Multiple Projectors 89 Projector Identification System for Multiple Projector ...

Страница 4: ...JLink Support 130 Crestron RoomView Support 131 Setting Up Crestron RoomView Support 131 Controlling a Networked Projector Using Crestron RoomView 131 Crestron RoomView Operation Window 132 Crestron RoomView Tools Window 133 Setting Projector Event Schedules 135 Adjusting the Menu Settings 138 Using the Projector s Menus 139 Using the On screen Keyboard 140 Available Text Using the On screen Keybo...

Страница 5: ...en Image File Names are not Displayed Correctly in PC Free 191 Solving Projector or Remote Control Operation Problems 192 Solutions to Projector Power or Shut Off Problems 192 Solutions to Problems with the Remote Control 192 Solutions to Password Problems 193 Solution When The Battery that Saves Your Clock Settings is Running Low Message Appears 193 Solutions to Gesture Presenter Problems 193 Sol...

Страница 6: ... 215 Indication of the manufacturer and the importer in accordance with requirements of EU directive 216 Wireless Telegraphy Act Regulations 216 Restriction of Use 216 Operating System References 216 Trademarks 216 Copyright Notice 217 Copyright Attribution 217 ...

Страница 7: ...n that if ignored could possibly result in personal injury or physical damage due to incorrect handling General Information Notations Attention This label indicates procedures that may result in damage or injury if sufficient care is not taken This label indicates additional information that may be useful to know Button name Indicates the name of the buttons on the remote control or the control pa...

Страница 8: ...Introduction to Your Projector Refer to these sections to learn more about your projector s features and part names g g Related Links Projector Features p 9 Projector Parts and Functions p 12 ...

Страница 9: ...U EB 2250U EB 2245U EB 2165W EB 2155W EB 2065 EB 2055 EB X550KG EB X500KG Automatic vertical keystone correction always displays a rectangular screen Auto V Keystone EB 2140W EB 2040 Screen Fit feature to automatically resize projected images EB 2265U EB 2255U EB 2250U EB 2245U EB 2165W EB 2155W EB 2065 EB 2055 EB X550KG EB X500KG Horizontal keystone slider allows you to quickly correct horizontal...

Страница 10: ...ou can project images from computers on the network or from smartphones or tablet devices on which Epson iProjection is installed See the EasyMP Multi PC Projection Operation Guide for details a When projecting images using a wireless LAN you must install the Epson 802 11b g n wireless LAN module and then set up your projector and computer for wireless projection The Epson 802 11b g n wireless LAN...

Страница 11: ...1 MHL port to connect an MHL cable to the mobile device and to the projector g g Related Links Connecting to Smartphones or Tablets p 25 Support for Smooth Meetings The Gesture Presenter feature allows you to control your presentation using your hands allowing you to give presentations in front of the screen without a presentation remote control EB 2265U EB 2255U EB 2250U EB 2245U EB 2165W EB 2155...

Страница 12: ...plained using illustrations of EB 2265U unless otherwise mentioned g g Related Links Projector Parts Front p 12 Projector Parts Rear p 14 Projector Parts Base p 16 Projector Parts Control Panel p 16 Projector Parts Remote Control p 17 Projector Parts Front EB 2265U EB 2255U EB 2250U EB 2245U EB 2165W EB 2155W EB 2065 EB 2055 EB X550KG EB X500KG ...

Страница 13: ...de the lever to open and close the A V mute slide C Foot release lever Press the foot release lever to extend and retract the front adjustable foot D Front adjustable foot When setup on a surface such as a desk extend the foot to adjust the position of the image E A V Mute slide Close when not using the projector to protect the lens By closing during projection you can hide the image and the sound...

Страница 14: ...5 EB 2055 EB X550KG EB X500KG Performs Screen Fit feature to automatically correct the shape and position of images to fit on your screen Hold down for three seconds to display the menu for the Gesture Presenter feature P Focus ring Adjusts the image focus Q Lamp cover Open when replacing the projector s lamp R Indicators Indicates the projector s status S Horizontal keystone slider EB 2140W EB 20...

Страница 15: ...uipment connected to the Video port I Security slot The security slot is compatible with the Microsaver Security System manufactured by Kensington J Remote receiver Receives signals from the remote control K HDBaseT port EB 2265U EB 2165W Connects a LAN cable to the optional HDBaseT Transmitter L HDMI2 port Inputs video signals from HDMI compatible video equipment and computers This projector is c...

Страница 16: ...tion of the image g g Related Links Installing a Security Cable p 98 Projector Parts Control Panel Name Function A Power button Turns the projector on or off B Home button Displays and closes the Home screen C Source Search button Changes to the next input source D Enter button Enters the current selection and moves to the next level while displaying the projector s menu or help Optimizes Tracking...

Страница 17: ...or s menu G Volume buttons and arrow buttons Adjusts the speaker volume Selects menu items while displaying the projector s menu or help H Menu button Displays and closes the projector s menu g g Related Links Input Signal Settings Signal Menu p 143 Home Screen p 38 Correcting the Image Shape with the Keystone Buttons p 50 Projector Parts Remote Control ...

Страница 18: ... buttons Controls page up and down on your computer when you connect a projector and computer using a USB cable or over the network Displays the previous or next screen while using the PC Free feature N E Zoom buttons Zooms in or zooms out the image area Name Function O A V Mute button Turns the video and audio on or off temporarily P Split button Projects two images from different image sources s...

Страница 19: ...etup Settings Extended Menu p 147 Home Screen p 38 Automatically Correcting the Image Shape with Screen Fit p 47 Using the Remote Control as a Wireless Mouse p 84 Projecting Two Images Simultaneously p 68 Using the Remote Control as a Pointer p 86 Connecting to a Computer for USB Video and Audio p 23 Controlling a Presentation with Your Hands p 78 Projecting a PC Free Presentation p 71 Using the P...

Страница 20: ...jector Follow the instructions in these sections to set up your projector g g Related Links Projector Placement p 21 Projector Connections p 23 Installing Batteries in the Remote Control p 33 Opening the Lens Cover p 35 ...

Страница 21: ...r case may crack causing it to fall from its ceiling mount This could cause serious injury to anyone under the ceiling mount and could damage the projector Do not cover the projector s air intake or air exhaust vents If the vents are covered the internal temperature could rise and cause a fire Do not install the projector on an unstable surface or in a location beyond the weight specifications of ...

Страница 22: ...es p 44 Projection Distance The distance at which you place the projector from the screen determines the approximate size of the image The image size increases the farther the projector is from the screen but can vary depending on the zoom factor aspect ratio and other settings See the Appendix for details about how far to place the projector from the screen based on the size of the projected imag...

Страница 23: ...or the optional Epson document camera g g Related Links Connecting to a Computer p 23 Connecting to Smartphones or Tablets p 25 Connecting to Video Sources p 26 Connecting to External USB Devices p 28 Connecting to a Document Camera p 29 Connecting to an HDBaseT Transmitter p 30 Connecting to External Output Devices p 30 Connecting to a Computer Follow the instructions in these sections to connect...

Страница 24: ...con in the Application folder When you finish projection do one of the following Windows Disconnect the USB cable You do not need to operate Safely Remove Hardware OS X Select Disconnect from the USB Display icon menu on the menu bar or Dock and then disconnect the USB cable g g Related Links USB Display System Requirements p 210 Connecting to a Computer for VGA Video and Audio You can connect the...

Страница 25: ...er end to the projector s HDMI port a If you have problems hearing audio through the HDMI connection connect one end of a commercially available 3 5 mm stereo mini jack audio cable to the projector s Audio port and the other end to your computer s audio out port Select the audio input port you connected to in the projector s Extended menu s Extended A V Settings HDMI1 Audio Output s Extended A V S...

Страница 26: ... the MHL cable Connecting to Video Sources Follow the instructions in these sections to connect video devices to the projector a If the port on the device you connect has an unusual shape use the cable supplied with the device or an optional cable to connect to the projector The cable differs depending on the output signal from the connected video devices Some video devices are capable of outputti...

Страница 27: ... to use an adapter cable along with a component video cable You can play sound through the projector s speaker system by connecting a commercially available stereo mini jack audio cable or RCA audio cable a To project an image source connected to the Computer2 Monitor Out port set Monitor Out Port to Computer2 in the projector s Extended menu s Extended Operation Monitor Out Port You can also set ...

Страница 28: ... A V cable You can play sound through the projector s speaker system by connecting a commercially available RCA audio cable a Make sure the audio cable is labeled No resistance a Connect the cable with the yellow connector to your video source s yellow video output port b Connect the other end to the projector s Video port c Connect the audio cable to your video source s audio out ports d Connect ...

Страница 29: ...ed USB device g g Related Links Projecting a PC Free Presentation p 71 Connecting to a USB Device You can connect your USB device to the projector s USB A port and use it to project images and other content a If your USB device came with a power adapter plug the device into an electrical outlet b Connect the USB cable or USB flash drive to the projector s USB A port as shown Attention Use the USB ...

Страница 30: ...port select On as the Extron XTP setting in the projector s Extended menu Control Communications is automatically set to On and Standby Mode in the projector s ECO menu is automatically set to Communication On s Extended HDBaseT Extron XTP Wired remote control using the HDBaseT port is not available a Turn off the projector and HDBaseT transmitter a Make sure the projector and HDBaseT transmitter ...

Страница 31: ...nks Projector Setup Settings ECO Menu p 159 Projector Setup Settings Extended Menu p 147 Connecting to External Speakers To enhance the sound from your presentation you can connect the projector to external self powered speakers You can control the volume using the projector s remote control a If you want to output audio from the external speakers when the projector is turned off select Always On ...

Страница 32: ...Projector Connections 32 g g Related Links Projector Setup Settings ECO Menu p 159 Projector Setup Settings Extended Menu p 147 ...

Страница 33: ...facing as shown Warning Check the positions of the and marks inside the battery holder to ensure the batteries are inserted the correct way If the batteries are not used correctly they could explode or leak causing a fire injury or damage to the product c Replace the battery cover and press it down until it clicks into place g g Related Links Remote Control Operation p 33 Remote Control Operation ...

Страница 34: ...e projector s receivers within the distance and angles listed here a Avoid using the remote control in conditions with bright fluorescent lights or in direct sunlight or the projector may not respond to commands If you are not going to use the remote control for a long time remove the batteries ...

Страница 35: ...pening the Lens Cover 35 a To open the projector s lens cover slide the A V Mute slide lever until it clicks b To cover the lens or temporarily turn off the projected image and sound close the lens cover ...

Страница 36: ...etting the Date and Time p 41 Selecting the Language for the Projector Menus p 43 Projection Modes p 44 Adjusting the Image Height p 46 Image Shape p 47 Resizing the Image with the Zoom Ring p 54 Focusing the Image Using the Focus Ring p 55 Selecting an Image Source p 56 Image Aspect Ratio p 58 Color Mode p 60 Adjusting the Image Color p 62 Controlling the Volume with the Volume Buttons p 66 ...

Страница 37: ...tus indicator flashes blue as the projector warms up Once the projector is warmed up the status indicator stops flashing and turns blue c Open the projector s lens cover Try the following if you do not see a projected image Verify the lens cover is open all the way Turn on the connected computer or video device Change the screen output from the computer when using a laptop computer Insert a DVD or...

Страница 38: ...ojector or replacing the lamp yourself be very careful not to allow such pieces of glass to get into the eyes or mouth If the lamp breaks ventilate the area immediately and contact a doctor if any fragments of broken glass are inhaled or get into the eyes or mouth a When the Direct Power On setting is set to On in the projector s Extended menu the projector turns on as soon as you plug it in Note ...

Страница 39: ...usly by splitting the projected screen G Corrects the shape of an image that is an uneven rectangle a The Home screen disappears after 10 minutes of inactivity g g Related Links Image Shape p 47 Projector Setup Settings Extended Menu p 147 Using a QR Code to Connect a Mobile Device p 110 Using the Projector s Menus p 139 Using the Projector Help Displays p 185 Projecting Two Images Simultaneously ...

Страница 40: ...s the power button on the control panel or remote control The projector displays a shutdown confirmation screen b Press the power button again To leave it on press any other button The projector beeps twice the lamp turns off and the status indicator turns off a With Epson s Instant Off technology there is no cool down period so you can pack up the projector for transport right away c To transport...

Страница 41: ...r d Select the Operation setting and press Enter e Select the Date Time setting and press Enter You see this screen f Select the Date Time setting and press Enter You see this screen g Select Date press Enter and use the displayed keyboard to enter today s date h Select Time press Enter and use the displayed keyboard to enter the current time i Select Time Difference UTC press Enter and set the ti...

Страница 42: ...press Enter Then select settings l When you are finished select Set and press Enter m To update the time automatically through an Internet time server select the Internet Time setting and press Enter Then select settings n When you are finished select Set and press Enter o Press Menu or Esc to exit the menus ...

Страница 43: ...er language you can change the Language setting a Turn on the projector b Press the Menu button on the control panel or remote control c Select the Extended menu and press Enter d Select the Language setting and press Enter e Select the language you want to use and press Enter f Press Menu or Esc to exit the menus ...

Страница 44: ...hanging the Projection Mode Using the Menus p 44 Projector Setup and Installation Options p 22 Changing the Projection Mode Using the Remote Control You can change the projection mode to flip the image over top to bottom a Turn on the projector and display an image b Hold down the A V Mute button on the remote control for 5 seconds The image disappears briefly and reappears flipped top to bottom c...

Страница 45: ...Projection Modes 45 d Select Projection and press Enter e Select a projection mode and press Enter f Press Menu or Esc to exit the menus ...

Страница 46: ...t a small angle a Turn on the projector and display an image b To adjust the front foot pull up on the foot release lever and lift the front of the projector The foot extends from the projector You can adjust the position up to 14 degrees c Release the lever to lock the foot d If the image is tilted rotate the rear feet to adjust their height A Extend the rear foot B Retract the rear foot If the p...

Страница 47: ... m EB 2265U EB 2255U EB 2250U EB 2245U Projection distance is about 0 9 to 3 0 m EB 2165W EB 2155W EB 2065 EB 2055 EB X550KG EB X500KG Projection angle is about 20º right or left or 30º up or down The Projection setting is set to Front in the projector s Extended menu a If you do not want to use the Auto H V Keystone function set Auto H V Keystone to Off in the projector s Settings menu s Settings...

Страница 48: ... EB 2245U Projection distance is about 1 2 to 3 0 m EB 2165W EB 2155W EB 2065 EB 2055 EB X550KG EB X500KG Projection angle is about 20º right or left or 30º up or down The room is not too dark The projection surface is not patterned and does not deflect the sensor in some way a Turn on the projector and display an image b Press the Screen Fit button on the control panel or remote control You see a...

Страница 49: ... s Settings menu If necessary you can correct the image corners individually using Quick Corner by pressing the arrow buttons on the control panel g g Related Links Projector Feature Settings Settings Menu p 145 Correcting the Image Shape with Quick Corner p 51 Correcting the Image Shape with the Horizontal Keystone Slider You can use the projector s horizontal keystone slider to correct the shape...

Страница 50: ...Turn on the projector and display an image b Press one of the keystone adjustment buttons on the control panel to display the Keystone adjustment screen c Press a keystone button to adjust the image shape After correction your image is slightly smaller a If the projector is installed out of your reach you can also correct the shape of the image using the remote control s Settings Keystone H V Keys...

Страница 51: ...ctor s Quick Corner setting to correct the shape and size of an image that is unevenly rectangular a Turn on the projector and display an image b Press the Menu button on the control panel or remote control c Select the Settings menu and press Enter d Select Keystone and press Enter ...

Страница 52: ...er in the direction indicated by the gray triangle To reset the Quick Corner corrections hold down Esc for about 2 seconds while the Quick Corner adjustment screen is displayed and select Reset Quick Corner Select Switch to H V Keystone to switch the image shape correction method to H V Keystone h Repeat steps 6 and 7 as needed to adjust any remaining corners i When you are finished press Esc The ...

Страница 53: ...Image Shape 53 g g Related Links Projector Feature Settings Settings Menu p 145 ...

Страница 54: ...Resizing the Image with the Zoom Ring 54 You can resize the image using the projector s zoom ring a Turn on the projector and display an image b Rotate the zoom ring to enlarge or reduce the image ...

Страница 55: ...about 1 5 to 3 0 m EB 2265U EB 2255U EB 2250U Projection distance is about 1 5 to 3 4 m EB 2245U Projection distance is about 0 9 to 3 0 m EB 2165W EB 2155W Projection distance is about 0 9 to 2 8 m EB 2065 EB 2055 EB X550KG EB X500KG Projection angle is about 20º right or left or 30º up or down The projection environment is not too bright a Turn on the projector and display an image b Press the F...

Страница 56: ...ng Press the Source Search button on the control panel or remote control until you see the image from the source you want a This screen is displayed when no image signal is detected Check the cable connections between the projector and image source Press the button for the source you want on the remote control If there is more than one port for that source press the button again to cycle through t...

Страница 57: ... A ports D Network source LAN and Screen Mirroring Press the Home button on the control panel or remote control Then select the source you want to use from the screen displayed a HDBaseT is available only with the EB 2265U EB 2165W Screen Mirroring is available only with the EB 2265U EB 2255U EB 2165W ...

Страница 58: ...to the computer s resolution g g Related Links Input Signal Settings Signal Menu p 143 Available Image Aspect Ratios You can select the following image aspect ratios depending on the input signal from your image source a Black bands and cropped images may project in certain aspect ratios depending on the aspect ratio and resolution of your input signal The Auto aspect ratio setting is available on...

Страница 59: ...e to 16 9 Projected Image Appearance with Each Aspect Mode Black bands and cropped images may project in certain aspect ratios depending on the aspect ratio and resolution of your input signal See the following table to confirm the position of black bands and cropped images a The image for Native varies depending on the input signal For projectors with a resolution of WUXGA 1920 1200 or WXGA 1280 ...

Страница 60: ... press the Color Mode button repeatedly a You can also set the Color Mode setting in the projector s Image menu g g Related Links Image Quality Settings Image Menu p 141 Available Color Modes You can set the projector to use these color modes depending on the input source you are using Color mode Description Presentation Best for projecting vivid images Dynamic This is the brightest mode Best for ...

Страница 61: ...trol c Select the Image menu and press Enter d Select Auto Iris and press Enter e Choose one of the following options and press Enter High Speed to adjust brightness as soon as the scene changes Normal for standard brightness adjustment f Press Menu or Esc to exit the menus ...

Страница 62: ...individual image colors a Turn on the projector and switch to the image source you want to use b Press the Menu button on the control panel or remote control c Select the Image menu and press Enter d Select Advanced and press Enter e Select RGBCMY and press Enter f Do the following as necessary for each R red G green B blue C cyan M magenta and Y yellow To adjust the overall hue of the color bluis...

Страница 63: ... sources by adjusting the Gamma setting a Turn on the projector and switch to the image source you want to use b Press the Menu button on the control panel or remote control c Select the Image menu and press Enter d Select Advanced and press Enter e Select Gamma and press Enter f Select and adjust the correction value When you select a smaller value you can reduce the overall brightness of the ima...

Страница 64: ...eproduced correctly depending on your settings and screen specifications g If you want to make finer adjustments select Customized and press Enter h Adjust the value using one of the following methods To select the color tone you want to adjust from the image select Adjust it from the image Press the arrow buttons to move the cursor to the part where you want to change the brightness and press Ent...

Страница 65: ...g the Image Color 65 you want to adjust Then press the up or down arrow button to adjust the value and press Enter i Press Menu or Esc to exit the menus g g Related Links Image Quality Settings Image Menu p 141 ...

Страница 66: ... b To lower or raise the volume press the Volume buttons on the control panel or remote control as shown A volume gauge appears on the screen c To set the volume to a specific level for an input source select Volume in the projector s Settings menu Caution Do not start a presentation at a high volume setting Sudden loud noises may cause hearing loss Always lower the volume before powering off so t...

Страница 67: ...ecting a PC Free Presentation p 71 Controlling a Presentation with Your Hands p 78 Shutting Off the Image and Sound Temporarily p 81 Stopping Video Action Temporarily p 82 Zooming Images p 83 Using the Remote Control as a Wireless Mouse p 84 Using the Remote Control as a Pointer p 86 Saving a User s Logo Image p 87 Using Multiple Projectors p 89 Projector Security Features p 94 ...

Страница 68: ...the projector menus a While using the split screen feature other projector features may not be available and some settings may be automatically applied to both images a Press the Split button on the remote control The currently selected input source moves to the left of the screen a You can perform the same operations from Split Screen in the projector s Settings menu b Press the Menu button You s...

Страница 69: ...age select Screen Size press Enter select a size and press Enter To exit the menu press Menu a Depending on the video input signals the images may not appear at the same size even if you select Equal f To select the audio select Audio Source press Enter select an audio option and press Enter To exit the menu press Menu a Select Auto to hear audio from the largest screen or the left screen g To ali...

Страница 70: ...rojector s Image menu you can apply them only to the image on the left Default adjustments are applied to the image on the right Adjustments that affect the entire projected image such as Color Mode and Color Temp are applied for both left and right images Even if you make adjustments for Noise Reduction and Deinterlacing in the projector s Image menu Noise Reduction is set to 0 and Deinterlacing ...

Страница 71: ...ble projecting from media formatted for non Windows file systems try formatting the media for Windows instead File contents File type extension Details Image jpg Make sure the file is not CMYK format Progressive format Highly compressed Above 8192 8192 resolution bmp Make sure the file is not Above 1280 800 resolution gif Make sure the file is not Above 1280 800 resolution Animated Interlaced png ...

Страница 72: ...r p 86 Starting a PC Free Slide Show After connecting a USB device to the projector you can switch to the USB input source and start your slide show a You can change the PC Free operation options or add special effects by highlighting Option at the bottom of the screen and pressing Enter a Press the USB button on the remote control The PC Free file list screen is displayed a If the Select Drive sc...

Страница 73: ...ious image press the left or right arrow button e To stop the display follow the on screen instructions or press the Esc button You return to the file list screen f Turn off the USB device if necessary and then disconnect the device from the projector g g Related Links PC Free Display Options p 76 Connecting to a USB Device p 29 Starting a PC Free PDF File Presentation After connecting a USB devic...

Страница 74: ...ditional files in a folder highlight Next Page or Previous Page and press Enter or press the Page up or down buttons on the remote control c Press the arrow buttons to highlight the file and press Enter Press the Esc button to return to the file list screen The first page in the PDF file is displayed at full screen size a If any file names are longer than the display area or include unsupported sy...

Страница 75: ... and then disconnect the device from the projector g g Related Links Connecting to a USB Device p 29 Starting a PC Free Movie Presentation After connecting a USB device to the projector you can switch to the USB input source and start your movie a You can change the PC Free operation options by highlighting Option at the bottom of the screen and pressing Enter a Press the USB button on the remote ...

Страница 76: ...o the file list screen e Turn off the USB device if necessary and then disconnect the device from the projector g g Related Links PC Free Display Options p 76 Connecting to a USB Device p 29 PC Free Display Options You can select these display options when using PC Free To access this screen highlight Option at the bottom of the PC Free file list screen and press Enter Setting Options Description ...

Страница 77: ...on 77 Setting Options Description Effect No No effect Wipe Transitions between images using a wipe effect Dissolve Transitions between images using a dissolve effect Random Transitions between images using a random variety of effects ...

Страница 78: ...2055 EB X550KG EB X500KG Projection angle is about 20º right or left or 20º up or down A Screen Mirroring connection is established with the operation permissions that allow a connected device s keyboard or mouse to control the projector Windows 10 only a Adjust the image settings such as keystone and color mode before starting the Gesture Presenter feature When you adjust the image settings while...

Страница 79: ...ent them from being covered accidentally when you do not want to perform the operations The markers are not available for the following input sources HDBaseT Computer component video Video USB A LAN Epson iProjection Screen Mirroring if the device does not support User Interface Back Channel UIBC For HDMI and Computer RGB image sources you can use the markers with Windows 2000 and later or OS X 10...

Страница 80: ...en User s Logo Schedule Settings Message Broadcasting When you move the projector or perform the following image shape adjustments the Gesture Presenter feature stops To use the Gesture Presenter feature again restart the feature after finishing the adjustments Screen Fit Keystone adjustment Quick Corner Focus Help Projection Reset Reset All At high altitudes or locations subject to high temperatu...

Страница 81: ...e projector s Extended menu s Extended Display A V Mute a Press the A V Mute button on the remote control to temporarily stop projection and mute any sound b To turn the image and sound back on press A V Mute again a You can also stop projection using the A V Mute slide lever on the projector The projector s power automatically turns off 30 minutes after A V Mute is enabled You can disable this fe...

Страница 82: ...sentation and keep the current image on the screen Any sound or video action continues to run however so you cannot resume projection at the point that you stopped it a Press the Freeze button on the remote control to stop the video action b To restart the video action in progress press Freeze again ...

Страница 83: ...any pair of adjacent arrow buttons at the same time Press the E Zoom button repeatedly to zoom into the image area Press and hold the E Zoom button to zoom in more quickly To pan around the zoomed image area use the arrow buttons To zoom out of the image press the E Zoom button To return to the original image size press Esc The enlarged image is projected and the enlargement ratio is displayed on ...

Страница 84: ...on the remote control to control your presentation To move through slides or pages press the Page up or down buttons To move the cursor on the screen use the arrow buttons To move the cursor diagonally press any pair of adjacent arrow buttons at the same time To left click press the Enter button once press it twice to double click To right click press the Esc button To drag and drop hold the Enter...

Страница 85: ...Using the Remote Control as a Wireless Mouse 85 g g Related Links Zooming Images p 83 Using the Remote Control as a Pointer p 86 ...

Страница 86: ...rrow You can change the shape in the Pointer Shape setting in the projector s Settings menu a Press the Pointer button on the remote control b Use the arrow buttons to move the pointer on the screen To move the pointer diagonally press any pair of adjacent arrow buttons at the same time c Press Esc to remove the pointer from the screen g g Related Links Projector Feature Settings Settings Menu p 1...

Страница 87: ...Protection setting menu set to Off before saving the user s logo When you copy the menu settings from one projector to another using the batch setup feature user s logo is also copied Do not register the information that you do not want to share between multiple projectors as a user s logo a Display the image you want to project as the user s logo b Press the Menu button on the control panel or re...

Страница 88: ...en and a completion message appears j Press Esc to exit the message screen k Select the Extended menu and press Enter l Select Display and press Enter m Select when you want to display the User s Logo screen To display it whenever there is no input signal select Display Background and set it to Logo To display it whenever you turn the projector on select Startup Screen and set it to On To display ...

Страница 89: ...s image so that the images match closely You can set a unique projector ID for each projector to operate them individually using a remote control and then correct the brightness and color for each projector a In some cases the brightness and color tone may not match completely even after correction If brightness and color tone differences become more noticeable over time repeat the adjustments g g...

Страница 90: ...at the target projector and press the ID button The current Projector ID is displayed on the projected screen It disappears after about 3 seconds b While holding the ID button press the number button that matches the ID of the projector you want to operate The projector you want to operate is selected c Press the ID button to check if the ID setting process worked You see a message displayed by th...

Страница 91: ...ing to Off you can operate the projector using the remote control whichever ID you select on the remote control Matching the Image Colors You can match the display quality of multiple projectors that will project next to each other Turn on all the projectors and select the Color Matching setting in each projector s Extended menu so that all the projectors display quality match on the combined scre...

Страница 92: ...level h Press the Esc button to return to the previous screen Adjusting RGBCMY You can adjust the Hue Saturation and Brightness settings for R red G green B blue C cyan M magenta and Y yellow color components Turn on all the projectors and select the RGBCMY setting in each projector s Extended menu so that the color tone on the combined screen becomes entirely even a Press the Menu button select t...

Страница 93: ...llowing as necessary for each setting To adjust the overall hue of the color bluish greenish reddish adjust the Hue setting To adjust the overall vividness of the color adjust the Saturation setting To adjust the overall color brightness of the color adjust the Brightness setting f Press Menu or Esc to exit the menus ...

Страница 94: ...ng on the projector at first time you must enter the correct password This also applies to Direct Power On and Auto Power On User s Logo Protection password prevents anyone from changing the custom screen displayed when the projector turns on when no signal is being input or when you use the A V Mute feature The custom screen discourages theft by identifying the projector s owner Network Protectio...

Страница 95: ...ssword f Press Esc to return to the menu g Make a note of the password and keep it in a safe place Selecting Password Security Types After setting a password you see this menu allowing you to select the password security types you want to use If you do not see this menu hold down the Freeze button on the remote control for 5 seconds until the menu appears To prevent unauthorized use of the project...

Страница 96: ...ssage and a prompt to try again Enter the correct password to proceed Attention If an incorrect password is entered three times in succession the message The projector s operation will be locked is displayed for approximately 5 minutes and the projector switches to standby mode If this happens disconnect the power plug from the electrical outlet reinsert it and turn the projector back on The proje...

Страница 97: ...ted using the remote control a Press the Menu button on the control panel or remote control b Select the Settings menu and press Enter c Select Lock Setting and press Enter d Select Control Panel Lock and press Enter e Select one of these lock types and press Enter To lock all of the projector s buttons select Full Lock To lock all buttons except the power button select Partial Lock ...

Страница 98: ... projector s Settings menu s Settings Lock Setting Control Panel Lock g g Related Links Projector Feature Settings Settings Menu p 145 Installing a Security Cable You can install the security cable on the projector to deter theft Use the security slot on the projector to attach a Kensington Microsaver Security system a For more details on the Microsaver Security System see http www kensington com ...

Страница 99: ...structions in these sections to set up your projector for use on a network g g Related Links Wired Network Projection p 100 Wireless Network Projection p 103 Wireless Network Projection from a Mobile Device Screen Mirroring p 113 Secure HTTP p 118 ...

Страница 100: ...g g Related Links Connecting to a Wired Network p 100 Selecting Wired Network Settings p 100 Connecting to a Wired Network To connect the projector to a wired local area network LAN use a 100Base TX or 10Base T network cable To ensure proper data transmission use a Category 5 shielded cable or better a Connect one end of the network cable to your network hub switch or router b Connect the other en...

Страница 101: ...tor Keyword lets you turn on a security password to prevent access to the projector by anyone not in the room with it You must enter a displayed randomized keyword from a computer using EasyMP Multi PC Projection or Epson iProjection to access the projector and share the current screen Display LAN Info lets you set the display format for the projector s network information a Use the displayed keyb...

Страница 102: ... the IP address from being displayed on the LAN standby screen and Home screen set the IP Address Display setting to Off i When you finish selecting settings select Complete and follow the on screen instructions to save your settings and exit the menus j Press the LAN button on the remote control The wired network settings complete when you see the correct IP address on the LAN standby screen ...

Страница 103: ...ownload Epson iProjection from App Store or Google play Any fees incurred when communicating with App Store or Google play are the responsibility of the customer g g Related Links Installing the Wireless LAN Module p 103 Installing the Wireless LAN Module into the Rear USB A Port p 104 Selecting Wireless Network Settings Manually p 105 Selecting Wireless Network Settings in Windows p 108 Selecting...

Страница 104: ...d f Close the air filter cover g Plug in and turn on the projector Installing the Wireless LAN Module into the Rear USB A Port To use the projector over a wireless network install the Epson 802 11b g n wireless LAN module EB 2140W EB 2040 Do not install any other type of wireless LAN module Attention Never remove the module while its indicator is blue or flashing or while you are projecting wirele...

Страница 105: ...ect the wireless LAN module to the USB A port c Attach the wireless LAN module cover and secure it in place with the screw Selecting Wireless Network Settings Manually Before you can project from your wireless network you need to select network settings for the projector a Press the Menu button on the control panel or remote control ...

Страница 106: ...ters long for accessing the projector using the Basic Control User name is EPSONREMOTE default password is guest Web Control Password lets you enter a password up to 8 alphanumeric characters long for accessing the projector over the Web User name is EPSONWEB default password is admin Moderator Password lets you enter a four digit number password for accessing the projector as a moderator using Ea...

Страница 107: ...ction mode assign the IP settings for your network as necessary If your network assigns addresses automatically select IP Settings to set the DHCP setting to On If you must set addresses manually select IP Settings to set the DHCP setting to Off and then enter the projector s IP Address Subnet Mask and Gateway Address as necessary If you want to connect the projector to the network using IPv6 sele...

Страница 108: ...n connecting in Advanced connection mode make sure AirPort is turned on and select the network name SSID of the network the projector is connecting to Setting Up Wireless Network Security You can set up security for your projector to use on a wireless network Set up one of the following security options to match the settings used on your network WPA2 PSK security WPA2 EAP security WPA WPA2 PSK sec...

Страница 109: ...TLS type CA certificate for the PEAP PEAP TLS EAP TLS or EAP FAST type a You can also register the digital certificates from your Web browser However be sure to register just once or the certificate may not install correctly k Select Register and press Enter l Follow the on screen instructions to connect a USB storage device to the projector s USB A port m Press Enter to display the certificate li...

Страница 110: ...s LAN Menu p 153 Supported Client and CA Certificates You can register these types of digital certificates Client Certificate PEAP TLS EAP TLS Specification Description Format PKCS 12 Extension PFX P12 Encryption RSA Hashes MD5 SHA 1 SHA 256 SHA 384 SHA 512 Key length 512 1024 2048 4096 bit Password Up to 32 alphanumeric characters required CA Certificate PEAP PEAP TLS EAP TLS EAP FAST Specificati...

Страница 111: ...e s QR code reader If you are too far from the screen the code may not be read When a connection is established select Contents menu from and then select the file you want to project Using a USB Key to Connect a Windows Computer You can set up your USB flash drive as a USB key to quickly connect the projector to a wireless LAN supported Windows computer The USB key allows you to automatically sele...

Страница 112: ...tor authority to install the software If it is not installed automatically double click MPPLaunch exe in the USB key After a few minutes your computer image is displayed by the projector If it does not appear press the LAN button on your projector s remote control or restart your computer i Run your presentation j When you have finished projecting wirelessly select the Safely Remove Hardware optio...

Страница 113: ...oring Settings during Screen Mirroring projection Doing so may cause the projector to disconnect and it may take a while to re connect s Network Screen Mirroring Settings Do not turn off the projector directly by the breaker during Screen Mirroring projection a Mobile devices with Android installed or Windows 8 1 or later installed mainly support Miracast Support for Miracast varies depending on t...

Страница 114: ... the projector is connecting to Adjust Image Quality lets you adjust the screen mirroring speed quality Select a small number to improve the quality and select large number to increase the speed Connection Mode lets you select the type of WPS Wi Fi Protected Setup Available only for the Basic operation mode h For the Extended operation mode select the Extended setting Meeting Mode lets you select ...

Страница 115: ...splay Name on the Home screen Connecting Using Screen Mirroring in Windows 10 You can set up your computer for wireless projection and play audio through the projector s speaker system by connecting using Screen Mirroring a Select Screen Mirroring Settings on your projector as necessary b Press the LAN button on the remote control to switch to the Screen Mirroring source You see the Screen Mirrori...

Страница 116: ... by connecting using Screen Mirroring a Select Screen Mirroring Settings on your projector as necessary b Press the LAN button on the remote control to switch to the Screen Mirroring source You see the Screen Mirroring standby screen c On your computer select Devices from Charms and select Project d Select Add a wireless display You see a list of available devices e Select the projector s Display ...

Страница 117: ... button on the remote control to switch to the Screen Mirroring source You see the Screen Mirroring standby screen c On your mobile device use your Miracast function to search for the projector You see a list of available devices d Select the projector s Display Name from the list e If you see the PIN entry screen on your mobile device enter the PIN code displayed on the Screen Mirroring standby s...

Страница 118: ...rver Certificate Using the Menus You can create your Web server certificate and import it using the projector menus and a USB flash drive a You can also register the digital certificates from your Web browser However be sure to register just once or the certificate may not install correctly a Make sure your digital certificate file is compatible with projector registration and directly placed on t...

Страница 119: ...HTTP Specification Description Format PKCS 12 Extension PFX P12 Encryption RSA Hashes MD5 SHA 1 SHA 256 SHA 384 SHA 512 Key length 512 1024 2048 4096 bit Common name Network host name Organization Optional Password Up to 32 alphanumeric characters required You can set a password using up to 64 alphanumeric characters However you need to use your Web browser to enter more than 32 characters ...

Страница 120: ...ver a network g g Related Links EasyMP Monitor p 121 Controlling a Networked Projector Using a Web Browser p 122 Setting Up Projector Network E Mail Alerts p 126 Setting Up Monitoring Using SNMP p 127 Using ESC VP21 Commands p 128 PJLink Support p 130 Crestron RoomView Support p 131 Setting Projector Event Schedules p 135 ...

Страница 121: ...Monitor software Windows only lets you monitor and control your projector through the network See the EasyMP Monitor Operation Guide for instructions You can download EasyMP Monitor from the following Web site http www epson com ...

Страница 122: ...by Mode to Communication On in the projector s ECO menu you can use a Web browser to select settings and control projection even if the projector is in standby mode when the power is off a Make sure the projector is turned on b Make sure your computer or device is connected to the same network as the projector c Start your Web browser on the computer or device d Go to the Epson Web Control screen ...

Страница 123: ... the HDBaseT source EB 2265U EB 2165W P Selects Computer1 port source Q Searches for sources g To select projector menu settings select Advanced on the Epson Web Control screen a You can also change projector settings by accessing the projector menu system from OSD Control Pad See help on how to use the OSD Control Pad screen You may need to log in before you see the Advanced OSD Control Pad or Te...

Страница 124: ... can register the digital certificates on the projector to provide security for your presentation files EB 2265U EB 2255U EB 2250U EB 2245U EB 2165W EB 2155W EB 2065 EB 2055 EB X550KG EB X500KG a You can also register the digital certificates in the projector s Network menu However be sure to register just once or the certificate may not install correctly s Network Network Configuration Wireless L...

Страница 125: ... default password is admin You can change the password in Web Control Password from the projector s Network menu s Network Network Configuration Basic Web Control Password f Under Network select Manage Certificates g Click the Browse button select the certificate file and click Open h Enter a password in the Password box i When you finish registering the certificate click Apply to finalize your ch...

Страница 126: ...server Port Number from 1 to 65535 default is 25 h Choose an address field enter the e mail address and select the alerts you want to receive Repeat for up to three addresses a Your e mail address can be up to 32 alphanumeric characters long i When you finish selecting settings select Complete and follow the on screen instructions to save your settings and exit the menus a If a critical problem ca...

Страница 127: ...k Configuration and press Enter d Select the Notifications menu and press Enter e Set the SNMP setting to On f Enter up to two IP addresses to receive SNMP notifications using 0 to 255 for each address field a Do not use these addresses 127 x x x or 224 0 0 0 through 255 255 255 255 where x is a number from 0 to 255 This projector supports SNMP agent version 1 SNMPv1 g Enter the SNMP Community Nam...

Страница 128: ...abnormally an error message is output and a is returned The following commands are available Item Command Power On Off On PWR ON Off PWR OFF Item Command Signal selection Computer1 Auto SOURCE 1F RGB SOURCE 11 Component SOURCE 14 Computer2 Auto SOURCE 2F RGB SOURCE 21 Component SOURCE 24 HDMI1 MHL SOURCE 30 HDMI2 SOURCE A0 Video SOURCE 41 USB Display SOURCE 51 USB SOURCE 52 LAN SOURCE 53 Screen Mi...

Страница 129: ...type Crossover null modem cable In the following illustration the projector side is shown on the left and the computer side on the right Signal name Function GND Signal wire ground TD Transmit data RD Receive data Communications protocol Default baud rate setting 9600 bps Data length 8 bit Parity None Stop bit 1 bit Flow control None ...

Страница 130: ...aptability verification http pjlink jbmia or jp english Non compatible commands Function PJLink command Mute settings Image muting set AVMT 11 Audio muting set AVMT 21 Input ports and corresponding input source number Input port name Input source number Computer1 11 Computer2 12 Video 21 HDMI1 MHL 32 HDMI2 33 USB 41 LAN 52 USB Display 53 HDBaseT 56 Screen Mirroring 57 HDBaseT is available only wit...

Страница 131: ...rowser g g Related Links Setting Up Crestron RoomView Support p 131 Controlling a Networked Projector Using Crestron RoomView p 131 Projector Setup Settings ECO Menu p 159 Setting Up Crestron RoomView Support To set up your projector for monitoring and control using a Crestron RoomView system make sure your computer and projector are connected to the network If you are connecting wirelessly set up...

Страница 132: ... To view information about the projector click the Info tab f To change the projector Crestron and password settings click the Tools tab select settings on the displayed screen and then click Send g When you finish selecting settings click Exit to exit the program g g Related Links Crestron RoomView Operation Window p 132 Crestron RoomView Tools Window p 133 Crestron RoomView Operation Window Sett...

Страница 133: ...essages to and receive messages from the administrator using Crestron RoomView Express Info Displays information on the projector that is currently connected Tools Changes settings in the projector that is currently connected Crestron RoomView Tools Window Settings on the Tools window let you customize various projector setup features A Make settings for Crestron central controllers B Projector Na...

Страница 134: ...ords are not the same an error is displayed Send Click to confirm the changes made to the Admin Password D Enabled User Password Select to require a password to open the operation window on the computer New Password Enter the new password when changing the password to open the operation window up to 26 alphanumeric characters Confirm Enter the same password as you entered in New Password If the pa...

Страница 135: ...ace flammable objects in front of the lens If you schedule the projector to turn on automatically flammable objects in front of the lens could catch on a fire a If you set a Schedule Protection password turn off your Schedule Protection password first a Set the date and time in the Date Time menu s Extended Operation Date Time b Press the Menu button on the control panel or remote control c Select...

Страница 136: ...ing the event status A valid schedule regular schedule invalid schedule B The date currently selected highlighted in yellow C one time schedule regular schedule standby schedule turns communication on or off during standby invalid schedule j To edit a scheduled event select the schedule and press Esc k Select an option from the menu displayed On or Off lets you enable or disable the selected event...

Страница 137: ...hange the event details or date and time Clear lets you remove the scheduled event from a list l Select Complete then select Yes To delete all scheduled events select Schedule Reset g g Related Links Setting the Date and Time p 41 Setting a Password p 94 ...

Страница 138: ...oard p 140 Image Quality Settings Image Menu p 141 Input Signal Settings Signal Menu p 143 Projector Feature Settings Settings Menu p 145 Projector Setup Settings Extended Menu p 147 Projector Network Settings Network Menu p 150 Projector Setup Settings ECO Menu p 159 Projector Information Display Info Menu p 161 Projector Reset Options Reset Menu p 164 Copying Menu Settings Between Projectors Bat...

Страница 139: ...tons to move through the menus listed on the left The settings for each menu are displayed on the right a The available settings depend on the current input source c To change settings in the displayed menu press Enter d Press the up or down arrow button to move through the settings e Change the settings using the buttons listed on the bottom of the menu screens f To return all the menu settings t...

Страница 140: ...t select Finish on the keyboard to confirm your entries Select Cancel to cancel entering text a You can select projector settings and control projection over a network using a Web browser from your computer Some symbols cannot be entered using the on screen keyboard Use your Web browser to enter the text g g Related Links Available Text Using the On screen Keyboard p 140 Controlling a Networked Pr...

Страница 141: ...inted blue when a high value is selected and tinted red when a low value is selected Color Temp Color Temp sets the color temperature according to the color mode you selected Customized Customized adjusts the individual R red G green and B blue components of the offset and gain Image Enhancement Noise Reduction Reduces flickering in analog images Advanced Selects the various detailed color setting...

Страница 142: ...ss mode use the Power Consumption setting in the projector s ECO menu You cannot select the Noise Reduction setting when the following are being input The Deinterlacing setting is set to Off A digital RGB signal is being input An interlaced signal 480i 576i 1080i is being input g g Related Links Available Color Modes p 60 ...

Страница 143: ...elected input source Tracking Varying levels available Adjusts the signal to eliminate vertical stripes in computer images Sync Varying levels available Adjusts the signal to eliminate fuzziness or flickering in computer images Position Adjusts the image location on the screen Auto Setup On Off Automatically optimizes computer image quality when On Overscan Auto Off 4 8 Changes the projected image...

Страница 144: ...sources connected to the video ports If interference appears or no image appears when set to Auto select the appropriate signal according to the connected equipment Reset Resets all adjustment values on the Signal menu to their default settings except for the following Input Signal g g Related Links Available Image Aspect Ratios p 58 ...

Страница 145: ...s the Gesture Presenter feature Marker Position Marker Position sets the marker position to the right or left Gesture Presenter Gesture Presenter enables or disables the Gesture Presenter feature Volume Varying levels available Adjusts the volume of projector s speaker system You can also adjust the volume of external speakers Setting values are saved for each source HDMI Link Adjusts the HDMI Lin...

Страница 146: ...the selected receiver Off turns off all receivers User Button Power Consumption Info Deinterlacing Test Pattern Resolution Multi Projection Display the QR Code Assigns a menu option to the User button on the remote control for one touch access Setting Options Description Test Pattern Displays a test pattern to assist in focusing and zooming the image and correcting image shape press the Esc button...

Страница 147: ...play when no signal is received Startup Screen Startup Screen set to On to display a logo when the projector starts up A V Mute A V Mute sets the screen color or logo to display when A V Mute is turned on User s Logo Creates a screen that the projector displays to identify itself and enhance security Projection Front Front Ceiling Rear Rear Ceiling Selects the way the projector faces the screen so...

Страница 148: ...disables communication from the Ethernet and serial ports on the transmitter turning on this setting disables the projector s LAN and RS 232C ports Set Extron XTP to Off first Setting Options Description Extron XTP Extron XTP set to On when you connect an Extron XTP transmitter or switcher to the HDBaseT ports See the following Extron Web site for more details on the XTP system http www extron com...

Страница 149: ...tion High Altitude Mode Auto Source Search Monitor Out Port Date Time A V Output HDBaseT Multi Projection Projector ID Color Mode Color Matching Schedule Settings Language Available only for EB 2265U EB 2255U EB 2250U EB 2245U EB 2165W EB 2155W EB 2065 EB 2055 EB X550KG EB X500KG Available only for EB 2265U EB 2165W a When you set User s Logo Protection to On in the Password Protection screen you ...

Страница 150: ...ng to On Screen Mirroring Settings To Screen Mirroring Settings menu Configures your Screen Mirroring settings Setting Options Description Wireless LAN Power On Off Configures your wireless LAN settings Select On to project images via a wireless LAN If you do not want to connect via wireless LAN turn it off to prevent unauthorized access by others Net Info Wireless LAN Connection Mode Wireless LAN...

Страница 151: ...his allows you to access the projector remotely g g Related Links Network Menu Screen Mirroring Settings p 151 Network Menu Basic Menu p 152 Network Menu Wireless LAN Menu p 153 Network Menu Wired LAN Menu p 155 Network Menu Notifications Menu p 156 Network Menu Others Menu p 157 Network Menu Reset Menu p 158 Selecting Password Security Types p 95 Network Menu Screen Mirroring Settings Settings on...

Страница 152: ...ng Display Device Name Set to On to display the newly connected device name on the projected image when projecting input sources other than Screen Mirroring Reset Resets all adjustment values on the Screen Mirroring Settings menu to their default settings Network Menu Basic Menu Settings on the Basic menu let you select the basic network settings s Network Network Configuration Basic Setting Optio...

Страница 153: ...s Text QR Code Network Menu Wireless LAN Menu Settings on the Wireless LAN menu let you select the wireless LAN settings s Network Network Configuration Wireless LAN Setting Options Description Connection Mode Select the type of wireless connection Quick Quick lets you connect to multiple smartphones tablets or computers directly using wireless communication When you select Quick connection mode t...

Страница 154: ...ically for security If the network settings are initialized it returns to the initial passphrase EAP Method Set the EAP settings for WPA2 EAP and WPA WPA2 EAP security Setting Options Description EAP Type EAP Type selects the protocol for authentication PEAP authentication protocol widely used in Windows Server PEAP TLS authentication protocol used in Windows Server Select this when using a client...

Страница 155: ...255 255 255 or 0 0 0 0 through 254 255 255 255 for Subnet Mask and 0 0 0 0 127 x x x or 224 0 0 0 through 255 255 255 255 for Gateway Address SSID Display On Off Select whether to display the SSID on the network standby screen and Home screen IP Address Display On Off Select whether to display the IP address on the network standby screen and Home screen IPv6 Settings Select the IPv6 settings if yo...

Страница 156: ...onnect the projector to the network using IPv6 IPv6 is supported to monitor and control the projector over a network using Epson Web Control and PJLink Auto Configuration Auto Configuration set to On to assign addresses automatically according to the Router Advertisement Use Temporary Address Use Temporary Address set to On if you want to use a temporary IPv6 address Network Menu Notifications Men...

Страница 157: ... x x or 224 0 0 0 through 255 255 255 255 where x is a number from 0 to 255 Community Name Up to 32 alphanumeric characters do not use spaces and any symbols other than Set the SNMP community name PJLink Notification On Off Enables or disables the PJLink notification function Setting Options Description Notified IP Address IP address Enter the IP address to receive the projector s operating status...

Страница 158: ...e EasyMP Monitor software Control4 SDDP On Off Set to On to allow device information to be acquired using Control4 Simple Device Discovery Protocol SDDP Message Broadcasting On Off Set to On to enable EPSON Message Broadcasting feature You can download Message Broadcasting and its Operation Guide from the following Web site http www epson com Available only for EB 2265U EB 2255U EB 2250U EB 2245U ...

Страница 159: ...ng Options Description Light Optimizer On Off When set to On the lamp brightness is adjusted according to the projected image This helps to reduce the power consumption by lowering the lamp brightness according to the scene being projected The setting is stored for each Color Mode This item is enabled when Power Consumption is set to Normal or Auto Auto Iris is set to Off s Image Auto Iris Multi P...

Страница 160: ...Always On s Extended A V Settings A V Output ECO Display On Off Displays a leaf icon in the bottom left corner of the projected screen to indicate the power saving status when the lamp brightness changes when On Reset Resets all adjustment values on the ECO menu to their default settings except for Standby Mode Available only for EB 2265U EB 2255U EB 2250U EB 2245U EB 2165W EB 2155W EB 2065 EB 205...

Страница 161: ...iewing the Projector Info menu in the projector s Info menu a The available settings depend on the current input source The lamp usage timer does not register any hours until you have used the lamp for at least 10 hours Information item Description Lamp Hours Displays the number of hours H the lamp has been used in Normal and ECO Power Consumption modes if the information is displayed in yellow ob...

Страница 162: ...solution 0020 0026 0032 0036 0037 0038 A screen mirroring communication error has occurred Turn the projector off and then on again or restart the network software 0021 Failed to startup Screen Mirroring Turn the projector off and then on again 0022 0027 0028 0029 0030 0031 0035 Unstable screen mirroring communication Check the network communication status wait a few moments and try connecting to ...

Страница 163: ...ed to acquire DHCP Make sure the DHCP server is operating correctly If you are not using DHCP set the DHCP setting to Off in the projector s Network menu s Network Network Configuration Wireless LAN IP Settings DHCP s Network Network Configuration Wired LAN IP Settings DHCP 0899 Other communication errors 089A The EAP authentication type does not match the network Check the wireless LAN security s...

Страница 164: ... usage timer to zero when you replace the lamp Reset All Config Resets most of the projector settings to their default values You cannot reset the following settings using the Reset All Config option Input Signal User s Logo Display Background Startup Screen A V Mute Color Matching Schedule Settings Language Date Time Network menu items Lamp Hours Password Available when you have save a user s log...

Страница 165: ...66 Transferring Settings From a USB Flash Drive You can copy menu settings from one projector to another of the same model using a USB flash drive a The USB flash drive must use a FAT format and not incorporate any security function Delete any files on the drive before using it for batch setup or the settings may not be saved correctly a Disconnect the power cord from the projector and check that ...

Страница 166: ...off b Connect a USB cable to the computer s USB port and to the projector s USB B port c Hold down the Esc button on the remote control or the control panel and connect the power cord to the projector d When all of the projector s indicators turn on release the Esc button The computer recognizes the projector as a removable disk e Open the removable disk icon or folder and save the batch setup fil...

Страница 167: ...ctly g g Related Links Batch Setup Error Notification p 167 Batch Setup Error Notification The projector s indicators notify you if an error occurs during a batch setup operation Check the status of the projector s indicators and follow the instructions described in the table here Indicator status Problem and solution Lamp Orange flashing fast Temp Orange flashing fast The batch setup file may be ...

Страница 168: ...eeds replacing contact Epson or an authorized Epson servicer Warning Before cleaning any part of the projector turn it off and unplug the power cord Never open any cover on the projector except as specifically explained in this manual Dangerous electrical voltages in the projector can injure you severely g g Related Links Cleaning the Lens p 169 Cleaning the Projector Case p 170 Air Filter and Ven...

Страница 169: ...free cloth with lens cleaner and gently wipe the lens Do not spray any liquid directly on the lens Warning Do not use a lens cleaner that contains flammable gas The high heat generated by the projector lamp may cause a fire Attention Do not use glass cleaner or any harsh materials to clean the lens and do not subject the lens to any impacts otherwise it could be damaged Do not use canned air or th...

Страница 170: ...e a soft dry lint free cloth To remove stubborn dirt use a soft cloth moistened with water and mild soap Do not spray liquid directly on the projector Attention Do not use wax alcohol benzene paint thinner or other chemicals to clean the projector case These can damage the case Do not use canned air or the gases may leave a flammable residue ...

Страница 171: ...lter and Vents Clean the projector s air filter or vents if they get dusty or if you see a message telling you to clean them a Turn off the projector and unplug the power cord b Gently remove the dust using a small vacuum designed for computers or a very soft brush such as a paintbrush a You can remove the air filter so that you can clean both sides Do not rinse the air filter in water or use any ...

Страница 172: ...he air filter out of the projector a Dispose of used air filters according to local regulations Filter frame Polypropylene Filter Polypropylene d Place the new air filter in the projector as shown and push gently until it clicks into place e Close the air filter cover g g Related Links Replacement Parts p 199 ...

Страница 173: ...soon as possible when the following occurs The projected image gets darker or quality declines A message is displayed when you turn on the projector telling you to replace the lamp the message is displayed 100 hours before the expected end of the lamp life and appears for 30 seconds The projector s power indicator is flashing blue and its lamp indicator is flashing orange ...

Страница 174: ...g the Lamp p 174 Resetting the Lamp Timer p 179 Projector Specifications p 206 Replacing the Lamp You can replace the lamp while the projector is placed on a table or mounted to the ceiling Warning Let the lamp fully cool before replacing it to avoid injury Never disassemble or modify the lamp If a modified or disassembled lamp is installed in the projector it could cause a fire electric shock or ...

Страница 175: ...75 d Slide the lamp cover out and lift it off e Loosen the screws securing the lamp to the projector The screws do not come all the way out EB 2265U EB 2255U EB 2250U EB 2245U EB 2165W EB 2155W EB 2065 EB 2055 EB X550KG EB X500KG ...

Страница 176: ...mp EB 2265U EB 2255U EB 2250U EB 2245U EB 2165W EB 2155W EB 2065 EB 2055 EB X550KG EB X500KG Lift up the lamp handle and carefully pull the lamp out of the projector EB 2140W EB 2040 Grasp the raised section of the lamp and gently pull the lamp out of the projector ...

Страница 177: ...t in the trash g Install the new lamp EB 2265U EB 2255U EB 2250U EB 2245U EB 2165W EB 2155W EB 2065 EB 2055 EB X550KG EB X500KG Gently insert the new lamp into the projector If it does not fit easily make sure it is facing the right way Press the handle down EB 2140W EB 2040 Gently insert the new lamp into the projector If it does not fit easily make sure it is facing the right way Attention Do no...

Страница 178: ...8 h Push in the lamp firmly and tighten the screws to secure it EB 2265U EB 2255U EB 2250U EB 2245U EB 2165W EB 2155W EB 2065 EB 2055 EB X550KG EB X500KG EB 2140W EB 2040 i Replace the lamp cover and tighten the screw to secure it ...

Страница 179: ...ust reset the lamp timer after replacing the projector s lamp to clear the lamp replacement message and to monitor lamp usage correctly a Do not reset the lamp timer if you have not replaced the lamp to avoid inaccurate lamp usage information a Turn on the projector b Press the Menu button on the control panel or remote control c Select the Reset menu and press Enter d Select Reset Lamp Hours and ...

Страница 180: ...es a Remove the battery cover as shown b Remove the old batteries c Insert the batteries with the and ends facing as shown Warning Check the positions of the and marks inside the battery holder to ensure the batteries are inserted the correct way If the batteries are not used correctly they could explode or leak causing a fire injury or damage to the product d Replace the battery cover and press i...

Страница 181: ...roblems using the projector g g Related Links Projection Problems p 182 Projector Indicator Status p 183 Using the Projector Help Displays p 185 Solving Image or Sound Problems p 186 Solving Projector or Remote Control Operation Problems p 192 Solving Network Problems p 194 ...

Страница 182: ... it on If this does not solve the problem check the following The indicators on the projector may indicate the problem The projector s Help system can display information about common problems The solutions in this manual can help you solve many problems If none of these solutions help contact Epson for technical support ...

Страница 183: ...ormal operation Power Lit blue Status Flashing blue Lamp Off Temp Off Warming up or shutting down When warming up wait about 30 seconds for an image to appear All buttons are disabled during warm up and shutting down Power Lit blue Status Off Lamp Off Temp Off Standby sleep mode or monitoring When you press the power button projection starts Power Flashing blue Status Off Lamp Off Temp Off Prepari...

Страница 184: ...blem persists unplug the projector and contact Epson for help Lamp cover has a problem Check that the lamp and the lamp cover are securely installed The lamp does not turn on if the lamp and the lamp cover are not installed correctly Power Flashing blue Status Indicator status varies Lamp Flashing orange Temp Indicator status varies Replace the lamp soon to avoid damage Do not continue using the p...

Страница 185: ...he Home button on the control panel or remote control c Select Help on the Home screen The Help menu is displayed d Use the up and down arrow buttons to highlight the problem you want to solve e Press Enter to view the solutions f Perform one of the following actions when you are finished To select another problem to solve press Esc To exit the help system press Menu ...

Страница 186: ...f the connected computer is in sleep mode or displaying a blank screen saver To project an image source connected to the Computer2 Monitor Out port set Monitor Out Port to Computer2 in the projector s Extended menu s Extended Operation Monitor Out Port Check the settings on the projector s Signal menu to make sure they are correct for the current video source Adjust the Brightness setting in the p...

Страница 187: ...udio p 23 Solutions When No Signal Message Appears If the No Signal message appears try the following solutions Press the Source Search button and wait a few seconds for an image to appear Turn on the connected computer or video source and press play to begin your presentation if necessary Check that all cables required for projection are securely connected Connect the video source directly to the...

Страница 188: ...n using the Position setting in the projector s Signal menu Press the Aspect button on the remote control to select a different image aspect ratio Change the Resolution setting in the projector s Signal menu according to the signal for the connected equipment If you zoomed into or out of the image using the E Zoom buttons press the Esc button until the projector returns to a full display Check you...

Страница 189: ...r video source adjust the Deinterlacing and Noise Reduction settings in the projector s Image menu s Image Advanced Deinterlacing s Image Image Enhancement Noise Reduction Select a computer video resolution and refresh rate that are compatible with the projector If you are projecting from a computer press the Auto button on the remote control to automatically adjust the Tracking and Sync settings ...

Страница 190: ...t or the colors are incorrect try the following solutions Press the Color Mode button on the remote control to try different color modes for the image and environment Check your video source settings Adjust the available settings on the projector s Image menu for the current input source such as Brightness Contrast Tint Color Temp and or Color Saturation Make sure you selected the correct Input Si...

Страница 191: ...or to a Mac using an HDMI cable make sure your Mac supports audio through the HDMI port If not you need to connect an audio cable If you want to use a connected audio source when the projector is off set the Standby Mode option to Communication On in the projector s ECO menu and make sure the A V Settings options are set correctly in the projector s Extended menu If the volume for the computer is ...

Страница 192: ... setting in the projector s ECO menu If the projector s lamp turns off the status indicator is flashing and the temp temperature indicator is lit the projector has overheated and turned off If the power button on the remote control does not turn on the projector check its batteries and make sure at least one of the remote receivers are available in the Remote Receiver setting in the projector s Se...

Страница 193: ...ite down the code and contact Epson for help Provide the request code and proof of ownership for assistance in unlocking the projector If you lose the remote control you cannot enter a password Order a new one from Epson Solution When The Battery that Saves Your Clock Settings is Running Low Message Appears If the message The battery that saves your clock settings is running low is displayed conta...

Страница 194: ...projector through a Web browser make sure you are using the correct ID and password When accessing Basic Control in Epson Web Control enter EPSONREMOTE as the user ID You cannot change the user ID Enter the password set in the projector s Network menu as the Basic Control password The default password is guest s Network Network Configuration Basic Remote Password When accessing Advanced in Epson W...

Страница 195: ...nu Change the Display Name so that it does not include in the projector s Screen Mirroring Settings setting menu or it may not be displayed correctly on your mobile device s Network Screen Mirroring Settings Display Name Select Off as the Screen Mirroring setting in the projector s Network menu and select On again Change the Operation Mode and connect again s Network Screen Mirroring Settings Oper...

Страница 196: ... improve the connection speed of the mobile device Make sure the projection contents meet the Screen Mirroring requirements Depending on the settings of the mobile device the connection may be lost when the device enters power saving mode Check the electrical power saving settings on the mobile device Update to the latest version of the wireless driver or firmware on the mobile device g g Related ...

Страница 197: ...nks Optional Accessories and Replacement Parts p 198 Screen Size and Projection Distance p 200 Supported Monitor Display Resolutions p 204 Projector Specifications p 206 External Dimensions p 209 USB Display System Requirements p 210 List of Safety Symbols corresponding to IEC60950 1 A2 p 211 Glossary p 213 Notices p 215 ...

Страница 198: ...ble screen ELPSC25 Portable roll type screens aspect ratio 16 10 Multi Aspect Screen ELPSC26 ELPSC26H Portable multi aspect screen Cables Computer cable ELPKC02 1 8 m for mini D sub 15 pin mini D Sub 15pin Computer cable ELPKC09 3 m for mini D sub 15 pin mini D Sub 15pin Computer cable ELPKC10 20 m for mini D sub 15 pin mini D Sub 15pin Use when connecting to the Computer port Component video cabl...

Страница 199: ...hen the projector is suspended from a ceiling install the remote control to operate the projector by hand HDBaseT Transmitter ELPHD01 EB 2265U EB 2165W Use when sending an HDMI or RS 232C signal over a long distance HDCP 2 2 is not supported Replacement Parts Lamp unit ELPLP95 EB 2265U EB 2255U EB 2250U EB 2245U EB 2165W EB 2155W EB 2065 EB 2055 EB X550KG EB X500KG Lamp unit ELPLP87 EB 2140W EB 20...

Страница 200: ...16 10 screen size A B Minimum Wide to Maximum Tele 30 65 40 86 145 4 35 75 47 101 169 4 16 10 screen size A B Minimum Wide to Maximum Tele 40 86 54 116 194 5 50 108 67 146 243 6 60 129 81 176 293 7 80 172 108 236 392 10 100 215 135 296 491 12 150 323 202 446 738 18 200 431 269 595 985 24 300 646 404 895 1479 37 4 3 screen size A B Minimum Wide to Maximum Tele 30 61 46 98 164 4 40 81 61 132 220 6 5...

Страница 201: ...51 249 2 50 108 67 168 277 2 60 129 81 203 333 3 70 151 94 237 389 3 80 172 108 271 445 4 100 215 135 340 557 5 150 323 202 512 837 7 16 10 screen size A B Minimum Wide to Maximum Tele 200 431 269 683 1117 10 260 560 350 889 1453 13 4 3 screen size A B Minimum Wide to Maximum Tele 40 81 61 152 250 2 50 102 76 191 314 3 60 122 91 230 377 3 70 142 107 269 441 4 80 163 122 308 504 4 100 203 152 385 6...

Страница 202: ...m Tele 30 61 46 100 164 1 40 81 61 134 219 2 50 102 76 169 275 2 60 122 91 203 331 2 80 163 122 271 442 3 4 3 screen size A B Minimum Wide to Maximum Tele 100 203 152 340 553 4 120 244 183 408 664 5 150 305 229 511 831 6 200 406 305 682 1108 8 250 508 381 854 1386 10 16 9 screen size A B Minimum Wide to Maximum Tele 30 66 37 91 149 1 40 50 89 122 199 1 50 111 62 153 249 2 60 133 75 184 300 2 80 17...

Страница 203: ... Maximum Tele 30 66 37 91 149 1 40 50 89 122 199 1 50 111 62 153 249 2 60 133 75 184 300 2 80 177 100 246 401 3 100 221 125 308 502 3 150 332 187 464 754 5 200 443 249 619 1006 7 250 553 311 775 1258 9 275 609 342 853 1384 10 16 10 screen size A B Minimum Wide to Maximum Tele 30 65 40 88 144 1 40 86 54 118 193 1 50 108 67 149 243 2 60 129 81 179 292 2 70 151 94 209 341 2 80 172 108 239 390 3 100 2...

Страница 204: ...Wide is selected as the Resolution setting in the projector s Signal menu WUXGA is available only for EB 2265U EB 2255U EB 2250U EB 2245U Even when signals other than those mentioned above are input it is likely that the image can be projected However not all functions may be supported Component Video Signal Refresh rate Hz Resolution dots SDTV 480i 480p 60 720 480 SDTV 576i 576p 50 720 576 HDTV 7...

Страница 205: ...n an HDMI connection is made using the optional HDBaseT Transmitter for EB 2265U EB 2165W WSXGA is available only for EB 2265U EB 2255U EB 2250U EB 2245U EB 2165W EB 2155W EB 2140W WUXGA is available only for EB 2265U EB 2255U EB 2250U EB 2245U MHL Input Signal Signal Refresh rate Hz Resolution dots VGA 60 640 480 SDTV 480i 480p 60 720 480 SDTV 576i 576p 50 720 576 HDTV 720p 50 60 1280 720 HDTV 10...

Страница 206: ...ment 1 1 6 Lamp EB 2265U EB 2255U EB 2250U EB 2245U EB 2165W EB 2155W EB 2065 EB 2055 EB X550KG EB X500KG UHE lamp 300 W Model No ELPLP95 EB 2140W EB 2040 UHE lamp 215 W Model No ELPLP87 Lamp life Normal Power Consumption mode Up to 5 000 hours ECO Power Consumption mode Up to 10 000 hours Max audio output 16W Speaker 1 Power supply EB 2265U EB 2165W EB 2065 EB X550KG 100 240V AC 10 50 60Hz 4 5 2 ...

Страница 207: ...o condensation Mass EB 2265U EB 2255U Approx 4 7 kg EB 2250U EB 2245U EB 2165W Approx 4 6 kg EB 2155W EB 2055 EB X500KG Approx 4 3 kg EB 2140W EB 2040 Approx 4 2 kg EB 2065 EB X550KG Approx 4 4 kg This product is also designed for IT power distribution system with phase to phase voltage 230V Angle of tilt If you use the projector tilted at an angle of more than 30 it could be damaged and cause an ...

Страница 208: ...B 2155W EB 2065 EB 2055 EB X550KG EB X500KG 1 USB connector Type A LAN port 1 RJ 45 HDBaseT port EB 2265U EB 2165W 1 RJ 45 RS 232C port 1 Mini D Sub 9 pin male a USB A and USB B port supports USB 2 0 However USB ports are not guaranteed to operate all devices that support USB USB B port is not support USB 1 1 ...

Страница 209: ...B 2265U EB 2255U EB 2250U EB 2245U EB 2165W EB 2155W EB 2140W EB 2065 EB 2055 EB 2040 EB X550KG EB X500KG A Center of lens B Distance from center of lens to suspension bracket fixing point The unit in these illustrations is mm ...

Страница 210: ...indows 8 Windows 8 32 and 64 bit Windows 8 Pro 32 and 64 bit Windows 8 Enterprise 32 and 64 bit Windows 8 1 Windows 8 1 32 and 64 bit Windows 8 1 Pro 32 and 64 bit Windows 8 1 Enterprise 32 and 64 bit Requirement Windows Mac Windows 10 Windows 10 Home 32 and 64 bit Windows 10 Pro 32 and 64 bit Windows 10 Enterprise 32 and 64 bit CPU Intel Core2Duo or faster Intel Core i3 or faster recommended Inte...

Страница 211: ... To identify the positive and negative connections the polarity on a piece of equipment to which a d c power supply may be connected No Symbol mark Approved standards Description I The same as No 8 J IEC60417 No 5001B Battery general On battery powered equipment To identify a device for instance a cover for the battery compartment or the connector terminals K IEC60417 No 5002 Positioning of cell T...

Страница 212: ... specific part of the equipment T Never look into the optical lens while the projector is on U To indicate that the marked item don t place anything on projector V ISO3864 IEC60825 1 Caution laser radiation To indicate the equipment has a laser radiation part W ISO 3864 Disassembly prohibition To indicate a risk of injury such as electric shock if the equipment is disassembled X IEC60417 No 5266 S...

Страница 213: ...rver router for communicating across a network subnet divided according to subnet mask HDCP HDCP is an abbreviation for High bandwidth Digital Content Protection It is used to prevent illegal copying and protect copyrights by encrypting digital signals sent over DVI and HDMI ports Because the HDMI port on this projector supports HDCP it can project digital images protected by HDCP technology Howev...

Страница 214: ... possible between devices with the same SSID Subnet Mask This is a numerical value that defines the number of bits used for the network address on a divided network subnet from the IP address SVGA A screen size standard with a resolution of 800 horizontal 600 vertical dots SXGA A screen size standard with a resolution of 1 280 horizontal 1 024 vertical dots Sync The signals output from computers h...

Страница 215: ... FCC Compliance Statement For United States Users This equipment has been tested and found to comply with the limits for a Class B digital device pursuant to Part 15 of the FCC Rules These limits are designed to provide reasonable protection against harmful interference in a residential installation This equipment generates uses and can radiate radio frequency energy and if not installed and used ...

Страница 216: ...e in applications requiring extremely high reliability safety such as aerospace equipment main communication equipment nuclear power control equipment or medical equipment related to direct medical care etc please make your own judgment on this product s suitability after a full evaluation Operating System References Microsoft Windows Vista operating system Microsoft Windows 7 operating system Mic...

Страница 217: ...s in those marks Copyright Notice All rights reserved No part of this publication may be reproduced stored in a retrieval system or transmitted in any form or by any means electronic mechanical photocopying recording or otherwise without the prior written permission of Seiko Epson Corporation No patent liability is assumed with respect to the use of the information contained herein Neither is any ...

Отзывы: