


21
Preparation
After setup of this product is complete, install the software required for using this product to the client computer. See
the
PP-100N Security User’s Guide
for details on the installation procedure.
Connecting the authentication keypad
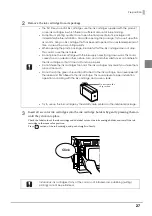
Connect the authentication keypad for entering the user number and PIN during the authentication process.
1
Remove the two screws on the rear side that secure the top plate.
2
Open the disc cover.
If you are using more than one unit of this product in the same environment and back up
the first unit and then restore the backup data on the second and subsequent units, the
configuration information of the first unit is saved, so you do not need to perform the
following work. See “Backing up and restoring data” on page 104 in this guide for details
on the backup and restoration procedure.
•
“Output device settings” on page 47 in this guide
•
“Notification email transmission settings” on page 50 in this guide
•
“Registering users” on page 79 in this guide
Always use one of the following USB keypads as the authentication keypad.
•
AKP09EU (Targus)
•
KP25B (Micro Innovations)
Notes
Содержание Disc producer PP-100N Security
Страница 1: ...Administrator s Guide M00012700 ...
Страница 22: ...22 3 Grasp the fixture on the top plate and slide the top plate backwards slightly 4 Remove the top plate ...
Страница 33: ...33 Preparation 4 Close the disc cover ...
Страница 49: ...49 Preparation 4 Click OK ...
Страница 88: ...88 4 Click OK The user list of the User management screen appears Check that the user was deleted ...
Страница 91: ...91 Administration and Management 6 Click OK ...
Страница 112: ...112 The usage statuses of drivers 1 and 2 and the number of published discs appear in the Device screen ...
Страница 140: ...140 5 Grasp the fixture inside the product top and slide it backwards slightly 6 Remove the top plate ...
Страница 144: ...144 5 Grasp the fixture on the top plate and slide it backwards slightly 6 Remove the top plate ...


