background image

6


Part Names and Functions

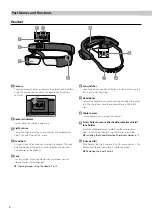
Headset

Camera

Captures images and movies. Remove the protective film before 
using the camera. You can adjust the direction of the camera 
vertically.

Camera indicator

Flashes while the camera is operating.

Light sensor

Senses the brightness of your surroundings and automatically 
adjusts the brightness of the screen.

Head pad

Fits against your forehead when wearing the headset. The head 
pad is equipped with a built-in sensor to detect the position 
and direction of the product.

Lens

Displays images. When you are not viewing images, you can 
slide up the lens to the head pad.


“Viewing Images Using the Headset” p. 12

Lens justifier

You can adjust the position of the lens vertically. Make sure the 
lens is level when adjusting.

Head band

Secures the headset on to your head. You can adjust the length 
to fit the size of your head (head circumference: 560 to 640 
mm).

Cable securer

Secures cables when wearing the headset.

Screw holes to secure the shade/protective shield/

lens holder

Install the shade/protective shield using the exterior screw 
holes. Install the lens holder using the interior screw holes.


“Installing the Shade/Protective Shield/Lens Holder” p. 9

Inner pad (B)

If the headset feels tight, replace this with inner pad A or C. The 
headset feels loose if you attach a smaller inner pad.


“Replacing the Inner Pad” p. 9

Содержание BT-2000

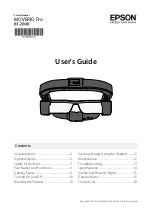
Страница 1: ...Intellectual Property Rights 15 General Notes 15 Contact List 18 Contents Smart Headset MOVERIO Pro Included Items 2 Optional Items 2 Safety Instructions 3 Part Names and Functions 6 Getting Ready 8 Turning On and Off 10 Wearing the Product 10 Copyright 2015 Seiko Epson Corporation All rights reserved ...

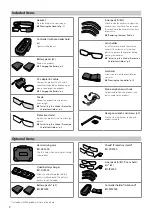
Страница 2: ... the headset at the time of purchase Replacing the Inner Pad p 9 Lens holder Install lenses and attach them to the headset This allows users who wear glasses to remove their glasses before wearing the headset Installing the Shade Protective Shield Lens Holder p 9 Armband Allows you to wear the controller on your arm Wearing the Controller p 10 Mono earphones with mic Outputs audio from the product...

Страница 3: ...ape of the case through heat or fire Do not expose the camera lens to direct sunlight for a long time Doing so may result in fire or explosion due to condensed beams of light from the lens Warning Product usage precautions Do not start using this product at a high volume Doing so may result in hearing impairment Lower the volume before turning off the product and gradually increase the volume afte...

Страница 4: ... power on function disable it before turn ing off the product If you have an implanted pacemaker or implanted defibrillator make sure you keep a distance of at least 22 cm between this product and the implanted device when using the Bluetooth or the wireless LAN function The electromagnetic waves may influence the operation of implanted pacemakers or implanted defibrillators Turn off this product ...

Страница 5: ...ernal battery reaches the end of its service life contact a service center for information on recycling Dust proofing and Water proofing When the product s battery cover and port covers are installed correctly the product is dust proof and water proof compliant with IP54 standard based on JISC0920 IEC60529 2001 confirmed by tests from a third party The dust proof and water proof features do not gu...

Страница 6: ...ide up the lens to the head pad Viewing Images Using the Headset p 12 F Lens justifier You can adjust the position of the lens vertically Make sure the lens is level when adjusting G Head band Secures the headset on to your head You can adjust the length to fit the size of your head head circumference 560 to 640 mm H Cable securer Secures cables when wearing the headset I Screw holes to secure the...

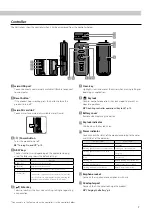
Страница 7: ...one second intervals Starting up Shutting down Flashing light blue once every three seconds Charging Blue Sleep mode Flashing red Battery running low Startup error Flashing red three times Insufficient battery to start up Flashing red and blue alternately Battery replacement mode L Earphone socket Connects the supplied mono earphones with mic M AC adapter port Connects the AC adapter to charge the...

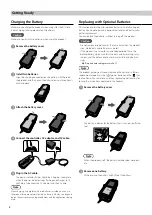
Страница 8: ... replacement mode Press the power button and the key lock button at the same time and then replace the batteries by fol lowing the instructions displayed in the headset A Remove the battery cover E Plug in the AC cable The power indicator flashes light blue Charging is complete when the power indicator stops flashing and changes to lit light blue Disconnect the AC adapter and the AC cable Note Whe...

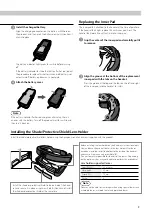
Страница 9: ...e them install lenses in the lens holder After lenses have been installed install the holder to the inside of the headset and secure it in place using screw hole B The customer is responsible for the cost of the lenses Depending on the opticians they may not be able to perform this procedure Lens holder supported lenses Lens W x H 50 x 24 mm Nose pads 20 mm Frame PD 70 mm Curve 4 Note You may not ...

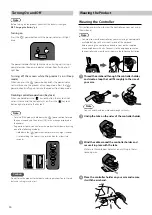
Страница 10: ...ey lock When you hold down the key lock button the key lock indi cator is lit blue and the key lock turns on Press the key lock button again to release the key lock Caution Do not force the product to shutdown unless operations freeze Stored data and settings may be lost Wearing the Product Wearing the Controller This section explains how to wear the controller on your arm using the armband Note Y...

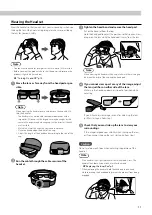
Страница 11: ...e headset from the top Hold the head pad to adjust the position so that you can view images on the lens while the head pad is away from the lens Note When wearing the headset with a cap make sure there is no gap between the brim of the cap and the head pad D If you cannot view a part or any of the image adjust the lens justifier on either side of the lens Make sure the head pad does not slip out o...

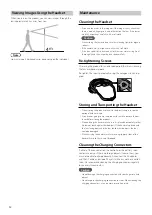
Страница 12: ...dset When storing the product place it in the box it came in or on the optional hard carry case If you are not going to use the product for a while remove the bat teries before storing the product When placing the headset make sure it is placed horizontally so that it does not touch against hard objects If the headset is placed with the lens facing down and the lens touches hard objects the lens c...

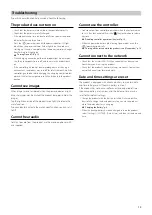
Страница 13: ...as been charged turn on the product select Settings SYSTEM Date time and then set the date and time The product does not turn on Check that the batteries are installed in the controller correctly Check that the batteries are fully charged If the product cannot turn on due to insufficient power the power indicator flashes red three times Press the power button until the power indicator is lit light...

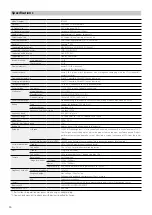
Страница 14: ... g Amount of watt hour rating Less than 20 Wh Frequency band IEEE 802 11 b g n a Frequency range 2 4 GHz band 1 to 13 ch 5 GHz band 36 to 140 ch Modulation OFDM DS SS Potential interference range 10 m Battery life Approx 4 hours When operating at full capacity Reliability Life span 10 000 h When brightness is set to the default and used continuously in an environment of 25 C The life span means th...

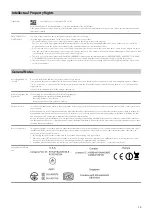
Страница 15: ... function in North America and Taiwan where wireless LAN channels are limited to 1 to 11 by the Wireless Telegraphy Act Follow local laws and regulations when using in other regions Wireless Telegraphy Act Regulations The following acts are prohibited by the Wireless Telegraphy Act Modifying and disassembling including the antenna Removing the label of conformance Using the 5 GHz bandwidth LAN whe...

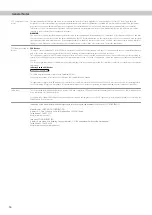
Страница 16: ... operation This equipment complies with FCC radiation exposure limits set forth for an uncontrolled environment End users must follow the specific operating in structions for satisfying RF exposure compliance This transmitter must not be co located or operating in conjunction with any other antenna or transmitter Caution You are cautioned that changes or modifications not expressly approved by the...

Страница 17: ...17 CE DECLARATION of CON FORMITY In France WLAN usage is only permitted indoors The purpose of the WLAN function is to connect to a 2 4 GHz access point ...

Страница 18: ...ael http www epson co il ITALY Epson Italia s p a http www epson it KAZAKHSTAN Epson Kazakhstan Rep Office http www epson kz LATVIA Epson Service Center Latvia http www epson lv LITHUANIA Epson Service Center Lithuania http www epson lt LUXEMBURG Epson Europe B V Branch office Belgium http www epson be MACEDONIA Digit Computer Engineering http www digit com mk NETHERLANDS Epson Europe B V Benelux ...

Страница 19: ...ENEZUELA Epson Venezuela S A http www epson com ve ASIA OCEANIA AUSTRALIA Epson Australia Pty Ltd http www epson com au CHINA Epson China Co Ltd http www epson com cn HONG KONG Epson Hong Kong Ltd http www epson com hk INDIA Epson India Pvt Ltd http www epson co in INDONESIA PT Epson Indonesia http www epson co id JAPAN Seiko Epson Co Toyoshina Plant http www epson jp KOREA Epson Korea Co Ltd http...

Отзывы: