background image

2-10

   Scanning and Other Basic Stuff

2

Select New Album and click OK. The Save New 

Album dialog box appears:


3

Type a name for the album and click OK.

Working with Your Album

Working with Your Album

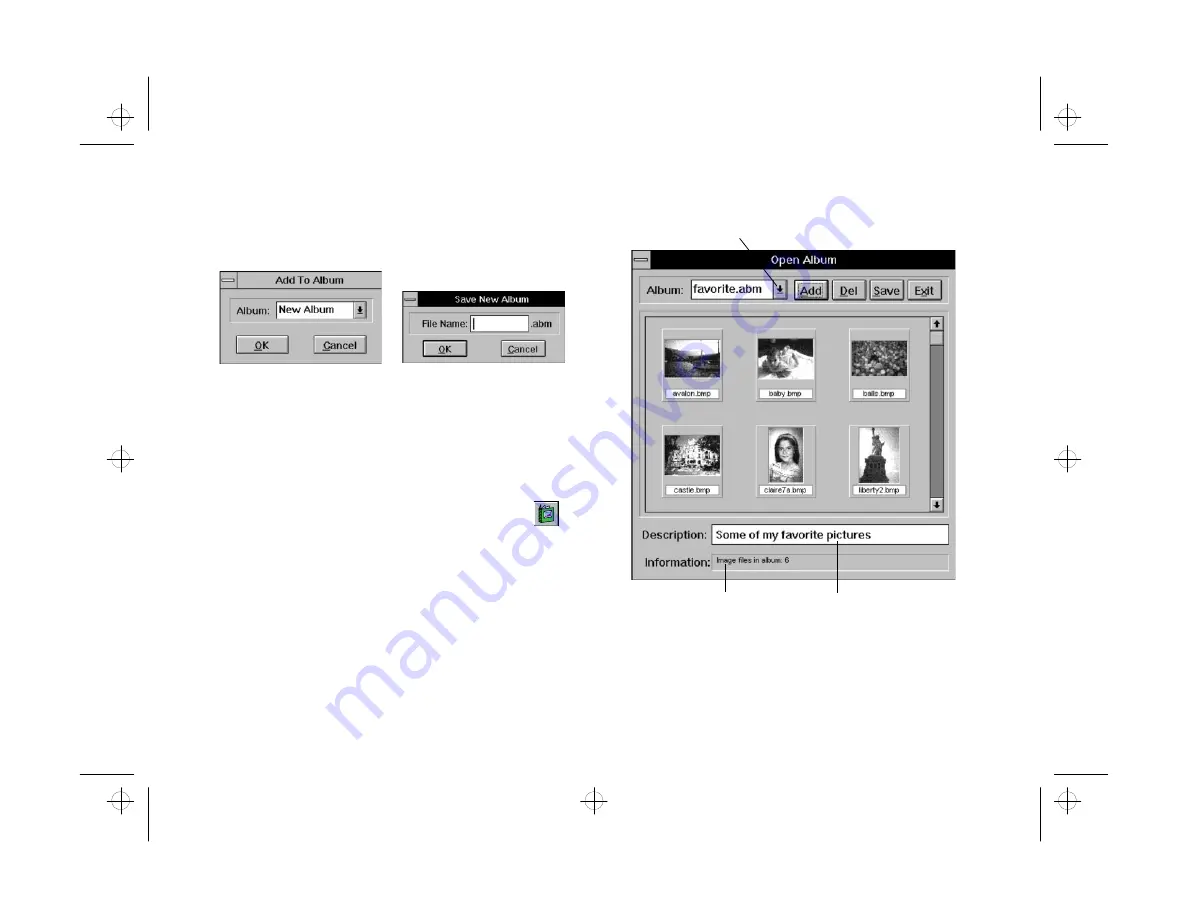
After you start an album, you can use it any time you 

want to open one of your pictures or add more pictures.

1

To open your album, click the Album button 

 or 

choose 

Open Album

Open Album

 from the File menu. 

2

The Open Album window appears, with your image 

or images, as shown to the right.

Click to see a different 
album or create new album.

Type album description here.

Click an image to see 
its information here.

php_2.fm5  Page 10  Monday, July 8, 1996  3:06 PM

Содержание Apex Plus 20

Страница 1: ...A phpfm fm5 Page 1 Monday July 8 1996 3 59 PM ...

Страница 2: ...fferent from that to which the receiver is connected Consult an experienced radio TV technician for help WARNING WARNING The connection of a non shielded equipment interface cable to this equipment will invalidate the FCC Certification of this device and may cause interference levels that exceed the limits established by the FCC for this equipment It is the responsibility of the user to obtain and...

Страница 3: ...ormation contained herein Further this publication and features described herein are subject to change without notice TRADEMARKS TRADEMARKS EPSON is a registered trademark of Seiko Epson Corporation PhotoPlus is a trademark of Epson America Inc General notice Other product names used herein are for identification purposes only and may be trademarks of their respective owners EPSON disclaims any an...

Страница 4: ...ng Your Photo 2 5 Adjusting Settings 2 6 Printing an Image 2 7 Saving an Image File 2 8 Using Photo Albums 2 9 Placing Your Picture in an Album 2 9 Working with Your Album 2 10 3 3 Editing Transforming Your Images Editing Transforming Your Images Opening Image Files 3 2 Opening an Image in an Album 3 2 Opening an Image with the Open Button 3 3 Viewing Images and Image Information 3 3 Zooming In an...

Страница 5: ...e Dates 5 9 Adding Text and Printing the Calendar 5 10 6 6 Print Artist Designing with Style Print Artist Designing with Style Getting Started with Print Artist 6 2 Creating a Greeting Card 6 4 Adding a Photo 6 6 Importing an Image 6 6 Scanning Pictures in Print Artist 6 7 Adding Text 6 8 Adding a Graphic 6 9 Saving Your Card 6 11 Printing Your Card and Exiting 6 11 7 7 PrintPaks Magnet Kit Family...

Страница 6: ...9 2 Stitching Two Images Together 9 4 10 10 Maintenance and Troubleshooting Maintenance and Troubleshooting Caring for PhotoPlus 10 1 Solving Scanner and System Problems 10 2 Solving Image Problems 10 4 A Specifications A Specifications Physical A 1 Power A 1 Technical A 2 Environmental A 2 Glossary Glossary Index Index php toc Page iii Monday July 8 1996 3 02 PM ...

Страница 7: ... stuff you need to work and play with your pictures You can edit and enhance the images and use them to create greeting cards calendars magnets and lots more Or scan business cards directly into a card file Setting up PhotoPlus is a snap Just plug it into your computer s parallel port and install the software You don t have to open up your computer case The special pass through parallel connector ...

Страница 8: ...re for scanning enhancing organizing and transforming your pictures with special effects Sierra Print Artist 3 0 for creating photo greeting cards banners calendars and much more PrintPaks Magnet Kit everything your kids need to make nifty magnets with their own pictures including interactive multimedia instructions magnets and special EPSON paper Corex CardScan SE for scanning business cards and ...

Страница 9: ...hapter 5 explains how to display your photos in slide shows and screen savers and print them in framed pictures and calendars Chapter 6 Chapter 6 introduces Print Artist and gets you started designing your own photo projects for work or play Chapter 7 Chapter 7 shows you how to use the multimedia Magnet Kit to design print and assemble 8 photo magnets Chapter 8 Chapter 8 tells you how to scan busi...

Страница 10: ... can obtain additional magnet supplies from PrintPaks by calling 800 774 6860 800 774 6860 If you purchased your PhotoPlus color photo scanner outside the United States or Canada contact your EPSON dealer or the marketing location nearest you for customer support and service Software Support Software Support If you ve tried the on screen help and you still have questions call the number for the ap...

Страница 11: ...and Service You can access EPSON s technical information library by calling 800 922 8911 800 922 8911 or 800 442 2110 800 442 2110 and providing a return fax number EPSON Download Service EPSON Download Service You can call the EPSON Download Service BBS at 800 442 2007 800 442 2007 No membership is required Make sure your communications software is set to 8 data bits with 1 stop bit no parity bit...

Страница 12: ... it against a hard surface or let it hang from its cable Unplug the scanner before cleaning Clean with a damp cloth only Do not spill liquid on the scanner Do not place the scanner on an unstable surface or near a radiator or heat register Do not store it in direct sunlight Use only the type of power source indicated on the scanner s label Connect all equipment to properly grounded power outlets A...

Страница 13: ...e power cord or plug is damaged if liquid has entered the scanner if the scanner has been dropped or the cabinet damaged if the scanner does not operate normally or exhibits a distinct change in performance Adjust only those controls that are covered by the operating instructions php_int fm5 Page 7 Monday July 8 1996 3 04 PM ...

Страница 14: ...our PhotoPlus scanner Setting up your PhotoPlus scanner Installing your PhotoPlus Fun Pak software Before you start make sure you have everything shown at the left Getting to Know Getting to Know Your P Your PhotoPlus hotoPlus Scanner Scanner After you unpack your PhotoPlus color photo scanner take a few minutes to learn about its features as shown on the following page T php_1 fm5 Page 1 Monday J...

Страница 15: ...lus scanner to the same computer port The power adapter power adapter lets you plug your PhotoPlus into an electric outlet The power socket power socket lets you plug the power adapter into the parallel connector Setting Up Setting Up Your Your PhotoPlus PhotoPlus Scanner Scanner Setting up your PhotoPlus scanner is simple Before you start make sure your computer printer and any other equipment co...

Страница 16: ... shown to the right and tighten the screws NOTE If you have a low profile computer the parallel connector may not fit in your port You may need to use an extender connector which you can purchase at any computer store 3 Plug the power adapter into the power socket on the PhotoPlus parallel connector On some computer models you may need to arrange the adapter plug to fit around your monitor cable P...

Страница 17: ...our Installing Your F Fun Pak un Pak Software Suite Software Suite The PhotoPlus Fun Pak provides everything you need to get creative with scanned images A single CD ROM includes these four software applications EPSON PhotoPlus 2 0 software Sierra Print Artist 3 0 PrintPaks Magnet Kit and Corex CardScan SE Follow these steps to install the software from your CD ROM 1 Insert the PhotoPlus Fun Pak C...

Страница 18: ...allation Make sure you wait while each program is installed and respond to the prompts as they appear NOTE Don t restart Windows until all the software programs have been installed You now have the following new program groups or folders PhotoPlus Sierra Print Artist PrintPaks Magnet Kit CardScan Now you can turn to Chapter 2 and start scanning php_1 fm5 Page 5 Monday July 8 1996 3 05 PM ...

Страница 19: ...r and print your image This chapter covers the basics including Starting your scan Scanning a picture Enhancing your photo Adjusting settings Printing Saving your file Using photo albums B H E L P I miss Jake I lost my best friend and buddy If you have any information on the whereabouts of Jake please let me know Call Tommy at 310 555 2287 php_2 fm5 Page 1 Monday July 8 1996 3 06 PM ...

Страница 20: ...indows 3 1 Program Manager double click the PhotoPlus icon In Windows 95 click Start point to Programs and then point to PhotoPlus Click the PhotoPlus icon You see the PhotoPlus opening screen 2 Click the scan button The Select Source dialog box appears 3 Click PhotoPlus Scan PhotoPlus Scan and then click the Select button Click to start scanning Click to display main screen Click to exit php_2 fm...

Страница 21: ...r Picture Follow these steps 1 Select one of the following scanning projects Color Photo Gray Photo or color photo that you want to scan in black and white Business Card Custom Settings If you choose Custom you see a Scanner Setting dialog box See page 2 6 for more information 2 Choose the orientation of the picture P for portrait vertical or L for landscape horizontal Image appears here during sc...

Страница 22: ...If your image appears sideways click P or L to choose the correct orientation 5 If you want to quickly adjust the brightness and contrast of your scanned image click Enhance Photo and follow the instructions on page 2 5 6 Click Transfer to complete the scanning process The PhotoPlus main screen displays your image as shown below line art Leslie Wolf landscape line art Leslie Wolf Align your pictur...

Страница 23: ...u scan with PhotoPlus you can make some basic enhancements even before you transfer your picture This is especially helpful when you re using an application like Print Artist After scanning an image click Enhance Photo on the PhotoPlus Scan screen to display the Enhance dialog box as shown to the right 1 Slide the Brightness control right to make the picture brighter or left to make it darker 2 Sl...

Страница 24: ...ow to process and takes up more space on your hard disk drive If your printer isn t capable of high resolution printing you won t see any difference between high and low resolution in the printed image Choose 400 DPI for black and white drawings This option is available only for scanning in the 1 bit lineart mode Choose 200 DPI for high quality printing of images This applies to both grayscale and...

Страница 25: ...Click Auto Crop to turn off this feature if your picture has a very dark background Auto Crop normally eliminates the area around an image when you scan a picture smaller than 4 6 inches However Auto Crop can t always detect the edge of the picture if it has a dark background 5 Click Manually Control only if you re using PhotoPlus as a hand scanner See Chapter 9 for instructions on scanning by han...

Страница 26: ...nt to center your image on the page horizontally vertically or both 6 Drag the slider if you want the printed image to be larger or smaller than the original image The resolution automatically increases if you reduce the size and decreases if you enlarge it 7 Click OK when you re ready to print Saving Saving an Image F an Image File ile To save an image you scanned follow these steps 1 Click the S...

Страница 27: ...ny Windows and DOS programs TGA Targa files were originally designed for specialized hardware and software 4 Type a name for the file and click OK Using Photo Albums Using Photo Albums After you scan and save your picture you should put it in an album PhotoPlus albums store and display your images just like the photo albums you use for your printed snapshots You can organize your pictures by subje...

Страница 28: ...ou can use it any time you want to open one of your pictures or add more pictures 1 To open your album click the Album button or choose Open Album Open Album from the File menu 2 The Open Album window appears with your image or images as shown to the right Click to see a different album or create new album Type album description here Click an image to see its information here php_2 fm5 Page 10 Mon...

Страница 29: ... Click the down arrow at the top of the screen to see a different album or create a new album Click and drag a thumbnail to rearrange the images in the album Click an image and click Del to remove it from the album The image file itself is not affected 3 Enter a description for the album up to 36 characters in the Description box if you want 4 Click Exit when you re finished working with albums ph...

Страница 30: ...group photo into an individual portrait cut and paste from one image to another or rotate your picture at any angle you want This chapter covers the following Opening image files Viewing images and image information Selecting part of your image Cutting copying and pasting Cropping Resizing Rotating Flipping Converting image types O php_3 fm5 Page 1 Monday July 8 1996 3 11 PM ...

Страница 31: ... the original picture in view You can open an image in two different ways using the Album button or using the Open button Opening Opening an an Image Image i in an Album n an Album When you use albums you see small thumbnail versions of your pictures You can easily choose the image you want even if you don t remember the file name Follow these steps 1 Click the Album button or choose Open Open Alb...

Страница 32: ...ewing Images and Image Information To get a close up look at part of your image you can use the Zoom tool or select the Zoom Zoom In In command on the View menu You can also use the View menu to display information about your image and to hide the Tools Bar and Status Bar on your PhotoPlus screen NOTE You re not actually changing the image size when you zoom in If you want to change the size use t...

Страница 33: ...on on the image Continue clicking the right button to zoom out even more Using the Zoom Commands Using the Zoom Commands Follow these steps to zoom from the menu 1 Choose Zoom In Zoom In or Zoom Out Zoom Out from the View menu You see a list of magnification ratios 2 Choose the degree of magnification or reduction you want Zoom tool Level of magnification php_3 fm5 Page 4 Monday July 8 1996 3 11 P...

Страница 34: ...oose Image Information Image Information from the View menu to display an information box like the one below Click Histogram to display a graph like the one below The histogram shows the brightness of the overall image and each of the three color channels red green and blue that make up the image The vertical axis of the graph represents the number of pixels the horizontal axis represents the brig...

Страница 35: ...kmark disappears from the menu 2 To bring back the original PhotoPlus screen choose Show Tools Bar or Show Status Bar again The checkmark reappears Selecting Part of Your Image Selecting Part of Your Image Selecting or masking a portion of your image allows you to make changes that affect only that portion The rest of the image isn t affected When using a selection mask you can choose the Discard ...

Страница 36: ...election mask click anywhere outside of it or press Del If the entire image is selected click the Crop tool and then click the image to remove the selection mask To move the selected area click and drag inside the area The selection floats on top of the original image To increase the size of a selection press Shift while you select an additional area next to the original area To decrease the size ...

Страница 37: ...rd Choose Copy Copy from the Edit menu to place a copy of the selected area or the entire image if there is no selection on the Windows Clipboard The original image is not affected Choose P Paste aste from the Edit menu to paste an image from the Clipboard into the active image You can drag the pasted area with your mouse if you want to move it Choose Paste As New Paste As New to create a new file...

Страница 38: ...lities To change the size of an entire image use the Image Size Image Size command on the Edit menu Resizing a Selection Resizing a Selection Follow these steps 1 Click the Resize tool 2 Click and drag on the part of the image you want to resize When you release the mouse button an animated rectangle surrounds the selected area 3 Click and drag a corner of the selection to change its size The sele...

Страница 39: ...y Follow these steps to resize an image 1 Choose Image Size Image Size from the Edit menu A dialog box like the one to the right appears 2 Click to uncheck Keep Aspect Ratio if you want to change the height to width proportion Leave it checked if you want to keep the proportion 3 Enter new values for the size in pixels or percentage of enlargement or reduction For example you would enter 300 to ma...

Страница 40: ...ommand on the Edit menu Rotating a Selection Rotating a Selection Follow these steps 1 Click the Rotate tool 2 Click and drag on the part of the image you want to rotate When you release the mouse button an animated rectangle surrounds the selected area 3 Click and drag a corner of the selection to rotate it The selected area floats on top of the original image you can move it by clicking inside t...

Страница 41: ... to display the Rotate dialog box shown to the right 3 Enter the exact degree of rotation in the box or drag the dial 4 Click OK to rotate the image F Flipping an Image or Selection lipping an Image or Selection You can use the Flip Flip command on the Edit menu to reverse or turn over a selected area or an entire image Horizontal flipping is a great technique to use when you re printing a T shirt...

Страница 42: ...ypes Converting images gives you the maximum flexibility for editing displaying and printing your pictures Keep in mind that changing an image s data type is permanent and sometimes loses information you should always keep the original image file and use the Save As Save As command to create the converted file Five image data types are available on the Convert menu 1 bit black and white 1 bit blac...

Страница 43: ...d 256 color 8 bit indexed 256 color Some Super VGA monitors and software can display only 256 colors Use this data type for the best image quality on low resolution systems or with some software applications PhotoPlus special effects and some other features don t work on indexed color images 24 bit RGB True Color 24 bit RGB True Color over 16 million colors This type of image provides the most acc...

Страница 44: ...get when you take pictures indoors With PhotoPlus software you can And that s just a start Using your imagination and PhotoPlus special effects you can turn an ordinary snapshot into an original work of art Here s what this chapter covers Adjusting brightness and contrast Adjusting hue and saturation Setting tone adjustment Sharpening Blurring Using special effects H php_4 fm5 Page 1 Monday July 8...

Страница 45: ...he Edit menu at any time even after you click OK Adjusting Brightness and Contrast Adjusting Brightness and Contrast You can adjust the brightness and contrast of an entire image or a selected part of an image Follow these steps 1 Select the area you want to change or make sure no area is selected if you want to change the entire image 2 Click the Brightness button or choose Brightness and Contras...

Страница 46: ...es and intensity of an image Picture a color wheel like the one you used in art class with all the colors of a rainbow arranged in a circle When you change the hue of an image all the colors are shifted by the same degree around the circle You can adjust the hue and saturation of a selected area or an entire image Follow these steps 1 Select the area you want to change or make sure no area is sele...

Страница 47: ...e area you want to change or make sure no area is selected if you want to change the entire image 2 Choose Tone Adjustment Tone Adjustment from the Enhance menu The Tone Adjustment dialog box appears The mapping curve which initially looks like a straight line shows the tone adjustments you make The horizontal axis represents the original brightness level from dark on the left to light on the righ...

Страница 48: ... midtones or to the left to darken these areas Adjusting the midtones also known as gamma value does not affect the highlights or shadows 7 Slide the Shadow control to the right to reduce the shadow area and lighten the image Slide it to the left to expand the shadow area and darken the image This also increases contrast in the midtones 8 Click OK when you re finished Sharpening Sharpening You can...

Страница 49: ...er less focused effect Follow these steps 1 Select the area you want to change or make sure no area is selected if you want to change the entire image 2 Click the Blur button or choose Blur Blur from the Enhance menu The Blur dialog box appears as shown on the right 3 If you want to see a small area of your image enlarged in the Before and After windows click the Pan Mode box 4 Slide the control t...

Страница 50: ... Browser button or choose Browser Browser from the Effects menu The Effects Browser dialog box appears as shown on the right 3 If you want to see a small area of your image enlarged in the Before and After windows click the Pan Mode box 4 Choose the effect you want 5 Slide the Intensity control to increase or decrease the intensity of the special effect 6 Click OK when you re finished For even mor...

Страница 51: ...4 8 Enhancing Playing with Your Images Here s what some of the special effects look like Fisheye Emboss Sketch Whirlpool Ribbon Mosaic Ripple Wrinkle php_4 fm5 Page 8 Monday July 8 1996 3 20 PM ...

Страница 52: ...n turn them into a slide show on your screen with animated fades and dissolves between the pictures Or install them as your Windows screen saver You can use the PhotoPlus templates to create a customized calendar with a picture and caption for each month or matted pictures with text and professionally designed borders This chapter covers the following Making a slide show Making a screen saver Usin...

Страница 53: ...solves between images If you don t want these effects click the Transition Effect box to remove the check 4 When you leave the Auto Loops box checked PhotoPlus plays the slide show continuously until you press Esc To play the slide show only once click the Auto Loops box to remove the checkmark 5 Enter the number of seconds you want to see each image 6 Click OK to start the show You can press Esc ...

Страница 54: ... Click Test or Preview if you want to see a sample of your screen saver 8 Click OK when the screen saver is set up the way you want Using the Matte Template Using the Matte Template You can use the Template feature to create a framed picture with personalized text Choose from 8 attractive backgrounds to design your printout NOTE Before you use the Template feature make sure your printer is set up ...

Страница 55: ... and click OK The image appears in the center of the page 5 Choose the Portrait or Landscape page orientation 6 Drag the slider if you want to change the size of the image 7 When you leave the Draw Frame box checked PhotoPlus draws a line around your picture If you don t want a line around the picture click Draw Frame to remove the checkmark 8 Click and drag your image to place it where you want A...

Страница 56: ...Double click the background The Template Background dialog box appears 2 Click the down arrow to choose a color or pattern If you click one of the pattern names such as Birthday Party or Sports the pattern appears in the window behind your picture 3 To choose a color select Color on the list of pattern names and then click the Change Color button The Color dialog box appears php_5 fm5 Page 5 Monda...

Страница 57: ...tom layer your picture is the middle layer and any text you add is the top layer You can even have the text print on top of your picture Feel free to experiment to get the effect you want Adding Text Adding Text You can add one or two blocks of text to your matted picture designed any way you want Follow these steps 1 Double click one of the text boxes The Edit Text dialog box appears 2 Type your ...

Страница 58: ...choose a light color for the text 5 Click OK when you re finished 6 Click OK again on the Edit Text box when you re finished typing your text 7 If you want two blocks of text on your page repeat steps 1 to 6 for the other block of text You can drag the text blocks around the screen to place them where you want You can even have text printed over part of your picture if you like Here s what a finis...

Страница 59: ... creating You might want to change some elements and reuse others Using the Calendar Template Using the Calendar Template You can create a personalized calendar using a different picture for each month Then you can add a colored or patterned background a title or caption and design the dates in any size color and style you want Follow these steps to get started 1 Click the Template button The Temp...

Страница 60: ... page Adding Background and Designing the Dates Adding Background and Designing the Dates You can add a custom color background to your calendar or choose from 9 patterned backgrounds Then you select the month and year and design the date portion of the calendar NOTE PhotoPlus creates your calendar with opaque layers The background is the bottom layer your picture is the middle layer and the dates...

Страница 61: ...ark you should choose a light color for the dates 5 Click OK when you re finished 6 Click OK again on the Edit Calendar box The dates appear on the page with your image 7 Drag the date box to position it the way you want Adding Text and Printing the Calendar Adding Text and Printing the Calendar When you finish designing the picture and dates you can add a title or caption and then print your cale...

Страница 62: ...te a new calendar page each month TIP Try creating a full page photo calendar with an enlarged lightly colored picture Use the Image Size Image Size option on the Edit menu to increase the size of your picture up to 300 and the resolution up to 600 dpi Then drag the slider on the calendar template so the picture just fills the page and becomes the background for dates and text When you re ready fo...

Страница 63: ...se documents clip art illustrations and fonts that you can combine with your PhotoPlus images You can customize graphic elements and lettering styles and even scan photos directly into Print Artist This chapter describes the following Getting started with Print Artist Creating a greeting card Adding a photo Finishing the card design Saving the card Printing the card and exiting P php_6 fm5 Page 1 ...

Страница 64: ...aphic design Follow these steps to get started 1 From the Windows 3 1 Program Manager double click the Print Artist icon in the Sierra group In Windows 95 click Start point to Programs and then point to Sierra Click the Print Artist icon You see the Select Document Type screen as shown to the right 2 Click the type of document you want to create and then click New php_6 fm5 Page 2 Monday July 8 19...

Страница 65: ...attractive layouts to choose from Choose Templates if you want to start with defined areas for text and graphics For most documents you can choose from several templates Choose Blank if you want to start from scratch Depending on the type of document you can choose from several layout sizes 4 Choose your layout and click OK The Print Artist main screen displays the starting layout From here you ca...

Страница 66: ...f the predesigned layouts You can add your own picture to the front and then decide whether to write your own message or use Print Artist s wording on the inside When you finish this quick lesson you ll have a personalized valentine Follow these steps to choose a colorful layout and get ready to add one of your scanned images 1 Start Print Artist as described on page 6 2 2 Click Greeting Card and ...

Страница 67: ... it the heart triangle and two squares As you select each one press Del to delete it Now you have just the cupid background and text You can choose from dozens of predesigned layouts for holidays events and so on Choose Occasion from the list of categories When you select a graphic you see the frame outline with handles php_6 fm5 Page 5 Monday July 8 1996 3 27 PM ...

Страница 68: ...port a picture 1 Choose Import Import from the File menu The Import dialog box appears as shown to the right 2 Make sure JPEG is selected under List Files of Type Or select a different file type if the picture you want to use is not saved in the JPEG format 3 Double click the Directories box to display the directory list Then double click the directory or folder containing your PhotoPlus images Th...

Страница 69: ... Scan and then click Select 3 Choose Acquire Acquire from the File menu You see the PhotoPlus Scan screen as shown on page 2 3 4 Follow the instructions on page 2 3 to scan your picture Then click Transfer to complete the scan You see the following dialog box 5 Type a name for the picture up to 8 characters and click OK Print Artist saves the image in the BMP format and stores it in the C SIERRA P...

Страница 70: ...ose Inside Right Inside Right from the View menu You see the inside right panel 2 Double click the text The Change Text window appears as shown below 3 Type new text if you want or click Quotes to choose from some famous quotations and click OK to return to the main screen 4 With your text selected click the Font palette button Double click to change or enter new text Font palette button php_6 fm5...

Страница 71: ...card Follow these steps 1 Click the gray shadow on the left side of the card or choose Inside Inside Le Left ft from the View menu You see the inside left panel 2 Click the yellow Insert Fill button A square block of yellow color appears on the left panel as shown on the next page This is the background for the graphic 3 Click and drag one of the corner handles to enlarge the color block 4 Click t...

Страница 72: ...rs 7 Type valentine in the Type Search Text box The Graphics box lists the available valentine pictures When you select a picture it appears in the window 8 Select the Lacy Heart graphic and click OK The inside left panel of the card displays the graphic on top of the color block Now you can save and print your card Insert graphic Color palette Insert fill Color palette Make sure Keywords is selec...

Страница 73: ...ct 3 Type a file name up to 8 characters long Print Artist automatically adds the GC extension for greeting cards 4 Click OK when you re finished Printing Your Card and Exiting Printing Your Card and Exiting After you save the card you re ready to print it Follow these steps 1 Click the Print button The Print Control Panel Preview window appears Default directory or folder where Print Artist saves...

Страница 74: ... you re ready for some family fun with the PrintPak Magnet Kit turn to Chapter 7 TIP The calendar on page 1 of the Introduction was created using some special Print Artist techniques as descibed below Start with any of the calendar layouts Select one of the date graphics Open the Edit menu and choose Select all Symbols Select all Symbols Then choose Change Graphic Change Graphic and select the she...

Страница 75: ...he kit comes with special EPSON paper for inkjet printers and adhesive backed magnet sheets You can always order refills if you want to make more magnets Your whole family will have fun with the following activities Getting ready to use the magnet kit Designing the magnets Printing the designs Putting the magnets together T php_7 fm5 Page 1 Monday July 8 1996 3 30 PM ...

Страница 76: ...ows documentation if you need instructions for changing video display modes Getting Ready to Use the Magnet Kit Getting Ready to Use the Magnet Kit You first need to scan in the pictures you want to use and crop and enhance them if necessary Then save or copy the files to the PHOTOS folder on your hard disk and start the program Follow these steps 1 Scan your pictures as described in Chapter 2 2 I...

Страница 77: ...instructions you need are presented on your screen If you re not sure what to do click Max s nose and he ll tell you Make sure your speakers are turned on so you can hear Max s voice and other sound effects Creating the Magnets Creating the Magnets Even young children can follow Max s instructions and the cartoon animation on the screen Here are the steps 1 Click the red button to continue from th...

Страница 78: ...he polygon shape appears in the magnet window as shown at the left 5 Click the camera You see a list of pictures you can choose from as shown on the right These are the picture files you copied to the PHOTOS folder 6 Click the picture you want to use You see it in the center of the magnet design as shown on the right 7 Choose the border design and add a name or message if you want 8 After you fini...

Страница 79: ...te you can print them You need to set up your printer first Follow these steps 1 Click the red button on the printing instruction screen You see a printer selection screen like the following 2 Click the name of your printer from the list on the left Your printer may be the only one listed Click when you re done Choose from these pictures Choose from these borders Add your own art Add PrintPaks art...

Страница 80: ...et for the following Best quality 720 DPI photo quality on EPSON Stylus printers Coated paper Portrait tall orientation Letter size 8 1 2 x 11 Click OK when you re finished setting options on each of the printer setup screens and click the red button when you re ready to go on You see a screen like the following Printing Your Magnets Printing Your Magnets It s a good idea to print your magnet desi...

Страница 81: ... re satisfied with your test print remove the regular paper and load a sheet of the special Magnet Kit paper following the instructions on the screen 5 Click the blue button to print You may need to gently guide the special paper into the printer by hand 6 When you re finished printing click the red button to go on Putting Your Magnets Together Putting Your Magnets Together After your designs are ...

Страница 82: ...lace the printed sheet on the magnet and position it carefully before you press it down Then click the red button again You see the final screen of instructions 5 Cut out each of your magnets and click the red button You re finished From here you can start over again to make a new set of magnets find out more about refills and other kits or close the Magnet Kit software For Magnet Kit technical su...

Страница 83: ...lowing Starting CardScan Scanning your cards Verifying the information Working with your address list Printing 8 CardScan Instant Address Book P NOTE Your CardScan SE software is a special edition of the product Some features of the full version such as exporting data and dialing phone numbers through your modem are not available in the special edition Click Upgrade Upgrade in the Help menu for in...

Страница 84: ...e to register immediately or at a later time The first time you use CardScan the Select Source dialog box appears 3 Select PhotoPlus Scan and click OK You see the CardScan opening screen as shown on the right From this screen you can scan in your cards edit the information view your address list and use all the CardScan features If you need more information click the Help button or choose Contents...

Страница 85: ...m all together or process each card after you scan it NOTE Scanning works best with cards printed in dark ink on a light background You may not be able to scan cards printed on dark glossy or metallic paper The software may not be able to recognize text printed at an angle or in a very small stylized or light font You can add a card manually following the instructions on page 8 7 Follow these step...

Страница 86: ...the results you expect you can experiment with the scanning mode Click the Custom icon and try the 400 dpi 1 bit lineart setting This mode may work better for simple cards printed in black on white 4 Click Start or press the start button Your card gradually appears in the scan window 5 If it looks too light click Enhance Text You see the Enhance dialog box Click to scan business cards php_8 fm5 Pa...

Страница 87: ...idually NOTE To avoid overloading your system don t try to scan and process more than 20 cards in one batch 8 Click No to process the card you just scanned CardScan displays its progress as it processes the card When processing is complete text appears in the various fields on the screen as shown to the right Click to add notes Click the left mouse button to zoom in on the image Click when you re ...

Страница 88: ...ious card Click the left mouse button on the business card image to zoom in enlarge it and click the right button to zoom out reduce it Click the Notes button to open a text box where you can type in any notes you want Click the Image button to return to the business card image view Choose Delete Image Delete Image from the Card menu when you no longer need the scanned image of the card This makes...

Страница 89: ...save the list with a new name See the next section to learn about working with your list or lists Working with Your Address List Working with Your Address List Click All on the CardScan window to view a list of all your cards as shown on page 8 8 Here are some of the things you can do Search Type in the Quick Search box to locate all cards that contain the search text As you type the address list ...

Страница 90: ...ents from the Help menu Printing Printing You can select the information you want to print for each card and choose the way you want it to look CardScan lets you print in the following formats Address list Phone list Labels Rotary cards Photo card album Envelopes Type text here to find matching cards Click to display list of all cards Double click on a line to display the card Click to add a card ...

Страница 91: ...nd select one of the formats This determines what information to print for each card 5 Select the page layout you want to use This determines how the information will be printed 6 Click OK Previewing and Printing Previewing and Printing Before you print it s a good idea to check your format and layout to make sure it looks the way you want Then you can either change it or just go ahead and print F...

Страница 92: ... print click the Print button on the Preview screen or choose Print Print from the File menu 3 Change print options if you want and then click OK to start printing For CardScan technical support call 617 492 4200 php_8 fm5 Page 10 Tuesday July 9 1996 10 18 AM ...

Страница 93: ...pter covers the following Setting the software for hand scanning Capturing the image by hand scanning Stitching two images together 9 Pro Scanning More Things You Can Do D NOTE The maximum width you can scan by hand is 4 1 inches The maximum length is 10 inches If the image you want to scan is too wide or too long you can scan it in several passes and stitch the images together Setting the Softwar...

Страница 94: ... and height 10 inches 6 Click Manually Control 7 Click OK 8 Click P portrait or L landscape depending on the orientation of the image Capturing the Image by Hand Scanning Capturing the Image by Hand Scanning After you set up your software follow these steps to scan the image 1 Remove the cable from the cable clip on the scanner base Then remove the scanning head from the base by pushing it up as s...

Страница 95: ...stops when you reach the set height or length If you want to stop before this point press Esc Press the pink button on the scanner to pause Then press it again to continue scanning 6 Click Transfer to complete the scanning process The PhotoPlus screen displays your image 7 Click Save and type a name for the new image NOTE If the original image is too wide repeat steps 3 through 7 to scan the secti...

Страница 96: ... the stitch feature to combine the parts into one seamless image You can also create some interesting special effects by stitching individual photos together Follow these steps to combine two images 1 Make sure both images are open in PhotoPlus 2 Choose Stitch Stitch from the Edit menu The Stitch dialog box appears as shown EPSON AMERICA INC Documentation Department 20770 Madrona Avenue Torrance C...

Страница 97: ...f blending you want between the two images Setting the Blend to 100 gives you the smoothest transition between the two images 6 To indicate where you want the two images to overlap click in the image windows to move the stitch marks It s best to locate the marks in areas that have similar colors and brightness Use the Zoom buttons to magnify the images if necessary 7 Click Adjust to refine the sti...

Страница 98: ...ean the scanner 10 Maintenance and Troubleshooting Y Then follow these guidelines for cleaning and maintaining the scanner Unplug the power adapter and the parallel connector before you clean the scanner Use a clean dry cloth to wipe off any dust Don t use harsh or abrasive cleaners Always operate PhotoPlus with clean hands and scan clean surfaces only If you notice a line in your scanned image yo...

Страница 99: ...ry to scan You get an error message when you try to scan Check the connection between PhotoPlus and your computer See page 1 2 for set up instructions Make sure the power cable is attached to the parallel connector and plugged into an electrical outlet If your printer is plugged into the PhotoPlus parallel connector make sure the printer is turned on If you don t see the PhotoPlus Scan screen make...

Страница 100: ...ace following the instructions on pages 9 2 to 9 4 Press the pink button on the scanner Then click Transfer to complete the scan You try to scan while printing and get an error You try to scan while printing and get an error message message Press Esc to cancel the scan Then scan again when you re finished printing Press the pink button on the scanner to pause the scan After you re finished printin...

Страница 101: ... Use your PhotoPlus software to adjust and enhance the image See Chapter 4 for instructions A mesh pattern appears on the scanned image A mesh pattern appears on the scanned image This happens when you scan a printed picture because of the dot pattern used in printing You ll get better results when you scan photographs or artwork Your image Your image is is too large or too small too large or too ...

Страница 102: ...it color See pages 3 13 to 3 14 for information about converting image types Your images do not display the best quality if your monitor or your computer s video controller doesn t support 24 bit color You may need to upgrade your system to achieve the best on screen resolution Your images don t look as good Your images don t look as good p print rinted out a ed out as they do s they do on the scr...

Страница 103: ...r picture is missing If your picture has a dark background the Auto Crop feature may not work correctly Scan the picture again using the Custom option In the Scanner Setting dialog box turn off Auto Crop See page 2 7 for more information php_10 fm5 Page 6 Monday July 8 1996 3 52 PM ...

Страница 104: ...tions Width 6 13 in Height 4 75 in Depth 5 5 in Weight including parallel connector 1 5 lb 675 g Power Power AC adapter 14 VDC 730 mA Scanner power consumption 5 5 W maximum feeder mode 5 W maximum hand held mode php_a fm5 Page 1 Monday July 8 1996 3 36 PM ...

Страница 105: ...ximum scan length for hand scanning 10 in 254 mm Scan speed 1 73 in 44 mm sec at 100 dpi 87 in 22 mm sec at 200 dpi 58 in 14 7 mm sec at 300 dpi 43 in 11 mm sec at 400 dpi Interface Parallel port 6 foot cable Light source Cold cathode fluorescent tube Condition Condition Operating range Operating range Storage range Storage range Temperature 41 to 104 F 5 to 40 C 4 to 140 F 20 to 60 C Humidity 35 ...

Страница 106: ...blue in the HSV model hue saturation and brightness in the CMYK model cyan magenta yellow and black Contrast Contrast The amount of difference between bright and dark colors in the image Adding contrast increases the difference bright colors become brighter and dark colors become darker Crop Crop The process of eliminating all but the selected area Dpi Dpi Dots per inch An image with a higher dpi ...

Страница 107: ...Histogram Histogram A special type of line chart that shows the color distribution of images by representing the number of pixels with given brightness values HSV HSV A color model that defines these color elements hue saturation and brightness Also called HSB Hue Hue The color characteristic that determines what part of the spectrum a color belongs to Image data type Image data type Describes the...

Страница 108: ...e and after close up of the image Paste Paste To place a duplicate of the clipboard contents in a floating selection on the image window PCD PhotoCD PCD PhotoCD The proprietary format originally designed by Eastman Kodak Corporation for the PhotoCD system PCX PCX A format originally designed by Z Soft Corporation for their PC based paint program Pixel Pixel A term used to describe the smallest ele...

Страница 109: ...nner A hardware device that copies photos and documents like a photocopier but instead of creating paper output it makes digital image copies of the originals Selected area Selected area The part of an image that lies within a mask If there is no current mask there is no currently selected area Selection Selection The part of an image that lies within a mask See Mask Shadows Shadows The darkest ar...

Страница 110: ...ade it Undoing twice has no effect because the second undo reverses the first VGA Video Graphics Array VGA Video Graphics Array A type of high resolution display adapter that provides a variety of video modes Video controller Video controller The electronic components required to generate a video display through a cable Also called video display adapter Video display adapter Video display adapter ...

Страница 111: ...xt 5 10 designing dates 5 9 printing 5 11 Calendar continued using template 5 8 Caption for image 2 8 CardScan customer support Intro 4 inside back cover deleting cards 8 8 deleting image 8 6 editing information 8 6 exiting 8 7 formats for printing 8 9 10 multiple lists 8 7 OCR optical character recognition 8 3 printing 8 9 8 10 processing 8 5 Quick Search 8 7 registering 8 2 saving list 8 7 scann...

Страница 112: ...g photos see Images editing Effects for images 4 7 8 Electronic support Intro 4 Enhancing photos see Images enhancing EPSON support Intro 4 6 Error message 10 2 Extender connector 1 3 10 2 F F File type 2 9 3 3 Files printing your scanned image 2 7 8 saving scanned image 2 8 9 Flipping 3 12 13 Font of template text 5 6 7 Frame creating 5 3 FTP Site EPSON Intro 5 Fun Pak description Intro 2 install...

Страница 113: ... mask 3 7 enhancing blurring 4 6 brightness 4 2 contrast 4 2 Images enhancing continued hue and saturation 4 3 sharpening 4 5 special effects 4 7 8 tone adjustment 4 4 in photo albums 2 9 matte template 5 3 opening files 3 2 3 poor quality 10 5 printing calendars 5 10 11 matted pictures 5 8 scanned images 2 7 8 problems 10 2 saving 2 8 stitching together 9 4 5 text adding 2 8 5 6 7 types convertin...

Страница 114: ...ning 2 10 Photo albums continued opening images 3 2 PhotoPlus caring for scanner 10 1 components 1 1 2 customer support Intro 4 features Intro 2 Fun Pak Intro 2 installing software 1 4 5 problems and solutions 10 2 6 registration Intro 6 scanning 2 2 setting up 1 2 5 settings 2 6 7 Photos editing see Images editing Pictures see Images Portrait photos 2 4 Positioning image on page 2 8 Power adapter...

Страница 115: ...image 3 10 R R Reduction of image 3 4 Registering PhotoPlus Intro 6 Requirements system Intro 2 Resizing images 3 10 Resolution settings 2 6 7 3 10 A 2 Rotating entire image 3 12 selected area 3 11 S S Safety instructions Intro 6 7 Saving images 2 8 9 3 13 Scanner see PhotoPlus Scanning business card see CardScan scanning by hand see Hand scanning custom 2 3 2 6 dark backgrounds 2 7 mode 2 6 A 2 p...

Страница 116: ...System requirements Intro 2 T T Template calendar 5 8 11 matte 5 3 8 Text on template adding 5 6 7 font 5 6 7 TGA Targa file type 2 9 3 3 Thumbnail images 2 9 TIF TIFF file type 2 9 3 3 Tone adjusting 4 4 Tools blur 4 6 brightness 4 2 crop 3 8 effects browser 4 7 hue 4 3 open button 3 3 resize 3 9 rotate 3 11 scan button 2 2 9 1 select 3 6 sharpen 4 5 slide show button 5 2 template button 5 3 5 8 ...

Страница 117: ...06 644 4343 503 295 6182 617 492 4200 Fax on demand Fax on demand 800 442 2110 206 644 7697 503 295 6182 617 492 6659 BBS BBS 800 442 2007 206 644 0112 CompuServe CompuServe GO EPSON GO SIERRA America Online America Online Keyword SIERRA World Wide Web World Wide Web http www epson com http www sierra com E mail E mail support sierra com FTP site FTP site ftp epson com Additional support Additiona...

Отзывы: