background image

Using the Printer Software with Windows

65

R4CE640
long.bk

Rev. E

A5 size

DWNH.FM

6/10/04

R

Proof Sign-off:
ABE J.Hashimoto, K.Iwamura
M.Ishigami
S. Halvorson

3

3

3

3

3

3

3

3

3

3

3

3

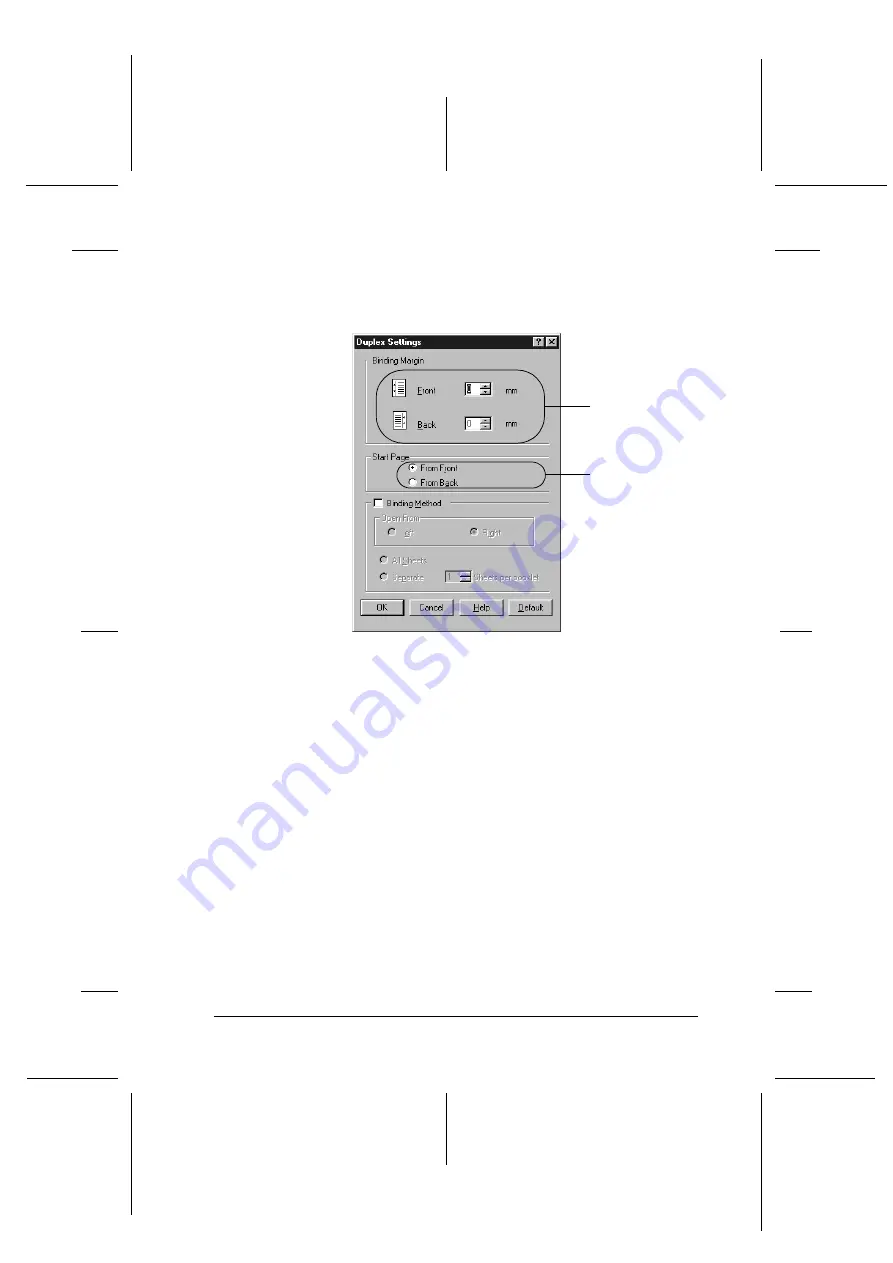
4. Specify the Binding Margin for the front and back sides of the 

paper, then select whether the front or back side of the paper 
is to be printed as the Start Page.

5. When printing for binding as a booklet, select the 

Binding 

Method

 check box and make appropriate settings. For details 

about each setting, see online help.

6. Click 

OK

 to apply the settings and return to the Layout menu.

Making Extended Settings

You can make various settings in the Extended Settings dialog 
box. To open the dialog box, click 

Extended Settings

 on the 

Optional Settings menu.

1

2

Содержание AcuLaser C3000 Series

Страница 1: ...ifications repairs or alterations to this product or excluding the U S failure to strictly comply with Seiko Epson Corporation s operating and maintenance instructions Seiko Epson Corporation and its affiliates shall not be liable against any damages or problems arising from the use of any options or any consumable products other than those designated as Original Epson Products or Epson Approved P...

Страница 2: ...printer s functions optional products maintenance troubleshooting and technical specifications Network Guide Provides network administrators with information on both the printer driver and network settings You need to install this guide from the software installation CD to your computer s hard disk before referring it Paper Jam Guide Provides you with solutions for paper jam problems about your pr...

Страница 3: ...ow Your Printer Printer Parts 15 Front view 15 Rear view 16 Inside the printer 17 Control panel 18 Options and Consumable Products 19 Options 19 Consumable products 20 Printer Features 21 High speed tandem printing engine 21 Duplex printing 21 Pre defined color settings in printer driver 22 Toner save mode 22 Resolution Improvement Technology RITech 22 Various Printing Options 23 Double sided prin...

Страница 4: ...sparencies 39 Envelopes 41 Labels 43 Thick paper and extra thick paper 45 Transparencies 45 Loading a custom paper size 46 Chapter 3 Using the Printer Software with Windows About the Printer Software 47 Accessing the printer driver 47 Making Changes to Printer Settings 48 Making the print quality setting 48 Resizing printouts 56 Modifying the print layout 58 Using a watermark 59 Printing with the ...

Страница 5: ...re with Macintosh About the Printer Software 93 Accessing the printer driver 93 Making Changes to Printer Settings 94 Making the print quality settings 94 Resizing printouts 101 Modifying the print layout 102 Using a watermark 104 Printing with the duplex unit 110 Making Extended Settings 112 Monitoring Your Printer using EPSON Status Monitor 3 114 Accessing EPSON Status Monitor 3 114 Getting prin...

Страница 6: ...ng up your printer as a shared printer 143 Accessing the shared printer 144 For Mac OS X 146 Chapter 6 Functions of the Control Panel Using the Control Panel Menus 147 When to make control panel settings 147 How to access the control panel menus 147 Control Panel Menus 151 Information Menu 151 Tray Menu 153 Setup Menu 155 Color Regist Menu 156 Reset Menu 157 USB Menu 159 Network Menu 159 Chapter 7...

Страница 7: ...over A 214 Jam AC cover A and paper cassettes 219 Jam B cover B 223 Jam ABC cover A paper cassettes and cover B 225 Jam at the MP tray 226 Printing a Status Sheet 227 Operational Problems 229 The Ready light does not turn on 229 The printer does not print Ready light off 229 The Ready light is on but nothing prints 229 The optional product is not available 231 Sharing Problems 231 Network printers...

Страница 8: ...put 239 The printed image is light or faint 240 The non printed side of the page is dirty 240 Memory Problems 241 Print quality decreased 241 Insufficient memory for current task 241 Insufficient memory to print all copies 241 Paper Handling Problems 242 Paper does not feed properly 242 Problems When Using Options 242 Paper does not feed from the optional paper cassette 243 Feed jam when using the...

Страница 9: ... Mechanical 278 Electrical 278 Standard and approvals 279 Interfaces 281 USB interface 281 Ethernet interface 281 Options and Consumables 282 500 Sheet 1000 Sheet Paper Cassette Unit 282 Memory modules 283 Toner cartridges 284 Photoconductor unit 285 Transfer unit 285 Fuser unit 120 220 286 Appendix B Working with Fonts EPSON BarCode Fonts Windows Only 287 System requirements 289 Installing EPSON ...

Страница 10: ...n Warnings Cautions and Notes wWarnings must be followed carefully to avoid bodily injury cCautions must be observed to avoid damage to your equipment Notes contain important information and useful tips on the operation of your printer Safety Precautions Be sure to follow these precautions carefully to ensure safe efficient operation ...

Страница 11: ...nsumable products installed one person should not lift or carry it Two people should carry the printer lifting it by the correct positions as shown below Do not lift the printer by these areas Be careful not to touch the fuser which is marked CAUTION HIGH TEMPERATURE or the surrounding areas If the printer has been in use the fuser and the surrounding areas may be very hot 1 2 ...

Страница 12: ...e always place them on a clean smooth surface Do not attempt to modify a toner cartridge or take them apart They cannot be refilled Do not touch the toner Keep the toner away from your eyes Do not dispose of used toner cartridges photoconductor units fuser units or transfer units in fire as they can explode and cause injury Dispose of them according to local regulations If toner is spilled use a b...

Страница 13: ...our skin can permanently damage its surface and affect print quality To get the best print quality do not store the photoconductor unit in an area subject to direct sunlight dust salty air or corrosive gases such as ammonia Avoid locations subject to extreme or rapid changes in temperature or humidity Be sure to keep consumable components out of the reach of children Do not leave jammed paper insi...

Страница 14: ...roduct meets the InternationalENERGYSTAR Program guidelines for energy efficiency The International ENERGY STAR Office Equipment Program is a voluntary partnership with the computer and office equipment industry to promote the introduction of energy efficient personal computers monitors printers fax machines copiers scanners and multifunction devices and in an effort to reduce air pollution caused...

Страница 15: ...oto K Iwamura M Ishigami S Halvorson 1 1 1 1 1 1 1 1 1 1 1 1 Chapter 1 Getting to Know Your Printer Printer Parts Front view a control panel b cover A c output tray d power switch e latch on cover B f latch on cover A g standard lower cassette h MP tray Multi Purpose tray i expansion tray a b c d e f g h i ...

Страница 16: ... Your Printer R4CE640 long bk Rev E A5 size GET FM 6 10 04 L Proof Sign off ABE J Hashimoto K Iwamura M Ishigami S Halvorson Rear view a stopper b Ethernet interface connector c USB interface connector d AC inlet a b c d ...

Страница 17: ...640 long bk Rev E A5 size GET FM 6 10 04 R Proof Sign off ABE J Hashimoto K Iwamura M Ishigami S Halvorson 1 1 1 1 1 1 1 1 1 1 1 1 Inside the printer a transfer unit b fuser unit c photoconductor unit d toner cartridge e cover D a b c d e ...

Страница 18: ...nel menu settings b c d e Back button Up button Enter button Down button Use these buttons to access the control panel menus where you can make printer settings and check the status of consumableproducts Forinstructionson how to use these buttons see Using the Control Panel Menus on page 147 f Error light Red On or flashes when an error has occurred Flashing slowly when the printer is not ready a ...

Страница 19: ... error and switches the printer to ready status h Ready light Green On when the printer is ready indicating that the printer is ready to receive and print data Off when the printer is not ready i Data light Yellow On when print data is stored in the print buffer the section of printer memory reserved for receiving data but not yet printed Flashes when the printer is processing data Off when no dat...

Страница 20: ...ou to print complex and graphics intensive documents Consumable products The life of the following consumable products is monitored by the printer The printer lets you know when replacements are needed The EPSON special media listed below provide you with the best quality printouts Toner Cartridge Yellow Toner Cartridge Magenta Toner Cartridge Cyan Toner Cartridge Black Photoconductor Unit Transfe...

Страница 21: ... and consistent high quality output The main features are described below High speed tandem printing engine Your printer s state of the art tandem engine features 400 MHz image processing and single pass technology that delivers 24 ppm pages per minute at 600 dpi color and monochrome printing Duplex printing This printer comes with a built in duplex unit allowing you to easily print on both sides ...

Страница 22: ...ity for various types of color documents For more information see Making the print quality setting on page 48 for Windows or Making the print quality settings on page 94 for Macintosh Toner save mode To reduce the amount of toner used in printing documents you can print rough drafts using the Toner Save mode Resolution Improvement Technology RITech Resolution Improvement Technology RITech is an or...

Страница 23: ...y of different printing options You can printin various formats or can print using many different types of paper The following explains the procedure for each type of printing Choose the appropriate one for your printing Double sided printing Printing with the duplex unit on page 63 Windows Printing with the duplex unit on page 110 Macintosh Lets you print on both sides of paper ...

Страница 24: ...ndows Resizing printouts on page 101 Macintosh Note This function is not available with Mac OS X Lets you automatically enlarge or reduce the size of your document to fit the paper size you selected Pages per sheet printing Modifying the print layout on page 58 Windows Modifying the print layout on page 102 Macintosh Lets you print two or four pages on a single sheet ...

Страница 25: ...M Ishigami S Halvorson Watermark printing Using a watermark on page 59 Windows Using a watermark on page 104 Macintosh Note This function is not available with Mac OS X Lets you print a text or image as a watermark on your printout For example you can put Confidential on an important document ...

Страница 26: ... LT Half Letter HLT Executive EXE Government Legal GLG Legal LGL Government Letter GLT F4 Custom size paper 88 9 139 7 mm minimum 215 9 355 6 mm maximum Up to a 100 sheets Total thick stack up to 10 mm Envelopes Monarch MON C10 DL C5 C6 IB5 Up to a 10 mm thick stack Labels A4 Letter LT Up to a 10 mm thick stack Thick paper Weight 106 to 159 g m 88 9 139 7 mm minimum 215 9 355 6 mm maximum Up to a ...

Страница 27: ...sparencies A4 Letter LT Up to a 10 mm thick stack Paper Type Paper Size Capacity Plain paper A4 A5 B5 Executive EXE Letter LT Legal LGL Government Legal GLG Up to 500 sheets Total thickness up to 56 mm EPSON Color Laser Paper A4 Letter LT Up to 500 sheets Paper Type Paper Size Capacity Plain paper A4 A5 B5 Letter LT Executive EXE Legal LGL Government Legal GLG Up to 500 sheets in each cassette Tot...

Страница 28: ...source that you want to use from the Paper Source list Then click OK For Macintosh access the printer driver open the Basic Settings dialog box and select the paper source that you want to use from the Paper Source list Then click OK Using the printer s control panel Access the control panel s Setup Menu then select Paper Source and specify the paper source you want to use Auto selection If you wa...

Страница 29: ...can change the priority of the MP tray by using the MP Mode setting in the control panel s Setup Menu For details see Setup Menu on page 155 With optional 500 Sheet 1000 Sheet Paper Cassette Unit installed MP Tray Lower Cassette 1 Lower Cassette 2 Lower Cassette 3 Note If you make paper size settings or paper source settings in your application these settings may override the printer driver settin...

Страница 30: ...the File menu You also need to click Setup Options Properties or a combination of these buttons To access the printer driver from Windows XP Me 98 95 2000 NT 4 0 or Server 2003 click Start point to Settings and click Printers Next right click the EPSON AL C3000 Advanced icon and click Properties in Windows Me 98 or 95 Printing Preferences in Windows XP 2000 or Server 2003 or Document Defaults in W...

Страница 31: ...ted size is already loaded go on to the next step Otherwise remove any paper remaining in the tray Load a sheet or a stack of the selected size paper with the printable side up Adjust the paper guides to match the paper size you are loading Note Load paper into the MP tray with the printable surface facing down but load the standard and optional paper cassettes with the printable surface facing up...

Страница 32: ...son MP tray Follow these steps to load paper into the MP tray 1 Open the MP tray then pull out the expansion tray on the MP tray to accommodate the size of the media you want to load 2 Load a stack of the desired media with the printable surface facing down then slide the guides against the sides of the stack to get a snug fit ...

Страница 33: ...e Standard lower cassette and optional paper cassette unit The paper sizes and types supported by the optional paper cassette units are the same as the standard lower cassette unit For more information see 500 Sheet 1000 Sheet Paper Cassette Unit on page 27 The paper loading procedure is the same for the standard lower cassette and the optional paper cassette unit In addition to plain paper you ca...

Страница 34: ...on 1 Pull the paper cassette out until it stops Then lift up the front of the cassette and pull out the cassette 2 Slide the guides to accommodate the paper you are loading Tilt the rear guide forward to slide it 3 To prevent the sheets from sticking together fan a stack of paper Then tap the edge on a firm surface to line it up ...

Страница 35: ...ur printouts are curled or do not stack properly when using plain paper try turning the stack over and reloading it 4 Insertthestack intothe cassette liningitupwithboththeback and right sides of the cassette Make sure that all the paper is under the metal retaining clip with the printable surface up Note Loading the cassette with too much paper may cause paper jams ...

Страница 36: ... Handling R4CE640 long bk Rev E A5 size PAPER FM 6 10 04 L Proof Sign off ABE J Hashimoto K Iwamura M Ishigami S Halvorson When loadingA5 size paper attachthe adjuster thatcomes with the cassette as shown below ...

Страница 37: ... S Halvorson 2 2 2 2 2 2 2 2 2 2 2 2 5 Slide the paper guides to fit the paper you are loading 6 Insert the paper cassette gently into the printer and push it back to the printer 7 Use the printer s control panel to select the LC1 Type setting that matches the type of loaded paper For details see Tray Menu on page 153 ...

Страница 38: ...t match the loaded paper types Output Tray The output tray is located on the top of the printer Since printouts are output face down this tray is also referred to as the face down tray This tray can hold up to 250 sheets Raise the stopper to prevent your printouts from slipping off the printer Printing on Special Media You can print on special media such as EPSON Color Laser Paper EPSON Color Lase...

Страница 39: ...er in the following paper sources MP tray up to 100 sheets standard lower cassette up to 500 sheets optional paper cassette unit up to 500 sheets in each cassette EPSON Color Laser Transparencies EPSON recommends the use of EPSON Color Laser Transparencies Note Duplex printing is not available for transparencies Transparencies can be loaded into the MP tray only up to a 10 mm thick stack When usin...

Страница 40: ...ontrol panel Please note the following when handling this media Hold each sheet by its edges as oil from your fingers may transfer to the surface and damage the printable surface of the sheet The EPSON logo appears on the printable side When loading transparencies in the MP tray insert the short edge first with the printable surface facing down MP Tray Size A4 or LT MP tray Type Trnsprncy ...

Страница 41: ... setting to Transparency in the printer driver When the Paper Type setting in the printer driver is set to Transparency do not load any other type of paper except transparencies cCaution Sheets that have just been printed on may be hot Envelopes The print quality of envelopes may be irregular because different parts of an envelope have different thicknesses Print one or two envelopes to check the ...

Страница 42: ...s for handling this media Loadenvelopes withtheshortedgefirstandtheprintableside down as shown below When printing on DL size envelopes load them with the long edge first and the printable side down Do not use an envelope that has glue or tape on it Paper Source MP tray up to 10 mm thickness MP Tray Size setting in the Tray Menu Mon C10 DL C5 C6 IB5 Printer driver settings Paper Size Mon C10 DL C5...

Страница 43: ... 110 can be used even if they do not meet the minimum size requirement shown above Labels You can load up to 10 mm thickness of labels into the MP tray at a time However you may need to feed some labels one sheet at a time or load them manually Note Duplex printing is not available for labels Depending on the quality of labels the printing environment or the printing procedure labels might be wrin...

Страница 44: ...ming into contact with printer parts always use labels that completely cover the backing sheet with no gaps between the individual labels Press a sheet of paper on top of each sheet of labels If the paper sticks do not use those labels in your printer You may have to make the setting Thick for Paper Type in the Setup Menu When using especially thick labels set Paper Type to ExtraThk Paper Source M...

Страница 45: ...d extra thick paper you cannot do duplex printing automatically Transparencies You can load transparencies up to 100 sheets into the MP tray The following table shows important settings you have to make when using transparencies Paper Source MP tray up to 10 mm thickness Printer driver settings Paper Size A4 A5 B5 LT HLT EXE LGL GLG GLT F4 Paper Source MP Tray Paper Type Thick or Extra Thick Paper...

Страница 46: ...list on the Basic Settings menu In the User Defined Paper Size dialog box adjust the Paper Width Paper Length and Unit settings to match your custom paper Then click OK and your custom paper size will be saved For Macintosh access the printer driver click Custom Size in the PaperSettingdialogbox ThenclickNew adjust the Paper Width Paper Length and Margin settings to match your custom paper Then en...

Страница 47: ... 3 on page 68 for more information Accessing the printer driver You can access the printer driver directly from any application programs from your Windows operating system The printer settings made from many Windows applications override the setting made when the printer driver is accessed from theoperating system so you should access the printer driver from your application to make sure that you ...

Страница 48: ...ick Printers Right click your printer icon then click Printing Preferences Windows NT4 0 users To access the printer driver click Start point to Settings then click Printers Right click your printer icon then click Document Defaults Note The printer driver s online help provides details on printer driver settings Making Changes to Printer Settings Making the print quality setting You can change th...

Страница 49: ...t output 300 dpi and 600 dpi 600 dpi provides high quality precise printing but requires more memory and slows the printing speed When Automatic is selected in the Basic Settings menu the printer driver takes care of all detailed settings according to the color setting you select Color and resolution are the only settings you have to make You can change other settings such as paper size or orienta...

Страница 50: ... the slider bar 3 Click OK to apply the settings Note If printing is unsuccessful or a memory related error message appears selecting a lower resolution may allow printing to proceed Using the predefined settings The predefined settings are provided to help you optimize print settings for a particular kind of printout such as presentation documents or images taken by a video or digital camera Foll...

Страница 51: ...ight of Automatic Note This screen may vary depending on your operating system version 3 Select the most appropriate setting from the list according to the type of document or image you want to print When you choose a predefined setting other settings such as Printing Mode Resolution Screen and Color Management are set automatically Changes are shown in the current settings list on the left of the...

Страница 52: ...ith a digital camera or scanned images EPSON PhotoEnhance4 automatically adjusts the contrast saturation and brightness of the original image data to produce sharper more vivid color printouts This setting does not affect your original image data ICM Except for Windows NT 4 0 ICM stands for Image Color Matching This feature automatically adjusts printout colors to match colors on your screen sRGB ...

Страница 53: ...able for printing high quality graphs charts and photos Advanced Photo Suitable for printing high quality scanned photos and digitally captured images Customizing print settings If you need to change detailed settings make the settings manually Follow the steps below to customize your print settings 1 Click the Basic Settings tab 2 Click Advanced then click More Settings 3 Choose Color or Black as...

Страница 54: ... L Proof Sign off ABE J Hashimoto K Iwamura M Ishigami S Halvorson Note When making the other settings see online help for details on each setting Note This screen may vary depending on your operating system version 4 Click OK to apply the settings and return to the Basic Settings menu 1 2 ...

Страница 55: ...he Basic Settings menu Note You cannot use a predefined setting name for your custom settings To delete a custom setting click Advanced click Save Settings in the Basic Settings menu select the setting in the Custom Settings dialog box then click Delete You cannot delete predefined settings If you change any setting in the More Settings dialog box when one of your custom settings is selected in th...

Страница 56: ...during printing To automatically resize pages to fit the output paper 1 Click the Layout tab 2 Select the Zoom Options check box then select the desired paper size from the Output Paper drop down list The page will be printed to fit on the paper you have selected 3 Select Upper Left to print reduced page image at upper left corner of the paper or Center to print reduced page image with centering f...

Страница 57: ...vorson 3 3 3 3 3 3 3 3 3 3 3 3 4 Click OK to apply the settings Resizing pages by a specified percentage 1 Click the Layout tab 2 Select the Zoom Options check box 3 Select the Zoom To check box then specify the magnification percentage in the box Note The percentage can be set between 50 and 200 in 1 increments 4 Click OK to apply the settings 1 2 ...

Страница 58: ...put Paper drop down list Modifying the print layout Your printer can print either two or four pages onto a single page and specifies the printing order automatically resizing each page to fit the specified paper size You can also choose to print documents surrounded by a frame 1 Click the Layout tab 2 Select the Print Layout check box then click Print Layout Settings The Print Layout Settings dial...

Страница 59: ...The Page Order choices depend on the number of pages selected above and the paper orientation Portrait or Landscape selected on the Basic Settings menu 5 Click OK to apply the settings and return to the Layout menu Using a watermark Follow the steps to use a watermark on your document In the Watermark dialog box you can select from a list of predefined watermarks or you can make an original waterm...

Страница 60: ...are with Windows R4CE640 long bk Rev E A5 size DWNH FM 6 10 04 L Proof Sign off ABE J Hashimoto K Iwamura M Ishigami S Halvorson 2 Select the Watermark check box then click Watermark Settings The Watermark dialog box appears 1 2 ...

Страница 61: ...age intensity of the watermark with the Intensity slider bar 5 Select Front to print the watermark in the foreground of the document or Back to print the watermark in the background of the document for the Position setting 6 Select the location on the page where you want to print the watermark from the Location drop down list 7 Adjust the horizontal or vertical Offset position 8 Adjust the size of...

Страница 62: ...Sign off ABE J Hashimoto K Iwamura M Ishigami S Halvorson Making a new watermark You can make a new watermark as follows 1 Click the Special tab 2 Select the Watermark check box 3 Click Watermark Settings The Watermark dialog box appears 4 ClickNew Delete TheUserDefinedWatermarks dialogbox appears ...

Страница 63: ... select Text 6 If you select Text type the watermark text in the Text box If you select BMP click Browse select the BMP file you want to use then click OK 7 Click Save Your watermark will appear in the List box 8 Click OK to apply the new watermark settings Note You can register up to 10 watermarks Printing with the duplex unit Duplex printing prints on both sides of the paper When printing for bi...

Страница 64: ...alvorson As an ENERGY STAR partner Epson recommends the use of the double sided printing function Refer to ENERGY STAR Compliance for more information on the ENERGY STAR program 1 Click the Layout tab 2 Select the Duplex check box then select Left Top or Right as Binding position 3 Click Duplex Settings to open the Duplex Settings dialog box 1 2 ...

Страница 65: ...hether the front or back side of the paper is to be printed as the Start Page 5 When printing for binding as a booklet select the Binding Method check box andmake appropriate settings For details about each setting see online help 6 Click OK to apply the settings and return to the Layout menu Making Extended Settings You can make various settings in the Extended Settings dialog box To open the dia...

Страница 66: ...driver d Ignore the selected paper size check box When you select this check box theprinterprintsonloadedpaper regardless of size e Auto Continue check box Selectthischeckboxtoclearerrors automatically and continue printing after a given time about 5 seconds when Paper Set Print Overrun or Mem Overflow occurs f Data Compression Level Select the compression level for image data from the drop down l...

Страница 67: ...on check box Select this check box to enable the collate settings that are specified on the application k Uses the spooling method provided by the operating system check box Select this check box to enable the Spool function for Windows XP 2000 NT 4 0 or Server 2003 l Avoid Page Error check box SelectthischeckboxtoavoidPrint Overrun errors when printing data which requires a lot of memory to print...

Страница 68: ...ing Your Printer Using EPSON Status Monitor 3 EPSON Status Monitor 3 is a utility program that monitors your printer and gives you information about its current status Note for Windows XP users Shared Windows XP LPR connections and shared Windows XP Standard TCP IP connections with Windows clients do not support the Job Management function EPSON Status Monitor 3 is not available when printing from...

Страница 69: ...ert the printer software CD ROM in the CD ROM drive Note If the language selection window appears select your country If the EPSON Installation Program screen does not appear automatically double click the My Computer icon right click the CD ROM icon click OPEN in the menu that appears then double click Epsetup exe 3 Click Continue When the software license agreement screen appears read the statem...

Страница 70: ...Ishigami S Halvorson 5 Click Custom 6 Select the EPSON Status Monitor 3 check box then click Install 7 In the dialog box that appears make sure that your printer icon is selected and click OK 8 In the dialog box that appears select your country or region and the URL for EPSON s Web site in that country or region appears Then click OK ...

Страница 71: ...your country or region allows you to change the settings of the URL The URL for the site is not displayed when selecting No Setting Also you cannot use the Order Online button on the EPSON Status Monitor 3 dialog box When you click the Cancel button the Web site s URL does not appear but the EPSON Status Monitor 3 installation continues 9 When the installation is complete click OK Accessing EPSON ...

Страница 72: ...72 Using the Printer Software with Windows R4CE640 long bk Rev E A5 size DWNH FM 6 10 04 L Proof Sign off ABE J Hashimoto K Iwamura M Ishigami S Halvorson 2 Click EPSON Status Monitor 3 1 2 ...

Страница 73: ...ami S Halvorson 3 3 3 3 3 3 3 3 3 3 3 3 Getting printer status details You can monitor printer status and obtain information on consumable products using the EPSON Status Monitor 3 dialog box Note This screen may vary depending on your operating system version a Icon Message The icon and message show the printer status a b c j d g h e f i ...

Страница 74: ...on for the paper trays and Consumables f Job Information Displays information for the print jobs The Job Information menu is displayed when the Show job information check box on the Monitoring Preferences dialog box is on See Using the Job Information menu on page 81 for details g Paper Displaysthepapersize thepapertype and the approximate amount of paper remaining in the paper source Information ...

Страница 75: ...nline To order consumables online click the Order Online button on the EPSON Status Monitor 3 dialog box The Order Online dialog box appears j Photoconductor Unit Indicates the remaining functional life of the photoconductor unit The green level meter indicates the remaining life of the photoconductor unit that is set The level meter color turns to red when the life is low e f a c d b ...

Страница 76: ...o connect to the Web site appears If you do not want this window to appear select the Do not display the confirming window check box in the confirmation window d Utility Settings button Opens the UtilitySettings dialog box and allows you to change the settings of the registered URL If you do not want the confirmation window to appear when you press theOrderNow FindDealerbutton select the Do not di...

Страница 77: ...references To make specific monitoring settings click Monitoring Preferences in the Utility tab of the printer driver The Monitoring Preferences dialog box appears The following settings and buttons appear in the dialog box a Select Notification Use the check boxes in this area to select the types of error that you wish to be notified about b Default button Restores default settings e f g h a c b ...

Страница 78: ...g Preferences from the menu to open the MonitoringPreferencesdialogbox and your printer from the menu to open the EPSON Status Monitor 3 dialog box d Job management To display the Job Information menuintheEPSONStatusMonitor 3 window select the Show job information check box Note This menu is enabled only under the conditions given in Connections Supporting the Job Management function on page 80 To...

Страница 79: ...e selected notification in the Monitoring Preferences dialog box If you wish to see information about printer consumables click Consumables Once this button is clicked the Status Alert window will not disappear even after a problem is cleared Click Close to close the window Job Management function Using the Job Management function you can obtain information on print jobs on the Job Information men...

Страница 80: ...or NT 4 0 clients When using the shared Windows 2000 Server 2003 or NT 4 0 EpsonNet Print TCP IP connection with Windows XP Me 98 95 2000 or NT 4 0 clients Client only environments When usingtheLPRconnection in WindowsXP 2000 Server 2003 or NT 4 0 When using the Standard TCP IP connection in Windows XP 2000 or Server 2003 When using the EpsonNet Print TCP IP connection in Windows XP Me 98 95 2000 ...

Страница 81: ...nitor 3 when the following connections are used When using the shared Windows 2000 Server 2003 or NT 4 0 LPR connection When using the shared Windows 2000 or Server 2003 standard TCP IP connection When using the shared Windows 2000 Server 2003 or NT 4 0 EpsonNet Print TCP IP connection Using the Job Information menu To display the Job Information menu select the Show job information check box on t...

Страница 82: ... be used a Status Waiting The print job which waiting to be printed Printing The print job which is printed currently Completed Displays onlyyour jobs thathave finished printing Canceled Displays only your jobs that have been canceled printing b Job Name Displays the user s print job file names Other user s print jobs are displayed as c Cancel Job button Selecting a print job and clicking this but...

Страница 83: ...mpleted Note When you canceled the target job the Notify when printing completed dialog box does not appear a Printing completed notice Displays the user s name document name number of sheets and computer name for the completed job b Notices Displays the number of notices including the one currently displayed c Previous Notice button Clicking this button makes the previous notify dialog box appear...

Страница 84: ...ayed in the Utility menu of Document Defaults in Windows NT 4 0 or in the Utility menu of Printing Preference in Windows XP 2000 or Server 2003 You can find out the current printer status by clicking the EPSON Status Monitor 3 icon in the printer driver s Utility menu Monitored Printers settings You can use the Monitored Printers utility to change the types of printers that EPSON Status Monitor 3 ...

Страница 85: ...USB interface that comes with your printer complies with Microsoft Plug and Play PnP USB specifications Note Only PC systems equipped with a USB connector and running Windows XP Me 98 2000 and Server 2003 support the USB interface Your computer must support USB 2 0 in order to use it as an interface Since USB 2 0 is fully compatible with USB 1 1 USB 1 1 can be used as an interface USB 2 0 is appli...

Страница 86: ...ows Me or 98 click the Details tab For Windows XP 2000 or Server 2003 click the Ports tab 3 For Windows Me or 98 select the EPUSB1 your printer USB port from the Print to the following port drop down list For Windows XP 2000 orServer 2003 selecttheUSB001 USB port in the list on the Ports menu Note This screen may vary depending on your operating system version 4 Click OK to save this settings ...

Страница 87: ...printer icon is displayed on the taskbar follow the instructions below to cancel the printing Double click your printer icon on the task bar Select the task in the list then click Cancel from the Document menu After the last page is output the Ready green light on the printer turns on The current job is canceled Note Youcanalso cancel the current print job that is sent from your computer by pressi...

Страница 88: ...SON Status Monitor 3 from a multi user Windows XP 2000 NT 4 0 and Server 2003 environment remove the shortcut icon from all clients before uninstalling You can remove the icon by clearing the Shortcut Icon check box in the Monitoring Preference dialog box Uninstalling the printer driver 1 Quit all applications 2 Click Start point to Settings then click Control Panel For Windows XP orServer2003 cli...

Страница 89: ... R Proof Sign off ABE J Hashimoto K Iwamura M Ishigami S Halvorson 3 3 3 3 3 3 3 3 3 3 3 3 4 Select EPSON Printer Software then click Add Remove Windows XP 2000 or Server 2003 select EPSON Printer Software then click Change Remove 5 Click the Printer Model tab select your printer icon 2 1 ...

Страница 90: ...of Sign off ABE J Hashimoto K Iwamura M Ishigami S Halvorson 6 Click the Utility tab and confirm that the check box for the printer software you want to uninstall is selected Note If you uninstall only EPSON Status Monitor 3 select the EPSON Status Monitor 3 check box 7 To uninstall click OK 1 2 ...

Страница 91: ...Follow the on screen instructions Uninstall the USB device driver When you connect the printer to your computer with a USB interface cable the USB device driver is also installed When you uninstalled the printer driver you also need to uninstall the USB device driver Follow the steps below to uninstall the USB device driver Note Uninstall the printer driver before uninstalling the USB device drive...

Страница 92: ...nly when the printer is connected to Windows Me or 98 with a USB interface cable If the USB device driver is not installed correctly EPSON USB Printer Devices may not appear Follow the steps below to run the Epusbun exe file in the CD ROM that comes with your printer 1 Insert the CD ROM in your computer s CD ROM drive 2 Access the CD ROM drive 3 Double click the Win9x folder 4 Double click the Epu...

Страница 93: ...h the Apple menu EPSON Status Monitor 3 lets you check the status of your printer See Monitoring Your Printer using EPSON Status Monitor 3 on page 114 for more information Accessing the printer driver To control your printer and change its settings use the printer driver The printer driver allows you to easily make all the print settings including paper source paper size and orientation Mac OS 9 x...

Страница 94: ... can change the print quality of printouts through settings in the printer driver With the printer driver you can make the print settings by choosing from a list of predefined settings or customizing the settings Choosing the print quality by using the Automatic setting You can change the print quality of printouts to favor speed or detail There are two levels of print output 300 dpi and 600 dpi 6...

Страница 95: ...asic Settings dialog box 2 Click Automatic on Print Quality then choose desired printing resolution from Fast 300 dpi or Fine 600 dpi with the slider bar Note For details about the RITech function see the Online Help If printing is unsuccessful or a memory related error message appears selecting a lower resolution may allow printing to proceed For Mac OS X users 1 Open the Print dialog box 2 Selec...

Страница 96: ...s for a particular kind of printout such as presentation documents or images taken by a video or digital camera Follow the steps below to use the predefined settings 1 Open the Basic Settings dialog box 2 Select Advanced You will find the predefined settings in the list on the right of Automatic 3 Select the most appropriate setting from the list according to the type of document or image you want...

Страница 97: ...ry drop downlistinthePrintdialogbox MacOSX orinthecurrent settings list on the left of the Basic Settings dialog box Mac OS 9 This printer driver provides the following predefined settings Automatic Standard Suitable for regular printing especially photos Text Graph Suitable for printing documents that include text and graphs such as presentation documents Graphic CAD Suitable for printing graphs ...

Страница 98: ...printing high quality presentation documents that include text and graphs Advanced Graphic CAD Suitable for printing high quality graphs charts and photos Advanced Photo Suitable for printing high quality scanned photos and digitally captured images Customizing print settings Many users will never need to make their own print settings manually However your printer provides for customized print set...

Страница 99: ...r or Black as the Color setting 4 ChoosedesiredprintingresolutionfromFast 300 dpi orFine 600 dpi Note When making the other settings see the button for details on each settings 5 Click OK to apply the settings and return to the Basic Settings dialog box Note For details on each settings see the Online help Saving your settings To save your custom settings select Advanced then click Save Settings o...

Страница 100: ...when one of your custom settings is selected in the Advanced Settings list on the Basic Settings dialog box the setting selected in the list changes to User Settings The custom setting that was previously selected is not affected by this change To return to your custom setting simply reselect it from the current settings list For Mac OS X users Use the following procedures to save your custom sett...

Страница 101: ... Note This function is not available with Mac OS X The enlarging or reducing rate is automatically specified according to the paper size selected in the Paper Setting dialog box The modifying or reducing rate selected in the Paper Setting dialog box is not available 1 Click the Layout icon on the Basic Settings dialog box The Layout dialog box appears 2 Select the Fit to Page check box then select...

Страница 102: ...ur pages onto a single page and to specify the printing order automatically resizing each page to fit the specified paper size by using Layout printing You can also choose to print documents surrounded by a frame 1 Click the Layout icon on the Basic Settings dialog box The Layout dialog box appears 2 Select the Print Layout check box then click Print Layout Settings The Print Layout Setting dialog...

Страница 103: ... on one sheet of paper 4 Select the page order in which the pages are printed on each sheet Note Page Order choices depend on Pages selected above and Orientation 5 Click OK to apply the settings and return to the Layout dialog box 6 Select the Print the Frame check box on the Layout dialog box when you want to print the pages surrounded by a frame 7 Click OK to apply the settings For Mac OS X use...

Страница 104: ...dard feature of Mac OS X Using a watermark Follow the steps below to use a watermark on your document In the Layout dialog box you can select from a list of predefined watermarks or you can select a bitmap PICT file or text file as your own custom watermark The Layout dialog box also allows you to make a variety of detailed watermark settings For example you can select the size intensity and posit...

Страница 105: ...watermark by dragging the watermark image on the preview window Also when you want to resize the watermark drag its handle 4 Adjust the image intensity of the watermark with the Intensity slider bar 5 For your own custom text watermark you can rotate it by inputting the degrees in the Angle box Or select the Rotate by mouse check box then rotate the text watermark with the pointer on the preview w...

Страница 106: ... Hashimoto K Iwamura M Ishigami S Halvorson To make a text watermark 1 Click the Layout icon on the Basic Settings dialog box The Layout dialog box appears 2 Select the Watermark Settings check box then click New Delete The Custom Watermark dialog box appears 3 Click Add Text on the Custom Watermark dialog box 1 2 ...

Страница 107: ... select the Font and Style then click OK on the Text Watermark dialog box 5 Type the file name in the Name box then click Save Note To edit the saved text watermark select it from the List box then click Edit Text After editing be sure to click OK to close the dialog box To remove the saved text watermark select it from the List box then click Delete After removing it be sure to click Save to clos...

Страница 108: ...stom watermark from the Watermark drop down list on the Layout dialog box then click OK To make a bitmap watermark Before making a custom watermark you should prepare a bitmap PICT file 1 Click the Layout icon on the Basic Settings dialog box The Layout dialog box appears 2 Select the Watermark Settings check box then click New Delete The Custom Watermark dialog box appears 1 2 ...

Страница 109: ...E A5 size DMNH FM 6 10 04 R Proof Sign off ABE J Hashimoto K Iwamura M Ishigami S Halvorson 4 4 4 4 4 4 4 4 4 4 4 4 3 Click Add PICT on the Custom watermark dialog box 4 Select the PICT file then click Open 5 Type the file name in the Name box then click Save 1 2 2 1 ...

Страница 110: ...then click OK Printing with the duplex unit Duplex printing prints on both sides of the paper When printing for binding the binding edge can be specified as required to produce the desired page order As an ENERGY STAR partner Epson recommends the use of the double sided printing function Refer to ENERGY STAR Compliance for more information on the ENERGY STAR program 1 Click the Layout icon on the ...

Страница 111: ...ont or back side of the paper is to be printed as the Start Page 7 Click OK to apply the settings and return to the Layout dialog box For Mac OS X users 1 Open the Print dialog box 2 Select Duplex Settings from the drop down list 3 Select the Duplex Settings check box 4 Select a Binding position from Left Top or Right 5 Specify the Binding Margin for the front and back sides of the paper 6 Select ...

Страница 112: ... box a Offset Makes fine adjustments to the printing position on the front and the back of data on a page in 1 mm increments b Ignore the selected paper size check box When you select this check box theprinterprintsonloadedpaper regardless of size c Skip Blank Page check box When you select this check box the printer skips blank pages Note This function is not available with Mac OS X d Automatical...

Страница 113: ...ge Error check box SelectthischeckboxtoavoidPrint Overrun errors when printing data which requires a lot of memory to print such as documentswithalargenumberof complex fonts or graphics Doing so may slow down printing somewhat f Default button For Mac OS 9 users click this button to return the settings in the Temporary Spool Folder to the initial settings For Mac OS X users click this button to re...

Страница 114: ...dy be selected in the Chooser so that necessary information can be received from the selected printer driver when the EPSON Status Monitor 3 starts If the printer port is not correct an error will occur If you change the printer driver in the Chooser while the spool file is printing in the background output to the printer may be disrupted Printer and consumable products status information appears ...

Страница 115: ...ck Print in the File menu of any application The Print dialog box appears 2 Select Utilities in the list where Copies Pages is displayed 3 Click the EPSON Status Monitor 3 icon Getting printer status details You can monitor printer status and get information on consumable products using the EPSON Status Monitor 3 dialog box Note This screen may vary depending on your operating system version a e g...

Страница 116: ...er image displays the current status of the printer When a problem occurs the most probable solution is displayed d Close button Clicking this button closes the dialog box e Paper Displays the paper size the paper type and the approximate amount of paper remaining in thepapersource Informationfor the optional cassettes are displayed only if this option is installed f Toner Indicates the amount of ...

Страница 117: ... The Monitor Setup dialog box appears The following settings and buttons appear in the dialog box a Select Notification Selectthe types of error that you wish to be notified about Note You can choose Once a day for consumables Once a day Whenanotificationoccurs it is displayed once a day until resolved b Default button Restores default settings c OK button Saves new changes Save button Saves new c...

Страница 118: ...d This window will also appear according to the selected notification in the Monitor Setup dialog box If you wish to see information about printer consumables click Show Details for Mac OS X users click button If you click this button the Status Alert window will not disappear even after the problem is cleared To close the window you need to click Close Using the Job Management function You can ob...

Страница 119: ...mation check box on the Monitoring Preferences dialog box Then click the Job Information menu on the EPSON Status Monitor 3 dialog box Note This screen is from the Mac OS X operating system a Status Waiting Waiting to print Printing Current job is being printed Completed Indicates job has been printed Canceled Indicates job has been canceled b Job Name Displays the user s print job file names Othe...

Страница 120: ...terface may be unstable depending on the hub used If you experience problems withthistypeofsetup connecttheUSBcabledirectlytoyourcomputer s USB connector 1 SelectChooserfromtheApple menu Clickyourprintericon then click the USB port your printer is connected to c Job Type The jobs are displayed as Normal Job Type is displayed only for Mac OS X d Cancel Job button Selecting a print job and clicking ...

Страница 121: ...may need to cancel printing WhenaprintjobcontinuesonthePC followtheinstructionbelow to cancel the printing Press the Period key while pressing the Command key to cancel printing Depending on applications the message shows the procedure to cancel printing during printing If this appears follow instructions in the message During background printing open EPSON Status Monitor 3 from the Application me...

Страница 122: ...restart your Macintosh 2 Insert the EPSON printer software CD ROM in your Macintosh 3 Double click the Language folder then double click Disk 1 folder inside the Printer Driver folder 4 Double click the Installer icon 5 Click Continue When the software license agreement screen appears read the statement then click Accept 6 Select Uninstall from the menu at the upper left then click Uninstall 7 Fol...

Страница 123: ...click your printer icon Note If the Authenticate dialog box appears enter the Password or phrase then click OK 6 Whenthesoftwarelicenseagreementscreenappears readthe statement then click Accept 7 Select Uninstall from the menu at the upper left then click Uninstall 8 Follow the on screen instructions Note If the printer name remains in the Print Center after uninstalling the printer software delet...

Страница 124: ...printer server and the other computers are the clients which need permission to share the printer with the printer server The clients share the printer via the printer server According to the versions of Windows OS and your access rights on the network perform the appropriate settings of the printer server and clients Setting the printer server For Windows Me 98 or 95 see Setting up your printer a...

Страница 125: ... Microsoft Networks component is installed Then on the server and clients make sure that the IPX SPX compatible Protocol or the TCP IP Protocol is installed The printer server and clients should be set on the same network system and they should be under the same network management beforehand The on screen displays on the following pages may differ depending on the version of Windows OS Setting up ...

Страница 126: ... restarting the computer 1 Double click the Printers icon on the control panel 2 Right click EPSON AL C3000 Advanced icon and click Sharing in the menu that appears 3 Select the Shared As button type the name in the Share Name box and click OK Type a Comment and Password if needed Note Do not use spaces or hyphens for the share name or an error may occur When sharing the printer be sure to set EPS...

Страница 127: ...om the server Follow these steps to set a Windows XP 2000 NT 4 0 or Server 2003 as a printer server and install the additional drivers Note You must access Windows XP 2000 NT 4 0 or Server 2003 as the Administrators of the local machine If the printer server s OS is Windows NT 4 0 the additional driver can be used only on Service Pack 4 or later 1 For a Windows 2000 or NT 4 0 printer server click ...

Страница 128: ...er Network Setup Wizard or If you understand the security risks but want to share printers without running the wizard click here In either case follow the on screen instructions 3 For a Windows 2000 or NT 4 0 printer server select the Shared as button then type the name in the Share Name box For a Windows XP or Server 2003 printer server select the Share this printer button then type the name in t...

Страница 129: ... of the server and clients use the same OS you do not have to install the additional drivers Just click OK after step3 On the Windows NT 4 0 printer server Select Windows being used for clients For example select Windows 95 to install the additional driver for the Windows Me 98 or 95 clients Then click OK Note You do not have to select Windows NT 4 0x86 because that driver has been already install...

Страница 130: ...ents Select Intel Windows 95 or 98 Windows 2000 Select Intel Windows 95 98 and Me Windows XP Select x86 Windows 95 WIndows 98 and Windows Millennium Edition Windows Server 2003 For Windows NT 4 0 clients Select Intel Windows NT4 0 or 2000 Windows 2000 Select Intel Windows NT4 0 or 2000 Windows XP Select x86 Windows NT4 0 Windows Server 2003 For Windows XP or 2000 clients Intel Windows 2000 Windows...

Страница 131: ...ve to install the additional drivers noted below because these drivers are preinstalled Intel Windows 2000 for Windows 2000 Intel Windows 2000 or XP for Windows XP x86 Windows 2000 Windows XP and Windows Server 2003 for Windows Server 2003 Do not select additional drivers other than the drivers listed in the above table The other additional drivers are not available 5 When a prompt appears insert ...

Страница 132: ...g drivers in Windows XP 2000 or Server 2003 Digital Signature is not found may appear Click Yes for Windows 2000 or Continue Anyway for Windows XP or Server 2003 and continue installing 7 When installing in Windows XP 2000 or Server 2003 click Close When installing in Windows NT 4 0 the property window closes automatically Note Confirm the following items when sharing the printer Be sure to set EP...

Страница 133: ...driver by accessing the shared printer on a network Note To share the printer on a Windows network you need to set the printer server For details see Setting up your printer as a shared printer on page 125 Windows Me 98 or 95 or Using an additional driver on page 127 Windows XP 2000 NT 4 0 or Server 2003 This section describes how to access the shared printer on a standard network system using the...

Страница 134: ...95 Follow these steps to set Windows Me 98 or 95 clients 1 Click Start point to Settings and click Printers 2 Double click the Add Printer icon then click Next 3 Select Network printer then click Next 4 Click Browse and the Browse for Printer dialog box appears Note You can also type the name of the computer that is locally connected to the shared printer the shared printer s name in the network p...

Страница 135: ...rver s OS is Windows Me 98 or 95 or the additional driver for Windows Me 98 or 95 is installed in the Windows XP 2000 NT 4 0 or Server 2003 printer server go to the next step If the additional driver for Windows Me 98 or 95 is not installed in the Windows XP 2000 NT 4 0 or Server 2003 printer server go to Installing the printer driver from the CD ROM on page 141 7 Make sure of the name of the shar...

Страница 136: ...indows NT 4 0 is installed You can not install the printer driver for Windows XP or 2000 as the additional driver in a Windows NT 4 0 printer server To install the printer driver for Windows XP or 2000 in Windows XP or 2000 clients the administrator installs the local printer driver in the clients from the CD ROM that comes with the printer then performs the following procedure 1 For Windows 2000 ...

Страница 137: ...for Windows 2000 or A network printer or a printer attached to another computer for Windows XP then click Next 4 For Windows 2000 type the name of the shared printer then click Next Note You can also type the name of the computer that is locally connected to the shared printer the shared printer s name in network path or queue name You do not necessarily need to type the name of the shared printer...

Страница 138: ...ect the Browse for a printer button 5 Click the icon of the computer or server that is connected to the shared printer and the name of the shared printer Then click Next Note The name of the shared printer may be changed by the computer or server that is connected to the shared printer To make sure of the name of the shared printer ask the administrator of the network 1 2 ...

Страница 139: ...an select the printer driver for Windows XP or 2000 as the current printer driver instead of the alternative driver in the Windows NT 4 0 server If the additional driver for Windows XP or 2000 NT 4 0 is installed in the Windows XP 2000 NT 4 0 or Server 2003 printer server go to the next step If the additional driver is not installed in the Windows NT 4 0 printer server or the printer server s OS i...

Страница 140: ...ble click the Add Printer icon 3 Select Network printer server then click Next 4 Click the icon of the computer or server that is connected to the shared printer and the name of the shared printer Then click OK Note You can also type the name of the computer that is locally connected to the shared printer the shared printer s name in network path or queue name The name of the shared printer may be...

Страница 141: ...0 or Server 2003 printer server or the printer server s OS is Windows Me 98 or 95 go to Installing the printer driver from the CD ROM on page 141 5 Select whether to use the printer as the default printer or not then click Next 6 Click Finish Installing the printer driver from the CD ROM This section describes how to install the printer driver in the clients when setting the network system as foll...

Страница 142: ...e printer driver from the CD ROM 2 Insert the CD ROM then type the appropriate drive and folder names in which the printer driver for clients is located then click OK When installing drivers in Windows XP 2000 or Server 2003 Digital Signature is not found may appear Click Yes for Windows 2000 or Continue Anyway for Windows XP or Server 2003 and continue installing The folder name differs depending...

Страница 143: ...nter via the printer server Note for Mac OS X users This function is available only with Mac OS X 10 2 or later To share your printer on a network use the Printer Sharing setting which is a standard feature of the Mac OS X 10 2 or later Setting up your printer as a shared printer Follow these steps to share a printer connected directly to your computer with other computers on an AppleTalk network ...

Страница 144: ...under Background Printing 3 Under Printer Sharing Set Up click Printer Sharing Setup 4 The Printer Sharing dialog box appears Select the Share this Printer check box then type the printer name and password information as needed 5 Click OK to accept the settings 6 Close Chooser Accessing the shared printer Follow these steps to access your printer from another computer on the network ...

Страница 145: ...want to access the printer select Chooser from the Apple menu Then click the AL C3000 Advanced AT icon and select the name of the shared printer in the Select a printer port box on the right You can only select from the printers connected to your current AppleTalk zone Note Make sure On is selected under Background Printing 3 Click Setup enter the password for the printer then click OK The Printer...

Страница 146: ...4 The following type of message appears if the client has fonts that are unavailable on the printer server 5 Click OK to close the message 6 Close Chooser For Mac OS X Use the Printer Sharing setting which is a standard feature of Mac OS X 10 2 or later This feature is not available with Mac OS X 10 1 See your operating system s documentation for details ...

Страница 147: ...propriate to make printer settings using the control panel When to make control panel settings In general printer settings can be made from the printer driver and do not needto be made usingthe control panel In fact printer driver settings override settings made using the control panel so use the control panel menus only to make settings you cannot make in your software or printer driver including...

Страница 148: ...ze CP FM 6 10 04 L Proof Sign off ABE J Hashimoto K Iwamura M Ishigami S Halvorson Accessing the control panel menus When the Ready light is on pressing any of the control panel buttons shown below accesses the control panel menus Press any button to access menus ...

Страница 149: ...l panel buttons Once you have accessed the menus the control panel buttons function as shown below a Back button Return to the previous level b Up Down buttons Scroll through menus items and settings on the current level c Enter button Advance to the next level carry out indicated operations and activate settings d Start Stop button Exit the control panel menus from any level b c d a ...

Страница 150: ...se the Up and Down buttons to scroll through the items or press the Back button to return to the previous level 5 Press the Enter button to carry out the operation indicated by an item such as printing a status sheet or resetting the printer or to view the settings available for an item such as paper sizes Use the Up and Down buttons to scroll through available settings and press the Enter button ...

Страница 151: ...int status and sample sheets showing the printer s current settings and a brief summary of available features Press the Down or Up button to select an item Press the Enter button to print a sheet This item appears only when the Network I F setting in the Network Menu is on Item Settings default in bold Status Sheet Network Status Sheet Color Regist Sheet C Toner E F M Toner E F Y Toner E F K Toner...

Страница 152: ...orking status of the network Color Regist Sheet Prints a sheet to check and adjust the registration position of each color Yellow Cyan and Magenta If you notice a misalignment of colors use this sheet to adjust the alignment as explained in Setup Menu on page 155 C Toner M Toner Y Toner K Toner Photoconductr Transfer Fuser Displays the amount of toner left in the toner cartridges and the remaining...

Страница 153: ...tal number of pages printed by the printer Color Pages Displays the total number of pages printed in color by the printer B W Pages Displays the total number of pages printed in black white by the printer Tray Menu This menu allows you to specify the size and type of paper loaded in the MP tray Accessing this menu also lets you check the size of the paper currently loaded in the paper cassettes ...

Страница 154: ... your paper size from this menu LC1 Size LC2 Size LC3 Size Displays the paper size loaded in the standard and optional paper cassettes MP Type Lets you set the paper type loaded in the MP tray LC1 Type LC2 Type LC3 Type Lets you select the paper type loaded in the standard and optional paper cassettes Item Settings default in bold MP Tray Size A4 A5 B5 LT HLT LGL GLT GLG EXE F4 MON C10 DL C5 C6 IB...

Страница 155: ...ifies the language displayed on the LCD panel and that printed on the status sheet MP Mode This setting determines whether the MP tray has the highest or lowest priority when Auto is selected as the Paper Source setting in the printer driver When Normal is selected as the MP Mode the MP tray has the highest priority as the paper source If you select Last the MP tray has the lowest priority Item Se...

Страница 156: ...o Cont When youturnthissettingon theprinterautomaticallycontinues printing after a certain period of time when one of the following errors occurs Paper Set Print Overrun or Mem Overflow When this option is off you must press the N Start Stop button to resume printing LCD Contrast Adjusts the contrast of the LCD panel Use the Up and Down buttons to set the contrast between 0 lowest contrast and 15 ...

Страница 157: ...n select Color Regist Sheet on the control panel s Information Menu to print a color registration sheet Then use the Magenta Regist setting to select the number that corresponds to the magenta and black line segments most closely aligned See Checking color registration on page 208 for more detailed instructions Yellow Regist Adjusts the registration position of the color yellow relative to black T...

Страница 158: ...rent job received from the active interface You may want to reset the printer when there is a problem with the print job itself and the printer cannot print successfully Reset All Stops printing clears the printer memory and restores the printer settings to their default values The print jobs received from all interfaces are erased Note Performing Reset All clears print jobs received from all inte...

Страница 159: ...ommunication between the printer and the computer when using the USB interface USB I F Allows you to activate or deactivate the USB interface USB SPEED Allows you to select the operation mode of USB interface Selecting HS is recommended Select FS if HS does not work on your computer system Network Menu See the Network Guide for each setting Item Settings default in bold USB I F On Off USB SPEED HS...

Страница 160: ...g handling precautions before installing the option The 500 sheet paper cassette unit weighs approximately 11 7 kg 25 8 lb or the 1000 sheet paper cassette unit weighs approximately 19 0 kg 41 9 lb always lift it with two or more people When installing this option on the printer make sure to lock the two casters at the front of the unit Paper Type Paper Size Capacity Plain paper A4 A5 B5 Letter LT...

Страница 161: ...bout 36 0 kg 79 lb One person should neverattempt to lift or carry it alone Two people should carry the printer lifting it from the positions shown below Do not lift the printer by these areas wWarning If you lift the printer incorrectly you could drop it and cause injury Installing the optional paper cassette unit Follow these steps to install the optional paper cassette unit ...

Страница 162: ...Make sure to unplug the power cord from the printer to prevent getting an electrical shock 2 Carefully remove the optional paper cassette unit from its carton and place it on the floor Note Make sure you have the four screws packed with the optional paper cassette unit Remove the protective materials from the unit Keep all protective materials in case you want to ship the optional paper cassette u...

Страница 163: ...otective materials inside of the cassette trays 4 For 1000 Sheet Paper Cassette Unit users lock the two casters at the front of the unit wWarning Be sure to lock both casters before installing the unit on the printer Otherwise the unit may move and cause an accident 5 Carefully grasp the printer at the positions indicated below and lift it carefully with two or more people ...

Страница 164: ...640 long bk Rev E A5 size OPT FM 6 10 04 L Proof Sign off ABE J Hashimoto K Iwamura M Ishigami S Halvorson wWarning Two people should lift the printer by the correct positions as shown below Do not lift the printer by these areas ...

Страница 165: ...imoto K Iwamura M Ishigami S Halvorson 7 7 7 7 7 7 7 7 7 7 7 7 6 Align the corners of the printer and the unit then lower the printer gently onto the unit so that the five pins on top of the unit fit into the holes on the bottom of the printer 7 Remove the standard lower cassette from the printer ...

Страница 166: ...over on the back of the standard lower cassette and secure the back of the unit to the printer with the remaining two screws Then reattach the cover 10 Reinsert the standard lower cassette into the printer 11 Reconnect all interface cables and the power cord 12 Plug the printer s power cord into an electrical outlet 13 Turn on the printer To confirm that the option is installed correctly print a S...

Страница 167: ...n click Settings Then select 500 Sheet 1000 Sheet Paper Cassette Unit from the Optional Paper Sources list on the Optional Settings dialog box and click OK Removing the optional paper cassette unit Follow these steps to remove the optional paper cassette unit 1 Turn the printer off and unplug the power cord 2 Remove all interface cables from the interface connectors 3 For 1000 Sheet Paper Cassette...

Страница 168: ... 04 L Proof Sign off ABE J Hashimoto K Iwamura M Ishigami S Halvorson 4 Remove the standard lower cassette from the printer 5 Remove the two screws securing the front of the unit to the printer wWarning Removing other screws and covers will expose high voltage areas ...

Страница 169: ...M Ishigami S Halvorson 7 7 7 7 7 7 7 7 7 7 7 7 6 Remove the cover on the back of the standard lower cassette and remove the twoscrews securingthe back of the unit Then reattach the cover wWarning Removing other screws and covers will expose high voltage areas 7 Insert the standard lower cassette into the printer ...

Страница 170: ...s on the top of the unit and place it on a flat stable surface 9 Repack the optional paper cassette unit in its original carton 10 Reconnect all interface cables and the power cord 11 Plug the printer s power cord into an electrical outlet 12 Turn on the printer Memory Module By installing a Dual In line Memory Module DIMM you can increase printer memory up to 576 MB You may want to add additional...

Страница 171: ... Note The maximum expandable memory is 576 MB Follow these steps to install an optional memory module wWarning Be careful when working inside the printer as some components are sharp and may cause injury cCaution Before you install a memory module be sure to discharge any static electricity by touching a grounded piece of metal Otherwise you may damage static sensitive components 1 Turn the printe...

Страница 172: ...A5 size OPT FM 6 10 04 L Proof Sign off ABE J Hashimoto K Iwamura M Ishigami S Halvorson 2 Loosen the two screws on the back of the printer wWarning Removing other screws and covers will expose high voltage areas 3 Pull out the circuit board tray ...

Страница 173: ... M Ishigami S Halvorson 7 7 7 7 7 7 7 7 7 7 7 7 4 Identify the memory slot Its position is shown below a Memory slot S0 b Memory slot S1 5 Hold the memory module above the memory slot and insert it into the slot until the clips come up to hold the memory module securely in place Do not apply too much force a b ...

Страница 174: ...ff ABE J Hashimoto K Iwamura M Ishigami S Halvorson cCaution Do not force the memory into the slot Be sure to insert the memory facing the correct way Do not remove any modules from the circuit board Otherwise the printer will not work 6 Slide the circuit board tray into the printer ...

Страница 175: ... Sheet on page 227 for instructions Ifthe totalamountofmemorylisted does not include the size of the optional memory module try reinstalling the module Make sure that the module is securely seated into the memory slot on the circuit board Note for Windows users If you are using Windows and EPSON Status Monitor 3 is not installed you have to make settings manually in the printer driver Click the Up...

Страница 176: ...for Mac OS X 10 2 or below and then re register the printer Removing a memory module Follow these steps to remove a memory module cCaution Before you remove a memory module be sure to discharge any static electricity by touching a grounded piece of metal Otherwise you may damage static sensitive components wWarning Be careful when working inside the printer as some components are sharp and may cau...

Страница 177: ...ev E A5 size OPT FM 6 10 04 R Proof Sign off ABE J Hashimoto K Iwamura M Ishigami S Halvorson 7 7 7 7 7 7 7 7 7 7 7 7 3 Loosen the two screws on the back of the printer wWarning Removing other screws and covers will expose high voltage areas ...

Страница 178: ... 10 04 L Proof Sign off ABE J Hashimoto K Iwamura M Ishigami S Halvorson 4 Pull out the circuit board tray 5 Identify the memory slot Its position is shown below a Memory slot S0 b Memory slot S1 6 Grasp both sides of the memory module and pull the module out a b ...

Страница 179: ...modules from the circuit board Otherwise the printer will not work 7 Store the memory module in an anti static packet such as the one it came packaged in 8 Slide the circuit board tray into the printer 9 Fasten the circuit board tray with the two screws 10 Reconnect all the interface cables and the power cord 11 Plug the printer s power cord into an electrical outlet 12 Turn on the printer ...

Страница 180: ...to maintain print quality and extend the life of your printer Note Do not replace the toner cartridge when the XXXX Toner Low message appears Toner remaining in the toner cartridge may spill out if you remove the toner cartridge to replace it Replace the toner cartridge when the Replace Toner xxxx message appears Note To clear the warning select Clear All Warning from the control panel s Reset Men...

Страница 181: ...maining in the yellow toner cartridge is low Note Messages appear for one consumable product at a time After replacing a consumable product check the LCD panel for replacement messages for other consumable products Toner Cartridge Handling precautions Always observe the following handling precautions when replacing toner cartridges Installing a genuine toner cartridge is recommended Using a non ge...

Страница 182: ...our eyes If toner gets on your skin or clothes wash it off with soap and water immediately Keep toner cartridges out of the reach of children Do not dispose of used toner cartridges in fire as they may explode and cause injury Dispose of them according to local regulations If toner is spilled use a broom and dustpan or a damp cloth with soap and water to clean it up Because the fine particles can ...

Страница 183: ...long bk Rev E A5 size MAINT FM 6 10 04 R Proof Sign off ABE J Hashimoto K Iwamura M Ishigami S Halvorson 8 8 8 8 8 8 8 8 8 8 8 8 2 Remove the top cover 3 Turn the toner cartridge knobs to the unlocked position Note Hold the knobs with both hands ...

Страница 184: ...ft the toner cartridge out of the slot Note A small amount of the toner may adhere to the bottom of the cartridge Be careful not to spill this toner or get it on your skin or clothes Put the used cartridge on a flat surface with the toner spout facing up to avoid spilling the toner Dispose of the used toner cartridge by putting it into its disposal bag ...

Страница 185: ...imoto K Iwamura M Ishigami S Halvorson 8 8 8 8 8 8 8 8 8 8 8 8 5 Take the new toner cartridge out of its package and gently shake it from side to side and front to back to distribute the toner evenly Note Do not remove the protective tape yet 6 Hold the toner cartridge as shown below and lower it into the slot ...

Страница 186: ...Ishigami S Halvorson 7 Turn the toner cartridge knobs to the locked position Note Hold the knobs with both hands and turn them until they click cCaution Be sure to turn the knob all the way to the locked position Otherwise you may have toner problems or leakage 8 Removetheprotective tape pullingstraightupfromthetoner cartridge ...

Страница 187: ...nductor unit Thephotoconductorunitweighs 4 5kg 9 9lb Be suretohold it firmly by the handle when carrying it When replacing the photoconductor unit avoid exposing it to room light any longer than necessary Be careful not to scratch the surface of the drum Also avoid touching the drum since oil from your skin may permanently damage its surface and affect print quality To get the best print quality d...

Страница 188: ...nductor unit wWarning Do not dispose of the used photoconductor unit in fire as it may explode and cause injury Dispose of it according to local regulations Keep the photoconductor unit out of the reach of children Replacing the photoconductor unit Follow these steps to replace the photoconductor unit 1 Turn off the printer 2 Press the latch on cover A and open the cover ...

Страница 189: ...640 long bk Rev E A5 size MAINT FM 6 10 04 R Proof Sign off ABE J Hashimoto K Iwamura M Ishigami S Halvorson 8 8 8 8 8 8 8 8 8 8 8 8 3 Raise cover D 4 Hold the photoconductor unit by the handle and slowly lift it straight out of the printer ...

Страница 190: ...mi S Halvorson 5 Take the new photoconductor unit and tear away the top portion of the bag along the dotted line to expose the handle Then grab the handle and remove the styrofoam insert and tear open the bag along the dotted line Note Always keep the cartridge positioned as shown in the illustration 6 Remove the protective material ...

Страница 191: ...f Sign off ABE J Hashimoto K Iwamura M Ishigami S Halvorson 8 8 8 8 8 8 8 8 8 8 8 8 cCaution Be careful not to touch or scratch the surface of the drum Avoid touching the drum since oil from your skin may permanently damage its surface and affect print quality 7 Remove the protective tapes ...

Страница 192: ... size MAINT FM 6 10 04 L Proof Sign off ABE J Hashimoto K Iwamura M Ishigami S Halvorson 8 Holding the handle firmly lower the photoconductor unit into the printer making sure the posts on the sides of the unit slide into the slots 9 Remove the protective sheet ...

Страница 193: ...gami S Halvorson 8 8 8 8 8 8 8 8 8 8 8 8 10 Close covers D and A Fuser Unit Prepare a new fuser unit for replacement when you get a message informing you to do so Handling precautions Note the following handling precautions before replacing the fuser unit Do not touch the surface of the fuser unit Doing so may impair print quality ...

Страница 194: ... 30 minutes until the temperature has subsided before replacing the fuser unit Do not dispose of the used fuser unit in fire as it may explode and cause injury Dispose of it according to local regulations Keep the fuser unit out of the reach of children Replacing the fuser unit Follow these steps to replace the fuser unit 1 Turn off the printer and wait for 30 minutes until the temperature has sub...

Страница 195: ... 195 R4CE640 long bk Rev E A5 size MAINT FM 6 10 04 R Proof Sign off ABE J Hashimoto K Iwamura M Ishigami S Halvorson 8 8 8 8 8 8 8 8 8 8 8 8 3 Push the lever down and raise cover D 4 Unlock the locks on both sides of the fuser unit ...

Страница 196: ...nsportation R4CE640 long bk Rev E A5 size MAINT FM 6 10 04 L Proof Sign off ABE J Hashimoto K Iwamura M Ishigami S Halvorson 5 Lift the fuser unit out of the printer as shown below 6 Take the new fuser unit out of its package ...

Страница 197: ...FM 6 10 04 R Proof Sign off ABE J Hashimoto K Iwamura M Ishigami S Halvorson 8 8 8 8 8 8 8 8 8 8 8 8 7 Hold the new fuser unit by the handles and lower it into the printer making sure that the guide posts slide into the holes on the bottom of the unit 8 Lock the fuser unit ...

Страница 198: ...sure that the locks are completely in the locked position 9 Close covers D and B Transfer Unit Prepare a new transfer unit for replacement when you get a message informing you to do so Handling precautions Note the following handling precautions before replacing the transfer unit Do not touch the surface of the transfer unit Doing so may impair print quality ...

Страница 199: ...vorson 8 8 8 8 8 8 8 8 8 8 8 8 wWarning Do not dispose of the used transfer unit in fire as it may explode and cause injury Dispose of it according to local regulations Keep the fuser unit out of the reach of children Replacing the transfer unit Follow these steps to replace the transfer unit 1 Press the latch on cover A and open the cover A ...

Страница 200: ...NT FM 6 10 04 L Proof Sign off ABE J Hashimoto K Iwamura M Ishigami S Halvorson 2 Grasp the two orange tabs and pull the unit forward and down then lift the unit out of the printer 3 Pull the transfer unit out of the printer 4 Take the new transfer unit from its package ...

Страница 201: ...R Proof Sign off ABE J Hashimoto K Iwamura M Ishigami S Halvorson 8 8 8 8 8 8 8 8 8 8 8 8 5 Hold the new transfer unit by the orange tabs and lower it into the printer making sure that it fits into the guides Push the transfer unit in and up until it clicks into place 6 Close cover A ...

Страница 202: ...cloth moistened with a mild detergent cCaution Never use alcohol or paint thinner to clean the printer cover these chemicals can damage the components and the case Be careful not to get water onto the printer mechanism or any electrical components Transporting the Printer For long distances If you need to transport your printer for long distances carefully repack it using the original box and pack...

Страница 203: ...unpacking and setting your printer at the new location you need to check the color registration and adjust the color alignment if necessary See Checking color registration on page 208 for instructions For short distances Alwayspayattentiontothefollowinghandlingprecautionswhen you need to move the printer for a short distance If you are moving the printer on its own two people should lift and carry...

Страница 204: ...the correct positions as shown below Do not lift the printer by these areas 3 When moving the printer always keep it horizontal Moving the printer together with an optional paper cassette unit installed Follow these steps to move the printer together with the optional paper cassette unit For 1000 Sheet Paper Cassette Unit users 1 Turn off the printer and remove the following items Power cord ...

Страница 205: ...toconductor unit 2 Unlock the two casters at the bottom of the unit 3 Roll the printer to the new location 4 Lock the casters after relocating the printer cCaution Do not move the printer on angled or uneven surfaces For 500 Sheet Paper Cassette Unit users 1 Turn off the printer and remove the following items Power cord Interface cable Paper ...

Страница 206: ...it horizontal Finding a place for the printer When relocating the printer always choose a location that has adequate space for easy operation and maintenance Use the following illustration as a guide for the amount of space required around the printer to ensure smooth operation Dimensions shown in the illustrations below are in centimeters To install and use any of the following options you will n...

Страница 207: ...d printer system away from potential sources of interference such as loudspeakers or the base units of cordless telephones Avoid using an electrical outlet that is controlled by wall switches or automatic timers Accidental disruption of power can erase valuable information in your computer s and printer s memory cCaution Leaveadequateroomaroundtheprintertoallowfor sufficient ventilation Avoid loca...

Страница 208: ...d to check the color registration for possible misalignment Follow these steps to check the color registration 1 Turn on the printer 2 Load paper into the MP tray 3 Make sure the LCD panel displays Ready or Sleep then press the Enter button on the control panel twice 4 Press the Down button several times to display ColorRegist Sheet 5 Press the Enter button The printer prints a color registration ...

Страница 209: ...are not aligned adjust the registration as explained below Adjusting color registration alignment 1 Make sure the LCD panel displays Ready or Sleep then press the Enter button to access the control panel menus 2 Press the Down button several times until the LCD panel displays Color Regist Menu then press the Enter button 3 Press the Up button several times until the LCD displays the XXXXRegist ite...

Страница 210: ...he number that corresponds to that pattern Press the Enter button to complete the adjustment In the case of the following example set Magenta to 3 to finish adjusting the color registration alignment Note The adjustment takes effect when you print the color registration sheet or restart the printer After making the settings be sure to confirm the alignment of the lines at the zero position for eac...

Страница 211: ...learing jammed paper Be sure to observe the following points when you clear jammed paper Do not remove jammed paper by force Torn paper can be difficult to remove and might cause other paper jams Pull it gently in order to avoid tearing Always trytoremove jammedpaperwithbothhandstoavoid tearing it If jammed paper is torn and remains in the printer or if paper is jammed in a place not mentioned in ...

Страница 212: ... or the surrounding areas If the printer has been in use the fuser and the surrounding areas may be very hot Do not insert your hand deep into the fuser unit as some components are sharp and may cause injury Jam AB covers A and B When there is paper jammed aroundthe fuser unit the LCD panel displays the Jam AB error message Follow these steps to clear the jammed paper 1 Press the latch on cover A ...

Страница 213: ...ashimoto K Iwamura M Ishigami S Halvorson 9 9 9 9 9 9 9 9 9 9 9 9 2 Turn the inner green levers of the fuser unit outward and gently remove any jammed paper with both hands Note If paper is torn be sure to remove all torn pieces 3 Close cover A 4 Press the latch on cover B and open the cover ...

Страница 214: ... Iwamura M Ishigami S Halvorson 5 Raise the outer green knobs to open the paper path and remove the jammed paper 6 Close cover B When the paper jam is cleared completely and the covers are closed printing resumes from the page that jammed Jam A cover A Follow these steps to clear paper jams at cover A ...

Страница 215: ...0 long bk Rev E A5 size TROUB FM 6 10 04 R Proof Sign off ABE J Hashimoto K Iwamura M Ishigami S Halvorson 9 9 9 9 9 9 9 9 9 9 9 9 1 Press the latch on cover A and open the cover 2 Remove any jammed paper gently with both hands ...

Страница 216: ...g R4CE640 long bk Rev E A5 size TROUB FM 6 10 04 L Proof Sign off ABE J Hashimoto K Iwamura M Ishigami S Halvorson 3 Open cover D 4 Grasp the handle of the photoconductor unit firmly and remove the unit from the printer ...

Страница 217: ...Sign off ABE J Hashimoto K Iwamura M Ishigami S Halvorson 9 9 9 9 9 9 9 9 9 9 9 9 cCaution Be careful not to scratch the surface of the drum Also avoid touching the drum since oil fromyourskinmay permanently damage its surface and affect print quality 5 Remove any jammed paper ...

Страница 218: ...ong bk Rev E A5 size TROUB FM 6 10 04 L Proof Sign off ABE J Hashimoto K Iwamura M Ishigami S Halvorson 6 Reinstall the photoconductor unit making sure the posts on the sides of the unit slide into the slots 7 Close covers D and A ...

Страница 219: ...mmed Jam AC cover A and paper cassettes When there is paper jammed at the place where paper feeds into the printer or in the paper cassettes the LCD panel displays the Jam AC error message Follow these steps to clear the jammed paper 1 Remove the paper cassette from the printer and discard any crumpled paper Note The illustration shows the standard lower cassette If the optional paper cassette uni...

Страница 220: ...k Rev E A5 size TROUB FM 6 10 04 L Proof Sign off ABE J Hashimoto K Iwamura M Ishigami S Halvorson 2 Gently remove any paper that has fed part way into the printer Note Confirm that the jammed paper is not still deep inside the printer ...

Страница 221: ...orson 9 9 9 9 9 9 9 9 9 9 9 9 3 Remove the stack of paper from the cassette tap it on a flat surface to even the edges then reinsert it into the paper cassette Be sure the paper is evenly aligned and the top of the stack is below the metal retaining clip and the maximum paper mark 4 Reinsert the paper cassette into the printer ...

Страница 222: ...imoto K Iwamura M Ishigami S Halvorson 5 Press the latch on cover A and open the cover 6 Removeanyjammedpapergentlywithbothhands Becareful not to tear the jammed paper z Note Always try to remove jammed paper with both hands to avoid tearing it If paper is torn be sure to remove all torn pieces ...

Страница 223: ...ay still be inside the paper cassettes Remove the paper cassettes then remove the black unit that is located on the top part of the inside of the cassette slot and check whether any jammed paper is there When the paper jam is cleared completely and cover A is closed printing resumes from the page that jammed Jam B cover B When there is paper jammed at the duplex unit the LCD panel displays the Jam...

Страница 224: ... Proof Sign off ABE J Hashimoto K Iwamura M Ishigami S Halvorson 1 Press the latch on cover B and open the cover 2 Gently remove any jammed or crumpled paper Note Be sure to remove the jammed paper by pulling it upward If paper is torn be sure to remove all torn pieces ...

Страница 225: ...lose cover B When the paper jam is cleared completely and cover B is closed printing resumes from the page that jammed Jam ABC cover A paper cassettes and cover B When there are paper jams where paper feeds into the printer or in the paper cassettes and at the duplex unit the LCD panel displays the Jam ABC error message To clear the paper jam first clear the jammed paper where paper feeds as descr...

Страница 226: ...hether any jammed paper is there Jam at the MP tray When the LCD panel displays the Check Transparency error message there may be paper jammed at the MP tray Remove the paper from the MP tray and remove any jammed paper Open and close cover A to clear the message on the LCD panel then reload the paper The printer resumes printing from the page that jammed Note When using transparencies load them i...

Страница 227: ...ing the printer s control panel 1 Turn on the printer The LCD panel shows Ready 2 Press the Enter button three times The printer prints a status sheet Enter button 3 Confirm that the information about the installed options is correct If the options are installed correctly they appear under Hardware Configurations If the options are not listed try reinstalling them Note If the status sheet does not...

Страница 228: ...he printer to print a correct status sheet contact your dealer For the Windows printer driver you can update the installed option information manually Click the Update the Printer Option Information Manually button and click Settings from the Optional Settings menu The Optional Settings dialog box appears Make settings for each installed option then click OK ...

Страница 229: ...and check the power cord connections between the printer and the electrical outlet Then turn the printer back on The electrical outlet may be controlled by an outside switch or an automatic timer Make sure that the switch is turned on orpluganotherelectricaldeviceintothe outlet to check whether the outlet is operating properly Cause What to do The printer is offline Press the N Start Stop button o...

Страница 230: ... cable If you are using the USB interface use a Revision 2 0 cable Some error may have occurred Check the LCD panel to see if an error message appears Your application software is not properly set up for your printer Make sure that the printer is selected in your application software Your computer system s memory is too small to handle the volume of data in your document Try reducing the image res...

Страница 231: ...ers cannot be monitored in a Windows 95 environment Cause What to do Ifyou are using Windows and EPSON Status Monitor 3 is not installed you have to make settings manually in the printer driver Click the Optional Settings tab select Update the Printer Option Information Manually then click Settings Cause What to do Your printer is in sleep mode Close the printer driver and EPSON Status Monitor3 th...

Страница 232: ...ged in securely You may not be using the correct interface cable If you are using the USB interface use a Revision 2 0 cable Note If a status sheet does not print correctly your printer may be damaged Contact your dealer or a qualified service representative Cause What to do The registration position of each color may have shifted while the printer was being shipped or moved to a new location Chec...

Страница 233: ...ake sure that you are using the correct pagelength and margin settings in your application The Paper Size setting may be incorrect Make sure the correct paper size is set in the Tray Menu on the control panel Cause What to do You may need more memory Graphics require large amounts of memory Install an appropriate memory module See Memory Module on page 170 Or select the Avoid Page Error check box ...

Страница 234: ...ation you are using is not appropriate for color printing Make sure that the settings in your application are appropriate for color printing Cause What to do Printer driver default settings and color tables vary by printer model Setthe Gamma settingto 1 5 intheMore Settings dialog boxin theprinter driver then print again If you still do not get the printouts you expect adjust the color using the s...

Страница 235: ...s perfectly selecting the printer driver s ICM setting for Windows XP Me 98 95 2000 or Server 2003 or ColorSync setting for Macintosh can improve color matching between different devices For details see Using the predefined settings on page 50 for Windows and Using the predefined settings on page 96 for Macintosh For Macintosh the System Profile setting is not in use To apply ColorSync properly yo...

Страница 236: ...ype of paper for your printer If the surface of your paper is too rough printed characters may appear distorted or broken EPSON special paper or smooth high quality copier paper is recommended for best results See Available paper types on page 272 for information on choosing paper The paper path inside the printer may be dusty Turn off the printer Clean internal printer components by printing thre...

Страница 237: ... with only one character per page Cause What to do Your paper may be moist or damp Do not store paper in a humid or damp environment There may be no toner left in the toner cartridge If the message on the LCD panel or in EPSON Status Monitor 3 indicates that the amount of toner left is low see Replacing a toner cartridge on page 182 There may be a problem with the photoconductor unit Replace the p...

Страница 238: ...problem with the photoconductor unit Replace the photoconductor unit See Photoconductor Unit on page 187 Cause What to do Your paper may be moist or damp Do not store your paper in a humid or damp environment You may not be using the correct type of paper for your printer EPSON special paper or smooth high quality copier paper is recommended for best results See Available paper types on page 272fo...

Страница 239: ...appear distorted or broken EPSON special paper or smooth high quality copier paper is recommended for best results See Available paper types on page 272 for information on choosing paper Cause What to do The printer may have loaded more than one sheet at a time Remove the paper stack and fan it Tap it on a flat surface to even the edges Then reload the paper There may be no toner left in the Toner...

Страница 240: ...r may be moist or damp Do not store your paper in a humid or damp environment The Toner Save mode may be on Turn off the Toner Save mode using the printer driver or the printer s control panel menus There may be no toner left in the toner cartridge If the message on the LCD panel or in EPSON Status Monitor 3 indicates that the amount of toner left is low see Replacing a toner cartridge on page 182...

Страница 241: ... automatically so that the printer can continue printing Check to see if the printout is acceptable Ifnot addmorememoryfor a permanent solution or lower print quality temporarily in the printer driver Cause What to do The printer has insufficient memory for current task Add more memory for a permanent solution or lower print quality temporarily in the printer driver Cause What to do The printer do...

Страница 242: ...have selected the correct paper source in your application There may be no paper in the cassettes Load paper The size of loaded paper differs from the control panel setting Make sure that the correct paper size is set in the control panel s Paper Source and MP Tray Size settings Too many sheets may be loaded in the MP tray or paper cassettes Make sure that you have not tried to load too many sheet...

Страница 243: ...0 Sheet 1000 Sheet Paper Cassette Unit on page 160 for instructions on installing an optional paper cassette unit The paper source setting may not be correct Make sure you have selected the proper paper source in your application There may be no paper in the paper cassette Load paper Too many sheets may be loaded in the paper cassette Make sure that you have not tried to load in with too many shee...

Страница 244: ...lly compatible with USB 1 1 USB 1 1 can be used as an interface USB 2 0 is applied for Windows XP 2000 and Server 2003 operating systems If your operating system is Windows Me or 98 use USB 1 1 interface USB connections USB cables or connections can sometimes be the source of USB problems Try one or both of these solution For best results you should connect the printer directly to the computer s U...

Страница 245: ...ilt in USB port For details about your computer contact your dealer Printer software installation Incorrect or incomplete software installation can lead to USB problems Take note of the following and perform the recommended checks to ensure proper installation Checking printer software installation for Windows XP 2000 and Server 2003 When using Windows XP 2000 or Server 2003 you must follow the st...

Страница 246: ...ss clickYes Windows2000 orContinue Anyway Windows XP or Server 2003 If you click No Windows 2000 or STOP Installation Windows XP or Server 2003 you will have to install the printer software again Checking printer software in Windows Me and 98 If you canceled the plug and play driver installation in Windows Me or 98 before the procedure was complete the USB printer device driver or the printer soft...

Страница 247: ... 247 R4CE640 long bk Rev E A5 size TROUB FM 6 10 04 R Proof Sign off ABE J Hashimoto K Iwamura M Ishigami S Halvorson 9 9 9 9 9 9 9 9 9 9 9 9 Select the icon for your printer and then click Properties on the File menu ...

Страница 248: ...248 Troubleshooting R4CE640 long bk Rev E A5 size TROUB FM 6 10 04 L Proof Sign off ABE J Hashimoto K Iwamura M Ishigami S Halvorson 2 Click the Details tab ...

Страница 249: ... 9 9 9 9 9 9 If EPUSBX EPSON AcuLaser C3000 is displayed in the Print to the following port list then the USB printer device driver and printer software are installed correctly If the correct port is not displayed proceed to the next step 3 Right click the My Computer icon on your desktop and then click Properties 4 Click the Device Manager tab ...

Страница 250: ... R4CE640 long bk Rev E A5 size TROUB FM 6 10 04 L Proof Sign off ABE J Hashimoto K Iwamura M Ishigami S Halvorson If your drivers are correctly installed EPSON USB Printer Devices should appear on the Device Manager menu ...

Страница 251: ...ick the plus sign beside Other devices to view the installed devices If USB Printer or EPSON AcuLaser C3000 appears under Other devices the printer software is not installed correctly Proceed to step 5 If neither USB Printer nor EPSON AcuLaser C3000 appears under Other devices click Refresh or unplug the USB cable from the printer then plug it into the printer again Once you ve confirmed that thes...

Страница 252: ...er or EPSON AcuLaser C3000 and click Remove Then click OK When the following dialog box appears click OK and then click OK to close the System Properties dialog box 6 Uninstall the printer software as explained in Uninstalling the Printer Software on page 88 Then turn the printer off restart your computer and reinstall the printer software as described in the Setup Guide ...

Страница 253: ...printer automatically calibrates itself when any of its covers are opened and when there is no paper jammed inside This is not an error message and will clear itself within a few minutes While the printer displays this message do not open the covers or turn off the printer Cancel All Print Job The printer is canceling all print jobs in the printer memory including jobs the printer is currently rec...

Страница 254: ...nsparency or transparencies are loaded when the Paper Setting in the printer driver is not set to Transparency Paper is jammed at the MP tray Remove the paper from the MP tray and remove the jammed paper from the MP tray Open and close cover A to clear the message on the LCD panel then reload the paper The printer resumes printing from the page that jammed Check Paper Size The paper size setting i...

Страница 255: ... by specifying the number of copies is no longer possible due to a lack of memory RAM If this error occurs print only one copy at a time To clear this error select Clear Warning from the control panel s Reset Menu For instruction about accessing the control panel menus see How to access the control panel menus on page 147 Color Unmatched The colors on your computer do not match the colors output b...

Страница 256: ...d The printer is ejecting paper due to a user request This message appears when pressing the N Start Stop button once to make the printer offline and then holding down the N Start Stop button for more than 2 seconds in order not to receive form feed command Image Optimum There is insufficient memory to print the page at the specified print quality The printer automatically lowers the print quality...

Страница 257: ... order Replace it with a new fuser unit Install LC1 The paper tray of the standard paper cassette is not installed or not installed properly Install the paper cassette correctly to clear this error Install LC2 The paper trays of the optional paper cassette unit are not installed or not installed properly Install the paper trays correctly to clear this error Install Photoconductor There is no photo...

Страница 258: ...K appear in place of XXXX and indicate the colors Cyan Magenta Yellow and Black respectively Install the indicated cartridges See Toner Cartridge on page 181 If the protective tape has not been removed from a toner cartridge turn the toner cartridge knobs to the unlocked position andthenreturntothelockedposition Thenremovetheprotective tape from the toner cartridge If that fails to clear the error...

Страница 259: ...responding multiple locations are displayed Location Description Jam AB Paper is jammed at the fuser unit For instructions on how to remove jammed paper at the fuser unit see Jam AB covers A and B on page 212 Jam A Paper is jammed at cover A For instructions on how to remove jammed paper at cover A see Jam A cover A on page 214 Jam AC Paper is jammed where it feeds into the printer or at the paper...

Страница 260: ...sage appears if you try to change the printer s settings through the control panel when the buttons are locked You can unlock them by using the EPSON WinAssist or WebAssist utility Refer to the Network Guide for information NonGenuine Toner xxxx The installed toner is not an EPSON genuine toner cartridge Using a non genuine toner cartridge may affect print quality EPSON shall not be liable for any...

Страница 261: ...ancel Job button to cancel the print job If you press the N Start Stop button without replacing the paper the printer will print on the loaded paper even though it does not match the required size Printer Open Cover A cover B cover D or some combination of these covers are open To clear this error close all covers Print Overrun The required time to process the print data exceeded the print engine ...

Страница 262: ...uctor has reached the end of its service life Turn off the printer then replace the photoconductor unit with a new one See Photoconductor Unit on page 187 for instructions The error clears automatically after you replace the unit and close all printer covers The photoconductor service life counter is reset automatically Replace Toner xxxx The indicated toner cartridges are out of toner and need to...

Страница 263: ...reset to the default configuration or to the last settings that were saved Reset to Save A control panel menu setting was changed while the printer was printing Press the N Start Stop button to clear this message The setting will become effective after printing has finished ROM Check The printer is checking the ROM Self Test The printer is performing a quick internal check Service Req xyyyy A cont...

Страница 264: ...lace the toner cartridges If that fails to clear the error turn the printer off Install the indicated cartridges See Toner Cartridge on page 181 Unable Clear Error The printer cannot clear an error message because the error status still remains Try solving the problem again Worn Fuser This message indicates that the fuser unit has reached the end of its service life Printing after this message app...

Страница 265: ...e to print until the Replace TransferUnit error message appears but early replacement is recommended to maintain high print quality Toclearthiswarningmessageandcontinueprinting selectClear All Warning from the control panel s Reset Menu For instruction about accessing the control panel menus see How to access the control panel menus on page 147 Write Error ROM P The printeris unable to write datai...

Страница 266: ...cate the colors Cyan Magenta Yellow and Black respectively You can continue to print until the Replace Toner xxxx error message appears Waiting until this message appears before replacing the toner is recommended as toner may spill during replacement if toner remains in the cartridge When printouts become faint see Toner Cartridge on page 181 for instructions Note Do not replace the toner cartridg...

Страница 267: ...st way to cancel printing Pressing this button cancels the currently printing job Pressing the q Cancel Job button for more than two seconds deletes all jobs from the printer memory including jobs the printer is currently receiving or printing Using the Reset menu Selecting Reset from the control panel s Reset Menu stops printing clears the print job being received from the active interface and cl...

Страница 268: ...hooting R4CE640 long bk Rev E A5 size TROUB FM 6 10 04 L Proof Sign off ABE J Hashimoto K Iwamura M Ishigami S Halvorson 4 Press the Enter button Printing is canceled the printer is ready to receive a new print job ...

Страница 269: ...er support for your area is not listed below contact the dealer where you purchased your product Customer support will be able to help you much more quickly if you give them the following information Product serial number The serial number label is usually on the back of the product Product model Product software version Click About Version Info or similar button in the product software Brand and ...

Страница 270: ...270 R4CE640 long bk Rev E A5 size CUSTO FM 6 10 04 L Proof Sign off ABE J Hashimoto K Iwamura M Ishigami S Halvorson ...

Страница 271: ...S Halvorson A A A A A A A A A A A A Appendix A Technical Specifications Paper Since the quality of any particular brand or type of paper may be changed by the manufacturer at any time EPSON cannot guarantee the quality of any type of paper Always test samples of paper stock before purchasing large quantities or printing large jobs ...

Страница 272: ... printer It may cause printer damage paper jams and poor print quality Media meant for other color laser printers black and white laser printers color copiers black and white copiers or ink jet printers Paper type Description Plain paper General copier paper Recycled paper is acceptable Envelopes No paste and no tape No plastic window Labels The backing sheet should be covered completely with no g...

Страница 273: ...per acid paper or paper that uses high temperature sensitive ink around 210 C Labels that peel easily or labels that do not cover the backing sheet completely Coated paper or special surface colored paper Paper that has binder holes or is perforated Paper that has glue staples paper clips or tape on it Paper that attracts static electricity Moist or damp paper Paper of uneven thickness Overly thic...

Страница 274: ...79 mm 8 5 11 in Legal 216 356 mm 8 5 14 in Half Letter 140 mm 216 mm 5 5 8 5 in GovernmentLetter 203 267mm 8 0 10 5 in Government Legal 216 330 mm 8 5 13 in Executive 184 267 mm 7 25 10 5 in F4 210 330 mm Custom 88 9 139 7 mm to 215 9 355 6 mm 3 5 5 5 in to 8 5 14 0 in Paper Sources MP tray for all sizes standard lower cassette forA4 A5 B5 Letter Legal Government Legal Executive optional paper cas...

Страница 275: ...k paper Size Monarch 3 7 8 7 1 2 in Commercial 10 4 1 8 9 1 2 in DL 220 110 mm C5 162 229mm C6 114 162 mm International B5 176 250 mm 7 9 8 in Paper Source MP tray only Size A4 210 297 mm Letter 216 279 mm 8 5 11 in Paper Source MP tray only Weight 106 to 162 g m 28 2 to 42 3 lb Size 88 9 139 7 mm to 215 9 355 6 mm 3 5 5 5 in to 8 5 14 0 in Paper Source MP tray only Weight 163 to 216 g m 42 5 to 5...

Страница 276: ...EPSON Color Laser Transparencies Printable area 5 mm minimum margin on all sides Size 88 9 139 7 mm to 215 9 355 6 mm 3 5 5 5 in to 8 5 14 0 in Paper Source MP tray only Size A4 210 297 mm Letter 216 mm 279 mm 8 5 11 in Paper Sources MPtray standardlowercassette optional paper cassette unit Size A4 210 297 mm Letter 216 mm 279 mm 8 5 11 in Paper Source MP tray only ...

Страница 277: ...conds from the standard lower cassette Warm up time About 30 seconds at normal temperature Paper feed Automatic or manual feed Paper feed alignment Center alignment for all sizes Duplex Available papertypesareA4 A5 B5 LT GLG LGL and EXE of plain paper EPSON Color Laser Paper Input paper supply MP tray Up to 100 sheets of plain paper EPSON Color Laser Paper Up to a 10 mm thick stack of envelopes la...

Страница 278: ... use 5 to 85 RH Altitude 3 100 meters 10 170 feet maximum Dimensions and weight Height 44 5 cm 17 5 in Width 43 9cm 17 3 in Depth 63 8 cm 25 1 in Weight Approx 29 8 kg 65 7 lb without consumables installed When extending all trays 72 9 cm 28 7 in Durability 5 years or 600 000 pages whichever comes first 110 V to 120 V Model Model KAA 3 220 to 240 V Model Model KAB 2 Voltage 110 V 120 V 10 220 V 24...

Страница 279: ...tralian model Power consum ption During printing Maximum 746 W 781 W Average 339 W 334 W During standby mode Average 73 W 70 W Sleep mode Up to 17 W Up to 18 W Safety UL 60950 CSA No 60950 EMC FCC Part 15 Subpart B Class B CSA C108 8 Class B Low Voltage Directive 73 23 EEC EMC Directive 89 336 EEC EN 60950 EN 55022 Class B EN 55024 EN 61000 3 2 EN 61000 3 3 EMC AS NZS CISPR22 Class B 110 V to 120 ...

Страница 280: ... not produce hazardous laser radiation Since radiation emitted by the laser is completely confined within protective housings and external covers the laser beam cannot escape from the machine during any phase of user operation CDRH regulations The Center for Devices and Radiological Health CDRH of the U S Food and Drug Administration implemented regulations for laser products on August 2 1976 Comp...

Страница 281: ...Windows XP Me 98 2000 or Server 2003support the USB interface Your computer must support USB 2 0 in order to use it as an interface Since USB 2 0 is fully compatible with USB 1 1 USB 1 1 can be used as an interface USB 2 0 is applied for Windows XP 2000 and Server 2003 operating systems If your operating system is Windows Me or 98 use USB 1 1 interface Ethernet interface You can use an IEEE 802 3 ...

Страница 282: ...gal GLG and Executive Paper weight 60 to 105 g m 16 to 28 lb Paper feed Two paper cassettes mounted Automatic feed delivery system Cassette capacity up to 500 sheets for each of cassettes Paper types Plain paper EPSON Color Laser Paper Power supply DC 5V and 24V supplied by the printer Model KAA 4 C12C802061 KAA 2 C12C802071 Dimensions and weight For 500 Sheet Paper Cassette Unit Height Width Dept...

Страница 283: ...orms to CE marking requirements in accordance with EC Directive 89 336 EEC Memory modules Only DIMMs produced specifically for EPSON products are compatible Height Width Depth Weight 336mm 13 2 in 439 mm 17 2 in 563 mm 22 2 in 19 0 kg 41 9 lb including all cassettes DRAM type Synchronous Dynamic RAM Dual In line memory module SDRAM DIMM Memory size 16MB 32 MB 64 MB 128 MB or 256 MB ...

Страница 284: ...s varies depending on the type of printing Product number Yellow 0210 Magenta 0211 Cyan 0212 Black 0213 Storage temperature 0 to 35 C 32 to 95 F Storage humidity 15 to 80 RH Life of factory installed cartridges Black Up to 2 000 images under conditions of A4 size paper continuous printing and 5 print ratio Yellow Magenta Cyan Up to 1 500 images Life of replacement cartridges Black Up to 4 500 imag...

Страница 285: ...the type of printing Product number S051093 Storage temperature 0 to 35 C 32 to 95 F Storage humidity 15 to 80 RH Life when using A4 or Letter size paper 30 000 pages of continuous printing Service life may be shortened by repeatedly warming up the printer or by frequently printing on envelopes labels thick paper or transparencies Product number S053006 Storage temperature 0 to 35 C 32 to 95 F Sto...

Страница 286: ...f pages you can print before replacing the fuser unit varies depending on the type of printing Product number S053011 S053012 Product number varies by location Storage temperature 0 to 35 C 32 to 95 F Storage humidity 15 to 80 RH Life when using A4 or Letter size paper and single side printing 100 000 pages of continuous printing Service life may be shortened by repeatedly warming up the printer o...

Страница 287: ...odes such as Start bar Stop bar and OCR B in addition to the bar code characters themselves However EPSON BarCode Fonts are designed to add such codes automatically allowingyou toeasilyprintbar codes thatconform to a variety of bar code standards EPSON BarCode Fonts support the following types of bar codes Bar code Standard EPSON BarCode OCR B Check Digit Comments EAN EPSON EAN 8 Yes Yes Creates E...

Страница 288: ...SON Code39 Num Yes No Code128 EPSON Code128 No Yes Creates Code128 bar codes Interleaved 2 of 5 ITF EPSON ITF No No Printing of OCR B and check digits can be specified with the font name EPSON ITF CD No Yes EPSON ITF CD Num Yes Yes EPSON ITF Num Yes No Codabar EPSON Codabar No No Printing of OCR B and check digits can be specified with the font name EPSON Codabar CD No Yes EPSON Codabar CD Num Yes...

Страница 289: ...ws 98 the procedure for other Windows operating systems is nearly the same 1 Make sure that the printer is off and that Windows is running on your computer 2 Insert the printer software CD ROM in the CD ROM drive Note If the language section window appears select your country If the EPSON Installation Program screen does not appear automatically double click the My Computer icon right click the CD...

Страница 290: ... click Local 5 Click Custom 6 Select the EPSON BarCode Font check box and click Install Then follow the on screen instructions 7 When installation is complete click OK EPSON BarCode Fonts are now installed on your computer Printing with EPSON BarCode Fonts Follow these steps to create and print bar codes using EPSON BarCode Fonts The application featured in these instructions is Microsoft WordPad ...

Страница 291: ...FM 6 10 04 R Proof Sign off ABE J Hashimoto K Iwamura M Ishigami S Halvorson B B B B B B B B B B B B 1 Open a document in your application andenter the characters you want to convert into a bar code 2 Select the characters then select Font from the Format menu ...

Страница 292: ...M Ishigami S Halvorson 3 Select the EPSON BarCode Font you want to use then set the font size and click OK Note In Windows XP 2000 NT 4 0 and Server 2003 you cannot use font sizes larger than 96 points when printing bar codes 4 The characters you selected appear as bar code characters similar to those shown below ...

Страница 293: ...will be printed as it appears on the screen but it cannot be read by a bar code reader Monochro me Printer Driver Color Printer Driver Host Based Monochrome Printer Driver Host Based Color Printer Driver Color not available Black not available Black Print Quality 600 dpi 600 dpi 600 dpi 600 dpi Toner Save Not selected Not selected Not selected Not selected Zoom Options Not selected Not selected No...

Страница 294: ...features in your application that enlarge or reduce the size of characters in only the vertical or horizontal direction Turn off your application s auto correct features for spelling grammar spacing etc To more easily distinguish bar codes from other text in your document set your application to show text symbols such as paragraph marks tabs etc Because special characters such as Start bar and Sto...

Страница 295: ...s This section contains details on the character input specifications for each EPSON BarCode Font EPSON EAN 8 EAN 8 is an eight digit abbreviated version of the EAN bar code standard Because the check digit is added automatically only 7 characters can be input The following codes are inserted automatically and need not be input by hand Left Right margin Left Right guard bar Center bar Check digit ...

Страница 296: ...ck digit is added automatically only 12 characters can be input The following codes are inserted automatically and need not be input by hand Left Right margin Left Right guard bar Center bar Check digit OCR B EPSON EAN 8 Character type Numbers 0 to 9 Number of characters 12 characters Font size 60 pt to 150 pt up to 96 pt in Windows XP 2000 NT 4 0 Server 2003 Recommended sizes are 60 pt 75 pt stan...

Страница 297: ... UPC Symbol Specification Manual OnlyregularUPC codesaresupported Supplementary codes are not supported The following codes are inserted automatically and need not be input by hand Left Right margin Left Right guard bar Center bar Check digit OCR B EPSON EAN 13 Character type Numbers 0 to 9 Number of characters 11 characters Font size 60 pt to 150 pt up to 96 pt in Windows XP 2000 NT 4 0 Server 20...

Страница 298: ...d by the American Universal Product Code UPC Symbol Specification Manual The following codes are inserted automatically and need not be input by hand Left Right margin Left Right guard bar Check digit OCR B The numeral 0 EPSON UPC A Character type Numbers 0 to 9 Number of characters 6 characters Font size 60 pt to 150 pt up to 96 pt in Windows XP 2000 NT 4 0 Server 2003 Recommended sizes are 60 pt...

Страница 299: ...s total length in conformance to the Code39 standard For this reason it is important to keep at least one space between the bar code and the surrounding text to prevent overlapping Spaces in Code39 bar codes should be input as _ underbars When printing two or more bar codes on one line separate the bar codes with a tab or select a font other than a BarCode Font and input the space If a space is in...

Страница 300: ...fonts support code sets A B and C When the code set of a line of characters is changed in the middle of the line a conversion code is automatically inserted Font size When OCR B is not used 26 pt or more up to 96 pt in Windows XP 2000 NT 4 0 Server 2003 Recommended sizes are 26 pt 52 pt 78 pt and 104 pt When OCR B is used 36 pt or more up to 96 pt in Windows XP 2000 NT 4 0 Server 2003 Recommended ...

Страница 301: ...ning spaces may not be correctly printed from applications that automatically delete spaces from the ends of lines or change multiple spaces into tabs When printing two or more bar codes on one line separate the bar codes with a tab or select a font other than a BarCode Font and input the space If a space is input while Code128 is selected the bar code will not be correct The following codes are i...

Страница 302: ... digits and OCR B The height of the bar code is automatically adjusted to 15 or more of its total length in conformance to the Interleaved 2 of 5 standard For this reason it is important to keep at least one space between the bar code and the surrounding text to prevent overlapping Interleaved 2 of 5 treats every two characters as one set When there are an odd number of characters EPSON ITF fonts ...

Страница 303: ...be input by hand Left Right quiet zone Start Stop character Check digit The numeral 0 added to the beginning of character strings as needed Font size When OCR B is not used 26 pt or more up to 96 pt in Windows XP 2000 NT 4 0 Server 2003 Recommended sizes are 26 pt 52 pt 78 pt and 104 pt When OCR B is used 36 pt or more up to 96 pt in Windows XP 2000 NT 4 0 Server 2003 Recommended sizes are 36 pt 7...

Страница 304: ... code is automatically adjusted to 15 or more of its total length in conformance to the Codabar standard For this reason it is important to keep at least one space between the bar code and the surrounding text to prevent overlapping When either a Start or a Stop character is input Codabar fonts automatically insert the complementary character If neither a Start nor a Stop character is input these ...

Страница 305: ... by hand Left Right quiet zone Start Stop character when not input Check digit Character type Numbers 0 to 9 Symbols Number of characters No limit Font size When OCR B is not used 26 pt or more up to 96 pt in Windows XP 2000 NT 4 0 Server 2003 Recommended sizes are 26 pt 52 pt 78 pt and 104 pt When OCR B is used 36 pt or more up to 96 pt in Windows XP 2000 NT 4 0 Server 2003 Recommended sizes are ...

Страница 306: ...ing with Fonts R4CE640 long bk Rev E A5 size APBAR FM 6 10 04 L Proof Sign off ABE J Hashimoto K Iwamura M Ishigami S Halvorson Print sample EPSON Codabar EPSON Codabar CD EPSON Codabar Num EPSON Codabar CD Num ...

Страница 307: ...he printer is turned on reset or initialized download To transfer information from the computer to the printer dpi dots per inch The number of dots per inch is a measure of printer resolution The higher the number of dots the higher the resolution driver See printer driver FF Form Feed A control code to break the page fixed width font A font whose characters are allotted the same amount of horizon...

Страница 308: ...eadsheets memory The part of the printer s electronic system that is used to store information Some information is fixed and is used to control how the printer operates Information that is sent to the printer from the computer is stored in memory temporarily See also RAM orientation Refers to the direction in which characters are printed on a page This direction is either portrait where the length...

Страница 309: ...varying amounts of horizontal space depending on the width of the character Thus the uppercase M takes up more horizontal space than the lowercase l RAM Random Access Memory The portion of the printer s memory used as a buffer and for storing user defined characters All data stored in RAM is lost when the printer is turned off reset To refresh the printer s memory and erase the current print jobs ...

Страница 310: ...tomatic print quality settings Macintosh 94 Automatic print quality settings Windows 49 C Canceling printing Macintosh 121 Canceling printing Windows 87 Clients with Macintosh 144 with Windows Me 98 or 95 134 with Windows NT 4 0 139 with Windows XP or 2000 135 Consumables fuser unit 193 order online 75 photoconductor unit 187 replacement messages 180 transfer unit 198 Contacting EPSON 269 Control ...

Страница 311: ... specifications 276 EPSON Color Laser Transparencies specifications 276 EPSON Status Monitor 3 about Macintosh 114 about Windows 68 how to access Macintosh 114 how to access Windows 71 how to install Windows 69 Job management Windows 79 Job management connections Windows 80 Job management how to use Windows 81 Job management setting to notify Windows 82 monitoring Windows 84 monitoring preferences...

Страница 312: ...acing 194 specifications 286 G Guides Administrator s Guide 2 Quick Reference 2 Reference Guide 2 Setup Guide 2 I Imaging cartridges handling precautions 181 replacing 182 Installing 550 Sheet Universal Paper Cassette Unit 161 memory modules 170 J Job management Windows 79 connections 80 how to use 81 setting to notify 82 L Labels driver settings 44 specifications 275 the use of 43 Loading paper c...

Страница 313: ... 170 Output tray 38 P Paper loading the optional paper cassette unit 33 printable area 276 prohibited 272 specifications 274 supported media types 272 Paper jams cover A Jam A 214 cover A paper cassettes and cover B JAM ABC 225 cover A and paper cassettes Jam AC 219 cover B Jam B 223 covers A and B Jam AB 212 MP tray 226 precautions when clearing jams 211 Paper sources 500 Sheet 1000 Sheet Optiona...

Страница 314: ...indows 47 how to uninstall Macintosh 122 how to uninstall Windows 88 Printer driver setting optional settings Windows 68 Printer driver settings automatically resizing printout Windows 56 customizing Macintosh 98 customizing Windows 53 duplex printing Macintosh 110 duplex printing Windows 63 extended settings Macintosh 112 extended settings Windows 65 making a new watermark Macintosh 105 making a ...

Страница 315: ... Windows 58 Print quality settings Windows 49 R Removing memory modules 176 Resetting the printer 267 Resizing page Macintosh 101 Resizing page Windows 57 Resizing page automatically Windows 56 S Safety precautions 10 Saving customized settings Macintosh 99 Saving customized settings Windows 55 Status alert Macintosh 118 Status alert Windows 79 Status sheet printing 227 Stopping monitoring Windows...

Страница 316: ...istances 202 for short distances 203 Troubleshooting error messages 253 LCD panel messages 253 paper handling problems 242 print quality problems 236 sharing problems 231 U Uninstalling Macintosh 122 Uninstalling Windows 88 91 USB Macintosh 120 USB WIndows 91 USB Windows 85 USB device driver how to uninstall Windows 91 W Watermark Macintosh how to make 105 how to use 104 Watermark Windows how to m...

Отзывы: