


5.
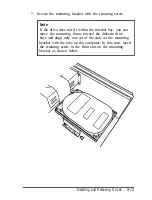
Secure the bracket to the drive with four screws.
If you plan to install two hard disk drives make sure
additional option cards do not exceed the power supply
limitations. See Appendix A.
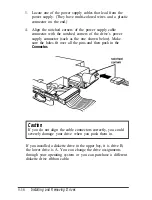
Also, use flat-head screws to secure a second drive to the
mounting bracket. You can purchase flat-head screws at
any hardware store; request this size: #6-32UNC x 8
FH,M,+.
Set the jumpers on both hard disk drives to indicate
which is the master and which is the slave drive. See the
documentation that came with your drive for
instructions.
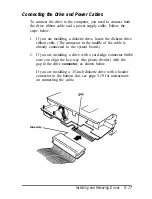
6.
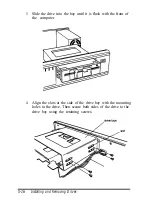
Turn the drive and the mounting bracket over, then slide
the slots in the mounting bracket under the tabs at the base
of the computer until the tabs hold the bracket in place.
5-12
Installing and Removing Drives
Содержание ActionDesk 4000
Страница 1: ......
Страница 128: ...Hard disk drive types continued Specifications A 9 ...
Страница 130: ...DMA Assignments Specifications A 11 ...
Страница 131: ...A 12 Specifications ...
Страница 132: ...System I O Address Map Specifications A 13 ...
Страница 133: ...A 14 Specification ...
Страница 134: ...Specifications A 15 ...
Страница 135: ...A 16 Specifications ...
Страница 136: ...Speaker connector pin assignments J21 Specifications A 17 ...
Страница 137: ...A 18 Specification ...
Страница 138: ...Specifications A 19 ...