


D4K Pro® User Manual
D4K_UserManual_v1.3_EN.docx, 2021-02-12
Page 15 of 52
5
Printer Delivery
5.1
Unpacking the Printer
The D4K Pro will arrive in cardboard packaging with a series of accessories boxes. The boxes will all be on top of a pallet. Deliver
them to the final site using a fork lift or a pallet jack. Alternatively, the boxes can be removed from the pallet and gently placed on
a dolly.
•
Crate
: D4K Pro, Starter Kit
•
Optional Boxes
: PCA 2000 (parts-curing apparatus), PWA 2000 (parts washing apparatus), and battery backup if
purchased.
Before opening the box, make sure that no visible damage can be observed or any sensors are broken. If these are present,
please inform the office immediately.
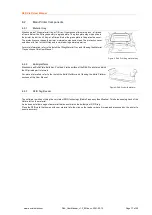
If everything is in good condition, open the box and carefully lift out the printer, then place it feet down on the designated space.
5.2
Starter Kit
NOTICE
Depending on the country of origin, the contents of the Starter kit may vary.
The delivered starter kit includes:
•
Build platform
•
Cone-shaped paint filters
•
Digital calipers
•
Ethernet cable
•
Glass scraper
•
Paint scraper
•
Power supply cord with adaptor
•
Spare material tray
•
Rubber spatula
•
USB drive
•
X-Acto knife
•
3mm allen key
5.3
Positioning the Printer
IMPORTANT
Risk of damage to the printer!
Incorrect positioning of the printer can cause damage to the printer and and/or to the built parts. Please, follow the
guidelines!
In order to obtain the best possible results, take the following factors into account when positioning the printer:
•
The D4K Pro needs to be
installed on a sturdy surface that can comfortably hold over 123.5 pounds (56 kg).
•
The printer requires a
minimum amount of space
for operation, maintenance, and heat dissipation.
•
A minimum of 8 inches/20 cm of clearance is required at the rear of the printer to prevent it from overheating.
•
A minimum of 12 inches/30 cm clearance is required at the left side of the printer to gain access to the main power,
USB, and Ethernet plugs
•
A minimum of 36 inches / 91 cm of clearance is required above the table-top.
•
Avoid installing the product in a place exposed to vibrations or impacts. Make sure the area it is placed on is a flat and
even surface.
•
Ensure you have sufficient electrical sockets near the printer location (at least two).
•
Keep workspace clear of any potential source of fire at all times.
•
Any heat generated from printer must be allowed and able to dissipate.