background image


Envision One cDLM® User Manual


www.envisiontec.com 

TS-MAM-EnvisionOneCDLMUserManual-V5.0-FN-EN , 2021-12-15 

Page 42 of 73 


8.7 

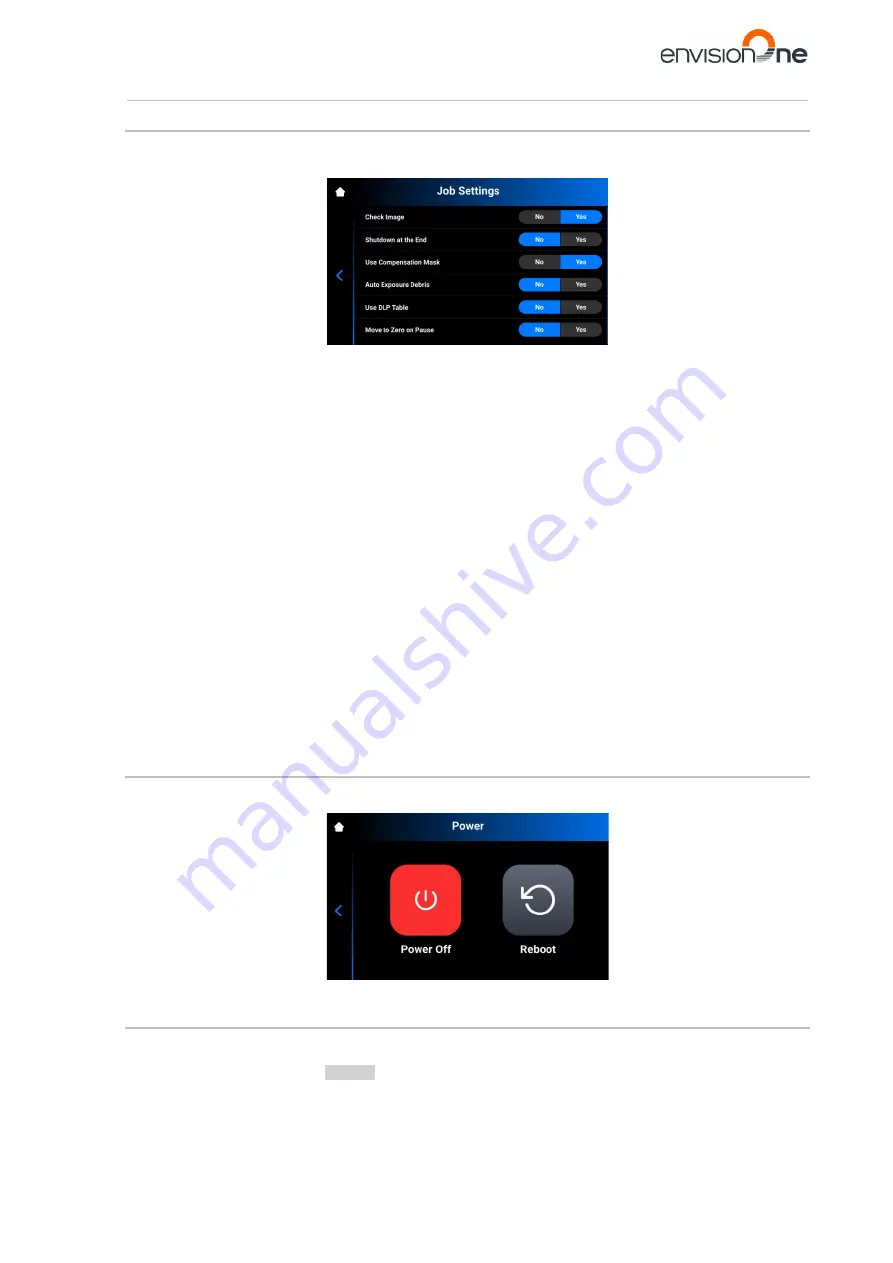
Job Settings Tab 

This tab allows the user


to check or change the printer settings. 

Tap 

Settings |Job settings

 to open the tab. 


The following settings are available: 


Check Image

: function of image verification. 

o


[Yes] 

-

 all layers of the job are checked before starting the job. 

o


[No]


- the layers are not checked before starting the job.  


Shutdown at the End

shutdown of the printer when the job is finished. 

o


[Yes]


- the printer turns off automatically after completion of the job. 

o


[No]


- the printer does not turn off after completion of the job.  


Use Compensation Mask

: function of mask application. 

o


[Yes]

 - the mask is applied to the projected image. 

o


[No]

 - the mask is not applied to the projected image. 


Auto Exposure Debris

: function of automatic exposure of the material tray to make cleaning the material 

tray easier. 

o


[Yes]

 - the material tray is automatically exposed after the job has failed.  

o


[No]


- the material tray is not exposed automatically when the job has failed. In this case, you 

can manually perform the material tray exposure after the completion of the build process. 


Use DLP Table:

 function of DLP table application. 

o


[Yes]

 - the DLP table is used. 

o


[No]

 - the DLP table is not used. 


Move to Zero on Pause

: function of build platform movement when the job is paused. 

o


[Yes]

 - the build platform moves to Zero position. 

o


[No]

 - the build platform stays at current layer of the job. 

8.8 

Power Tab 

This tab allows for switching the printer of or reboot it when needed. 

Tap 

Settings | Power


to open the tab. 


8.9 

Ethernet Tab 

This tab allows for setting the Network on Envision One printer. 

Tap 

Settings | Ethernet


to open the tab. 

For detailed information, see the 

Network

 section of this User Manual. 

Содержание cDLM

Страница 1: ...EnvisionTEC GmbH Brüsseler Str 51 45968 Gladbeck Germany Instruction Manual Original Instructions Envision One cDLM Version 5 0 Keep for further reference ...

Страница 2: ... 7 Obligations of the Printer Owner 13 3 8 Obligations of the Personnel 13 3 9 Personnel Qualification 13 3 10 Personal Protective Equipment 14 3 11 Interventions in Emergency Situations 14 3 11 1 Shutdown in Case of an Emergency 14 3 11 2 First aid measures and medical attendance 14 4 Technical Data 15 4 1 Mechanical Data 15 4 2 Electrical Requirements 15 4 3 Network Requirements 16 4 4 Intended ...

Страница 3: ...Linux 28 7 8 3 Supported Clients for Android 28 7 8 4 Supported Clients for iOS 29 8 Software Presentation 30 Envision One Control Software 30 Settings Menu 30 8 1 Wi Fi Tab 30 8 2 Material Info Tab 30 8 3 Printer Settings Tab 31 8 3 1 Printer Name 31 8 3 2 Units 32 8 3 3 About Printer 32 8 3 4 Software Update 33 8 3 5 Software Recovery 36 8 3 6 Support 38 8 3 7 Printing Statistics 39 8 3 8 Usage ...

Страница 4: ...g the Printer After a Print 63 11 5 Cleaning Printed Models and Removing Supports 63 11 6 Post curing the Printed Models 63 11 7 Finish Post processing of a Printed Model 63 12 Service and Maintenance 64 12 1 Customer Service 64 12 2 Operational Maintenance 64 12 2 1 Cleaning the Build Platform 65 12 2 2 Cleaning the Domeless Material Tray 65 12 2 3 Cleaning the Printer Casing 67 12 2 4 Cleaning t...

Страница 5: ...en consent of EnvisionTEC GmbH EnvisionTEC Inc or authorized distributors All documents are protected within the sense of copyright law No part of this documentation may be reproduced utilized or transmitted without specific prior consent Infringements are an offence resulting in obligatory compensatory damages All industrial rights reserved 1 4 Registered Trademarks EnvisionTEC cDLM and Perfactor...

Страница 6: ...nex Updated the Start a Print section Updated the Manual layout 4 2 Oct 2020 Updated Automatic Home Position Calibration section Updated Printing Statistics section 4 3 Oct 2020 Updated figures Updated screenshots Added Connect the Oxygen Concentrator to the Printer section Added Loading a Job from Envision One RP to Envision One section Added Maintaining EnvisionTEC Materials section Updated Addi...

Страница 7: ...ading a Job via FTP section Updated Mask Generation section Updated Troubleshooting section 4 5 Jan 2021 Updated Troubleshooting section Updated Setting Up the Oxygen Concentrator section F 4 6 Oct 2021 Updated Setting Wi Fi section Updated Job Settings Tab section Updated About Printer section Updated Troubleshooting section Updated Starting a Print section 4 7 Dec 2021 Updated Manual Debris Remo...

Страница 8: ...onsible employees have been trained by the manufacturer or the distributor trained operators for operation and persons with specialist technical training mechanics electrical engineering for troubleshooting fault elimination and maintenance 2 3 Locations in the Instruction Manual All the directions and locations in this instruction manual are always seen from the working position of the operator 2...

Страница 9: ... situation which if not avoided will result in death or serious injury WARNING Indicates a hazardous situation which if not avoided could result in death or serious injury CAUTION Indicates a hazardous situation which if not avoided may result in minor or moderate injury NOTICE Application hints and particularly useful information IMPORTANT Indicates an obligation to special behavior or an activit...

Страница 10: ...teed Intended Use is considered misuse Reasonably foreseeable misuse is e g Operating the printer with inappropriate materials Exceeding the technical values specified for normal operation Operating the printer with damaged printer parts or electric cables Unauthorized modifications and changes to the printer For any damage resulting from misuse The printer owner bears the sole responsibility The ...

Страница 11: ... printer transported by trained personnel only Risk of injury caused by improper handling of the build platform Before taking the build platform out make sure that all persons are clear of the danger zone Avoid unnecessary movements Avoid non ergonomic joint positions Risk for the operator to slip stumble or fall Keep the floor of the printer area clear of loose cables objects or liquids Electrica...

Страница 12: ...s eye irritation H332 Harmful if inhaled H334 May cause allergy or asthma symptoms or breathing difficulties if inhaled H335 May cause respiratory irritation H360f May damage the unborn child Suspected of damaging fertility H361f Suspected of damaging fertility H412 Harmful to aquatic life with long lasting effects H413 May cause long lasting harmful effects to aquatic life Other hazards Polymeriz...

Страница 13: ...ed for commercial use Therefore ensure that all general safety regulations and codes of practice as well as the safety measures described in this manual are observed at all times observe all environmental regulations when disposing any of the components or consumables make sure that the Material Safety Data Sheets for the materials used are observed and kept in proximity to the printer 3 8 Obligat...

Страница 14: ...ts laboratory coats safety goggles dust mask during post processing 3 11 Interventions in Emergency Situations An intervention in emergency situations includes individually or in combination Shutdown in case of an emergency First aid measures and medical attendance 3 11 1 Shutdown in Case of an Emergency In case of an emergency press and hold the power button to immediately shut down the printer 3...

Страница 15: ...entrator requires 120 volts with no less than 3 amps 5 Oxygen Concentrator Power supply 220V 22V 50Hz 1Hz 110V 15V 60Hz 1Hz Operation voltage V Hz AC220 50 AC110 60 6 Plug the printer and oxygen concentrator into separate surge protectors or separate battery backups 7 The Envision One does not require a dedicated server It can be connected wirelessly hard wired into the network or directly connect...

Страница 16: ...ge Minimum temperature of 73 F 23 C Maximum temperature of 85 F 28 C Follow the temperature instructions for each material that is being used These instructions can be found On the label of the material bottle Extended instructions are located in the material handling guide on the provided USB drive in the Starter Kit of the printer Air Quality Considerations Use the Envision One in a calm atmosph...

Страница 17: ... systematic approach Use a flathead screwdriver to pry the metal crate fasteners from the corners 5 To remove the L brackets from the crate slide the screwdriver under the end of the bracket with a break in the metal Leverage the bracket up one side at a time until the bracket comes free from the crate Take the stack of brackets and set them off to the side They will be used again to store the cra...

Страница 18: ... of 18 inches 46 cm behind the printer A minimum of 24 inches 61 cm on the left and right side of the printer A minimum of 48 inches 122 cm above the table top The printer requires an oxygen concentrator in order to print The concentrator weighs 11 9 lb 5 4 kg and is made to sit on the floor near the printer The concentrator connects to the printer via a 6 foot long tube and as such the concentrat...

Страница 19: ...ured material sticks to the build platform or to the previous layer Before starting the build process certain calibrations must be performed at the factory The material is then directly poured into the material tray The job is transferred to the printer through Envision One RP software or via USB drive The build process begins After the build process has finished the models are removed from the bu...

Страница 20: ...6 3 1 Hood The hood of the printer has no locking mechanism Open or close the hood manually by rotating it on its hinges IMPORTANT Risk of injury The protection hood must always be closed except when removing models from the printer After the models are removed close the hood on the printer If the hood opens during the printing process then the job will pause and the following message will appear ...

Страница 21: ...aluminum anodized It is used for medical and technical applications 6 3 4 The Domeless Material tray IMPORTANT Use a different material tray for each kind of material to avoid contamination If not possible clean the material tray carefully and thoroughly The domeless material tray is an assembly with a closed circuit of oxygen airflow which minimizes separation forces while printing and has been d...

Страница 22: ...o detect the presence of the build platform and the material tray on the printer There are two of them on the printer one for the build platform and one for the material tray The hall sensors detect when the build platform and material tray are not installed The sensors prevent the job from starting and the corresponding error message appears on the screen Figure 9 Hall sensor for the build platfo...

Страница 23: ...nd you save a backup copy of the data on your USB drive in a separate place such as cloud based storage external hard drive a backup computer etc 7 1 2 Switching the Printer On WARNING Risk of injury Risk of injury from crushing caused by moving printer parts The printer may only be operated by instructed and specially trained personnel The printer may only be operated if the protecting devices ar...

Страница 24: ...ut the oxygen concentrator you can find in the corresponding User Manual Step by Step 1 Place the oxygen concentrator on the floor near the printer 2 Place the concentrator so that there are at least 12 inches 30 cm of space between the concentrator and any walls curtains or other obstructions 3 Plug the power cable into the concentrator 4 Wait about ten minutes for the automatic priming process A...

Страница 25: ...fective surface of the laboratory as described in EN 13779 IMPORTANT Risk of damage to the printer It is important to always remove the build platform before taking the material tray assembly out of the printer Failure to do so can result in material dripping down into the safety glass causing failed builds and ruined equipment IMPORTANT Use a different tilt material tray for each kind of material...

Страница 26: ...printer to your network proceed as follows 1 Plug the Ethernet cable into the network connector located on the back of the printer 2 Connect the Ethernet cable to your network 3 On the main screen of Control Software tap Settings Ethernet There are two types of Connection static and dynamic Dynamic connection or DHCP printer gets the dynamic IP address All the fields are greyed out 4 To set the St...

Страница 27: ...this network to disable automatic connection to the current Wi Fi network It is possible to reconnect to this network again in the future The system will ask for a password for protected Wi Fi networks 7 8 Connect to the Printer via VNC Clients WARNING Risk of injury Improper use of the remote printer control over local network using VNC software may lead to damage or injuries Use the remote print...

Страница 28: ... Type the IP address into the VNC Server box 3 Tap Connect The control screen appears 4 Proceed working on the printer 7 8 2 Supported Clients for Linux VNC Viewer Step by step 1 Download VNC Viewer and open the program 2 Type the IP address into the VNC Server box 3 Tap Connect The control screen appears 4 Proceed working on the printer 7 8 3 Supported Clients for Android bVNC Free Step by step 1...

Страница 29: ...V5 0 FN EN 2021 12 15 Page 29 of 73 2 Tap Connect The control screen appears Proceed working on the printer 7 8 4 Supported Clients for iOS VNC Viewer Type the IP address and the connection name into the Address and Name boxes The control screen appears Proceed working on the printer ...

Страница 30: ...r the LAN connection allows the user to switch the printer off electronically To exit the Settings Menu tap the icon on the left part of the screen To enter the main screen tap the icon on top left corner of the screen 8 1 Wi Fi Tab The Wi Fi tab allows for setting the Wi Fi connection on the printer Tap Settings Wi Fi to open the tab For detailed information see the section WI FI Set on the print...

Страница 31: ...inter Settings tab provides information about the printer allows for changing the printer name selecting units of measurement and updating the software version Tap Settings Printer Settings to open the tab 8 3 1 Printer Name This option allows for changing the name of a printer 1 Tap Settings Printer Settings Printer Name 2 Enter the required name of the printer into the corresponding field using ...

Страница 32: ...out Printer to open the tab Printer Name the name of the printer S N printer serial number Control Software the version of control software set on the printer LED Operational Time the time of LED operation RAM Usage the volume of the occupied memory as percentage of the total volume Storage Usage the volume of the occupied storage as percentage of the total storage For more in depth information on...

Страница 33: ... Software Update tab on the touch screen which provides information about the current versions of software and the new versions of software if they are available Tap Settings Printer Settings Software Update to open the tab If the latest versions of software are installed on the printer the ChangeLog button is available It allows the operator to check the detailed information about the current ver...

Страница 34: ... Experience Improvement message appears 3 Tap OK to allow data collection or Skip to skip this step The process of printer updating starts The following message appears 4 Tap OK to allow data collection or Skip to skip this step see the Usage Analytics The process of printer updating starts After a successful printer update the following screen appears 5 To apply changes reboot the printer It will...

Страница 35: ... will receive an encrypted version number and would be able to install that custom update on the printer To install the custom update of the Software version 1 Go to Settings Printer Settings Software Update on your printer The following screen appears 2 Tap Change Version The following screen appears NOTICE If no custom updates are installed yet the Apply button will be grayed out 3 Tap Add Versi...

Страница 36: ...message appears 8 Tap OK to allow data collection or Skip to skip this step see the Usage Analytics The process of printer updating starts After a successful printer update the following screen appears 9 To apply changes reboot the printer It will reboot automatically in 30 seconds To reboot the printer manually tap Reboot 8 3 5 Software Recovery The Software Recovery tab allows to recover the pre...

Страница 37: ...to the previous version of Control Software The following message appears 3 Tap Recover to confirm the Software recovery The process of software recovery starts After successful software recovery the following screen appears 4 To apply changes reboot the printer It will reboot automatically in 30 seconds To reboot the printer manually tap Reboot ...

Страница 38: ... to the printer 2 Tap Settings Printer Settings Support Download Log Report to open the tab The following screen appears 3 Tap Latest Data to download the latest printer information or All Data to download the report containing all information received during printer operation The following message appears 4 Make sure the USB drive is connected to the printer and tap Ok The report downloads to the...

Страница 39: ...evaluation data the quality of finished jobs successful partially successful and failed Materials usage the name and volume of each material in use Job quantity the quantity of completed aborted and failed jobs Average print duration the average duration of the job in hours Damaged material trays the number of material trays marked as damaged 8 3 8 Usage Analytics Collecting and sending statistics...

Страница 40: ...n for Calibrate the Home Position Dry position is the lowest position of the build platform along the Z axis It is used for calibration of the platform while the material tray is empty of the material 8 6 2 Home Calibration Tap Settings Move Calibration Home Calibration to open the tab For detailed information see the section Calibrate the Home Position of this User Manual 8 6 3 Mask Generation St...

Страница 41: ...to the calibration plate You can tap the required box to adjust its projection power or just tap Next to move to the next box 7 Place the USB light sensor in the center of the light spot that is projected and tap Next to start adjustment of projection power The Next button becomes Pause button The projection power is being adjusted The red Pause button becomes active allowing to pause the adjustme...

Страница 42: ...rojected image Auto Exposure Debris function of automatic exposure of the material tray to make cleaning the material tray easier o Yes the material tray is automatically exposed after the job has failed o No the material tray is not exposed automatically when the job has failed In this case you can manually perform the material tray exposure after the completion of the build process Use DLP Table...

Страница 43: ...erial 5 Proceed following the step by step for Filtering Material if needed Job List Menu Tap Job List on the main screen of the Control Software to open the tab Scroll through the list to view different jobs There is the following information on job statistics Layer thickness the thickness of one layer in µm Layers the number of layers for the job Print time the estimated time when the job will f...

Страница 44: ...tomatically fixed oriented and supported in Envision One RP they may be transferred to the printer as a folder containing a series of images and files This information is used by the printer to build three dimensional models With each printer we send a USB drive containing the following program and data Envision One RP Software Buildstyles for the printer bsx You will find information on how to in...

Страница 45: ...erial tray NOTICE Recalibrate the Home position of the build platform after each change of the material tray The printer depending on its configuration can be equipped with the Hall sensors and or Load cells The Load cells are used to enable the Dry home position calibration The Hall sensors are used to detect the presence of the build platform and the material tray on the printer If the build pla...

Страница 46: ...ut the material tray maintenance click on the icon in the upper right corner of the screen Scan the QR code to visit the corresponding page in the online knowledge base If you have already calibrated the platform position with this material tray proceed as follows Find the serial number or name of your material tray in the list and tap it The following screen appears Tap Select if you want to sele...

Страница 47: ...he calibration will give a false reading to the sensors 3 Tap OK The platform starts moving to its Dry position Once the platform finds its Dry position it starts moving to Zero position Dry position calibration has been saved The following screen appears 9 1 1 1 Adding new material tray If you want to add new material tray to the list proceed as follows Tap Settings Move Calibration Home Calibrat...

Страница 48: ...ears 3 Tap OK The following screen appears IMPORTANT Make sure your material tray does not contain material in it Material residue in the material tray during the calibration will give a false reading to the sensors 4 Tap OK The platform starts moving to its Dry position Once the platform finds its Dry position it starts moving to Zero position Dry position calibration has been saved The following...

Страница 49: ...calibration will give a false reading to the sensors 4 Tap OK The platform starts moving to its Dry position Once the platform finds its Dry position it starts moving to Zero position Dry position calibration has been saved The following screen appears 9 1 2 Manual Home Position Calibration IMPORTANT Always remove the platform before taking the material tray out of the printer Failure to do so can...

Страница 50: ...n the USB drive that is shipped with every Envision One cDLM printer The file is also available to download by contacting EnvisionTEC support or an authorized distributor 4 Print the Home Position Calibration Cubes stl file See Start Job for details 5 Once the print has completed check if there are nine cubes on the platform 6 If any of the cubes are missing tap the icon and remove any cured parti...

Страница 51: ...etween the between Block 1 and Block 9 is 2mm 200 microns The result 200 microns is divided by 2 is equal to 1mm 100 microns The adjustments is turn 14 Using the 3 mm Allen wrench apply adjustments cautiously and precisely 15 Print the Home Position Calibration Cubes stl file again and measure the cubes Adjust the parallelism again as needed Adjusting Home position 16 Remove the build platform fro...

Страница 52: ...e platform down Tapping the icon resets the motion distance value to zero 22 Reference the values in Step 10 to determine the new home position The adjustment should be made based on the average height of the calibration blocks a If the average height measurement is below 4 90 mm for the disposable tray 4 80 mm move the platform up tapping Move the required number of steps b If the average height ...

Страница 53: ...s an air change of 25 m h per m effective surface of the laboratory as described in EN 13779 NOTICE The execution of job preparatory activities including date and performing operator shall be documented for reasons of traceability 10 1 Checking Z axis First make sure the printer has its Z axis slide activated 1 Tap Settings Move Calibration Move on the main screen 2 Tap the up and down arrow icons...

Страница 54: ...0 3 1 Loading a Job via FTP To load a job to the printer 1 Enter the IP address of the printer e g ftp 10 0 0 114 The Windows file explorer opens showing the folders on the printer 2 Open the Job folder 3 Put the job files to the folder All the files from Job folder are now shown in the Job List tab 10 3 2 Loading a Job from USB Drive To save a Job to USB drive follow the next steps 1 Connect the ...

Страница 55: ... job to the USB drive as described above 2 Insert the USB drive with the uploaded job into the corresponding plug of the printer The job is automatically added to the Job List of Envision One NOTICE The icon indicates that USB drive is connected to the printer The icon in the Job list indicates that the job was added via USB drive 10 3 3 Loading a Job from Envision One RP 1 Open the Envision One R...

Страница 56: ...tioning NOTICE The pressure gauge should read between 0 05 and 0 80 PSI when ready to start a print Before beginning a print always check the following things 1 The hood is closed 2 The flat surface of the build platform is clean and free of all cured material and the build platform torque knob is secured in position 3 The material tray is secured in position and the material tray torque knobs are...

Страница 57: ...n failed builds and damage to the equipment NOTICE Before starting a print the software checks the buildstyle in the job matches the material tag on the printer If they do not match then the job will not start IMPORTANT To pause a job use the Pause Job button All other methods will likely result in a failed build Proceed with attention To start a job 1 From the Home screen select the Job List 2 Se...

Страница 58: ...concentrator is connected The following window appears NOTICE To learn more about how to check and adjust the oxygen pressure click on the icon in the upper right corner of the screen Scan the QR code to visit the corresponding page in the online knowledge base 4 If you want to start the job now wait until the job starts If you want to delay your job print tap Start Later NOTICE The minimum delay ...

Страница 59: ...ation window appears 6 Wait until the job starts The build platform homes The job starts The following window appears The job has been printed successfully The following window appears If for some reason you want to remove the job from the material tray tap the icon and proceed by following a step by step for debris removal specified in Abort Job The following window appears 7 Rate the print by ta...

Страница 60: ... 10 6 1 Abort Job The job can be aborted by tapping the icon in the job printing window The following window appears 1 In the confirmation window tap Yes The job has been aborted The following window appears If there is no need to simplify the process of cleaning the material tray tap Cancel To simplify the process of debris removal from the material tray tap Yes The job has stopped The whole mate...

Страница 61: ...UserManual V5 0 FN EN 2021 12 15 Page 61 of 73 2 Select the job you want to delete from the list of jobs by tapping it The following screen appears 3 Tap Waste Bin icon to delete a job file The following confirmation window appears 4 Tap Delete to confirm a job file removal ...

Страница 62: ...er 11 3 Detaching Models from the Build Platform WARNING Risk of injury People could be injured As handling chemicals puts you at risk of coming into contact with corrosive chemicals being burnt inhaling poisonous vapors etc always put on suitable protective clothing gloves protective goggles etc before working with construction substances Take utmost care to avoid getting any chemicals in your ey...

Страница 63: ...the corresponding PWA 2000 Technical Guide provided with your PWA 2000 if ordered REFERENCE For information on cleaning of the printed models consult the Material Best Practice guide or Instruction of Use provided by your manufacturer or distributor 11 6 Post curing the Printed Models The PCA 2000 Parts Curing Apparatus is the recommended curing unit for the Envision One To get the information on ...

Страница 64: ...e personnel accordingly The following sections contain information on service and maintenance of the printer A regular maintenance according to the maintenance plan is an essential precondition for an efficient use of the printer Section Operational Maintenance describes the operational maintenance and how to carry out the maintenance tasks Section Auxiliary Materials and Consumables gives an over...

Страница 65: ... clean as possible between print jobs in order to keep your printer in optimal printing condition The build platform should be cleaned when build platform becomes sticky material cured around the build platform clamping handle when changing the material type Step by step 1 Clean the connection cavity at the top of the build platform using a Q tip with 99 IPA 2 If too much material has cured in the...

Страница 66: ...ation Use the rubber spatula from the Starter Kit to gently remove the cured material from the surface of the film assembly The Material Chamber is the vessel to hold the material in the printer during operation It comprises of two sections the upper chamber and the lower chamber 1 Use a clean dry paper towel to clean the material chamber Using chemicals or alcohol to clean anything that comes in ...

Страница 67: ...ng may become discolored 12 2 4 Cleaning the Hard Drive Space Time needed approximately five minutes Maintenance frequency Weekly Overview The Envision One has an internal PC that is capable of storing a limited amount of data It is a good practice to remove print job folders from the printer in order to free up space When the majority of the hard drive space has been used the printer may show err...

Страница 68: ...ons when the printer is powered on 3 To remove dust power down the printer disconnect the power cable and then wipe the vents and fan with a microfiber cloth 4 After the printer has been cleaned look down through the safety glass under the material tray to make sure that there isn t any dust or debris on the lens 12 2 7 Power Cycling Time needed Approximately five minutes Maintenance frequency Wee...

Страница 69: ...t by keeping the hood closed 2 Mix the material in the material tray before each print using the rubber spatula from the Starter Kit To do this Lightly skim the spatula back and forth across the surface of the material in the tray Mix carefully to avoid puncturing or tearing the film at the bottom of the domeless material tray Mix the material until it s a completely uniform color 3 Check the mate...

Страница 70: ...discarded after each use Do not use a paint strainer that requires cleaning as cleaning solutions can contaminate and ruin material 12 3 Auxiliary Materials and Consumables Materials have varying shelf lives between 6 12 months You will likely use all of the material before it expires Consumables such as material trays and material can be ordered on the Contact Us page of the EnvisionTEC website I...

Страница 71: ... material from alcohol or some other chemical 1 Pour the old material in separate container Do not pour it back into new or unused material container 2 Clean out the material tray completely with dry soft paper towels only don t use any chemicals 3 Clean the corners of the material tray with dry Q tips 4 Replace with new material and rebuild parts To avoid future contamination Do not place any che...

Страница 72: ...when there is not enough system memory for the printer to operate or start a job Delete unnecessary jobs from the printer and check the memory usage in the About Printer menu Error message Case A failed to move home This can happen during the Auto homing procedure An obstacle during the motion along the Z axis was detected Remove the obstacle part debris stuck to the build platform floating debris...

Страница 73: ...the Envision One RP User Guide provided with the printer for details 2 Use automatic placement to place parts 3 Generate supports 4 Generate job in Envision One RP and save it in to the folder 5 Make sure that the printer is on and plugged into the network 6 Locate the printer in the local network 7 Copy job to printer 8 Attach the build platform to the printer 9 Insert the material tray with mate...

Отзывы: