6
5. Operating Instructions (cont.)
charge cycle, the charger will stop the charge and show the off-
charge display without the message “BMS CONNECTED”.
5.4. Stop charging
5.5.1.
The charging can be paused and restarted where it left off at any
time. Just hit the center power button (marked as number 3 in
control panel section) Remote is available for controlling at a
distance.
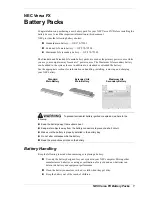
5.5. Charge complete
5.6.1.
End of charge display
5.6.2. End of charge without equalization
5.6.2.1.
The green complete LED comes on after proper end of
charge. The green complete LED is on and the display
shows CHARGE COMPLETE. The display alternates
between:
• Total charging time
• Amp-Hours restored to the battery
5.6.2.2.
Any other lit LED indicates a problem during charging.
Please refer to paragraph Control Panel for more
information.
5.6.2.3.
If the battery remains plugged in and refresh charge has
been enabled, refreshes will occur to maintain an optimal
charge.
5.6.2.4.
The battery is now ready for use. Push the ON/OFF button
before unplugging the battery.
5.6.3. End of charge with equalization
5.6.3.1.
An Equalize charge
can be started manually or
automatically.
5.6.4. Manual equalization start
5.6.4.1.
At the end of charge (green LED on or flashing), press
on the <EQUALIZE> button. The equalize button can also
be pressed any time during the charge and an equalize
charge will be started after charging is complete.
5.6.4.2.
The start of the equalization charge is indicated by the
symbol. During the equalization charge, the charger
displays the output current and alternates, the battery
voltage and voltage per cell and remaining time.
5.6.4.3.
NOTE: When an Equalize charge is manually started, the
output will be set automatically.
5.6.5. Automatic equalization start
5.6.5.1.
If an equalization day has been programmed in Charger
configurations the equalization charge will start
automatically on the programmed day of the week after
charging is complete.
5.6.5.2.
After the equalization, the battery will be available when
the green LED comes back on and the display shows
AVAIL. The battery is now ready for use. If the battery
remains plugged in and refresh charge has been enabled,
refreshes will occur to maintain an optimal charge. Push
the ON/OFF button before unplugging the battery.
5.6. AC power fail
5.7.1.
If the AC power fails with a battery connected to the charger during
a charge cycle, the charger will reset and start a new charge cycle
when power is restored. All charger settings as well as the time and
date are preserved
.
5.7. Series charging
5.8.1.
In series charging, the voltages of both batteries add up and must
match charger’s nameplate DC Volts rating. The charger’s amp-hour
rating must be equal to each battery’s ampere-hour rating. Charge
cycle will not start unless both batteries are connected.
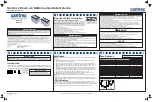
6.1. Main menu display
6.1.1.
When the charger is idle, press and hold <ESC>, the Main Menu
is then displayed. The main menu is automatically exited after 60
seconds of inactivity or can be exited voluntarily by pressing the
<ESC> button.
6.1.2.
All menus are accessed from Main Menu; a detailed description
of each menu is included in the next sections of this manual. The
menus that require a password are not displayed until the correct
password has been entered.
6.1.3.
The menus provide access to the following functions:
• View status and memorizations (LOGS icon)
• Viewing of faults, alarms, etc. (CHARGER icon)
• USB functions (USB icon)
• Setting of date, language and others (SETTINGS icon)
• Management of password (For service technicians only)
• Exit main menu (EXIT icon)
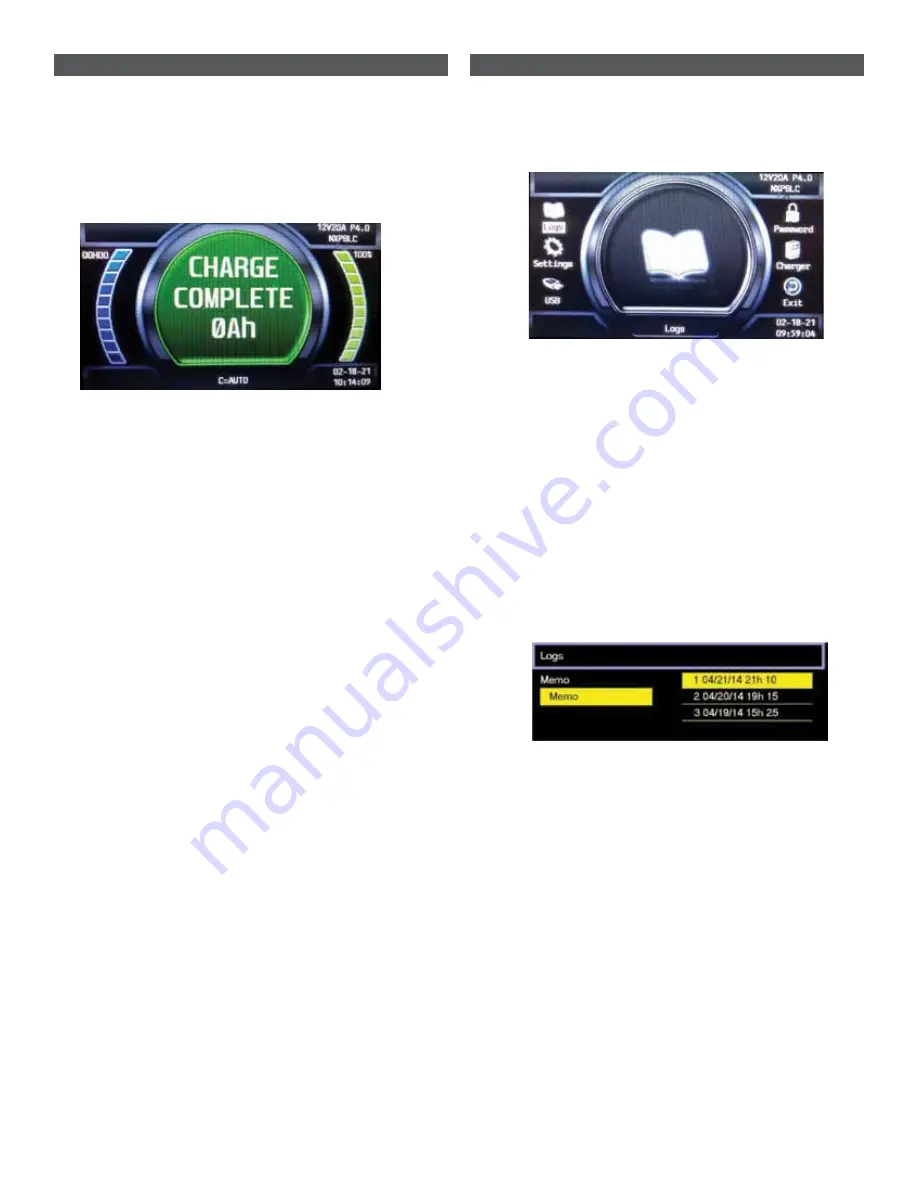
6.2. Logs
6.2.1. Memory display screen
6.2.1.1.
The charger can display the details of the last 300 charge
cycles.
6.2.1.2.
The display here shows 3 charges have been stored in
memory. MEMO 1 is the latest charge memorized. After
memorizing the three-hundredth charge, the oldest record
is deleted and replaced by the next oldest.
6. Menu and Display Information
6.2.2. Display a charge cycle
6.2.2.1.
Proceed as follows:
1.
Select a record (MEMO x) using the
▲
/
▼
buttons.
2.
Display the first History screen by pressing Enter.
3.
Display the second History screen by pressing
▼
.
4.
Return to the Main Menu by pressing Esc.
6.2.2.2.
The charge history is displayed; use the
▲
/
▼
to scroll
through the parameters.