ASSA ABLOY, the global leader in door opening solutions
Installation & Programming Guide
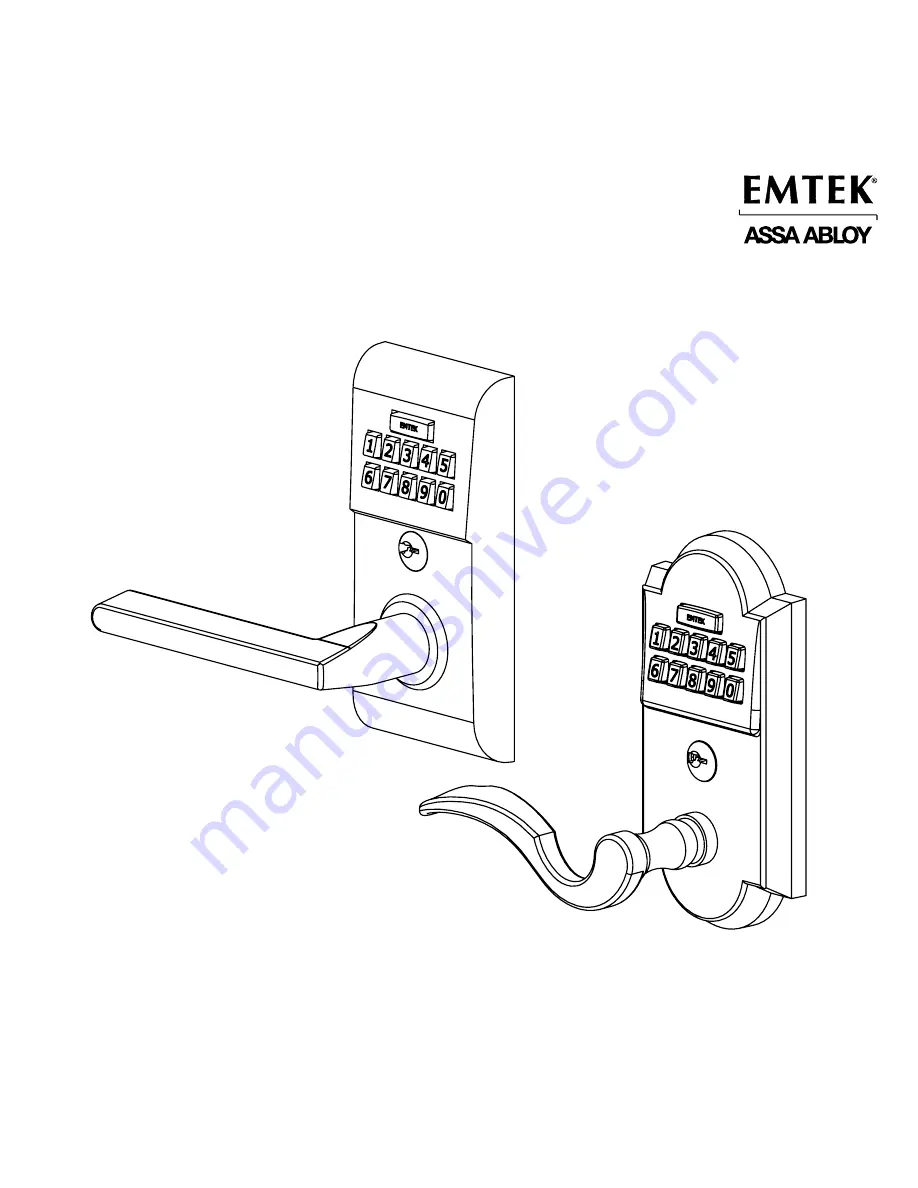
Modern Style & Classic Style
Electronic Keypad Lever Locksets
Modern Style Keypad
Classic Style Keypad
Страница 1: ...ASSA ABLOY the global leader in door opening solutions Installation Programming Guide Modern Style Classic Style Electronic Keypad Lever Locksets Modern Style Keypad Classic Style Keypad...
Страница 2: ...set 1 4 Inside Trim Plate Assembly 1 4a Inside Chassis 1 4b Inside Trim Plate 1 4c 8 32 x 3 8 Flat Head Machine Screw 2 4d 9V Alkaline Battery 1 5 8 32 x 11 2 Flat Head Machine Screw 2 6 8 x 3 4 Wood...
Страница 3: ...right Door is Right Hand RH Hinge is on the left Door is Left Hand LH In Swing Doors Out Swing Doors outside outside Preparation Fasten Strike Plate using two 8 x 3 4 Wood Screws item 6 A 2 3 8 or 2 3...
Страница 4: ...e from the Inside Chassis Fasten Latch using two 8 x 3 4 Wood Screws item 6 Remove Screws from Inside Trim Plate How to Install Remove inside chassis from trim plate before installing the outside trim...
Страница 5: ...the marking TOP can be seen from an overhead view Position the Outside Trim Plate Assembly through the bore hole With the Outside Trim Plate Assembly flush to the door REMOVE the Plastic Extender Feed...
Страница 6: ...ust remain in the correct position during installation Confirm the position of Cam Link For Left Hand Locks Turn to left position For Right Hand Locks Turn to right position Feed the Wire Harness thro...
Страница 7: ...shown B A B Install Battery For optimal performance always use a good quality battery Optional An additional 8 wood screw provided can be installed to prevent the interior trim from rotating 9V Batter...
Страница 8: ...e Trim Plate Assembly Inside Correct position for installation Thumbcam must be positioned as shown Neutral Position 5 User codes are located on the inside trim plate back cover page Fasten Inside Tri...
Страница 9: ...Enter 4 digit user codes See sticker located on the inside trim plate or back cover page 2 Turn Handle To Lock 1 Rotate Thumbturn from inside Passage Feature Does not apply to Keypad Storeroom Gate pr...
Страница 10: ...ashes 2 beeps Add User Code 4 digits Store up to 20 User Codes 2 Enter New User Code 4 digits Re Enter New User Code 4 digits 1 Green LED flash 1 beep 1 Green LED flash 1 beep 2 Green LED flashes 2 be...
Страница 11: ...tton for 3 seconds 1 Green LED flash and 2 short beeps followed by 1 Green LED Flash and 2 short beeps indicates the lock has been successfully restored Restoring the Lock to Factory Default Setting T...
Страница 12: ...12...
Страница 13: ...e global leader in door opening solutions Guide d installation et de programmation FR Levier et clavier lectroniques pour jeu de serrures Style Moderne et Style Classique Clavier Style Moderne Clavier...
Страница 14: ...Assemblage de la plaque de garniture int rieure 1 4a B ti int rieur 1 4b Plaque de garniture int rieure 1 4c Vis m tal t te plate 8 32 x 3 8 po 2 4d Pile alcaline de 9 V 1 5 Vis m tal t te plate 8 32...
Страница 15: ...s deux vis bois n 8 x 3 4 po article n 6 Installation de la plaque de g che D 15 FR Confirmation du sens d ouverture LE SENS DE LA PORTE EST TOUJOURS D TERMIN DE L EXT RIEUR Ext rieur Ext rieur Pr par...
Страница 16: ...e p ne l aide des deux vis bois n 8 x 3 4po article n 6 Retirez les vis de la plaque de garniture int rieure Pour installer Avant d installer la garniture ext rieure retirez le b ti int rieur de la pl...
Страница 17: ...ue TOP peut tre vue du dessus Positionnez l assemblage de la plaque de garniture ext rieure dans le trou de la poign e Alors que l assemblage de la plaque de garniture est align sur la porte RETIREZ l...
Страница 18: ...ec ouverture gauche Tournez vers la position de gauche Pour les serrures avec ouverture droite Tournez vers la position de droite Faites passer le faisceau de c blage dans le b ti int rieur 4 TAPE 1 T...
Страница 19: ...e utilisez toujours une pile de bonne qualit Fixez le b ti int rieur l aide de deux vis m tal n 8 32 x 11 2 po t te plate article n 5 TAPE 3 TAPE 4 TAPE 5 Pile de 9V Avavccnt de fixer fermement les vi...
Страница 20: ...que de garniture int rieure l aide de deux vis m tal n 8 32 x 3 8 po t te plate article n 4c Installation de la plaque de garniture int rieure Les codes d utilisateurs se trouvent sur la plaque de gar...
Страница 21: ...que de garniture int rieure ou reportez vous la couverture arri re 2 Tournez la poign e Pour verrouiller 1 Tournez la poign e barrette tournante par l int rieur Fonction pour passage Ceci ne s appliqu...
Страница 22: ...es utilisateurs les active tous s ils taient d sactiv s 2 clignotements de la DEL Verte 2 bips Supprimer tous les codes d utilisateur 5 Entrez de nouveau le code de programmation 1 clignotement de la...
Страница 23: ...enrouge La serrure n acceptera pas de code additionnel durant 20 secondes 20 bips Lorsqu un prochain code valide est entr la serrure met 3 bips rapides pour indiquer que des codes invalides ont t pr c...
Страница 24: ......
Страница 25: ...al leader in door opening solutions Gu a de Instalaci n y Programaci n ES Estilo Moderno y Estilo Cl sico Palanca y Teclado Electr nico para Juego de Cerraduras Teclado Estilo Teclado Estilo Moderno T...
Страница 26: ...e de la Placa Decorativa Interior 1 4a Chasis Interno 1 4b Placa Decorativa Interior 1 4c Tornillo de Cabeza Plana de 8 32 x 3 8 2 4d Bater a Alcalina de 9V 1 5 Tornillo de Cabeza Plana de 8 32 x 11 2...
Страница 27: ...ST SIEMPRE DETERMINADA DESDE AFUERA La bisagra est a la izquierda La puerta es Izquierda LH La bisagra est a la derecha La puerta es Derecha RH La bisagra est a la derecha La puerta es Derecha RH La b...
Страница 28: ...el Pestillo usando dos Tornillos para Madera 8 x 3 4 art culo 6 Retire los Tornillos de la Placa Decorativa Interior C mo Instalar Retire el chasis interno de la placa decorativa antes de instalar la...
Страница 29: ...isualizada desde arriba Posicione el Montaje de la Placa Decorativa Exterior a trav s del orificio Con el Montaje de la Placa Decorativa Exterior alineado a la puerta RETIRE Extensor de Pl stico B A 3...
Страница 30: ...vas Para Cerraduras Izquierdas Gire a la posici n izquierda Para Cerraduras Derechas Gire a la posici n derecha Introduzca el Arn s de Cables a trav s del Chasis Interno 4 PASO 1 PASO 2 La uni n de le...
Страница 31: ...e use una bater a de buena calidad Asegure el Chasis Interno usando dos tornillos de Cabeza Plana 8 32 x 11 2 art culo 5 PASO 3 PASO 4 PASO 5 Bater a 9V Verifique la alineaci n antes de ajustar por co...
Страница 32: ...Placa Decorativa Interior usando dos Tornillos de Cabeza Plana 8 32 x 3 8 art culo 4c Instale la Placa Decorativa Interior Los c digos de usuario est n localizados en la placa interior y la ltima p g...
Страница 33: ...usuario de 4 d gitos Vea la etiqueta ubicada dentro de la placa decorativa interior o la ltima p gina 2 Gire la Palanca Para Bloquear 1 Gire el Cerrojo Manual desde adentro Caracter stica de paso No s...
Страница 34: ...io 4 d gitos Reingresar el Nuevo C digo de Usuario 4 d gitos 1 Destello del LED Verde 1 bip 1 Destello del LED Verde 1 bip 2 Destellos del LED Verde 2 bips Borrar el C digo de Usuario 3 Ingrese el C d...
Страница 35: ...stello del LED Amarillo 1 bip corto Seguro Manual Externo Habilitado 2 destellos del LED Verde Corte la energ a desconecte la bacter a de 9V de la Cerradura Presione y mantenga presionado el bot n EMT...
Страница 36: ...50 E Stafford Street City of Industry CA 91744 Tel 800 356 2741 626 961 0413 Fax 800 577 5771 626 336 2812 emtek com Copyright 2017 Emtek Products Inc an ASSA ABLOY Group company All rights reserved R...