background image

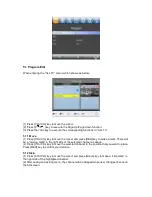
14.3  Rename 


(1) Press [GREEN] key to rename the selected program. 
(2) Press [OK] key to save the changes. 
 

15. Packing list 


PART 

QUANTITY 

N150H player 

Power adapter  

Remote control 

CD with user manuals 


16. Troubleshooting 


If you encounter problems when using this product, please check the following points before 
requesting service. 
 

Problem 

Solution 

No power on 

Confirm that you have an appropriate power 
source. 
Check if all the connections between the wall outlet 
and power supply, and the power supply and the 
player are correct. 
Switch the power button in front of the player to 
turn on the power. 

Buttons do not work 

To completely reset the player, unplug the AC cord 
from the AC outlet for 5-10 seconds. 

The player does not respond to 
the remote control 

Point the remote control towards the remote 
receiver. 
Make sure the signal from the remote control to the 
receiver on the player is not blocked by solid 
objects. 
Reduce the distance to the media player. 
Replace the batteries in the remote control. 
Re-insert the batteries with their polarities (+/- 
signs) as indicated. 

No picture on screen 

Check if the TV is switched on. 
Select the appropriate video input on your TV. 

No sound or distorted sound 

Adjust the volume. 
Check that the audio cables are connected 
correctly. 
Select the audio output supported by your TV. 

 
WARNING 
Under no circumstances should you try to repair the system yourself, as this will invalidate 
the warranty. Do not open the system as there is a risk of electric shock. 

Содержание Movie Cube N150H

Страница 1: ...Movie Cube N150H User s Manual v1 0 ...

Страница 2: ... LCN 9 5 5 Games 9 6 Picture 9 7 Channel Search 10 7 1 Auto Search 10 7 2 Manual Search 10 8 Time 11 9 Option 12 10 System 12 11 USB 13 11 1 Multimedia 14 11 2 Photo set up 15 11 3 Movie set up 15 11 4 PVR Time shift set up 15 12 Firmware upgrade 16 13 Record function 17 14 Manage recordings 17 14 1 Full screen 17 14 2 Delete 17 14 3 Rename 18 15 Packing list 18 16 Troubleshooting 18 ...

Страница 3: ... it will not be walked on Please take special attentions to cords at plugs convenience receptacles and the point where they exit from the unit Object and Liquid Entry Never put objects of any kind into this STB through openings as they may touch dangerous voltage points or short out parts that could result in a fire or electric shock Never spill any liquid on the STB Parts Replacement When the uni...

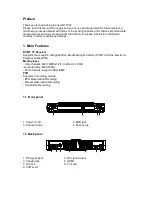
Страница 4: ...ny damage 1 Main Features DVB T TV Receiver Supports the reception of Digital Video Broadcasting Terrestrial DVB T and the Electronic Program Guide EPG Media player Video formats MKV MPEG1 2 4 H 264 AVI VOB Audio formats MP3 WMA Photo formats support JPEG BMP PVR Supports 3 recording modes EPG Reservation Recording Manual Reservation Recording One Button Recording 1 1 Front panel 1 Power on off 2 ...

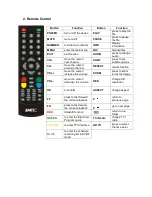
Страница 5: ...previous channel REPEAT repeat function VOL move the cursor increase the volume ZOOM press to zoom in out the image VOL move the cursor decrease the volume RES change HD resolution OK to confirm ASPECT change aspect FF press to fast forward the current playback P return to previous page FR press to fast rewind the current playback P go to next page RED timeshift function return to up folder GREEN ...

Страница 6: ...rch and press OK key to begin the auto scan 4 Press Exit key to exit menu 5 Program Press the Menu key to enter the main menu which shows as below 1 Press VOL VOL key to select menu pages among Program Picture Channel Search Time Option System and USB 2 Press CH or OK key to enter the Program Edit If Menu Lock is On a dialogue inquires the password which is 000000 for default 3 Press Exit key to g...

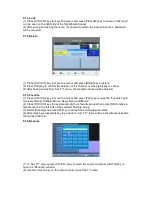
Страница 7: ...sor and press RED key to make a mark There will be a moving mark in the right side of the selected channel as above 2 Press CH CH key to move the selected channel to the position that you want to place Press RED key to confirm your decision 5 1 2 Skip 1 Press CH CH key to move the cursor and press Green key to make a skip mark in the right side of the highlighted channel 2 After saving and exiting...

Страница 8: ...annel will be deleted 5 1 5 Favorite 1 Press CH CH key to move the cursor and press FAV key to open the Favorite Type window showing Disable Movie News Sport and Music 2 Press CH CH key to navigate among the 4 favorite groups then press OK to make a favorite mark in the left side of the selected Favorite group 3 Select Disable and press OK key to cancel the existing favorite mark 4 After marking p...

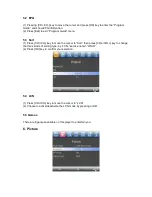
Страница 9: ... Press CH CH key to move the cursor to Sort then press VOL VOL key to change the three kinds of sorting type by LCN service name ONID 2 Press OK key to confirm your selection 5 4 LCN 1 Press CH CH key to move the cursor to LCN 2 Choose to active deactivate the LCN mode by pressing on off 5 5 Games There are 6 games available on this player to entertain you 6 Picture ...

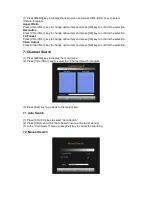
Страница 10: ...hange option item and press OK key to confirm the selection Video Output Press VOL VOL key to change option item and press OK key to confirm the selection 7 Channel Search 1 Press MENU key to display the main menu 2 Press VOL VOL key to select the Channel Search program 3 Press Exit key to go back to the main menu 7 1 Auto Search 1 Press CH CH key to select Auto Search 2 Press OK to enter the Auto...

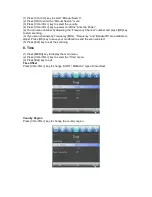
Страница 11: ...ey to start scanning b If you scan channels by Frequency MHz Frequency and Bandwidth are available to adjust Press OK key to save your modifications and the scan will start 5 Press Exit key to exit the scanning 8 Time 1 Press MENU key to display the main menu 2 Press VOL VOL key to select the Time menu 3 Press Exit key to exit Time Offset Press VOL VOL key to change AUTO MANUAL type of time offset...

Страница 12: ... to select the Option menu and OSD Language 3 Press VOL VOL key to choose the language Subtitles Language Press VOL VOL key to choose TV subtitles language Audio Language Press VOL VOL key to choose audio language Digital Audio Press VOL VOL key to choose digital audio output PCM RAM Press Exit key to exit the Option 10 System 1 Press MENU key to display the main menu 2 Press VOL VOL key to select...

Страница 13: ...e numeric keys of the remote control to set the new password Restore Factory Default 1 Press OK key to enter the sub menu and then OK to confirm to restore the default 2 Press EXIT key to cancel the restoring Information Press OK key to show the system information model no SW version HW version 11 USB The USB menu will be disabled when the USB device is unplugged The media player list will not be ...

Страница 14: ...Press CH CH key to select the file and press OK key to play the music 3 Press EXIT key to return to folder Photo 1 Press OK key to enter the Photo menu 2 Press CH CH key to select the file and press OK key to show the picture 3 Press EXIT key to return to folder Movie 1 Press OK key to enter Movie menu 2 Press CH CH key to select the file and press OK key to play the movie 3 Press EXIT key to retu...

Страница 15: ... and press OK enter the Photo configure menu 2 Press CH CH and VOL VOL key to adjust the slide time 11 3 Movie set up 1 Press CH CH key to move the cursor and press OK to enter the Movie configure menu 2 Press CH CH and VOL VOL key to adjust the aspect ratio 11 4 PVR Time shift set up Press CH CH key to move the cursor and press OK key to enter the PVR Configure menu ...

Страница 16: ...IT key to return to sub menu Timeshift function This function is only available when you connect USB storage to the player Press Red to start the timeshift then press Stop to stop the recording Format 1 Press CH CH key to move the cursor and 2 Press OK key to enter the Format then 3 Press VOL VOL key to choose the Format 4 Press Exit key to return sub menu ...

Страница 17: ...ystem will update the firmware automatically 3 Please restart STB after the software upgrade is complete 13 Record function If you press key to start recording the screen will be displayed as below Press key to stop recording 14 Manage recordings 14 1 Full screen 1 Press CH CH key to choose the file to play 2 Press BLUE key to make it full screen 14 2 Delete 1 Press YELLOW key to delete the select...

Страница 18: ... player unplug the AC cord from the AC outlet for 5 10 seconds The player does not respond to the remote control Point the remote control towards the remote receiver Make sure the signal from the remote control to the receiver on the player is not blocked by solid objects Reduce the distance to the media player Replace the batteries in the remote control Re insert the batteries with their polariti...

Отзывы: