

GPS
Satellites
What’s in the Box:
•
Osprey Personal Tracker
•
Charger kit (including USB lead & international plug adapters)
•
Quick Start Guide (this document)
The Osprey is a compact, light-weight, personal tracker that uses
Inmarsat and GPS satellites to provide regular position reporting and
two-way messaging from most locations on the Earth's surface.
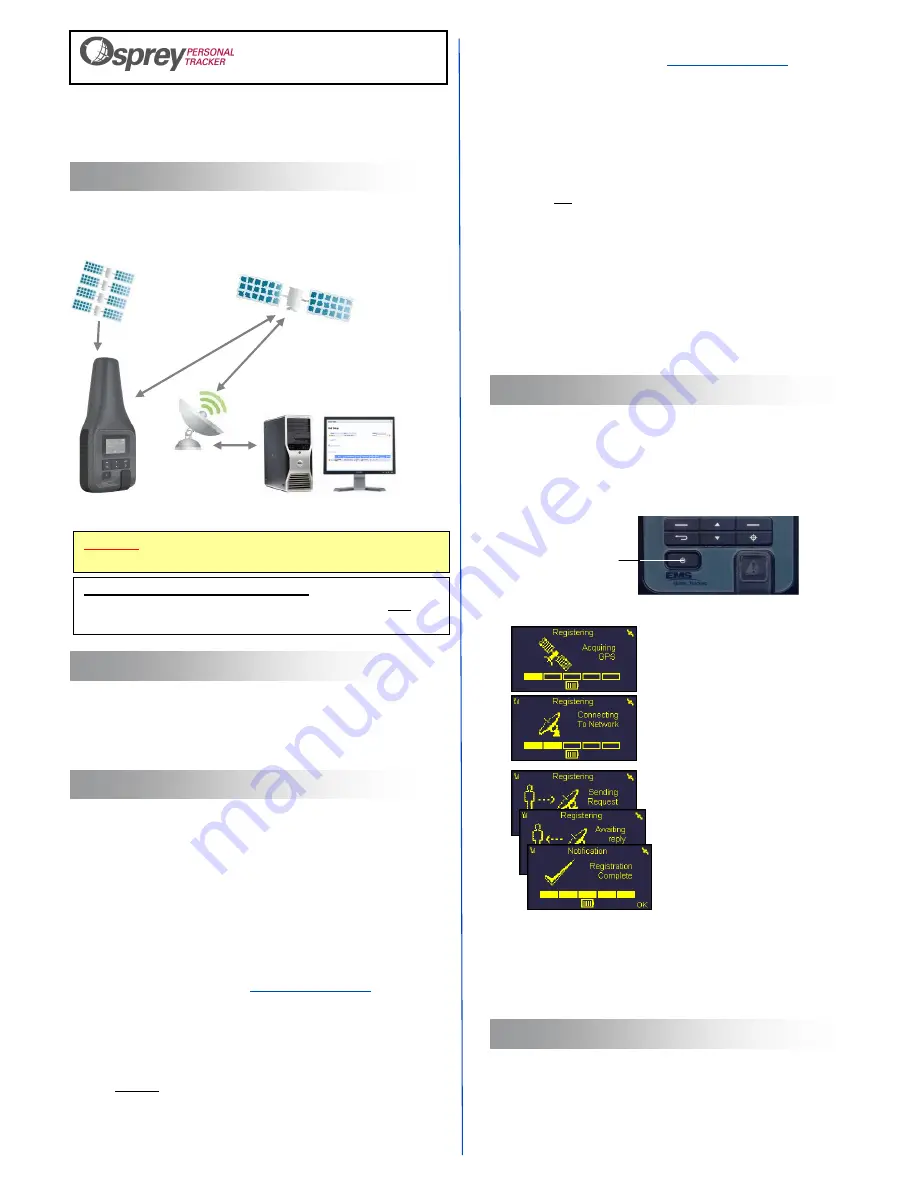
Figure 1: Osprey Operation
Before using the Osprey, charge the battery for a minimum of 6 hours
using the supplied charger. The Osprey connects to the charger using
the supplied USB cable.
Replace the rubber bung after charging the unit.
This section is for system administrators who need to register the
Osprey before use in the field.
The Osprey must be activated for use
on an airtime account prior to registration.
S
kip to Step 3 if the
Osprey has already been registered.
Step 2a – Create Your User Account
Before registering your Osprey, you must have a user account with the
EMS Global Tracking online service. If you already have one go directly
to Step 2b.
To create a user account:
1. Using your Web browser, go to:
http://emsviewpoint.com
2. On the Login page, click the
Register
link provided for new users.
3. Enter your personal details on the registration page then click
Register
to submit them.
An email message will be sent to you containing a link to activate your
account.
DO NOT
log in until you receive the email. Click the link near
the bottom of the email to complete the account setup.
Note:
If you have attempted to log in before clicking the link, select
Reset Password
on the login page to receive a new email.
Step 2b – Add Your Osprey to the ViewPoint Application
1. Using your web browser, go to:
http://emsviewpoint.com
2. On the Login page, enter your username (this is your email
address) and password, then click
SECURE LOGIN
.
Note:
If you see a security warning, click
Proceed anyway
, or the
equivalent option in your browser.
3.
If this is the first Osprey you have registered:
•
••
•
Click
add terminal
in the Welcome page.
If this is not the first Osprey you have registered:
•
••
•
Click the
TERMINALS
menu in the system menu, then click
Add Terminal
.
4. Enter the details of the Osprey when prompted:
•
••
•
Inmarsat Serial No. (ISN)
and
Serial Number
– Printed on the
label on the rear of the Osprey (
ISN
and
SERIAL
respectively).
•
••
•
Unit Name
– A unique name of your choice.
•
••
•
Fleet Name
– The name of the group of trackers to which this
Osprey belongs (suggestion: use your company name).
5. Follow the prompts, then exit ViewPoint.
Complete the registration process as follows:
1.
Take your Osprey outside to a location with a good sky view
to
the south in the northern hemishere, or to the north in the southern
hemisphere -
refer to the Operator Manual for detailed information.
2. Switch on your Osprey by pressing the
On/Off
key for 2 seconds:
3. The Osprey starts the registration process:
Note:
In extreme cases, the whole process may take up to 20 minutes.
If you see a "Poor Sky View" or "Registration Failed" message,
move to a location with a better sky view and select OK to try
again. Refer to the Operator Manual for further information.
During normal operation, the Osprey reports its GPS position, heading
and speed to ViewPoint at intervals scheduled in ViewPoint (default 8
minutes). It will receive any incoming messages and transmit any
messages that you have composed. Between communication periods,
the Osprey remains dormant, using very little battery power.
Normal Operation
STEP 1 – Charge the Battery
Introduction
STEP 3 – Switch On the Osprey
STEP 2 – Register the Osprey on the Web Site
QUICK START GUIDE
Osprey
Ground Station
ViewPoint Application
Inmarsat Satellite
On/Off Key
CAUTION:
DO NOT SWITCH ON YOUR OSPREY UNTIL YOU
REACH STEP 3!!
PLEASE READ THE OPERATOR MANUAL
for additional
information. The manual is available as a download from the Help
section in ViewPoint.
a) The Osprey acquires the GPS
satellites. The top-right icon flashes
during this process and is steady when
the satellites are located.
c) The Osprey sends a request to
ViewPoint to complete the registration
process, and awaits a reply.
Select
OK
when you see "Registration
Complete". The Home page is
displayed (see over).
b) The Osprey connects to the Inmarsat
satellite. The top-left icon flashes and
shows the signal strength.
Ensure there
are at least two signal strength bars.
A
steady icon means the unit is connected.