background image


9019URF  QG  英 

3100506040  v1.0


9019URF Keyboard with Mouse & Dual Mode Joystick Mouse 

Quick Installation Guide


Hardware Installation 


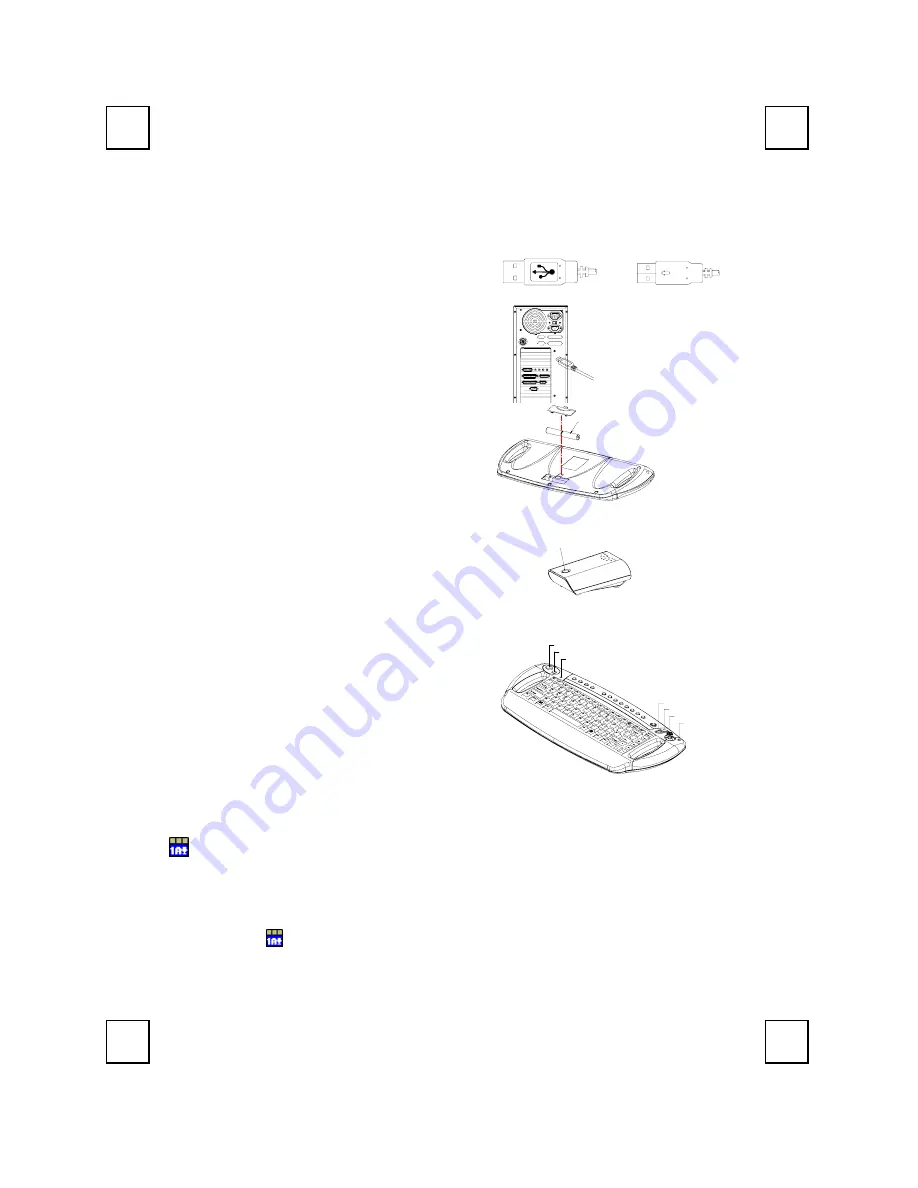
Front View of USB Connector          Back View of USB Connector


1. 

Plug in the receiver connector into your 

available USB port on PC. 


2. 

Take the keyboard and make sure the 

batteries on the back are installed correctly. 
(Follow the polarity signs in the battery 
compartment.) 

11

0V


(+)

( - )

1.5V 2pcs


ID Button Setting 

This ID-recognition function helps to protect 
against interference from other RF keyboards in 
the same environment. Remember to set the ID 
when you replace the batteries or your keyboard 
kits do not work properly. 


The word CONNECT labels the ID button on 
each unit. 


The LED under ID button of receiver shows 
connecting condition. 

1.  Your PC must be on to change the ID setting. 
2.  Press ID button on the top of the receiver 

once. 

3.  Press ID button on the upper-left corner on 

the keyboard front side once. 

Attention:

 The whole procedure should be 

completed 

within 1 minute

ID Button(LED)


Mouse Right Button

ID Button

Scroll Down

Sticker

Mouse Middle Button

Scroll Up

Mouse Left Button


Software Installation 

In order to take advantage of the special button functionality of the keyboard you will have to 
install the keyboard driver which is located on the driver disk included in the box. 

1.  Remove any existing keyboard software from the computer. 
2.  Insert the driver CD in your computers, and run "

SetupKey.exe

". 

3.  Follow the on screen instructions to finish the installation procedure. The driver default will 

be installed at 

C:\Program Files\KMaestro

The driver icon 

  will show on Windows system tray when all setup procedures are finished, 

the operating system need not to be restarted. 


Plugging in USB 
Connector 

Bottom view of 
9019URF 
keyboard 

ID Button on Receiver   
(With a LED under the ID button)

Front View of 9019URF Keyboard 

Содержание 9019URF

Страница 1: ...e top of the receiver once 3 Press ID button on the upper left corner on the keyboard front side once Attention The whole procedure should be completed within 1 minute ID Button LED Mouse Right Button...

Страница 2: ...it tre mis en marche pour modifier le R glage d ID 2 Pressez une fois le bouton ID sur le dessus du r cepteur 3 Pressez une fois le bouton ID situ dans l angle sup rieur gauche sur l avant du clavier...

Страница 3: ...eingeschaltet sein um die ID Einstellung zu ndern 2 Dr cken Sie einmal den ID Knopf auf der oberen Teil des Empf ngers 3 Dr cken Sie einmal die ID Taste vorne an der oberen linken Ecke der Tastatur A...

Страница 4: ...superiore del ricevitore 3 Premere una volta il tasto ID nell angolo in alto a sinistra della parte frontale della tastiera Attenzione L intera procedura deve essere completata entro 1 minuto ID Butt...

Страница 5: ...iew of USB Connector 1 PC PC 2 110V 1 5V 2pcs ID ID RF ID CONNECT ID ID LED 1 PC ID 2 ID 3 ID 1 1 ID Button LED Mouse Right Button ID Button Scroll Down Sticker Mouse Middle Button Scroll Up Mouse Lef...

Страница 6: ...alterar a defini o da ID 2 Prima uma vez o bot o ID localizado na parte de cima do receptor 3 Prima uma vez o bot o ID situado no canto superior esquerdo da parte frontal do teclado Aten o Todo o pro...

Страница 7: ...Pulse el bot n ID en la parte superior del receptor una vez 3 Pulse una vez el bot n ID situado en la esquina superior izquierda de la parte frontal del teclado Atenci n Todo el procedimiento deber a...

Страница 8: ...RF ID CONNECT ID LED 1 ID 2 ID 3 ID ID ID Button LED Mouse Right Button ID Button Scroll Down Sticker Mouse Middle Button Scroll Up Mouse Left Button KeyMaestro KeyMaestro CD 1 2 CD SetupKey exe 3 C P...

Отзывы: