background image

User Manual 

Section 1 

GFK-3066 Rev. A 

May 2019 


BIOS Setup 

53 


3.4.3.1


Secure Boot 

Enable or disable secure boot. Secure Boot can be enabled if: 1. System running in user mode with enrolled 
platform key (PK); 2. CSM function is disabled. 


3.4.3.2


Secure Boot Mode 

Select secure boot mode: standard or custom. Custom mode enables users to change image execution 
policy and manage secure boot keys. 


3.4.4


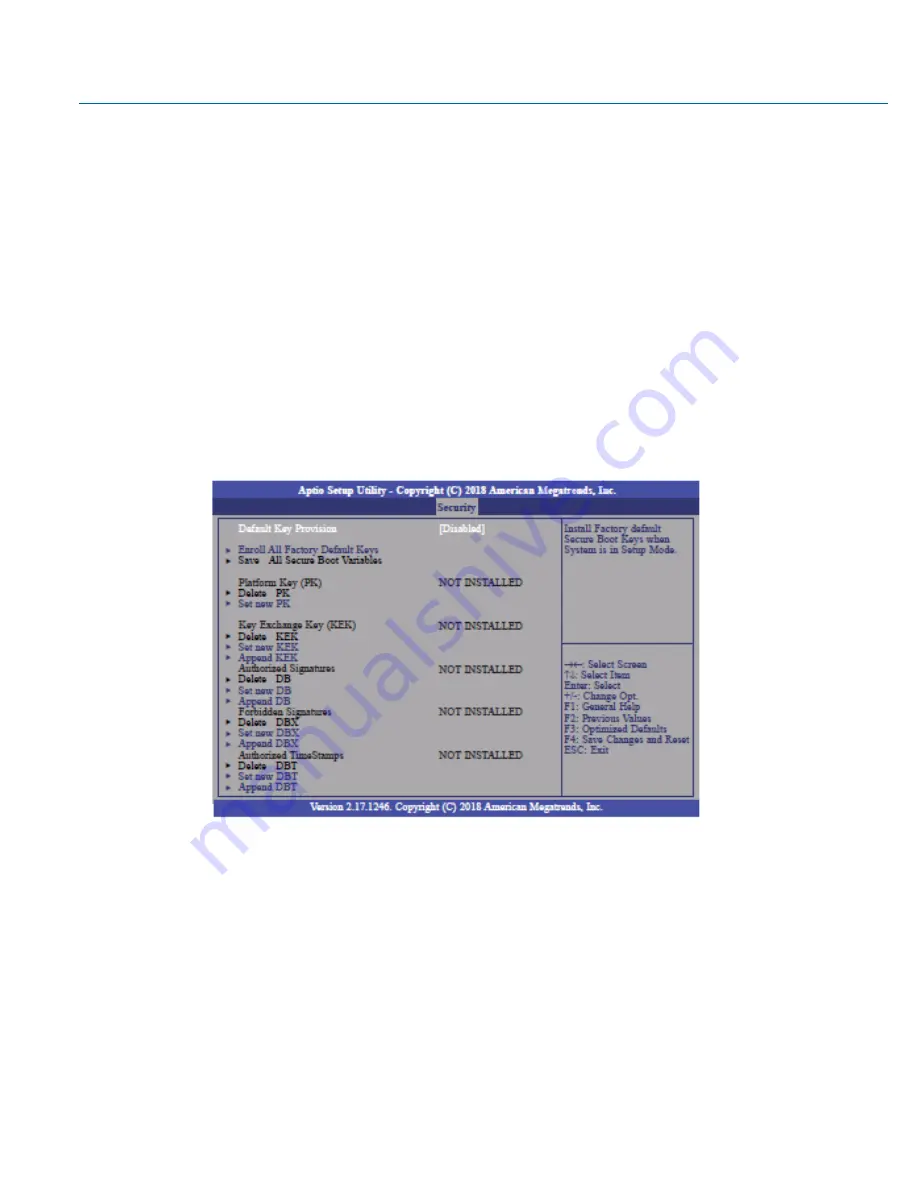
Key Management 

This section enables experienced users to modify secure boot variables. 


3.4.4.1


Default Key Provision 

Enable or disable to install factory default secure boot keys when system is in setup mode. When enabled, a 
pop-

up window will display. Select “Yes” and p

ress <Enter> to install factory default keys. 


3.4.4.2


Enroll All Factory Default Keys 

Select “Yes” and press <Enter> to install ALL factory default keys, including PK, KEK, DB, DBX and DBT. 

Change takes effect after reboot. 


Содержание RXi

Страница 1: ...User Manual GFK 3066 May 2019 RXi Panel PC ...

Страница 2: ...User Manual Contents GFK 3066 Rev A May 2019 Contents i ...

Страница 3: ...O 25 2 3 2 Connecting Input Power 24V DC in 25 2 3 3 Graphics Interface 26 2 3 3 1 DP Port 26 2 3 3 2 BIOS Setting 26 2 3 4 RJ45 LAN Ports 26 2 3 4 1 Features 26 2 3 4 2 BIOS Setting 26 2 3 5 USB Ports 27 2 3 5 1 BIOS Setting 27 2 3 5 2 Wake On USB Keyboard Mouse 27 2 3 6 Serial Ports UART 27 2 3 7 Audio 27 2 3 7 1 Rear Audio 27 2 3 7 2 BIOS Setting 28 2 3 8 I O Connectors 28 2 3 8 1 Serial ATA SA...

Страница 4: ...uage 32 3 2 4 System Date 32 3 2 5 System Language 33 3 2 6 Advanced 33 3 2 7 ACPI Settings 33 3 2 7 1 Enable ACPI Auto Configuration 34 3 2 7 2 Enable Hibernation 34 3 2 7 3 ACPI Sleep State 34 3 2 8 Trusted Computing 34 3 2 8 1 Security Device Support 34 3 2 8 2 Pending Operation 35 3 2 9 Wakeup Configuration 35 3 2 9 1 Resume by PME 35 3 2 9 2 Resume by USB 35 3 2 10 CPU Configuration 36 3 2 10...

Страница 5: ...twork Stack 43 3 2 18 2 Ipv4 PXE Support 43 3 2 18 3 Ipv6 PXE Support 43 3 2 18 4 PXE boot wait time 43 3 2 18 5 Media detect time 43 3 3 Chipset 44 3 3 1 OnChip SATA Channel 45 3 3 2 OnChip SATA Type 45 3 3 3 SD Mode 45 3 3 4 SD Host Controller Version 46 3 3 5 SD Host Controller Version 46 3 3 5 1 Auto 46 3 3 5 2 Disabled 46 3 3 5 3 Enabled 47 3 3 6 Restore on AC power loss 47 3 3 6 1 Power On 4...

Страница 6: ...ecurity 52 3 4 1 Administrator Password 52 3 4 2 User Password 52 3 4 3 Secure Boot Menu 52 3 4 3 1 Secure Boot 53 3 4 3 2 Secure Boot Mode 53 3 4 4 Key Management 53 3 4 4 1 Default Key Provision 53 3 4 4 2 Enroll All Factory Default Keys 53 3 4 4 3 Set new PK 54 3 4 4 4 Set new KEK 54 3 4 4 5 Append KEK 54 3 4 4 6 Set new DB 54 3 4 4 7 Append DB 54 3 4 4 8 Set new DBX 54 3 4 4 9 Append DBX 54 3 ...

Страница 7: ...4 Installation of Drivers 56 4 1 Drivers Installation Instruction 56 Section 5 Mounting Information 60 5 1 Panel Mount 60 5 1 1 Panel Cutout Dimensions 60 5 1 2 Installation Steps 61 5 2 Mounting to Modular Display 62 5 3 VESA Mount 65 5 3 1 VESA Mount Dimensions 65 ...

Страница 8: ...creens Fanless Design 24VDC Wide Range Power Input 1 2 Specifications Display Display Size 7 10 12 15 19 24 Resolution 1024 x 600 WSVGA 1280 x 800 WXGA 1920 x 1080 Full HD Format Widescreen 16 10 Widescreen 16 9 Orientation Land Scape Reading Angle 150 H 145 V 170 H 170 V 176 H 176 V 170 H 170 V 178 H 178 V Display Off Color Black Contrast 800 1 1000 1 800 1 1000 1 5000 1 Brightness cd m2 500 1000...

Страница 9: ...tware Operating Control Method Touch Touchscreen Technology Projected Capacitive Touch PCT PCAP Touch Sensor Multi touch Ten Point Interfaces Port 1 2 x 10 100 1000 Base T Ethernet RJ45 4 x 10 100 1000 Base T Ethernet RJ45 Port 2 1 x RS 232 COM Port 5 Pin Connector Isolated 1 x RS 485 COM Port 5 Pin Connector Isolated Port 3 2 x USB 3 0 Type A 2 x USB 3 0 Type A 2 x USB 2 0 Type A Port 4 1 x Displ...

Страница 10: ...30 C Operating Altitude 10000 ft 3 000 m Vibration 1Grms 5 500Hz Random Operation IEC 60068 2 64 10G peak acceleration 11 msec duration operation IEC 60068 2 27 Compliance Certifications UL and cUL 62368 UL and cUL 61010 IECEE CB Scheme UL TYPE 4 4X IP66 ANSI IEC 60529 CE EN 62368 EN 61000 6 4 61000 6 2 FCC Part15 Class A RoHS Certifications Coming Q4 2019 UL Listed US CAN Hazardous Locations Clas...

Страница 11: ...User Manual Section 1 GFK 3066 Rev A May 2019 Getting Started 10 1 3 Technical Drawings Dimensions Figure 1 1 Dimensions of 7 ...

Страница 12: ...User Manual Section 1 GFK 3066 Rev A May 2019 Getting Started 11 Figure 1 2 Dimensions of 10 ...

Страница 13: ...User Manual Section 1 GFK 3066 Rev A May 2019 Getting Started 12 Figure 1 3 Dimensions of 12 ...

Страница 14: ...User Manual Section 1 GFK 3066 Rev A May 2019 Getting Started 13 Figure 1 4 Dimensions of 15 ...

Страница 15: ...User Manual Section 1 GFK 3066 Rev A May 2019 Getting Started 14 Figure 1 5 Dimensions of 19 ...

Страница 16: ...User Manual Section 1 GFK 3066 Rev A May 2019 Getting Started 15 Figure 1 6 Dimensions of 24 ...

Страница 17: ...cessor or a Quad Core 1 2GHz Processor with 4GB or 8GB of available DDR3 RAM with Windows 10 IOT Enterprise LTSB OS installed standard The high resolution multitouch projective capacitive screens can be used with personal protective equipment and feature quick response times The outdoor rated sunlight readable screens are optically bonded and feature UV protection reducing reflections and glare Al...

Страница 18: ...User Manual Section 1 GFK 3066 Rev A May 2019 Getting Started 17 Figure 1 8 Front View of 10 Figure 1 9 Front View of 12 ...

Страница 19: ...User Manual Section 1 GFK 3066 Rev A May 2019 Getting Started 18 Figure 1 10 Front View of 15 Figure 1 11 Front View of 19 ...

Страница 20: ...User Manual Section 1 GFK 3066 Rev A May 2019 Getting Started 19 Figure 1 12 Front View of 24 Figure 1 13 Rear View of 7 ...

Страница 21: ...User Manual Section 1 GFK 3066 Rev A May 2019 Getting Started 20 Figure 1 14 Rear View of 10 Figure 1 15 Rear View of 12 ...

Страница 22: ...User Manual Section 1 GFK 3066 Rev A May 2019 Getting Started 21 Figure 1 16 Rear View of 15 Figure 1 17 Rear View of 19 ...

Страница 23: ...User Manual Section 1 GFK 3066 Rev A May 2019 Getting Started 22 Figure 1 18 Rear View of 24 ...

Страница 24: ...ual Section 1 GFK 3066 Rev A May 2019 BIOS Setup 23 Section 2 Hardware 2 1 Key Features Watchdog Timer DDR3 Graphics Serial ATA Gigabit LAN Power Failure Recovery USB Wake On LAN Wake On USB ACPI STR RTC Timer ...

Страница 25: ...esolution up to 1920x1200 60Hz BIOS AMI SPI 64Mbit Storage 1 x Micro SD 1 x SATA 3 0 7 15pin Ethernet 2 x Intel I210IT 40 to 105 C PCIe 10 100 1000Mbps Outside I O 2 x USB 3 0 1 x RS 232 1 x RS 485 1 x Line out 1 x Mic in 2 x GbE RJ 45 1 x DP 1 x Power Button Internal I O 1 x LVDS LCD Panel Connector 1 x AIO DIO 1x30pin Connector JAE TX24 30R 10ST H1E Battery CR2032 Coin Cell Audio Codec 92HD73C E...

Страница 26: ...onnecting Input Power 24V DC in To connect to power follow these steps 1 Verify that the power cable is not energized 2 Loosen the screw clamps on the mating power connector 3 Strip the insulation from the power cables 4 Secure the power cable to the mating connector noting polarity and tighten the screw clamps The torque for the attaching screws is 0 3 Nm 2 26 in lb 5 Apply dc power to the unit D...

Страница 27: ...vice such as a computer monitor It is used to transmit audio and video simultaneously The interface which is developed by VESA delivers higher performance features than any other digital interface 2 3 3 2 BIOS Setting Configure the display device in the Chipset menu DISPLAY control submenu of the BIOS Refer to the chapter 3 for more information 2 3 4 RJ45 LAN Ports 2 3 4 1 Features 2 Intel I210IT ...

Страница 28: ...Advanced menu Wakeup Configuration submenu of the BIOS Refer to chapter 3 for more information 2 3 5 2 Wake On USB Keyboard Mouse The Wake On USB Keyboard Mouse function allows you to use a USB keyboard or USB mouse to wake up a system from the S3 STR Suspend To RAM state 2 3 6 Serial Ports UART Serial Connection Pin Function RS232 1 TXD 2 RXD 3 RTS 4 CTS 5 GND RS485 6 TX 7 TX 8 RX 9 RX 10 GND 2 3...

Страница 29: ...nector to a SATA connector on the other end to your Serial ATA device 2 3 8 1 2 BIOS Setting Configure the Serial ATA drive in the Chipset menu SB SATA Configuration submenu of the BIOS Refer to chapter 3 for more information 2 3 9 Expansion Slots 2 3 9 1 1 Micro SD Socket The micro SD socket allows you to install a micro SD card for the expansion of available storage 2 3 10 LVDS LCD Panel Connect...

Страница 30: ...he computing module when separated from the screen as shown below Safety Measures Danger of explosion if battery incorrectly replaced Replace only with the same or equivalent type recommend by the manufacturer Dispose of used batteries according to local ordinances 2 4 LED Indicators 2 4 1 Operation Status LEDs Screen All RXi Industrial Displays have a tri color LED built into the screen that prov...

Страница 31: ...User Manual Section 1 GFK 3066 Rev A May 2019 BIOS Setup 30 2 4 2 Ethernet Port Operation LEDs LED LED State Operating State Speed Yellow ON 10 100 1000 Link Activity Green ON Link Status ...

Страница 32: ...using CMOS data loss If this happens you need to install a new CMOS battery and reconfigure the BIOS settings Keys Function Right and Left arrows Moves the highlight left or right to select a menu Up and Down arrows Moves the highlight up or down between submenu or fields Enter Press Enter to enter the highlighted submenu or item plus key Scrolls forward through the values or options of the highli...

Страница 33: ...p sequence until it brings you to the Main Menu 3 2 2 Main Menu The Main menu is the first screen that you will see when you enter the BIOS Setup Utility 3 2 3 System Language Choose the system default language 3 2 4 System Date The date format is day month date year Day displays a day from Sunday to Saturday Month displays the month from 01 to 12 Date displays the date from 01 to 31 Year displays...

Страница 34: ...0 to 23 Minute displays minutes from 00 to 59 Second displays seconds from 00 to 59 3 2 6 Advanced The Advanced menu allows you to configure your system for basic operation Some entries are defaults required by the system board while others if enabled will improve the performance of your system or allow the user to set some features according to their preference 3 2 7 ACPI Settings This section co...

Страница 35: ...p State This option may be not be functional with all operating systems 3 2 7 3 ACPI Sleep State This field is used to select ACPI sleep state the system will enter when the SUSPEND button is pressed 3 2 8 Trusted Computing This section is used to configure the Trusted Computing settings 3 2 8 1 Security Device Support Enable or disable BIOS support for security device The Operating System will no...

Страница 36: ...rity device Your computer will reboot during restart in order to change state of security device 3 2 9 Wakeup Configuration This section is used to configure the Wakeup ACPI Power Management 3 2 9 1 Resume by PME Enable or disable to resume by PME PCI PCIe LAN etc 3 2 9 2 Resume by USB Enable or disable to resume by USB ...

Страница 37: ...on is used to configure the CPU It will also display the detected CPU information 3 2 10 1 SVM Mode Enable or disable CPU Virtualization 3 2 10 2 Core Leveling Mode Select the number of cores in the system Automatic mode Three cores per processor Two cores per processor or One core per processor ...

Страница 38: ...User Manual Section 1 GFK 3066 Rev A May 2019 BIOS Setup 37 3 2 10 3 Node 0 Information View Memory Information related to Node 0 ...

Страница 39: ...v A May 2019 BIOS Setup 38 3 2 11 IDE Configuration This section is used to configure the IDE Devices It will also display the detected information 3 2 12 USB Configuration This section is used to configure the parameters of USB Device ...

Страница 40: ... 3 2 13 1 1 Enabled Enable Legacy USB 3 2 13 1 2 Disabled Keep USB devices available only for EFI applications 3 2 13 1 3 Auto Disable support for legacy when no USB devices are connected 3 2 14 USB Mass Storage Driver Support Enable or disable the support of the USB Mass Storage Driver ...

Страница 41: ...User Manual Section 1 GFK 3066 Rev A May 2019 BIOS Setup 40 3 2 15 NCT61120 Super IO Configuration This section is used to configure the parameters of the system super IO chip ...

Страница 42: ... the serial COM port 3 2 15 2 RS485 Auto Flow Support Enable or disable the RS485 auto flow support 3 2 16 NCT 6112D HW Monitor This section is used to monitor the hardware status 3 2 17 NCT 6112D Super IO Features This section is used to configure some control functions of the system super IO chip ...

Страница 43: ... used to automatically reset an embedded device that hangs because of a software or hardware fault Use this menu to select the WatchDog Timer Unit second or minute 3 2 17 2 WatchDog Timeout Value Enter the value to set the Super IO WatchDog timer 0 means disabled 3 2 18 Network Stack Configuration This section is used to enable or disable network stack settings The Network Stack Controls LAN1 LAN2...

Страница 44: ...elow 3 2 18 2 Ipv4 PXE Support When enabled Ipv4 PXE boot supports When disabled Ipv4 PXE boot option will not be available 3 2 18 3 Ipv6 PXE Support When enabled Ipv6 PXE boot supports When disabled Ipv6 PXE boot option will not be available 3 2 18 4 PXE boot wait time Enter the wait time value to abort the PXE boot 3 2 18 5 Media detect time Enter the wait time in seconds to detect media ...

Страница 45: ...User Manual Section 1 GFK 3066 Rev A May 2019 BIOS Setup 44 3 3 Chipset This section configures relevant chipset functions ...

Страница 46: ...6 Rev A May 2019 BIOS Setup 45 3 3 1 OnChip SATA Channel Enable or disable Serial ATA 3 3 2 OnChip SATA Type Select OnChip SATA Type Native IDE AHCI or Legacy IDE 3 3 3 SD Mode Enable or disable Secure Digital SD Mode configuration ...

Страница 47: ...Controller Version Select Secure Digital SD host controller version SD2 0 or SD3 0 3 3 5 SD Host Controller Version Control the detection of the Azalia device 3 3 5 1 Auto HD Audio will be enabled if present disabled otherwise 3 3 5 2 Disabled HD Audio will be fully disabled ...

Страница 48: ... the system will remain off You must press the Power button to power on the system 3 3 6 3 Last State When power returns after an AC power failure the system will return to the state where you left off before power failure occurs If the system s power is off when AC power failure occurs it will remain off when power returns If the system s power is on when AC power failure occurs the system will p...

Страница 49: ...User Manual Section 1 GFK 3066 Rev A May 2019 BIOS Setup 48 3 3 8 GPP3 Hotplug Mode Control Enable or disable GPP3 hotplug mode control ...

Страница 50: ...Select NB PCIe connect type display device DP or Disabled 3 3 11 Auto Backlight Dimming Enable or disable dimming backlight by TB573D 3 3 12 Minimum Dimming Level Set the minimum dimming level control The range is 1 20 3 3 13 Boot 3 3 13 1 Setup Prompt Timeout Select the number of seconds to wait for the setup activation key 65535 0xFFFF denotes indefinite waiting ...

Страница 51: ...fault the system boots up with NumLock on wherein the function of the numeric keypad is the number keys When set to Off the function of the numeric keypad is the arrow keys 3 3 13 3 Quiet Boot Enable or disable Quiet Boot option 3 3 13 4 Boot Option 1 2 Select the system boot order 3 3 14 Hard Drive BBS Priorities Set the order of the legacy devices in this group ...

Страница 52: ...er This option controls what device s the system will boot to 3 3 14 3 Launch PXE OpROM policy This field controls the execution of UEFI and Legacy PXE OpROM 3 3 14 4 Launch Storage OpROM policy This field controls the execution of UEFI and Legacy Storage OpROM 3 3 14 5 Launch Video OpROM policy This field controls the execution of UEFI and Legacy Video OpROM ...

Страница 53: ...ev A May 2019 BIOS Setup 52 3 4 Security 3 4 1 Administrator Password Set the administrator password 3 4 2 User Password Set the user password 3 4 3 Secure Boot Menu This section is used to configure customizable secure boot settings ...

Страница 54: ...image execution policy and manage secure boot keys 3 4 4 Key Management This section enables experienced users to modify secure boot variables 3 4 4 1 Default Key Provision Enable or disable to install factory default secure boot keys when system is in setup mode When enabled a pop up window will display Select Yes and press Enter to install factory default keys 3 4 4 2 Enroll All Factory Default ...

Страница 55: ...ct No and press Enter to load it from a file on external media 3 4 4 7 Append DB Select Yes and press Enter to set a new DB or select No and press Enter to load it from a file on external media 3 4 4 8 Set new DBX Select Yes and press Enter to set a new DBX or select No and press Enter to load it from a file on external media 3 4 4 9 Append DBX Select Yes and press Enter to set a new DBX or select...

Страница 56: ...e changes select this field and then press Enter A dialog box will appear Select Yes to reset the system setup without saving any changes 3 5 1 3 Restore Defaults To restore and load the optimized default values select this field and then press Enter A dialog box will appear Select Yes to restore the default values of all the setup options 3 5 2 Updating the BIOS To update the BIOS you will need t...

Страница 57: ...on 4 GFK 3066 Rev A May 2019 Installation of Drivers 56 Section 4 Installation of Drivers 4 1 Drivers Installation Instruction 1 Read the End User License Agreement and accept to start installation 2 Detecting hardware ...

Страница 58: ...User Manual Section 4 GFK 3066 Rev A May 2019 Installation of Drivers 57 3 Select Express Installation 4 Installing now ...

Страница 59: ...l Section 4 GFK 3066 Rev A May 2019 Installation of Drivers 58 5 Radeon Software 17 7 has been installed and restarts the computer now 6 Select Custom Installation 7 Select your requirements of this installation ...

Страница 60: ...User Manual Section 4 GFK 3066 Rev A May 2019 Installation of Drivers 59 8 Complete the whole installation and restart the computer again ...

Страница 61: ...ing Information 5 1 Panel Mount 5 1 1 Panel Cutout Dimensions Panel Thickness 1 6 to 5mm All measurements within 0 5mm Figure 5 1 Panel Cutout Dimension Definitions Width Height Display Size in Width mm Height mm 7 183 5 128 5 10 255 5 174 12 317 214 5 15 398 245 5 19 482 297 24 581 360 ...

Страница 62: ...gasket is present and properly seated in the bezel channel located on the sides of the unit 2 Insert the Panel PC into the mounting panel cutout Figure 5 2 Panel Install View 3 Insert the hook of the mounting bracket into the mounting hole as displayed in the following figure Figure 5 3 Mounting Bracket Insertion ...

Страница 63: ...ection 5 GFK 3066 Rev A May 2019 Mounting Information 62 4 Tighten the screws on the mounting bracket in a clock wise direction Figure 5 4 Tighten Mounting Bracket 5 2 Mounting to Modular Display Figure 4 2 7 Mount ...

Страница 64: ...User Manual Section 5 GFK 3066 Rev A May 2019 Mounting Information 63 Figure 4 3 10 Mount Figure 4 4 12 Mount ...

Страница 65: ...User Manual Section 5 GFK 3066 Rev A May 2019 Mounting Information 64 Figure 4 5 15 Mount Figure 4 6 19 24 Mount ...

Страница 66: ... 65 5 3 VESA Mount 5 3 1 VESA Mount Dimensions All 7 10 units include VESA Mount Dimensions of 75mm x 75mm All 12 through 24 units include VESA Mount Dimensions of 100mm x 100mm All units fastened with four M4x8 Screws Figure 5 5 7 VESA Mount Figure 5 6 10 VESA Mount ...

Страница 67: ...User Manual Section 5 GFK 3066 Rev A May 2019 Mounting Information 66 Figure 5 7 12 VESA Mount Figure 5 8 15 VESA Mount ...

Страница 68: ...User Manual Section 5 GFK 3066 Rev A May 2019 Mounting Information 67 Figure 5 9 19 24 VESA Mount ...

Страница 69: ...District 2 Nova Building 5th floor 020334 Bucharest Romania T 40 212062506 Icerenkoy MAh Topcu Ibrahim Sk No 13 K 4 Icerenkoy Istanbul Turkey T 90 2165739848408 Middle East Africa 2 Monteer Road Isando Kempton Park 1600 South Africa T 27 11 974 3336 PO Box 17033 Jebel Ali Free Zone Dubai United Arab Emirates T 971 4883 5235 Asia Pacific 19 Kian Teck Crescent Singapore 628885 T 65 6501 4600 471 Mou...

Отзывы: