

Setting up your camera
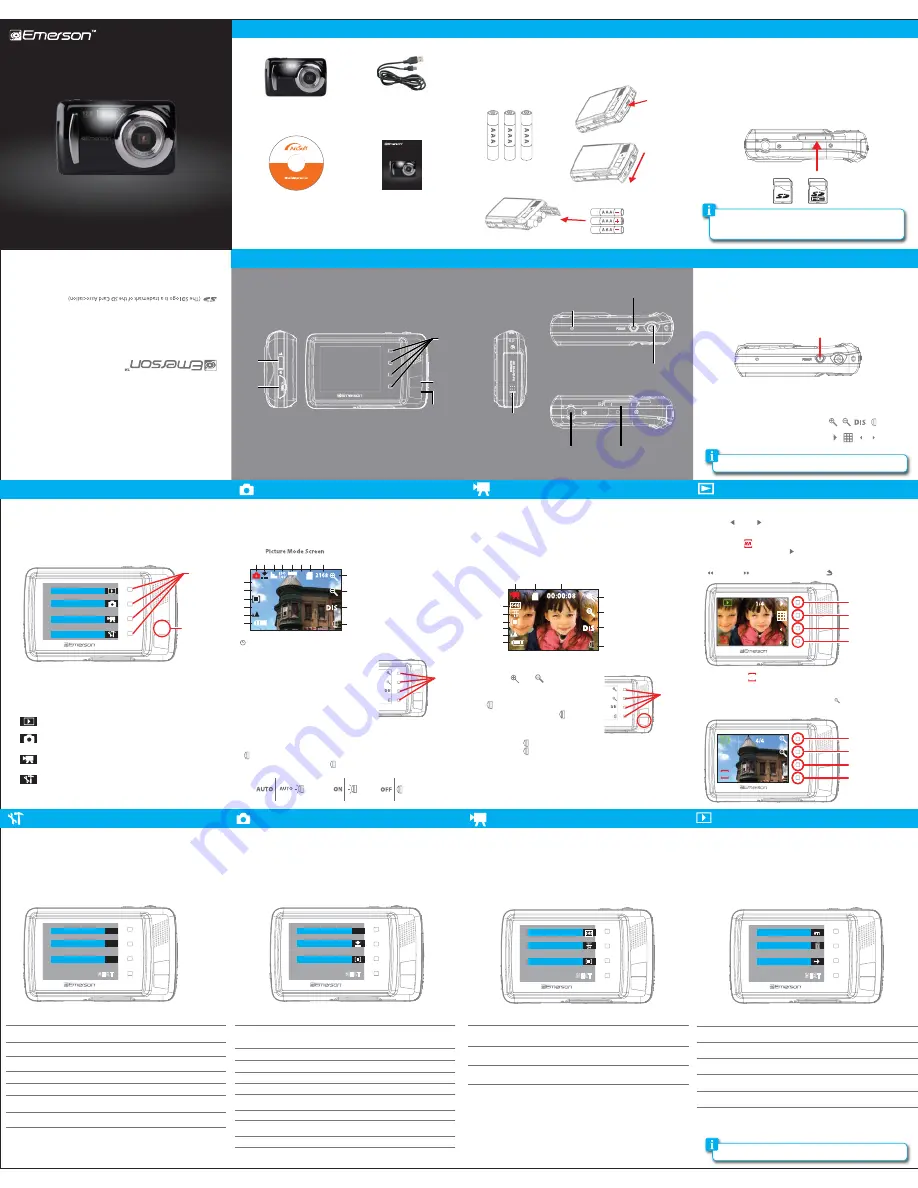
In the box
1. Make sure that an SD card is inserted into the camera.
2. Turn on the camera, and press the
[HOME]
button, then press the
[Movie
Mode]
touch key. The
Video Mode Screen
is displayed.
3. Press the
[SHUTTER]
button, the camera starts recording video.
4. To stop recording and save, press the
[SHUTTER]
button again.
1. Turn on the camera, and press the
[HOME]
button, then press the
[Playback]
touch key to enter
Playback mode
.
2
. Use the
[ ]
and
[ ]
touch keys to scroll through the video and picture
files.
Video Playback
1. If you select a video, press the
[ ]
touch key (play video) to start the video
playback. The video starts playing and the touch key icons change.
2. Use the video playback touch keys to:
[ ]
rewind /
[ ]
fast forward /
[ II ]
pause /
[ ]
return to Playback mode
Picture Playback
1. If you select a picture, use the touch key’s as shown below to control picture
playback.
2. To view pictures in thumbnail mode, press the
[ ]
touch key (zoom out)
while zoomed out all the way.
Location of controls
System Settings
Playback Mode Settings
Camera modes
Video Mode
Playback Mode
Using your camera
SD card installation
This camera has no internal memory and requires an SD card (not included) to
take and save pictures or record videos. The camera can support SD cards up to
16GB
. To install the SD card into the camera, follow the steps below:
1. Turn off the camera.
2. Insert the SD card into the card slot (as shown below) until it clicks and locks
into place. Make sure the metal contacts are facing the front of the camera.
3. To remove the card, gently push it in until it pops out.
Battery Installation
1. Open the battery cover by pressing and sliding the battery lock.
2. Insert 3 alkaline “AAA” size batteries (not included) into the compartment.
3. Close the battery cover.
Turning the camera on/off
1. To turn the camera on, press and HOLD the
[POWER]
button until
the display turns on.
2. To turn the camera off, press and HOLD the
[POWER]
button until
the display turns off.
Touch keys
This camera has four touch keys which perform different actions depending on
what you are doing with the camera. For example:
A) In picture mode the four touch keys will be:
B) In playback mode the four touch keys will be:
Mini
USB
Port
[POWER]
button
[SHUTTER]
Button
Microphone
Touch keys
Touch keys
[HOME]
button
[HOME]
button
[MENU]
button
Battery
compartment
Playback Mode - Playback videos or view pictures
Picture Mode - Take Pictures
Video Mode - Record videos
Setup - make changes to the camera’s settings
When you turn on the camera, the default mode is Photo Mode. To switch
modes, press the
[HOME]
button, then use the touch keys to select from one of
four modes.
Use the touch keys to select from one of the following options:
1. Video Mode Icon
2. SD card indicator
3. Recording time (video)
4.
[Zoom in]
touch key
5.
[Zoom out]
touch key
6.
[Display]
touch key
7.
[LED light]
touch key
8. Battery Indicator
9. Macro/Infinity mode
10. White balance
11. Metering
12. Frame rate
13. Video quality
1
3
2
8
9
10
11
12
13
4
7
5
6
AUTO
LED light
In Video Mode press the
[ ]
touch
key to turn the LED light On. This is
useful for low light situations.
1. Press the
[ ]
touch key to turn the LED on.
2. Press the
[ ]
touch key again to turn the LED off.
Zoom
Use the
[ ]
and
[ ]
touch keys to zoom
in and out when recording video,
taking photos or viewing still images.
Display mode
Use the
[DIS]
touch key to switch the display modes
between:
icons showing / icons off / display off
when
recording video or taking photos.
1. Make sure that an SD card is inserted into the camera.
2. Turn on the camera, the
Standby
Picture Mode Screen
is displayed and the
camera is in
Picture Mode
.
3. Press the
[SHUTTER]
button to take a picture.
Self timer and continuous shooting
1. While in picture mode, press the
[MENU]
button, then press the
[NEXT]
touch key, then
press the
[Driver Mode]
touch key.
2. Use the touch keys to select from 2 second
self-timer, 10 second self-timer or Burst.
3. When you select 2 or 10 seconds self timer,
the timer starts counting down from 2 or 10
seconds, and the camera takes a picture; when
you select burst, the camera takes 3 pictures
continuously.
4. Press the
[SHUTTER]
button to start self
timer or burst snapshot.
5. To turn off the self timer or Burst feature repeat step 1 then select “Off”.
LED light indicator
While in Picture Mode press the
[ ]
touch key repeatedly to select from:
Picture Mode
2
1
8
7
10
9
12
11
13
14
15
16
17
18
5
3
AUTO
1. Picture Mode Icon
2. Picture quality
3. Sharpness
4. ISO
5. Exposure mode
6. Scene mode
7. SD card indicator
8. Pictures remaining
9.
[Zoom in]
touch key
10.
[Zoom out]
touch key
11.
[Display]
touch key
12.
[LED light]
touch key
13. Battery indicator
14. Macro / Infinity mode
15. White balance
16. Metering
17. Effect mode
18. Picture size
• Make sure the Lock switch on the SD card is in the UNLOCKED position.
• A card can only be inserted one way: do not use force when inserting the card.
• Inserting or removing a card while the camera is on may damage the card, files
stored on the card, or the camera.
This camera has an auto-shutoff feature which can be set for specific times (refer to
System Settings
>
Power Save
).
Slideshow, Effect, Rotate, and Resize will only be options when a picture (jpg) is being
viewed.
USB Cable
(connects to your
computer)
Requires 3 AAA batteries (not included)
User Guide
Digital Camera
CD (ArcSoft® Media
Impression software)
EDC240
User Guide
Digital Camera
EDC240
User Guide
Digital Camera
Macro
Settings
Tripod mount
SD card slot
or
AAA Batteries
[POWER]
button
4
6
System Settings Options
set time of review after picture is taken (off, 1 sec, 3 sec).
AUTO REVIEW
(The Camera’s default setting is 60hz for the USA and North America)
50Hz / 60Hz
POWER FREQUENCY
Select 1,3, or 5 minutes. To conserve battery power, the camera
will shut off if no buttons are pressed within the selected time.
POWER SAVE
Set the camera’s date and time.
DATE & TIME
Set the camera’s language
LANGUAGE
MSDC or PCCAM (Only select PCCAM when you would like to
use the camera as a webcam then be sure to change back to MSDC
when using as camera).
Erase all data on the SD card
USB
FORMAT
Reset the camera’s settings to factory default.
DEFAULT SETTING
Playback Mode Settings Options
Lock one or all of your picture and video files. When locked the files
will not be to be deleted.
LOCK
“One” (Delete the currently displayed video or picture) or “All”
DELETE
Start a slide show, and adjust the slide show settings.
SLIDE SHOW
Select from various special effects.
EFFECT
Rotate the picture.
ROTATE
Resize the picture.
RESIZE
To make changes to the playback mode settings , follow the instructions below:
1. Make sure you are in playback mode (press the
[HOME]
button, then press
the
[Playback]
touch icon).
2. Press the
[MENU]
button. The
Playback Mode Settings
will open.
3. Use the
[
NEXT
]
touch key to scroll to more options.
4. Use the touch keys to make changes to the following
Playback Mode Settings
where you can change the options below.r
To make changes to the camera’s settings , follow the instructions below:
1. Press the
[HOME]
button, then press the
[Setup]
touch key. The system
settings screen will open.
2. Use the
[
NEXT
]
touch key to scroll to more options.
3. Use the touch keys to make changes to the following system settings where
you can change the options below.
Video Mode Settings
Video Mode Settings Options
MOVIE SIZE
640X480 (Higher quality video / shorter recording time)
320X240 (lower quality video / longer recording time)
METERING
Center / Multi / Spot
30 Frames Per Second (Higher quality video / shorter recording time)
15 Frames Per Second (Lower quality video / longer recording time)
FRAME RATE
Auto / Daylight / Cloudy / Fluorescent / Tungsten
WHITE BALANCE
Video Mode Settings Screen
Picture Mode Settings Screen
Playback Mode Settings Screen
To make changes to the video mode settings , follow the instructions below:
1. Make sure you are in video mode (press the
[HOME]
button, then press the
[Movie Mode]
touch icon).
2. Press the
[MENU]
button. The
Video Mode Settings Screen
will open.
3. Use the
[
NEXT
]
touch key to scroll to more options.
4. Use the touch keys to make changes to the following
Video Mode Settings
where you can change the options below.
Picture Mode Settings
Picture Mode Settings Options
·
1M (1280x1024) / 3M (2048x1536) / 5M (2592x1944) / 8M (3264x2448)
/ 12M (4000x3000) (Higher picture resolution takes up more space on
the card).
Super fine / Fine / Normal
Center / Multi / Spot
Auto / Daylight / Cloudy / Fluorescent / Tungsten
RESOLUTION
QUALITY
METERING
WHITE BALANCE
Adjust the exposure
EXPOSURE
“Off” (disables the self timer), “2” or “10” second options
(self timer), “Burst” (3 frame shot)
DRIVER MODE
Norma / B&W / Sephia / Negative / Red / Green / Blue
EFFECT
Auto / Landscape / Portrait / Night Portrait / Beach / Sport / Dinner
/ High sensitivity
SCENE
AUTO / 100 / 200 / 400 / 800
ISO
Soft / Normal / Sharp
SHARPNESS
To make changes to the picture mode settings , follow the instructions below:
1. Make sure you are in picture mode (press the
[HOME]
button, then press the
[Still Image]
touch icon).
2. Press the
[MENU]
button. The
Picture Mode Settings Screen
will open.
3. Use the
[
NEXT
]
touch key to scroll to more options.
4. Use the touch keys to make changes to the following
Picture Mode Settings
where you can change the options below.
Emerson and the G-Clef logo ar
e reg
ister
ed trademar
ks of Emerson Radio C
orp.
Parsippan
y, New Jersey USA
You
Tube™ is a r
egist
ered tr
ademark of
You
Tube
, LLC.
This pr
oduct is not affilia
ted with, or endorsed b
y You
Tube™.
ArcS
oft and M
edia Impr
ession are tr
ademarks of A
rcS
oft, I
nc.
Other tr
ademarks and tr
ade names are those of their r
espectiv
e owners
.
Cust
omer Suppor
t:
1-877-768-8483 (Toll F
ree)
cs@southernt
elecom.c
om
ww
w.souther
ntelec
om.com
Made in China / D
esigned in the USA
Manufac
tured b
y: AIT I
nc. Br
ooklyn, N
Y 11232
© 2011 All r
ights r
eserved
.
HOME
MENU
HOME
MENU
Playback
Still Image
Movie Mode
Setup
HOME
MENU
Auto Review
Power Frequency
Power save
HOME
MENU
P
HOME
MENU
3M
Nor
Video Mode Screen
Picture screen
touch keys
Video screen
touch keys
Play video
Thumbnail mode
Scroll to previous file
Scroll to next file
HOME
MENU
Zoom in
Zoom out / Thumbnail mode
Scroll to previous file
Scroll to next file
HOME
MENU
JPG
JPG
NEXT
OFF
60Hz
5min
HOME
MENU
Resolution
Quality
Metering
NEXT
5M
HOME
MENU
Movie Size
Frame Rate
Metering
NEXT
HOME
MENU
Lock
Delete
Slideshow
NEXT
EVC1800
User Guide


