background image

www.emachines.com

53

Cleaning the monitor 

To clean the monitor:


To clean an LCD flat panel monitor, use a soft cloth and 
water to clean the screen. Dampen the cloth (never apply 
liquid directly to the screen), then wipe the screen with 
the cloth.

To clean a CRT monitor, use a soft cloth and glass cleaner 
to clean the monitor screen. Squirt a little cleaner on the 
cloth (never directly on the screen), then wipe the screen 
with the cloth.

Cleaning the mouse

If the mouse pointer begins moving erratically across the 
computer screen or becomes difficult to control precisely, 
cleaning the mouse will likely improve its accuracy.

To clean the mouse:


Wipe the bottom of the mouse with a damp, lint-free 
cloth.

Cleaning optical discs

Optical discs (CDs, DVDs, and Blu-ray Discs) get dirty from 
frequent handling.

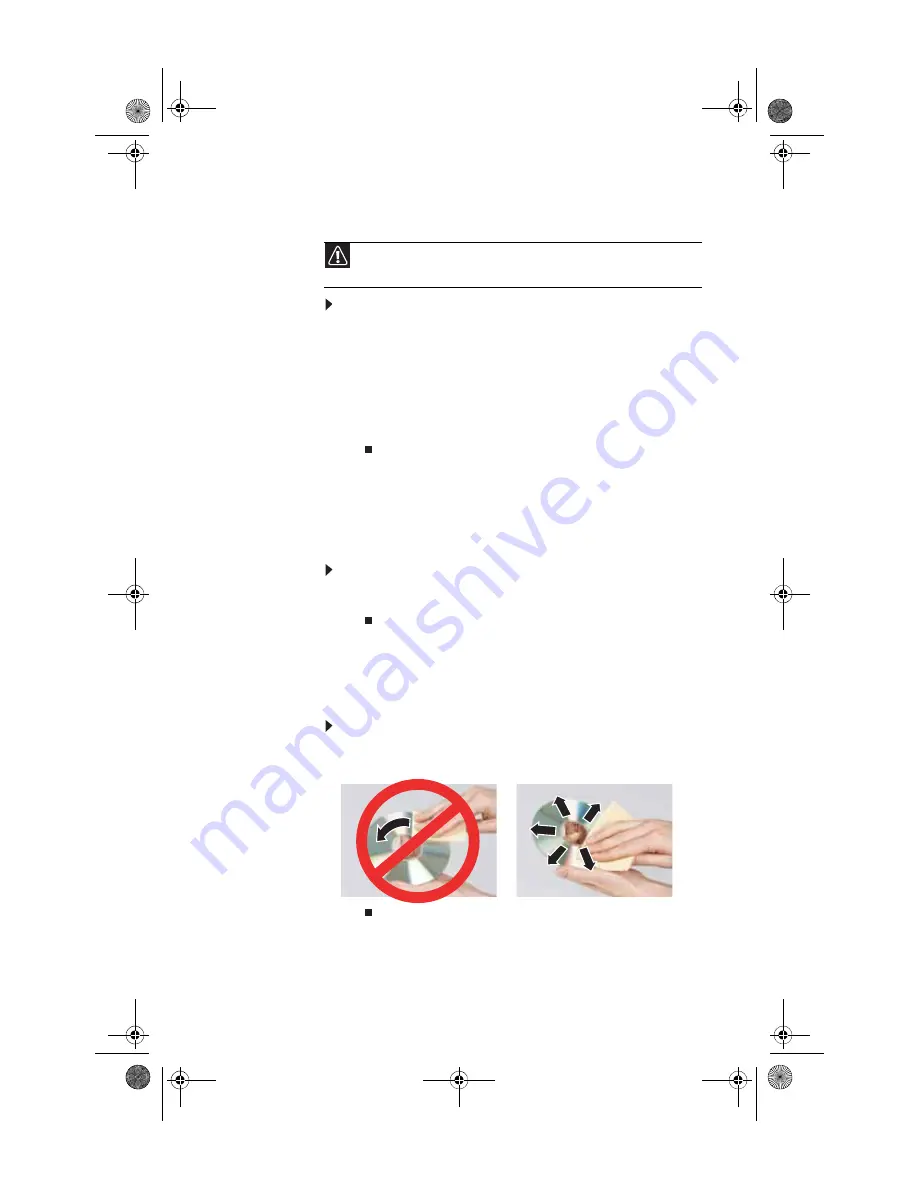
To clean an optical disc:


Wipe from the center to the edge, not around in a circle, 
using a product made especially for the purpose.

Caution

A flat-panel display is made of specially coated glass and can be scratched 

or damaged by abrasive or ammonia-based glass cleaners.

8512635.book  Page 53  Friday, July 27, 2007  11:21 AM

Содержание W3650

Страница 1: ...Computer Reference Guide 8512635 book Page a Friday July 27 2007 11 21 AM...

Страница 2: ...8512635 book Page b Friday July 27 2007 11 21 AM...

Страница 3: ...repetitive strain 14 Preparing power connections 14 Protecting from power source problems 14 Checking the voltage selection 15 Connecting to a broadband modem or network 16 Connecting a dial up modem...

Страница 4: ...board 46 Chapter 5 Maintaining Your Computer 49 Setting up a maintenance schedule 50 Caring for your computer 50 Cleaning your computer 51 Cleaning the exterior 52 Cleaning the keyboard 52 Cleaning th...

Страница 5: ...Ethernet 70 Expansion cards 71 File management 71 Hard drive 71 Internet 72 Keyboard 74 Media Center 75 Memory 78 Memory card reader 78 Modem cable or DSL 78 Modem dial up 79 Monitor 82 Mouse 83 Netwo...

Страница 6: ...Contents iv Appendix A Legal Notices 97 Index 107 8512635 book Page iv Friday July 27 2007 11 21 AM...

Страница 7: ...1 About This Reference About this guide Accessing the online User Guide eMachines contact information Microsoft Certificate of Authenticity For more information 8512635 book Page 1 Friday July 27 200...

Страница 8: ...Web address shown on your computer s label The Support page also has links to additional documentation and detailed specifications Accessing the online User Guide In addition to this guide the User G...

Страница 9: ...you call for assistance Microsoft Certificate of Authenticity The Microsoft Certificate of Authenticity label found on the top of your computer includes the product key code for your operating system...

Страница 10: ...Chapter 1 About This Reference 4 8512635 book Page 4 Friday July 27 2007 11 21 AM...

Страница 11: ...Chapter 2 5 5 Checking Out Your Computer Front Back 8512635 book Page 5 Friday July 27 2007 11 21 AM...

Страница 12: ...cking Out Your Computer 6 Front Memory card reader optional DVD CD drive Power button power indicator USB ports DVD CD drive optional Microphone jack Headphone jack 8512635 book Page 6 Friday July 27...

Страница 13: ...power indicator Press this button to turn the power on or off You can also configure the power button to operate in Standby Resume mode or Hibernate mode The power indicator lights when the computer...

Страница 14: ...lection on page 15 Telephone jack PS 2 mouse port PS 2 keyboard port Voltage switch Power connector Ethernet network jack Audio in side speaker jack Case cover thumbscrew Headphone front speaker jack...

Страница 15: ...device on page 27 S PDIF output jack optional Plug an optical cable from an amplifier or entertainment system into this jack for digital sound Microphone jack pink plug Plug a microphone into this jac...

Страница 16: ...ation see Configuring the audio jacks on page 26 Audio in side speaker jack blue plug OR Side speaker jack This jack is user configurable for one of the following Stereo in Plug an external audio inpu...

Страница 17: ...d modem or network Connecting a dial up modem Starting your computer Turning off your computer Restarting rebooting your computer Using the keyboard Using the mouse Using optical drives Adjusting the...

Страница 18: ...allel to the floor Adjust the screen so it is perpendicular to your line of sight and the top of the screen is no higher than eye leve Place your feet flat on the floor or on a footrest Keep ventilati...

Страница 19: ...sk is the appropriate height and the chair helps you maintain good posture Select a flat surface for your computer desk Adjust the height of the computer desk so your hands and arms are positioned par...

Страница 20: ...o your computer can increase to far above normal levels and cause data loss or system damage Protect your computer and peripheral devices by connecting them to a surge protector which absorbs voltage...

Страница 21: ...to slide the voltage selection switch to the correct voltage position The switch is located on the back of your computer near the power cable connector For the location see Back on page 8 Caution If y...

Страница 22: ...hone line to connect to the internet or fax documents To connect the modem 1 Insert one end of the modem cable into the modem jack on the modem at the back of your computer For the location see Back o...

Страница 23: ...iles For more information on using your computer s menus see Using Windows and Customizing Windows in the online User Guide Waking up your computer When you have not used your computer for several min...

Страница 24: ...mputer 1 Click Start then click Turn Off Computer 2 Click Restart 3 As a part of the regular startup process a program to check the disk status runs automatically When the checks are finished Windows...

Страница 25: ...is active Enhanced keyboard Standard keyboard Function keys Indicators Windows keys Application key Directional keys Numeric keypad Editing buttons Internet buttons Audio playback buttons Navigation...

Страница 26: ...sor to the beginning of a line to the end of a line up the page down the page to the beginning of a document or to the end of a document Indicators Show if your NUM LOCK CAPS LOCK or SCROLL LOCK keys...

Страница 27: ...ntrols the pointer movement on the computer display This illustration shows the standard mouse As you move the mouse the pointer arrow on the display moves in the same direction Scroll wheel Left butt...

Страница 28: ...e middle of the mouse pad then continue moving the mouse Select an object on the computer display Position the pointer over the object Quickly press and release the left mouse button This is called cl...

Страница 29: ...drive types Look on the front of the drive for one or more of the following logos Important When you place a single sided disc in the tray make sure that the label side is facing up If the disc has tw...

Страница 30: ...lity of the double layer recordable DVD drive the blank DVDs you purchase must state Double Layer Dual Layer or DL Using other types of blank media will result in less capacity DVD RAM RW Installing p...

Страница 31: ...ol buttons on the keyboard For more information see Using the keyboard on page 19 To adjust the volume from Windows 1 Click Start then click Control Panel The Control Panel window opens If your Contro...

Страница 32: ...ur audio device s to the computer audio jack s 2 Click Start then click Control Panel The Control Panel window opens 3 Click Sounds Speech and Audio Devices Sounds and Audio Devices then click Advance...

Страница 33: ...whenever you plug it into the appropriate port When you use an IEEE 1394 or USB device for the first time your computer will prompt you to install any software the device needs After doing this you ca...

Страница 34: ...Chapter 3 Setting Up and Getting Started 28 8512635 book Page 28 Friday July 27 2007 11 21 AM...

Страница 35: ...closing the case Installing memory Replacing the system battery Adding or replacing an optical disc drive Adding or replacing a hard drive Replacing the heat sink and processor Adding or replacing an...

Страница 36: ...ntistatic bags only when you are ready to use them Do not lay components on the outside of antistatic bags because only the inside of the bags provide electrostatic protection Always hold expansion ca...

Страница 37: ...eral device cables 3 Press the power button for ten seconds to drain any residual power from your computer 4 Loosen the two captive thumbscrews on the back edge of the side panel These screws cannot b...

Страница 38: ...e front bezel 1 Remove the side panel by following the instructions in Removing the side panel on page 31 2 Press the three bezel retention tabs then swing the left side of the bezel away from the com...

Страница 39: ...he slots on the left side of the computer 3 Press the left side of the bezel firmly until the release tabs snap into place Replacing the side panel To replace the side panel 1 Make sure that all of th...

Страница 40: ...ct type of memory module for your computer Your computer uses DIMM memory To install or replace DIMM memory 1 Remove the side panel by following the instructions in Removing the side panel on page 31...

Страница 41: ...des of the memory module should secure the memory module automatically When the module is secure you hear a click 6 Replace the side panel by following the instructions in Replacing the side panel on...

Страница 42: ...bay then go to Step 8 For the location of the screws see the photo in Step 6 4 If you are replacing an existing drive disconnect the cables from the drive noting their locations and orientation You wi...

Страница 43: ...drive then replace the two drive retention screws 9 Reconnect the drive cables using your notes from Step 4 or according to the manufacturer s instructions 10 Replace the front bezel by following the...

Страница 44: ...oving the side panel on page 31 2 Disconnect and label all hard drive cables noting their locations and orientation You will reconnect the cables after you install the new drive 3 Disconnect the hard...

Страница 45: ...hard drive to the cage 7 If you are replacing a drive note any jumper settings on the old drive and set the jumper on the new drive to be the same OR If you are adding a new drive set the jumper as in...

Страница 46: ...are using the new hard drive as your primary drive install Windows using the operating system DVD that came with your computer For more information on restoring your system see Recovering your system...

Страница 47: ...down lift it completely up then lift the processor retention bracket 6 Remove the processor from the system board 7 Install the new processor onto the system board Make sure that Pin 1 on the processo...

Страница 48: ...screws that secure it to the system board 10 Connect the heat sink fan cable to the system board 11 Replace the side panel by following the instructions in Replacing the side panel on page 33 Adding...

Страница 49: ...you have just replaced an expansion card reconnect the expansion card cables if any using your notes from Step 2 If you have added a new expansion card connect its cables according to its user guide 7...

Страница 50: ...nd submenus then exit from the utility 4 Shut down your computer 5 Remove the side panel by following the instructions in Removing the side panel on page 31 6 For more stability place your computer on...

Страница 51: ...until it snaps into place 10 Replace the side panel by following the instructions in Replacing the side panel on page 33 11 Reconnect all external cables and the power cord 12 Turn on your computer 1...

Страница 52: ...the directions in Adding or replacing an expansion card on page 42 4 Remove all memory modules by following the directions in Installing memory on page 34 5 Disconnect all the power and data cables fr...

Страница 53: ...tem board by following the directions in Replacing the heat sink and processor on page 40 then install them into the new system board by following the directions in the same procedure 11 Slide the pow...

Страница 54: ...Chapter 4 Upgrading Your Computer 48 8512635 book Page 48 Friday July 27 2007 11 21 AM...

Страница 55: ...tting up a maintenance schedule Caring for your computer Cleaning your computer Updating Windows Using BigFix Managing hard drive space Scheduling maintenance tasks Moving from your old computer 85126...

Страница 56: ...commend that you put it in the original packaging materials Keep your computer away from magnetic fields Magnetic fields can erase data on hard drives Never turn off your computer when the drive indic...

Страница 57: ...work environments Dust and dirt can clog the internal mechanisms and can lead to permanent damage to the computer Do not block the ventilation fan slots If these slots are blocked your computer may ov...

Страница 58: ...nts Cleaning the keyboard You should occasionally clean the keyboard to remove dust and lint trapped under the keys To clean the keyboard 1 Use an aerosol can of air with a narrow straw like extension...

Страница 59: ...mouse pointer begins moving erratically across the computer screen or becomes difficult to control precisely cleaning the mouse will likely improve its accuracy To clean the mouse Wipe the bottom of...

Страница 60: ...h the Windows Security Center For more information see Protecting Your Computer in the online User Guide Using BigFix Your computer may have BigFix installed not available in some locations BigFix mon...

Страница 61: ...y files defragment files and back up files Checking hard drive space To check hard drive space 1 Click Start then click My Computer The My Computer window opens 2 Right click the drive that you want t...

Страница 62: ...ick the hard drive that you want to delete files from for example Local Disk C then click Properties The Properties dialog box opens at the General tab 3 Click Disk Cleanup The Disk Cleanup dialog box...

Страница 63: ...Also use Error checking if you encounter hard drive problems To check the hard drive for errors 1 Click Start then click My Computer The My Computer window opens 2 Right click the drive that you want...

Страница 64: ...ing do not use your keyboard or mouse because using them may continuously stop and restart the defragmenting process Also if you are connected to a network log off before starting Disk Defragmenter Ne...

Страница 65: ...e display When finished Disk Defragmenter asks if you want to quit the program 7 Click Close then click the X in the top right corner to close the Disk Defragmenter window Help For more information ab...

Страница 66: ...ould back up your files regularly to a writable optical disc if you have a recordable drive Use a backup device such as a recordable disc drive to do a complete hard drive backup If you do not have a...

Страница 67: ...indow opens 2 Double click the Add Scheduled Task icon The Scheduled Task Wizard opens 3 Click Next then click the task or program you want to schedule and follow the on screen instructions to customi...

Страница 68: ...ng them to removable media such as a writable disc an external hard drive a network location or a flash drive Finding your documents Many programs save your personal data files in the My Documents fol...

Страница 69: ...To find files using Find or Search 1 In Windows XP click Start then click Search The Search Results window opens OR In Windows 98 Windows Me or Windows 2000 click Start Find or Search then click For...

Страница 70: ...rnet Connection Wizard 1 Click Start All Programs Accessories Communications then click New Connection Wizard The New Connection wizard opens 2 Configure your Internet settings by following the on scr...

Страница 71: ...all your old printer 1 Shut down and turn off your computer 2 Connect your parallel port printer 3 Turn on your printer then turn on your computer 4 If Windows detects your printer install your printe...

Страница 72: ...s you want to install on your new computer Locate your original program installation discs and installation guides Your original discs and guides should contain any serial numbers or product ID keys t...

Страница 73: ...Chapter 6 67 67 Troubleshooting Safety guidelines First steps Troubleshooting Recovering your system Telephone support 8512635 book Page 67 Friday July 27 2007 11 21 AM...

Страница 74: ...n the exact message The message may help Customer Care in diagnosing and fixing the problem Warning Never remove your computer case cover while your computer is turned on and while the modem cable net...

Страница 75: ...ards The computer does not recognize an add in card Shut down and restart your computer Make sure that you have installed the required software For more information see the documentation that came wit...

Страница 76: ...first N should be the same for all computers on your network and the second N should be different for all computers on your network The computer does not recognize an add in Ethernet card Shut down an...

Страница 77: ...ile is restored to the place where it was originally deleted from If the Recycle Bin was emptied before you try to restore a file the file cannot be restored Hard drive You see an Insufficient disk sp...

Страница 78: ...your computer If your computer has been subjected to static electricity or physical shock you may need to reinstall the operating system You see a Non system disk or disk error error message Your har...

Страница 79: ...es Connecting to a Web site takes too long Many factors can affect Internet performance The condition of the telephone lines in your residence or at your local telephone service The condition of the I...

Страница 80: ...works Reinstall the keyboard device driver A keyboard character keeps repeating or you see a keyboard stuck or key failure error message Make sure that nothing is resting on the keyboard Make sure th...

Страница 81: ...n affect on the video quality The video displayed from the Media Center is only as good as the source video signal Cable digital cable and satellite usually provide better quality than an antenna Type...

Страница 82: ...e of the TV Newer TVs usually have more advanced features produce a better quality picture and support higher screen resolutions The Media Center video display will likely be better on a newer model T...

Страница 83: ...computer to a DVD Yes you can The Media Center saves recorded programs in the DVR MS format You can burn a DVR MS file to a DVD with DVD recording burning software and with the Media Center itself You...

Страница 84: ...ory error message Use a third party diagnostic program to help determine if a memory module is failing You see a Not enough memory error message Close all programs then restart your computer Memory ca...

Страница 85: ...services such as call waiting call messaging or voice mail make sure that all messages are cleared and call waiting is disabled before using the modem Contact your telephone service to get the correc...

Страница 86: ...telephone line either a different telephone number in your house or a telephone line at a different location If you can connect on this line call your telephone service Try connecting with the modem...

Страница 87: ...with the connection Shut down and restart your computer Run Windows modem diagnostics To run modem diagnostics 1 Close all open programs 2 Click Start then click Control Panel The Control Panel window...

Страница 88: ...odems tab 3 Click the modem you want to adjust then click Properties 4 Click the Modem tab then adjust the Speaker volume control 5 Click OK twice to close the Phone and Modem Options dialog box Monit...

Страница 89: ...g to make sure that the mouse port works The mouse works erratically If the mouse pointer begins moving erratically across the computer display or becomes difficult to control precisely cleaning the m...

Страница 90: ...restarts Make sure that the IDE controllers are enabled Make sure that the drive is configured correctly by following the instructions in the drive documentation Reinstall the device driver An audio...

Страница 91: ...l codes that help control DVD title exports and help reduce illegal disc distribution To be able to play a DVD the disc s regional code and your DVD drive s regional code must match The regional code...

Страница 92: ...nto an AC power source The printer is on but will not print Check the cable between the printer and your computer Make sure that it is connected to the correct port Make sure that the printer is onlin...

Страница 93: ...to use If the menu shows a check mark next to Use Printer Offline click Use Printer Offline to clear the check mark Wait until files have been printed before sending additional files to the printer If...

Страница 94: ...re information see Adjusting the volume on page 25 If you are using external speakers see the speaker setup poster to check your speaker connections Make sure that the universal jacks are configured c...

Страница 95: ...g specific files such as device drivers and most pre installed software If you need to recover software that did not come pre installed on your system you need to follow the software s own instruction...

Страница 96: ...Microsoft System Restore on page 90 Recovering your system using Microsoft System Restore Before using Gateway System Recovery you should try Microsoft System Restore to determine whether you can res...

Страница 97: ...re point in the list Step 2 on the screen 5 Click Next The Confirm Restore Point Selection dialog box opens 6 Make sure that you want to use the restore point you selected and read all notices on the...

Страница 98: ...covery program starts OR Turn on or restart your computer and press F11 while your computer is starting 3 Insert the Operating System Recovery CD DVD when prompted The System Recovery program starts 4...

Страница 99: ...8 Reconnect your Internet cable and all USB peripheral devices You are done Telephone support Before calling Customer Care If you have a technical problem with your computer follow these recommendatio...

Страница 100: ...hooting section of this chapter Have yourcustomer ID serialnumber and order number available along with a detailed description of your problem including the exact text of any error messages and the st...

Страница 101: ...the following resources The printed or online documentation that came with your hardware or software In many cases additional product information and online documentation for eMachines supplied hardw...

Страница 102: ...Chapter 6 Troubleshooting 96 8512635 book Page 96 Friday July 27 2007 11 21 AM...

Страница 103: ...Appendix A 97 97 Legal Notices Important safety information Regulatory compliance statements Environmental information Notices 8512635 book Page 97 Friday July 27 2007 11 21 AM...

Страница 104: ...ided for ventilation Do not block or cover these openings Make sure you provide adequate space at least 6 inches 15 cm around the system for ventilation when you set up your work area Never insert obj...

Страница 105: ...wer cables and modem cables from the wall outlets before cleaning the system Unplug the system from the wall outlet and refer servicing to qualified personnel if The power cord or plug is damaged Liqu...

Страница 106: ...he equipment to an outlet on a different circuit from that to which thereceiver is connected Consult the dealer or an experienced radio TV technician for help Compliance Accessories The accessories as...

Страница 107: ...nservice Connection to party line service is subject to state tariffs Contact the state public utility commission or public service commission for information When programming or making test calls to...

Страница 108: ...classified as Class 1 Laser Products under a US Department of Health and Human Services DHHS Radiation Performance Standard Should the unit ever need servicing contact an authorized service location T...

Страница 109: ...such power lines or circuits Warning When installing or realigning an outside antenna system extreme care should be taken to keep from touching such power lines or circuits Contact with them could be...

Страница 110: ...ngand using the energy saving features of this product where applicable recycling the inner and outer packaging including shipping containers this product was delivered in and by disposing of or recyc...

Страница 111: ...port the following paragraph applies This product incorporates copyright protection technology that is protected by method claims of certain U S patents and other intellectual property rights owned b...

Страница 112: ...Appendix A Legal Notices 106 8512635 book Page 106 Friday July 27 2007 11 21 AM...

Страница 113: ...acing 33 Blu ray 7 broadband connection connecting 10 C cable modem 16 connecting 10 Caps Lock indicator 20 cards adding expansion 42 replacing expansion 42 troubleshooting add in card 69 troubleshoot...

Страница 114: ...eo camera 9 Zip drive 7 9 D default printer 86 defragmenting hard drive 58 deleting files and folders 56 digital audio out 9 digital camera locating USB port 7 9 digital video camera locating IEEE 139...

Страница 115: ...tion keys 20 H hard drive adding 38 backing up files 60 checking for errors 57 checking for free space 55 defragmenting 58 deleting files and folders 56 replacing 38 scanning for errors 57 troubleshoo...

Страница 116: ...cleaning computer display 53 cleaning computer screen 53 cleaning mouse 53 defragmenting 58 deleting files 56 suggested schedule 50 using Scheduled Task Wizard 61 memory adding 34 installing 34 repla...

Страница 117: ...vices 27 Plug and Play devices IEEE 1394 support for 27 USB support for 27 pointer 21 moving 22 ports See connections power button 7 connector 9 Hibernate mode 7 source problems 14 Standby Resume 7 tr...

Страница 118: ...rols 25 muting 25 speaker jack 9 speakers configuring 26 Standby mode 7 starting computer 17 programs 22 starting computer 7 static electricity 30 surge protector 14 system battery replacing 44 system...

Страница 119: ...toring fee based 95 U uninterruptible power supply UPS 14 updating Windows 54 UPS 14 USB port 7 9 27 V volume adjusting 25 adjusting modem 82 controls 25 muting 25 troubleshooting 88 W Windows key 20...

Страница 120: ...114 Index 8512635 book Page 114 Friday July 27 2007 11 21 AM...

Страница 121: ...8512635 book Page 115 Friday July 27 2007 11 21 AM...

Страница 122: ...MAN ECOOPER XP HW REF R0 7 07 8512635 book Page 116 Friday July 27 2007 11 21 AM...

Отзывы: