105
OPERA
TION
PR
OCEDURE
English
n
Saving the image
(1) Press the [
] button on the operating panel or the [
] button on the remote control to
switch the output image to the camera image.
(2) Make sure that the OSD is not displayed, and then press the [
] button on the
operating panel or on the remote control.
(3) Saving begins when the [
] mark is displayed on the screen. Saving is complete
when the symbol disappears.
N o t e
• Zoomed images cannot be saved during digital zooming. However, images which are
zoomed to the maximum [ZOOM-IN
] limit within the range of the optical zoom can
be saved.
• Image data cannot be recorded with the correct date and time.
• Be sure to try shooting and confirm that the images are saved correctly beforehand.
If images cannot be saved normally due to some problem with this camera or the SD
card, ELMO is not liable to compensate for such failure.
• The [
] mark is only displayed on the screen when [Function Setting]
→
[Guide] is
set to ON from the Camera OSD menu.
•
When the SD card is write-protected, images cannot be saved in the SD card.
• If the SD card is full when recording, an [X] mark is displayed on the screen. Delete
any unnecessary images or use another SD card.
• Never remove the SD card while it is reading or writing data. This may cause
malfunctions to occur.
• Do not turn off the power to this product while reading or writing to an SD card. This
may cause malfunctions to occur.
n
Displaying the image
There are two display modes for SD images. You can use Single display to display one
image only, or 4 x 4 display to display 16 images.
Single display
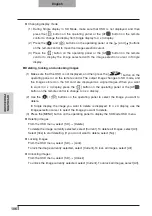
(1) Make sure that the OSD is not displayed, and then press the [
] button on the
operating panel or on the remote control. The output image changes to SD mode, and the
images stored on the SD card are displayed as single images.
(2) Make sure that the OSD is not displayed, and then press the [
] button on the
operating panel or the [ ] button on the remote control to change to the next image.
Press the [
] button on the operating panel or the [ ] button on the remote control
to return to the previous image.
(3) You can zoom in or out of the image being displayed by using the zoom dial on the
main unit, and you can reset zoom in/out by using the AF button on the main unit.
N o t e
• When an SD image is enlarged, the Scroll function cannot be used. If you want to use
the Scroll function, press the AF button to reset the image enlargement, and then scroll.
Содержание L-1EX
Страница 2: ......
Страница 3: ......
Страница 4: ......
Страница 5: ...AC AC...
Страница 6: ...AC AC AC AC AC AC...
Страница 7: ...AC AC AC AC AC...
Страница 8: ...AC AC AC AC AC AC...
Страница 9: ...AC AC AC100V 50Hz 60Hz 0 40 30 85 CMOS CMOS AC FD MO MD...
Страница 10: ...CD DVD LED SD Ni Cd 4...
Страница 12: ...10 Manual 55 56 56 57 58 60 61 PinP 62 63 6 64 64 7 66 66 67 67 68 68...
Страница 13: ...11 P 15 P 35 P 49 P 35 AF P 50 P 35 P 16 P 12 P 45 P 35 Image Mate CD ROM P 14 1...
Страница 14: ...12...
Страница 18: ...16 4 2 4...
Страница 20: ...18 7 30 7m 30 3 0 3 0 3 0 3 0 3 0 3 0 3 0 3 0...
Страница 21: ...19 OSD On Screen Display OSD OSD OSD OSD OSD 1 MENU OSD 2 MENU...
Страница 22: ...20 1 2...
Страница 23: ...21 Image Setting Function Setting Back OSD MENU OSD P 54 Camera OSD...
Страница 30: ...28 1 2 90 180 2...
Страница 31: ...29 3 AC DC IN 12V AC P 30 POWER 4 POWER ON POWER ON...
Страница 32: ...30 AC RGB RGB OUT RGB PC RGB RGB IN RGB RGB OUT DC IN 12V VIDEO OUT TV RGB IN USB PC PC PC PC...
Страница 34: ...32 1 POWER OFF POWER 2 OFF 2 AC AC 3 90 3 OFF...
Страница 35: ...33 4 180 AC OFF...
Страница 37: ...35 PC ON P 49 AF P 50 BRIGHTNESS BRIGHTNESS P 53 ON OFF ON OFF...
Страница 39: ...37 1 2 OSD 3 ZOOM IN SD OSD Guide ON SD SD SD SD SD SD SD 1 16 4 4 2 1 OSD SD SD 2 OSD 3 AF SD AF...
Страница 45: ...43 P 45 PC ON OSD Microscope Set AF Image Mode 1 Graphics1...
Страница 46: ...44 OSD Microscope Off OSD Microscope Off Image Mode Image Mode Microscope BRIGHTNESS BRIGHTNESS...
Страница 47: ...45 1 2 3...
Страница 48: ...46 4 5 20mm 28mm...
Страница 49: ...47 PC ON AF OSD Focus Manual P 50 BRIGHTNESS BRIGHTNESS P 53 ON OFF ON OFF 50mm...
Страница 50: ...48 OSD Image Rotation On 180 110 110 50mm OFF...
Страница 51: ...49 ZOOM OUT ZOOM IN 5 2 8 SD SD 5 L 1ex...
Страница 52: ...50 AF 50mm SD SD...
Страница 53: ...51 OSD Focus OSD AF AF Mode Zoom Sync...
Страница 54: ...52 ON OFF ON OFF OFF LED LED ON OFF ON OFF...
Страница 56: ...54 RGB RGB IN SD RGB RGB IN RGB VIDEO VIDEO PC PC RGB OUT PC VIDEO CAMERA...
Страница 58: ...56 OSD Preset 1 3 USB OSD Preset ON Power On USB 4 1 3 ON AF E x i t O N 3 2 1 ZOOM IN...
Страница 59: ...57 OSD Call 1 3 OSD Call ON Power On OSD Call Default USB E x i t O N 3 2 1...
Страница 60: ...58 OSD Function Setting Highlight Darkness Size...
Страница 61: ...59 SD PC OSD...
Страница 62: ...60 OSD Function Setting Mask Darkness SD PC...
Страница 63: ...61 OSD Function Setting Scroll 2 3 4 SD PC...
Страница 64: ...62 PinP 1 4 PinP 1 4 PinP PinP SD PC PinP 1 4...
Страница 65: ...63 RGB 1 OFF 2 3 ON 1 2 MENU ENTER...
Страница 67: ...65 SD SD SD SD SD 2 1 2 LED...
Страница 82: ...80 PART NAMES AND FUNCTIONS English Functions 1 2 6 7 8 11 13 3 9 4 5 14 10 12 Operating Panel...
Страница 150: ...148 NOMENCLATURE ET FONCTIONS Fran ais Fonctions 1 2 6 7 8 11 13 3 9 4 5 14 10 12 Tableau de commande...
Страница 175: ...173 PROC DURES DE FONCTIONNEMENT Fran ais Pr sentation l aide d une carte SD disponible dans le commerce...
Страница 210: ......
Страница 222: ...220 NAMEN DER TEILE UND FUNKTIONEN Deutsch Funktionen 1 2 6 7 8 11 13 3 9 4 5 14 10 12 Bedienfeld...
Страница 247: ...245 INBETRIEBNAHME Deutsch Pr sentation mit einer SD Karte im Handel erh ltlich...
Страница 282: ......
Страница 283: ......

