background image


1


  TDTAC51T-CC173-CMES 


FR


TONDEUSE A GAZON A ESSENCE 

TRADUCTION DES INSTRUCTIONS D’ORIGINE


NL  GRASMAAIER MET BENZINEMOTOR 

VERTALING VAN DE ORIGINELE INSTRUCTIES


GB  PETROL LAWN MOWER


ORIGINAL INSTRUCTIONS 


S17 M04 Y2013 

Cette tondeuse est livrée SANS HUILE NI ESSENCE dans le moteur -


Содержание TDTAC51T-CC173-CMES

Страница 1: ...N A ESSENCE TRADUCTION DES INSTRUCTIONS D ORIGINE NL GRASMAAIER MET BENZINEMOTOR VERTALING VAN DE ORIGINELE INSTRUCTIES GB PETROL LAWN MOWER ORIGINAL INSTRUCTIONS S17 M04 Y2013 Cette tondeuse est livr...

Страница 2: ...eurs Soyez attentifs aux mains et aux pieds de l op rateur pour viter toute blessure Fum es toxiques n utilisez pas l int rieur Le carburant est inflammable tenir loign des flammes N ajoutez pas de ca...

Страница 3: ...maux se trouvent proximit Gardez l esprit que l op rateur ou l utilisateur est responsable des accidents ou blessures arrivant d autres personnes ou leurs biens Pr paration Pendant la tonte portez tou...

Страница 4: ...ni ne transportez jamais une tondeuse dont le moteur est en fonctionnement Arr tez le moteur et d branchez le c ble de la bougie d allumage assurez vous que les pi ces mobiles sont compl tement arr t...

Страница 5: ...ioration Remplacez les pi ces us es ou endommag es pour des raisons de s curit La cas ch ant vidangez le r servoir de carburant en ext rieur AVERTISSEMENT Ne touchez pas la lame en mouvement AVERTISSE...

Страница 6: ...d assurer que vous obteniez les meilleurs r sultats de votre tondeuse gazon essence veuillez lire toutes les instructions de s curit et de fonctionnement avec soin avant d utiliser ce produit TABLE D...

Страница 7: ...que acier Niveau de puissance acoustique garanti 98 dB A R gime moteur Levier de frein moteur Choke Bouton Poign e du d marreur Manette de r glage en hauteur Jauge d huile D charge lat rale Silencieux...

Страница 8: ...de transport restants le cas ch ant V rifiez qu il ne manque rien dans le carton V rifiez que l appareil le cordon d alimentation la fiche d alimentation lectrique et tous les accessoires n ont pas su...

Страница 9: ...H dans les supports de gauche et de droite pour fixer le guidon avec les vis et les boutons Le trou H est la position haute du guidon et le trou L est la position basse du guidon Placement du c ble d...

Страница 10: ...10 Montage du panneau de commande Sortez du carton le panneau et deux vis dans un sac et fixez le panneau avec les vis Assemblage du sac herbe VIS PANNEAU DE COMMANDE...

Страница 11: ...11...

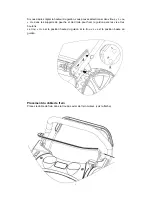
Страница 12: ...r un Mulching plus efficace Installez et enlevez l accessoire de mulching en soulevant le capot de d charge arri re comme montr L accessoire de mulching ne se place que d une seule fa on Enlevez l acc...

Страница 13: ...oulevez le capot mettez en place la goulotte de l jection lat rale Uniquement Mulching veuillez enlever la goulotte de d charge lat rale SIDE DISCHARGE GUARD CAPOT DE DECHARGE LATERALE SIDE DISCHARGE...

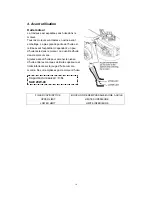
Страница 14: ...un peu d huile reste dans le moteur La quantit d huile dans le moteur varie Ajoutez assez d huile pour amener le niveau d huile entre les marques de limite sup rieure et limite inf rieure sur la jauge...

Страница 15: ...zone bien ventil e le moteur tant l arr t Ne fumez pas et ne laissez pas de flammes ni d tincelles dans la zone o vous faites le plein du moteur ou de stockage d essence Evitez le contact r p t ou pro...

Страница 16: ...hauteur de coupe Contr lez les r glages de hauteur de coupe et faites les ajustements n cessaires AVERTISSEMENT La lame peut causer de graves blessures Arr tez le moteur avant de r gler la hauteur de...

Страница 17: ...e des gaz en position CHOKE Tirez sur le Levier de frein moteur moteur et maintenez le contre le guidon Rel chez le levier de traction Ceci emp chera la tondeuse de se d placer vers l avant lorsque vo...

Страница 18: ...r d marre Imm diatement apr s le d marrage repoussez le levier du papillon d air de la position CHOKE vers la position MARCHE A basse temp rature laissez le moteur tourner quelques minutes avant de co...

Страница 19: ...ontre le guidon pour d placer la tondeuse vers l avant Rel chez le levier de traction pour arr ter le mouvement vers l avant de la tondeuse Rel chez toujours le levier de traction avant de d marrer le...

Страница 20: ...n position ACCELERER Lorsque la lame tourne la vitesse rapide pr d finie elle cr e une forte action de ventilateur qui soul ve et coupe l herbe plus efficacement Arr ter le moteur Mettez la manette de...

Страница 21: ...nt rieur d un b timent o les vapeurs sont susceptibles d atteindre une flamme ou une tincelle ou une source de forte chaleur Laissez le moteur refroidir avant de ranger la machine dans un endroit conf...

Страница 22: ...ments de carburant et les rat s au d marrage Inspectez la lame pour dommage fissures et rouille ou corrosion excessives Une lame mouss e peut tre aff t e mais une lame qui est excessivement us e tordu...

Страница 23: ...toyez compl tement le sac avec un tuyau de jardin et laissez le compl tement s cher avant de l utiliser un sac humide se colmate rapidement Remplacement D clipsez du cadre les bords en plastique du sa...

Страница 24: ...24...

Страница 25: ...usera un dommage au moteur Vidange d huile moteur Vidanger l huile usag e pendant que le moteur est chaud L huile chaude s coule plus rapidement et compl tement Essuyez la zone de l orifice de remplis...

Страница 26: ...contre une surface dure pour enlever la salet ou soufflez de l air comprim travers le filtre air de l int rieur Ne jamais essayer d enlever la salet par brossage le brossage va forcer la salet dans le...

Страница 27: ...E LA BOUGIE D ALLUMAGE Enlevez la bougie d allumage avec une cl bougie SPARK PLUG WRENCH CLE A BOUGIE Inspectez la bougie d allumage Remplacez la si les lectrodes sont us es ou si l isolant est fissur...

Страница 28: ...d allumage peut endommager les filets dans la culasse R glage du c ble de levier de traction et du c ble de Levier de frein moteur Si le levier de traction est desserr vous devez tourner le r glage d...

Страница 29: ...chargez la batterie avant de l utiliser temp rature ambiante pendant 24 heures 5 R tablissez le contact avant la mise en service Destruction DE LA BATTERIE Les batteries portant le symbole conteneur p...

Страница 30: ...s 6 mois ou 50 h Tous les ans ou 100 h Tous les deux ans ou 250 h Contr ler O Huile moteur Remplacer O O 2 Contr ler O Filtre air Remplacer O Contr ler r gler O Bougie d allumage Remplacer O Plaquette...

Страница 31: ...colmat dysfonctionnement du carburateur dysfonctionnement de l allumage soupape bloqu e etc Remplacer ou r parer les composants d fectueux si n cessaire 4 Appuyez sur le bouton d amor age A froid App...

Страница 32: ...prot ger l environnement nous recommandons d accorder une attention sp ciale aux points suivants Toujours utiliser de l essence sans plomb pure Toujours utiliser un entonnoir et ou un bidon d essence...

Страница 33: ...c Les frais d exp dition et d emballage Utilisez uniquement des pi ces de rechange provenant du fabricant Le fabricant d cline toute responsabilit si la machine n a pas t utilis e dans le but pr vu ou...

Страница 34: ...gul e d utilisation Min 1 3000 Allumage Electrique Bougie TORCH F7RTC Ecartement des lectrodes 0 7 0 8 mm Carburant recommand 95 98 oct sans plomb Capacit du r servoir essence l 1 Consommation essence...

Страница 35: ...urs de l utilisation r elle de l outil lectrique peut diff rer de la valeur totale d clar e selon les m thodes d utilisation de l outil et signifiant la n cessit d identifier les mesures de s curit vi...

Страница 36: ...AN DE SYMBOLEN OP HET PRODUCT Lees de gebruiksaanwijz Houd omstanders uit de buurt Besteed als gebruiker extra aandacht aan handen en voeten om letsel te voorkomen Giftige dampen Niet binnenshuis gebr...

Страница 37: ...maaien altijd stevige schoenen en een lange broek Gebruik de grasmaaier niet met blote voeten of met open sandalen Controleer het gehele terrein dat u wilt maaien grondig en verwijder alles wat door h...

Страница 38: ...f voeten in de buurt van of onder draaiende delen Blijf altijd uit de buurt van de uitwerpopening De grasmaaier nooit optillen of dragen wanneer de motor loopt Schakel de motor uit en maak de bougieka...

Страница 39: ...vet Controleer regelmatig de grasopvangzak op slijtage en beschadigingen Vervang veiligheidshalve versleten of beschadigde delen Als de brandstoftank moet worden geleegd moet u dit in de open lucht do...

Страница 40: ...waarborgen dat u de beste resultaten bekomt van uw benzinegrasmaaier al deze veiligheids en gebruiksinstructies zorgvuldig doorlezen vooraleer u dit product gebruikt INHOUDSOPGAVE 1 Productspecificati...

Страница 41: ...alen maaibladkap staal Gewaarborgde geluidsvermogenwaarde 98 dB A Gashendel Remhendel Chokehendel Knop Starterhendel Hoogteafstelhendel Oliepeilstok Zijdelingse grasafvoer Knaldemper Luchtfilter Brand...

Страница 42: ...jvende verpakking en de transportsteunen indien aanwezig Controleer of de inhoud van de verpakking compleet is Controleer het toestel het netsnoer de stekker en alle toebehoren op transportschade Berg...

Страница 43: ...e gaten in de beugel aan de linker rechterzijde om de stuurstang vast te zetten met schroeven en knoppen Het H gat is de hoge positie van de stuurstang en het L gat is de lage positie van de stuurstan...

Страница 44: ...44 Paneelinstelling Neem het paneel en twee schroeven uit de zak in het karton en zet het paneel vast met de twee schroeven SCHROEF CONTROLEPANEEL...

Страница 45: ...45 Assemblage van de grasopvangzak...

Страница 46: ...46 Til de afvoertrechterkap achteraan op verwijder de Mulching en installeer de grasopvangzak...

Страница 47: ...Mulching past slechts op n manier in de pasvorm Verwijder de Mulching bij gebruik van een grasopvangzak Afvoertrechterkapstutten Neem twee stutten uit de zak in het karton en licht de afvoertrechterk...

Страница 48: ...De grasmaaier wordt verstuurd zonder olie in de motor Alle motoren worden proefgedraaid in de fabriek vooraleer ze worden verzonden De meeste olie wordt verwijderd voorafgaand aan de verzending er bli...

Страница 49: ...wetsuren of overlijden veroorzaken Wees uiterst voorzichtig bij het hanteren van benzine Buiten bereik van kinderen houden Vul de brandstoftank bij in een goed verluchte ruimte met de motor uitgezet R...

Страница 50: ...ernstige kwetsuren veroorzaken Stop de motor vooraleer u de maaihoogte aanpast 5 Bediening De motor starten Zet de chokehendel in de CHOKE stand Trek de remhendel naar achter en houd deze tegen de he...

Страница 51: ...51 Laat de koppelingshendel los Dit zal voorkomen dat de grasmaaier naar voor beweegt als u de starter bedient Druk lichtjes op de E startknop waarna de motor zal starten KOPPELINGSHENDEL E startknop...

Страница 52: ...motor te stoppen telkens u de grasmaaier moet achterlaten Koppelingshendel Laat de koppelingshendel los om de voorwaartse beweging van de grasmaaier te stoppen Laat de koppelingshendel steeds los voo...

Страница 53: ...n de SNEL stand Als het maaiblad draait met de vooringestelde hoge snelheid cre ert dit een sterke ventilatoractie die het gras op effici ntere wijze oplicht en maait Motor stoppen Zet de gashendel in...

Страница 54: ...bron van extreme hitte kan bereiken Laat de motor afkoelen vooraleer deze op te bergen in een gesloten ruimte Om het brandgevaar te verminderen moet u de motor de uitlaatknaldemper het batterijvak en...

Страница 55: ...lad kan worden geslepen maar een maaiblad dat te sterk versleten verbogen gebarsten of op enige andere wijze beschadigd is moet worden vervangen Een momentsleutel moet steeds worden gebruikt bij het i...

Страница 56: ...zak met een tuinslang en laat deze volledig drogen vooraleer in gebruik te nemen een natte zak zal snel verstopt raken Vervangen Maak de raamranden plastic zak en draai de 4 schroeven los en verwijder...

Страница 57: ...57 A B...

Страница 58: ...ie af terwijl de motor nog warm is Warme olie vloeit snel en volledig af Veeg de olievulzone schoon en verwijder vervolgens de olievulkap peilstok Plaats een geschikte container naast de grasmaaier om...

Страница 59: ...een hard oppervlak te kloppen om vuil te verwijderen of blaas perslucht doorheen de luchtfilter langs de binnenzijde Probeer nooit het vuil af te borstelen daardoor wordt het vuil immers in de vezels...

Страница 60: ...EUTEL Voer een visuele inspectie van de bougie uit Vervang de bougie als de elektroden versleten zijn of als de isolator gebarsten of afgeschilferd is Meet de elektrospleet van de bougie met een gepas...

Страница 61: ...pelingshendelkabel en van de remhendelkabel Als de koppelingshendel los komt te zitten moet u de koppelingskabelafstelling verdraaien om deze aan te spannen zie de afbeelding Als de remhendel los komt...

Страница 62: ...ccu in een koele en droge omgeving 4 Laad de accu voor het gebruik bij omgevingstemperatuur op gedurende 24 uur 5 Herstel het contact weer voor het gebruik AFVOER VAN DE ACCU De accu s met het symbool...

Страница 63: ...n verhelpen MOTOR WIL NIET STARTEN Mogelijke oorzaak Correctie Benzinetank leeg Brandstof bijvullen 1 Controleer brandstof Slechte brandstof motor opgeslagen zonder benzine te behandelen of af te tapp...

Страница 64: ...ren Let op tijdens de afstelling van de machine om vastklemming van de vingers tussen bewegende maaibladen en vaste delen van de machine te voorkomen Laat het product afkoelen gedurende minstens 30 mi...

Страница 65: ...e luchtfilter enz Vracht en verpakkingskosten Gebruik alleen wisselstukken die van de fabrikant afkomstig zijn De fabrikant zal elke aansprakelijkheid van de hand wijzen als de machine niet werd gebru...

Страница 66: ...l vermogen Kw 3 6 maximaal koppel N m 10 5 Snelheid gecontroleerd gebruik Min 1 3000 ontsteking Elektrisch kaars TORCH F7RTC Elektrodenafstand 0 7 0 8 mm Aanbevolen brandstof 95 98 oct loodvrije Capac...

Страница 67: ...eert dat de emissie van trilling in de loop van het werkelijke gebruik van het elektrische instrument kan verschillen van de aangegeven totale waarde volgens de gebruiksmethodes van het instrument doo...

Страница 68: ...ch use SYMBOLS MARKED ON THE PRODUCT Read operator s manual Keep bystanders away Pay more attention to the operator s hands and feet to avoid injured Toxic fumes Don t operate inside house Fuel is fla...

Страница 69: ...nd that the operator or user is responsible for accidents or hazards occurring to other people or their property Preparation While mowing always wear substantial footwear and long trousers Do not oper...

Страница 70: ...logging chute before checking cleaning or working on the lawn mower after striking a foreign object Inspect the lawn mower for damage and make repairs before restarting and operating the lawn mower if...

Страница 71: ...r To ensure that you get the best results from your Gasoline Lawnmower please read all of these safety and operating instructions carefully before using this product TABLE OF CONTENTS 1 Product Specif...

Страница 72: ...ection capacity 65L Metal deck steel Guaranteed Sound Power Level 98dB A Throttle Lever Brake lever Choke lever Knob Starter handle Height adjust handle Oil dipstick Side discharge Muffler Air filer F...

Страница 73: ...and transit supports if existing Check the completeness of the packing content Check the appliance the power cord the power plug and all accessories for transportation damages Keep the packing materia...

Страница 74: ...e L or H two holes in left right Bracket to fix the handle bar with screws and knobs The H hole is high position of the handle bar and the L hole is low position of the handle bar Brake Cable Setup Pu...

Страница 75: ...75 Panel Setup Take out panel and two screws in a bag from carton and fix the panel with screws Grass Bag Assembly SCREW CONTROL PANEL...

Страница 76: ...76...

Страница 77: ...nstall and remove the mulching plug by raising the rear discharge guard as shown The mulching plug only fits one way Remove the mulching plug when using a grass bag Rear Discharge Guard Props Take out...

Страница 78: ...er is shipped without oil in the engine All engines are run at the factory prior to packaging Most of the oil is removed prior to shipment however some oil remains in the engine The amount of oil left...

Страница 79: ...Keep out of reach of children Refuel in a well ventilated area with the engine stopped Do not smoke or allow flames or sparks in the area where the engine is refueled or where gasoline is stored Avoid...

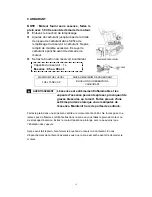
Страница 80: ...80 5 Operation Starting The Engine Move the choke lever to the CHOKE position Pull back on the brake lever and hold it against the handle CHOKE BRAKE LEVER...

Страница 81: ...te the starter Press the E starting button lightly the engine will be started Immediately after the start push back the choke lever from CHOKE position to RUN position If the temperature is low allow...

Страница 82: ...the clutch lever forward and hold it against the handlebar to propel the mower forward Release the clutch lever to stop the mower s forward movement Always release the clutch lever before starting th...

Страница 83: ...mow with the throttle lever in the FAST position When the blade rotate at the preset fast speed it creates a strong fan action that lifts and cuts grass more efficiently Stop Engine Move the throttle...

Страница 84: ...clutch lever Release the brake lever The blade will continue to rotate for a few seconds after the engine has stopped Disconnect the spark plug cap if the lawnmower is to be left unattended CLUTCH LEV...

Страница 85: ...epaired Use genuine spare parts blades should always bear the symbol Parts that are not of the same quality can damage the equipment and be dangerous for your safety If the fuel tank has to be drained...

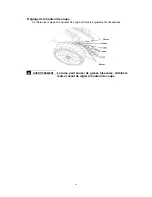
Страница 86: ...moving the bolt Then remove the blade Install the blade using the blade bolt and special washers Be sure to install the special washers with the concave side toward the blade and the convex side towar...

Страница 87: ...Replacement Cleaning Wash the bag with a garden hose and allow it to dry completely before use a wet bag will clog quickly Replacement Unclip the frame edges plastic bag and unscrew the 4 screws and...

Страница 88: ...88...

Страница 89: ...is warm Warm oil drains quickly and completely Wipe the oil filler area clean then remove the oil filler cap dipstick Place a suitable container next to the mower to catch the used oil then tilt the m...

Страница 90: ...nspect the filter and foam element and replace it if damaged Clean the filter by tapping it several times on a hard surface to remove dirt or blow compressed air through the air filter from the inside...

Страница 91: ...plug wrench Inspect the spark plug Replace it if the electrodes are worn or if the insulator is cracked or chipped Measure the spark plug electrode gap with a suitable gauge The gap should be 0 028 0...

Страница 92: ...in the cylinder head The Clutch Lever Cable and Brake lever Cable Adjustment If the clutch lever were loose you should turn the clutch cable adjustment to tighten please see the picture If the brake...

Страница 93: ...ore the battery in a fresh and dry place 4 Recharge the battery before use at room temperature for 24 hours 5 Restore the contact before use BATTERY DISPOSAL Those batteries marked with a crossed out...

Страница 94: ...onths or 25 Hrs Every 6 Months or 50 Hrs Every Year or 100 Hrs Every Two Years or 250 Hrs Check O Engine oil Replace O O 2 Check O Air cleaner Replace O Check adjust O Spark plug Replace O Flywheel br...

Страница 95: ...lements 2 Check fuel Bad fuel engine stored without treating or draining gasoline of refueled with bad gasoline Drain the fuel tank and carburetor Refuel with fresh gasoline 3 Take engine to an author...

Страница 96: ...the enclosed guarantee conditions for the terms and conditions of guarantee The manufacturer will replace at his expense the spare parts which would be classified as defective by him or an agreed stat...

Страница 97: ...Damaged switches must be replaced by our after sales service department ENVIRONMENT Should your machine need replacement after extended use do not put it in the domestic waste but dispose of it in an...

Страница 98: ...m Recommended fuel 95 98 oct Unleaded Fuel tank capacity l 1 Fuel consumption l h 1 07 Running time on tank of fuel H 1 Recommended oil SAE 20W 40 Engine oil capacity l 0 6 Noise according to EN 836 1...

Страница 99: ...hich the tool is used and of the need to identify safety measures to protect the operator that are based on an estimation of exposure in the actual conditions of use taking account of all parts of the...

Страница 100: ...100...
Страница 101: ...e leeftijd van de bediener Bewaar de machine buiten het bereik van kinderen wanneer deze niet wordt gebruikt Dit gereedschap is er niet voor bestemd om te worden gebruikt door personen inclusief kinde...

Страница 102: ...armonis es appliqu es EN 836 1997 A4 2011 EN ISO 14982 2009 EN ISO 3744 2010 ISO 11094 1994 Caract ristiques techniques Produit Tondeuse gazon essence Type TDTAC51T CC173 CMES 173cm 508mm Niveau de la...

Страница 103: ...or 2005 88 EEG Toegepaste geharmoniseerde normen EN 836 1997 A4 2011 EN ISO 14982 2009 EN ISO 3744 2010 ISO 11094 1994 Technische Daten Product Grasmaaier met benzinemotor Type TDTAC51T CC173 CMES 173...

Страница 104: ...Applied harmonized standards EN 836 1997 A4 2011 EN ISO 14982 2009 EN ISO 3744 2010 ISO 11094 1994 Technical Data Product Petrol Lawn Mower Type TDTAC51T CC173 CMES 173cm 508mm Level of sound pressur...

Страница 105: ...de Goz e 6110 Montigny le Tilleul Belgique T l 0032 71 29 70 70 Fax 0032 71 29 70 86 Made in China S A V sav eco repa com Service Parts separated 32 71 29 70 83 32 71 29 70 86 Fabriqu en Chine 2013 Ma...

Отзывы: