background image

6

Installation

1. Decide where the ductwork will run between the

hood and the outside.

2. A straight, short duct run will allow the hood to

perform most efficiently.

3. Long duct runs, elbows, and transitions will reduce

the performance of the hood. Use as few of them
as possible. Larger ducting may be required for best
performance with longer duct runs.

4. Install a roof or wall cap. Connect round metal

ductwork to cap and work back towards hood
location. Use duct tape to seal the joints between
ductwork sections.

5. Never make the size or area of the ductwork smaller

than the size that originates at the hood.

6. Bigger ductwork is better.

7. Keep duct lenght less than 50 linear feet.

8. Minimize use of elbows and transitions (4 or less).

9. Always separate 90 degree elbows with at least 2

feet of straight ductwork.

10. Place transitions at least 1 foot from the hood

outlet.

To reduce the risk of fire, use only metal
ductwork.

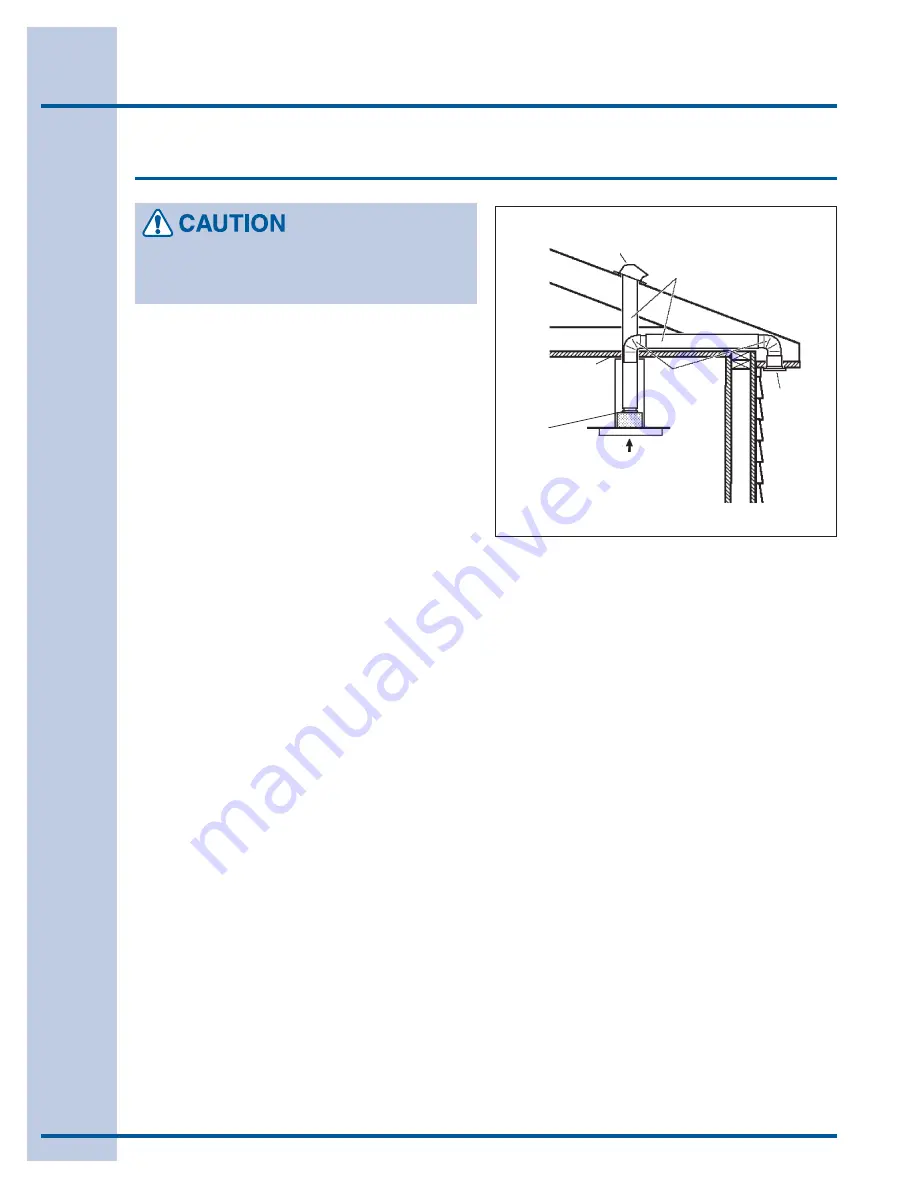
Install the ductwork

HOOD

ROUND
ELBOW

ROUND

DUCT

ROOF CAP

D E C O R A -

T I V E

F L U E

24” TO 30” ABOVE

COOKING SURFACE

EAVE
VENT

6” ADAPTER

Содержание Vent Hood

Страница 1: ...Use Care Guide Installation Instructions Vent Hood 316495008 09 2007 ...

Страница 2: ...es our ability to serve you You can register online at www electroluxusa com or by dropping your Product Registration Card in the mail Questions For toll free telephone support in the U S and Canada 1 877 4ELECTROLUX 1 877 435 3287 For online support and Internet product information visit http www electroluxusa com Table of contents Finding information 2 SAFETY 3 Verify package contents 5 Installa...

Страница 3: ... in accordance with all ap plicable codes and standards including fire rated construction codes and standards 4 Sufficient air is needed for proper combustion and exhausting of gases through the flue chimney of fuel burning equipment to prevent backdrafting Fol low the heating equipment manufacturer s guide lines and safety standards such as those published by the National Fire Protection Associat...

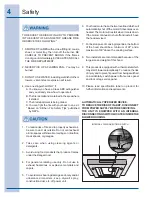
Страница 4: ...oduce flames under the Range Hood 4 For general ventilating use only Do not use to exhaust hazardous or explosive materials and vapors 5 To avoid motor bearing damage and noisy and or unbalanced impellers keep drywall spray construction dust etc off power unit 6 Your hood motor has a thermal overload which will automatically shut off the motor if it becomes over heated The motor will restart when ...

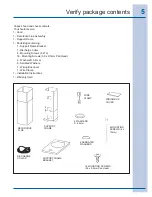
Страница 5: ...s 6 x 70 16 Mounting Screws 3 9 x 9 5mm Pan Head 4 Washers D 6 4mm 6 Serrated Washers 1 Wiring Box Cover 1 Wire Clamp 1 Installation Instructions 1 Warranty Card 4 MOUNTING SCREWS 6 x 70mm 16 MOUNTING SCREWS 3 9 x 9 5mm Pan Head DISCHARGE COLLAR DECORATIVE FLUE SUPPORT FRAME SUPPORT FRAME BRACKET 4 WASHERS D 6 4mm 6 SERRATED WASHERS WIRE CLAMP WIRING BOX COVER Verify package contents ...

Страница 6: ...rk back towards hood location Use duct tape to seal the joints between ductwork sections 5 Never make the size or area of the ductwork smaller than the size that originates at the hood 6 Bigger ductwork is better 7 Keep duct lenght less than 50 linear feet 8 Minimize use of elbows and transitions 4 or less 9 Always separate 90 degree elbows with at least 2 feet of straight ductwork 10 Place transi...

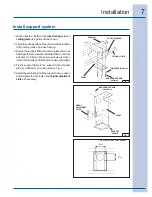
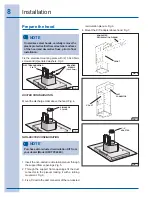
Страница 7: ...screws are driven intocenterofjoistsandframingformaximumstrength 4 Fix the support frame to the support frame bracket with 4 3 9x9 5mm mounting screws Fig 2 5 Adjust the overall height of the support frame Loosen and re tighten the 4 screws in the height adjustment slots as necessary Install support system HEIGHT ADJUSTMENT SLOTS SUPPORT FRAME TOP VIEW OF SUPPORT FRAME DRYWALL 515 16 CROSS FRAMING...

Страница 8: ...ONFIGURATION NOTE Purchase a Non ducted recirculation KIT from your dealer Model DFKTPC40EC 1 Insert the non ducted recirculation plenum through the support frame openings Fig 5 2 Through the support frame openings fit the duct connector to the plenum locking it with a turning movement Fig 6 3 Fix a 5 duct to the duct connector of the non ducted recirculation plenum Fig 6 4 Mount the 6 5 adapter a...

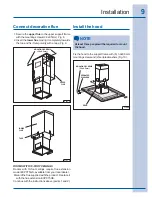
Страница 9: ... TAPE Install the hood Fix the hood to the support frame with 6 3 9x9 5mm mounting screws and 2 serrated washers Fig 10 NOTE Atleastthreepeoplewillberequiredtomount the hood FIG 10 MOUNTING SCREWS 3 9x9 5mm SERRATED WASHERS ROOMS WITH 10 FOOT CEILINGS Rooms with 10 foot ceilings require flue extension model EXPC75GS available from your local dealer Discard the flue supplied with the product Replac...

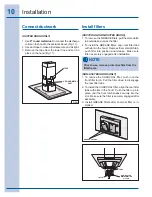
Страница 10: ...ARCOAL filter align the rear filter tabs with slots in the hood Push the filter up into place until the front latch snaps securely into the slot Make sure the filter is securely engaged after assembly 3 Install GREASE filters after charcoal filter is in stalled GREASE FILTERS TABS LATCH NON DUCTED RECIRCULATION FILTER Install filters NOTE Prior to use remove protective film from the filter frame C...

Страница 11: ...e appearance Cleaning tips O Hot water with soap or detergent is all that is usu ally needed O Follow all cleaning by rinsing with clear water Wipe dry with a clean soft cloth to avoid water marks O For discolorations or deposits that persist use a non scratching household cleanser or stainless steel polishing powder with a little water and a soft cloth O For stubborn cases use a plastic scouring ...

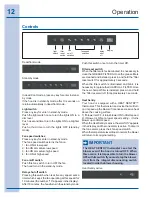
Страница 12: ... it is necessary to clean the GREASE FILTERS Once the grease filters are cleaned and installed press in and hold the filter reset switch for approximately 3 seconds When the filter switch is illuminated and blink it is necessary to replace the CHARCOAL FILTER Once the new charcoal filter is installed press in and hold the filter reset switch for approximately 3 seconds Heat Sentry Your hood is equ...

Страница 13: ...WITCH OFF THE ELECTRICITY SUPPLY BEFORE CARRYING OUT ANY OPERATIONS ON THE APPLIANCE To change bulbs 1 Open the cover by prying from the proper slots DO NOT ROTATE CAUTION BULB MAY BE HOT 3 Replace with a max 20W 12V Type T3 bulb G4 Base bulb Do not touch replacement bulb with bare hands If the bulb is touched with the bare hand it should be cleaned with a lint free cloth moistened with methylated...

Страница 14: ...n ceiling and into the wiring box For the Non Ducted Hoods do not use the upper hole of the wiring box Secure cable to the wiring box using an appropriate connector 3 Feed the range hoods power cable through the lower hole of the wiring box use a wire clamp located in the Hardware Package 4 Make electrical connections Wire white to white black to black and green to green 5 Push all wiring inside t...

Страница 15: ...nt of light bulbs and or fluorescent tubes on models with these features This warranty does not cover the following 1 CONSEQUENTIAL OR INCIDENTAL DAMAGES SUCH AS PROPERTY AND INCIDENTAL EXPENSES RESULTING FROM ANY BREACH OF THIS WRITTEN OR ANY IMPLIED WARRANTY NOTE Some states do not allow the exclusion or limitation of incidental or consequential damages so this limitation or exclusion may not ap...

Страница 16: ...04307839 2S ...
Отзывы: