background image

Содержание RH36PC60GSB

Страница 1: ...AUG 12 Installation Use Care Guide 36 and 42 island Range Hood Guia de Instalacibn Uso y Cuidado 36 y 42 Campana extractora Guide d installation utilisation et d entretien 36 et 42 Hotte aspirante J f ...

Страница 2: ...Table of contents Important Safety Instructions 3 4 Electrical i Installation requirements 5 Electrical requirements 5 IMPOTANT 5 Before installing the hood 5 Parts Included with your hood 6 Optional Accessories 6 Tools Materials required 6 Installing the hood 7 9 Installing preparation 8 Removing the packaging 8 Ceiling Support Structures 9 Ceiling ducting 10 Making the electrical connections Con...

Страница 3: ...i bodily injuryorproperty iiiiiiiiiiiiiiiiiiiiiiiiiiiiiiiiiiiiii damage iiiiiiiiiiiiiiiiiiiiiiiiiiiiiiiiiiiiii PLEASEREADENTIREINSTRUCTIONSBEFOREPROCEEDING iiiiiiiiiiiiiiiiiiiiiiiiiiiiiiiiiiiiiiiiiii INSTALLATIONMUSTCOMPLYWITHALLLOCALCODES iiiiiiiiiiiiiiiiiiiiiiiiiiiiiiiiiiiiii IMPORTANT Savethese Instructionsforthe Local Electrical Inspector s use iiiiiiiiiiiiiiiiiiiiiiiiiiiiiiiiiiiiiiiiiii INSTA...

Страница 4: ...Hood With Any External Solid State Speed Control Device Automatically Operated Device To Reduce The Risk Of Injury Disconnect From Power Supply Before Servicing This unit is equpeed with integral disconnecting switch located inside the blower housing TO REDUCE THE RISK OF A RANGE TOP GREASE FIRE a Never leave surface units unattended at high settings Boilovers cause smoking and greasy spillovers t...

Страница 5: ...tions for electrical inspector s to where the ducting enters the heated portion iiiiiiiiiiiiiiiiiiiiiiiiiiiiiiiiiiiiii use ofthehouse iiiiiiiiiiiiiiiiiiiiiiiiiiiiiiiiiiiiii Therangehood mustbeconnectedwithcopperwire 6 Makeupair Local buildingcodesmayrequirethe iiiiiiiiiiiiiiiiiiiiiiiiiiiiiiiiiiiiii only useofMake UpAirSystemswhenusingUucted iiiiiiiiiiiiiiiiiiiiiiiiiiiiiiiiiiiiii VentilationSystems...

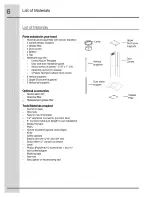
Страница 6: ...orts Optional accessories Recirculation KIT Charcoal filter Replacement grease filter Tools Materials required Aluminum tape Wire nuts Tape to mount template 1 2 electrical connector junction box 8 rounded metal duct length to suit installation Measuring tape Pliers Gloves to protect against sharp edges Knife Safety glasses Electric drill with 5 16 and 3 8 bits Strain relief 1 2 conduit connector ...

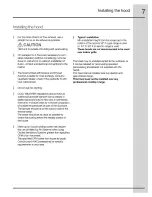
Страница 7: ... for most surfaces consult a Qualified Installer check if they perfectly fit with your cabinet wall Typical installation Min installation height from the range top to the bottom of the hood is 30 if a gas range is used or 24 to 30 if an electric range is used These hoods are not recommended to be used over indoor grills The hood may be installed vented to the outdoors or it can be installed for re...

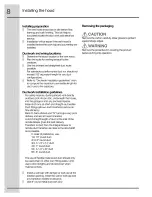
Страница 8: ... into any enclosed space Keep duct runs as short and straight as possible Duct fittings elbows and transitions reduce air flow eficiency Back to back elbows and S turns give very poor delivery and are not recommended A short straight length of duct at the inlet of the remote blower gives the best delivery Transition to duct from the integral blower or remote duct transition as close to the downdra...

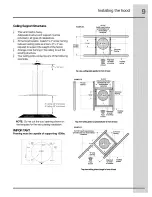
Страница 9: ...ront of cooktop outline of hood Topview ceiling joistsparallel to fi ontofhood EXAMPLEB spacing 10 I 16 cen_erline 2x4 cross framing T _ iiiiiiiiiiiiiiiiiiiiiiiiii 8 Ceiling 24 minimum 9 Ceiling 30 minimum I r _X _Cookto _ Align duct P T _ to center outline _b_ Front of cooktop _ of hood NOTE DO not cut the duct opening shown on Top view ceiling joists runperpendicular tofrontof hood the template ...

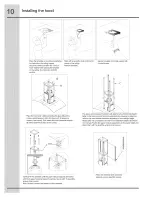
Страница 10: ...support B with 8 assembly screws 2 per corner The upper vertical supports position will determine the hood s total height Refer to the maximum and minimum extensions line drawing to determine which is the most suitable dimension according to your ceiling s height Always take into consideration the minimum installation heights declared in this manual Position the upper vertical supports C at the pr...

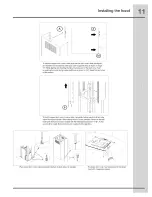
Страница 11: ...over s tabs are aligned and inserted into the stainless steel duct cover support s slots as shown in image A While aligning and inserting the tabs the lower part of the duct cover must be pushing the metal spring inside at all times as shown in A1 Keep the duct cover in this position ...

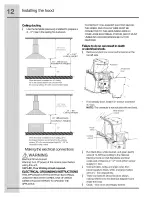
Страница 12: ...an result in death or electrical shock Remove junction box cover and knockout on the top left side Knockout Junction box cover When the Island is installed in a 10 Ceiling 35 is the closest distance we can have from the cooking surface 35 is the recommended height T _ 0 n_in _Xt nSiO Y i 8 96 Ceiling Height 3o Maximum nstallation Height When the Island is installed in an 8 Ceiling 30 is the longes...

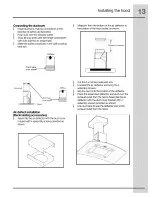
Страница 13: ...rated Push duct over the exhaust outlet Wrap all duct joints and the flange connections with duct tape for an airtight seal Make the same connection in the wall or ceiling vent exit Airflow Duct tape over seam Measure from the bottom of the air deflector to the bottom of the hood outlet as shown t Dimension to measure ...

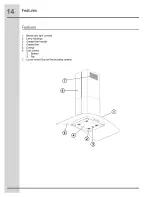
Страница 14: ...iiiiiiiiiiiiiiiiiiiiiiiiiiiiiiiiiiiiiiiiiiiiiiiiiiiiiiiiiiii Fe s _i_i _i _i _i_i _i _i_i _i _i _i_i _i _i_i _i _i _i_i _i _i_i _i _i _i_i _i _i _i_i _i _i_i _i _i _i_i _i _i_i _i _i _i_i _i _i_i _i _i _i_i _i _i _i_i _i _i_i _i _i _i_i _i _i_i _i _i _i_i _i _i_i _i _i _i_i _i _i _ 1 Blower and light controls 2 Lamp housings 3 Grease filter Handle 4 Grease filter 5 Canopy 6 Duct covers Bottom Top ...

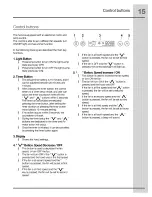
Страница 15: ...the A button is pressed and the hood was OFE If the fan is at first speed and the A button is pressed the fan will be set to second speed If the fan is at second speed and the A and A buttons within 5 seconds Th_ timercanlb_initiated immediatel button is pressed thefan will be settothird Y pressingthetimerbutton aftersettingthe speed A timerdurationorpressingthetimerbutton _ fthefan isatthird spe_...

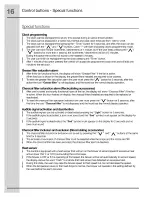
Страница 16: ...urs of the fan the display will show Charcoal Filter if the fan is active When this icon flashes on display the charcoal filters installed are required to be replaced or reactivated To reset the charcoal filter saturation indication the user must press the V button for 5 seconds after this time the icon Charcoal filter is not displayed and the hood has the normal display operation Audible signal a...

Страница 17: ... upward through the hood Thus when heat smoke moisture grease and cooking odors are produced they will be carried outside instead of drifting into other rooms Use the low speeds for normal use and the higher speeds for strong odors or fumes Drafts across the range or cooktop will cause the escape of heat smoke moisture grease and cooking odors from the hood Such drafts should be prevented in so fa...

Страница 18: ...he fan and lights off Pull the spring release handle Lights Before replacing the lamps switch power off at service panel and lock service panel disconnecting means to prevent power from being switched on accidentally NOTE Turn off the lights and fan Allow the lights to cool before handling Replace lights per instructions If new lights do not operate be sure lights are inserted correctly before cal...

Страница 19: ...ion of the stainless steel for extended periods Plastic surfaces iiiiiiiiiiiiiiiiiiiiiiiiiiiiiiiiiiiiii grain Wipeareadrytoavoidwatermarks Wipewithamoistsoapysponge iiiiiiiiiiiiiiiiiiiiiiiiiiiiiiiiiiiiii Aftercleaning placeallpartsintheirproper Rinseanddry iiiiiiiiiiiiiiiiiiiiiiiiiiiiiiiiiiiiii positionsbeforeusing AluminumMeshFilters Oleanfiltersinthedish iiiiiiiiiiiiiiiiiiiiiiiiiiiiiiiiiiiiii Th...

Страница 20: ...panies use of parts other than genuine Electrolux parts or parts obtained from persons other than authorized service companies or external causes such as abuse misuse inadequate power supply accidents fires or acts of God If You Need Service DISCLAIMER OF IMPLIED WARRANTIES LIMITATION OF REMEDIES CUSTOMER S SOLE AND EXCLUSIVE REMEDY UNDER THIS LIMITED WARRANTY SHALL BE PRODUCT REPAIR OR REPLACEMEN...

Страница 21: ......

Страница 22: ...AUG 12 Installation Use Care Guide 36 and 42 island Range Hood Guia de Instalacibn Uso y Cuidado 36 y 42 Campana extractora Guide d installation utilisation et d entretien 36 et 42 Hotte aspirante J f ...

Страница 23: ...Table of contents Important Safety Instructions 3 4 Electrical i Installation requirements 5 Electrical requirements 5 IMPOTANT 5 Before installing the hood 5 Parts Included with your hood 6 Optional Accessories 6 Tools Materials required 6 Installing the hood 7 9 Installing preparation 8 Removing the packaging 8 Ceiling Support Structures 9 Ceiling ducting 10 Making the electrical connections Con...

Страница 24: ...i bodily injuryorproperty iiiiiiiiiiiiiiiiiiiiiiiiiiiiiiiiiiiiii damage iiiiiiiiiiiiiiiiiiiiiiiiiiiiiiiiiiiiii PLEASEREADENTIREINSTRUCTIONSBEFOREPROCEEDING iiiiiiiiiiiiiiiiiiiiiiiiiiiiiiiiiiiiiiiiiii INSTALLATIONMUSTCOMPLYWITHALLLOCALCODES iiiiiiiiiiiiiiiiiiiiiiiiiiiiiiiiiiiiii IMPORTANT Savethese Instructionsforthe Local Electrical Inspector s use iiiiiiiiiiiiiiiiiiiiiiiiiiiiiiiiiiiiiiiiiii INSTA...

Страница 25: ...Hood With Any External Solid State Speed Control Device Automatically Operated Device To Reduce The Risk Of Injury Disconnect From Power Supply Before Servicing This unit is equpeed with integral disconnecting switch located inside the blower housing TO REDUCE THE RISK OF A RANGE TOP GREASE FIRE a Never leave surface units unattended at high settings Boilovers cause smoking and greasy spillovers t...

Страница 26: ...tions for electrical inspector s to where the ducting enters the heated portion iiiiiiiiiiiiiiiiiiiiiiiiiiiiiiiiiiiiii use ofthehouse iiiiiiiiiiiiiiiiiiiiiiiiiiiiiiiiiiiiii Therangehood mustbeconnectedwithcopperwire 6 Makeupair Local buildingcodesmayrequirethe iiiiiiiiiiiiiiiiiiiiiiiiiiiiiiiiiiiiii only useofMake UpAirSystemswhenusingUucted iiiiiiiiiiiiiiiiiiiiiiiiiiiiiiiiiiiiii VentilationSystems...

Страница 27: ...orts Optional accessories Recirculation KIT Charcoal filter Replacement grease filter Tools Materials required Aluminum tape Wire nuts Tape to mount template 1 2 electrical connector junction box 8 rounded metal duct length to suit installation Measuring tape Pliers Gloves to protect against sharp edges Knife Safety glasses Electric drill with 5 16 and 3 8 bits Strain relief 1 2 conduit connector ...

Страница 28: ... for most surfaces consult a Qualified Installer check if they perfectly fit with your cabinet wall Typical installation Min installation height from the range top to the bottom of the hood is 30 if a gas range is used or 24 to 30 if an electric range is used These hoods are not recommended to be used over indoor grills The hood may be installed vented to the outdoors or it can be installed for re...

Страница 29: ... into any enclosed space Keep duct runs as short and straight as possible Duct fittings elbows and transitions reduce air flow eficiency Back to back elbows and S turns give very poor delivery and are not recommended A short straight length of duct at the inlet of the remote blower gives the best delivery Transition to duct from the integral blower or remote duct transition as close to the downdra...

Страница 30: ...ront of cooktop outline of hood Topview ceiling joistsparallel to fi ontofhood EXAMPLEB spacing 10 I 16 cen_erline 2x4 cross framing T _ iiiiiiiiiiiiiiiiiiiiiiiiii 8 Ceiling 24 minimum 9 Ceiling 30 minimum I r _X _Cookto _ Align duct P T _ to center outline _b_ Front of cooktop _ of hood NOTE DO not cut the duct opening shown on Top view ceiling joists runperpendicular tofrontof hood the template ...

Страница 31: ...support B with 8 assembly screws 2 per corner The upper vertical supports position will determine the hood s total height Refer to the maximum and minimum extensions line drawing to determine which is the most suitable dimension according to your ceiling s height Always take into consideration the minimum installation heights declared in this manual Position the upper vertical supports C at the pr...

Страница 32: ...over s tabs are aligned and inserted into the stainless steel duct cover support s slots as shown in image A While aligning and inserting the tabs the lower part of the duct cover must be pushing the metal spring inside at all times as shown in A1 Keep the duct cover in this position ...

Страница 33: ...an result in death or electrical shock Remove junction box cover and knockout on the top left side Knockout Junction box cover When the Island is installed in a 10 Ceiling 35 is the closest distance we can have from the cooking surface 35 is the recommended height T _ 0 n_in _Xt nSiO Y i 8 96 Ceiling Height 3o Maximum nstallation Height When the Island is installed in an 8 Ceiling 30 is the longes...

Страница 34: ...rated Push duct over the exhaust outlet Wrap all duct joints and the flange connections with duct tape for an airtight seal Make the same connection in the wall or ceiling vent exit Airflow Duct tape over seam Measure from the bottom of the air deflector to the bottom of the hood outlet as shown t Dimension to measure ...

Страница 35: ...iiiiiiiiiiiiiiiiiiiiiiiiiiiiiiiiiiiiiiiiiiiiiiiiiiiiiiiiiiii Fe s _i_i _i _i _i_i _i _i_i _i _i _i_i _i _i_i _i _i _i_i _i _i_i _i _i _i_i _i _i _i_i _i _i_i _i _i _i_i _i _i_i _i _i _i_i _i _i_i _i _i _i_i _i _i _i_i _i _i_i _i _i _i_i _i _i_i _i _i _i_i _i _i_i _i _i _i_i _i _i _ 1 Blower and light controls 2 Lamp housings 3 Grease filter Handle 4 Grease filter 5 Canopy 6 Duct covers Bottom Top ...

Страница 36: ...the A button is pressed and the hood was OFE If the fan is at first speed and the A button is pressed the fan will be set to second speed If the fan is at second speed and the A and A buttons within 5 seconds Th_ timercanlb_initiated immediatel button is pressed thefan will be settothird Y pressingthetimerbutton aftersettingthe speed A timerdurationorpressingthetimerbutton _ fthefan isatthird spe_...

Страница 37: ...urs of the fan the display will show Charcoal Filter if the fan is active When this icon flashes on display the charcoal filters installed are required to be replaced or reactivated To reset the charcoal filter saturation indication the user must press the V button for 5 seconds after this time the icon Charcoal filter is not displayed and the hood has the normal display operation Audible signal a...

Страница 38: ... upward through the hood Thus when heat smoke moisture grease and cooking odors are produced they will be carried outside instead of drifting into other rooms Use the low speeds for normal use and the higher speeds for strong odors or fumes Drafts across the range or cooktop will cause the escape of heat smoke moisture grease and cooking odors from the hood Such drafts should be prevented in so fa...

Страница 39: ...he fan and lights off Pull the spring release handle Lights Before replacing the lamps switch power off at service panel and lock service panel disconnecting means to prevent power from being switched on accidentally NOTE Turn off the lights and fan Allow the lights to cool before handling Replace lights per instructions If new lights do not operate be sure lights are inserted correctly before cal...

Страница 40: ...ion of the stainless steel for extended periods Plastic surfaces iiiiiiiiiiiiiiiiiiiiiiiiiiiiiiiiiiiiii grain Wipeareadrytoavoidwatermarks Wipewithamoistsoapysponge iiiiiiiiiiiiiiiiiiiiiiiiiiiiiiiiiiiiii Aftercleaning placeallpartsintheirproper Rinseanddry iiiiiiiiiiiiiiiiiiiiiiiiiiiiiiiiiiiiii positionsbeforeusing AluminumMeshFilters Oleanfiltersinthedish iiiiiiiiiiiiiiiiiiiiiiiiiiiiiiiiiiiiii Th...

Страница 41: ...panies use of parts other than genuine Electrolux parts or parts obtained from persons other than authorized service companies or external causes such as abuse misuse inadequate power supply accidents fires or acts of God If You Need Service DISCLAIMER OF IMPLIED WARRANTIES LIMITATION OF REMEDIES CUSTOMER S SOLE AND EXCLUSIVE REMEDY UNDER THIS LIMITED WARRANTY SHALL BE PRODUCT REPAIR OR REPLACEMEN...

Страница 42: ......

Отзывы: