background image

1.2 

Children and vulnerable people safety

This appliance can be used by children aged from 8

years and above and persons with reduced physical,

sensory or mental capabilities or lack of experience and

knowledge if they have been given supervision or

instruction concerning use of the appliance in a safe

way and understand the hazards involved.

Do not let children play with the appliance.

Keep all detergents away from children.

Keep children and pets away from the appliance door

when it is open.

Cleaning and user maintenance shall not be made by

children without supervision.

2. 

SAFETY INSTRUCTIONS

2.1 

Installation

• Remove all the packaging.

• Do not install or use a damaged

appliance.

• Do not install or use the appliance

where the temperature is less than 0

°C.

• Obey the installation instruction

supplied with the appliance.

• Make sure that the appliance is

installed below and adjacent to safe

structures.

2.2 

Electrical connection

WARNING!

Risk of fire and electrical

shock.

• The appliance must be earthed.

• Make sure that the electrical

information on the rating plate agrees

with the power supply. If not, contact

an electrician.

• Always use a correctly installed

shockproof socket.

• Do not use multi-plug adapters and

extension cables.

• Make sure not to cause damage to the

mains plug and to the mains cable.

Should the mains cable need to be

replaced, this must be carried out by

our Authorised Service Centre.

• Connect the mains plug to the mains

socket only at the end of the

installation. Make sure that there is

access to the mains plug after the

installation.

• Do not pull the mains cable to

disconnect the appliance. Always pull

the mains plug.

• This appliance complies with the E.E.C.

Directives.

• Only for UK and Ireland. The appliance

has a 13 amp mains plug. If it is

necessary to change the fuse in the

mains plug, use fuse: 13 amp ASTA

(BS 1362).

2.3 

Water connection

• Make sure not to cause damage to the

water hoses.

• Before you connect the appliance to

new pipes or pipes not used for a long

time, let the water flow until it is clean.

• The first time you use the appliance,

make sure that there is no leakage.

• The water inlet hose has a safety valve

and a sheath with an inner mains

cable.

www.electrolux.com

4

Содержание GA60GLVSCN

Страница 1: ...GA60GLVSCN EN DISHWASHER USER MANUAL 2 DE GESCHIRRSPÜLER BENUTZERINFORMATION 22 ...

Страница 2: ... you can be safe in the knowledge that you ll get great results every time Welcome to Electrolux Visit our website for Get usage advice brochures trouble shooter service information www electrolux com Register your product for better service www registerelectrolux com Buy Accessories Consumables and Original spare parts for your appliance www electrolux com shop CUSTOMER CARE AND SERVICE Always us...

Страница 3: ...re minimum and maximum must be between 0 5 0 05 8 0 8 bar Mpa Obey the maximum number of 15 place settings If the supply cord is damaged it must be replaced by the manufacturer its Authorised Service Centre or similarly qualified persons in order to avoid a hazard Put knives and cutlery with sharp points in the cutlery basket with the points down or in a horizontal position Do not keep the applian...

Страница 4: ...rthed Make sure that the electrical information on the rating plate agrees with the power supply If not contact an electrician Always use a correctly installed shockproof socket Do not use multi plug adapters and extension cables Make sure not to cause damage to the mains plug and to the mains cable Should the mains cable need to be replaced this must be carried out by our Authorised Service Centr...

Страница 5: ...dishes The appliance can release hot steam if you open the door while a programme operates Do not put flammable products or items that are wet with flammable products in near or on the appliance 2 5 Internal light WARNING Risk of injury This appliance has an internal lamp that comes on when you open the door and goes off when the door is closed The lamp in this appliance is not suitable for househ...

Страница 6: ...10 Lower basket 11 Upper basket 12 Cutlery drawer 3 1 TimeBeam The TimeBeam is a display that shows on the floor below the appliance door When the programme starts the programme duration comes on When the programme is completed 0 00 and CLEAN come on When the delay start starts the countdown duration and DELAY come on When the appliance has a malfunction an alarm code appears www electrolux com 6 ...

Страница 7: ...id indicator It is always off while the programme operates 5 PROGRAMMES Programme Degree of soil Type of load Programme phases Options P1 ECO 1 Normal soil Crockery and cutlery Prewash Wash 50 C Rinses Dry TimeSaver P2 AUTO 2 All Crockery cut lery pots and pans Prewash Wash from 45 C to 70 C Rinses Dry P3 70 Pro 3 Heavy soil Crockery cut lery pots and pans Prewash Wash 70 C Rinses Dry TimeSaver P4...

Страница 8: ...ays at 70 C for at least 10 minutes 4 With this programme you can wash a load with fresh soil It gives good washing results in a short time 5 This is the most silent programme The pump works at a very low speed to decrease the level of noise Because of the low speed the programme duration is long 5 1 Consumption values Programme 1 Water l Energy kWh Duration min P1 ECO 11 0 961 225 P2 AUTO 7 14 0 ...

Страница 9: ...ot happen you can set the programme selection mode in the following way Press and hold Reset until the appliance is in programme selection mode 6 2 The water softener The water softener removes minerals from the water supply which would have a detrimental effect on the washing results and on the appliance The higher the content of these minerals the harder your water is Water hardness is measured ...

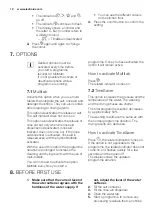
Страница 10: ...aid level The appliance must be in programme selection mode 1 To enter the user mode press and hold simultaneously and until the indicators and start to flash and the display is blank 2 Press The indicators and go off The indicator continues to flash The display shows the current setting e g level 4 The levels of rinse aid are from 0A to 6A Level 0 no rinse aid is released 3 Press again and again ...

Страница 11: ...shows the number and the duration of the programme 6 6 Acoustic signals Acoustic signals sound when a malfunction of the appliance occurs It is not possible to deactivate these acoustic signals There is also an acoustic signal that sounds when the programme is completed By default this acoustic signal is deactivated but it is possible to activate it How to activate the acoustic signal for the end ...

Страница 12: ...e of this option the programme duration is prolonged to increase the cleaning and drying results with the use of multi tablets You do not need to activate the option Multitab every time you start a programme Once you have activated the option it will remain active How to activate Multitab Press The related indicator comes on 7 2 TimeSaver This option increases the pressure and the temperature of t...

Страница 13: ...move it 2 Put 1 litre of water in the salt container Only for the first time 3 Fill the salt container with dishwasher salt 4 Remove the salt around the opening of the salt container 5 Turn the cap of the salt container clockwise to close the salt container Water and salt can come out from the salt container when you fill it Risk of corrosion To prevent it after you fill the salt container start a...

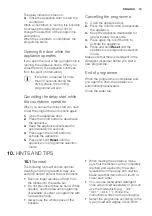
Страница 14: ...n decreases energy consumption by deactivating automatically the appliance when it is not operating The function comes into operation 5 minutes after the completion of the programme After 5 minutes if the programme has not started Starting a programme 1 Keep the appliance door ajar 2 Press the on off button to activate the appliance Make sure that the appliance is in programme selection mode 3 Pre...

Страница 15: ... appliance 3 Keep the appliance deactivated for approximately 30 seconds 4 Press again the on off button to activate the appliance 5 Press and hold Reset until the appliance is in programme selection mode Make sure that there is detergent in the detergent dispenser before you start a new programme End of programme When the programme is completed and you open the door the appliance is automatically...

Страница 16: ... with a rinsing phase Do not add detergent and do not load the baskets 4 When the programme is completed adjust the water softener according to the water hardness in your area 5 Adjust the released quantity of rinse aid 10 4 Loading the baskets Only use the appliance to wash items that are dishwasher safe Do not put in the appliance items made of wood horn aluminium pewter and copper Do not put in...

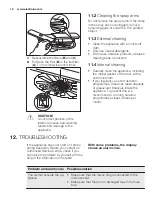
Страница 17: ... washing results Make a check regularly and if necessary clean them 11 1 Cleaning the filters The filter system is made of 3 parts C B A 1 Turn the filter B counterclockwise and remove it 2 Remove the filter C out of filter B 3 Remove the flat filter A 4 Wash the filters 5 Make sure that there are no residues of food or soil in or around the edge of the sump 6 Put back in place the flat filter A M...

Страница 18: ... the appliance including the rubber gasket of the door with a soft moist cloth If you regularly use short duration programmes these can leave deposits of grease and limescale inside the appliance To prevent this we recommend to run long duration programmes at least 2 times per month 12 TROUBLESHOOTING If the appliance does not start or it stops during operation Before you contact an Authorised Ser...

Страница 19: ...act an Authorised Service Centre Once you have checked the appliance deactivate and activate the appliance If the problem occurs again contact an Authorised Service Centre For alarm codes not described in the table contact an Authorised Service Centre 12 1 The washing and drying results are not satisfactory Problem Possible solution There are whitish streaks or bluish layers on glasses and dishes ...

Страница 20: ...Via Violino 11 6928 Manno Morgenstrasse 131 3018 Bern Zürcherstrasse 204E 9000 St Gallen Seetalstrasse 11 6020 Emmenbrücke St Jakob Turm Birsstrasse 320B 4052 Basel Comercialstrasse 19 7000 Chur Spare parts service Industriestrasse 10 5506 Mägenwil Tel 0848 848 111 Specialist advice Sale Badenerstrasse 587 8048 Zürich Tel 044 405 81 11 Warranty For each product we provide a two year guarantee from...

Страница 21: ...ces Do not dispose appliances marked with the symbol with the household waste Return the product to your local recycling facility or contact your municipal office For Switzerland Where should you take your old equipment Anywhere that sells new equipment or hand it in to official SENS collection points or official SENS recycling firms The list of official SENS collection points can be found at www ...

Страница 22: ...ssheit dass Sie stets großartige Ergebnisse erzielen werden Willkommen bei Electrolux Besuchen Sie uns auf unserer Website um Anwendungshinweise Prospekte Fehlerbehebungs und Service Informationen zu erhalten www electrolux com Ihr erworbenes Produkt zu registrieren um den besten Service dafür zu gewährleisten www registerelectrolux com Zubehör Verbrauchsmaterial und Original Ersatzteile für Ihr G...

Страница 23: ...muss zwischen 0 5 0 05 8 0 8 bar Mpa liegen Beachten Sie dass die Höchstzahl an Maßgedecken 15 beträgt Wenn das Netzkabel beschädigt ist muss es vom Hersteller seinem autorisierten Kundenservice oder einer gleichermaßen qualifizierten Person ausgetauscht werden um Gefahrenquellen zu vermeiden Stellen Sie Messer und Besteck mit scharfen Spitzen mit der Spitze nach unten in den Besteckkorb oder lege...

Страница 24: ...en nicht von Kindern ohne Aufsicht erfolgen 2 SICHERHEITSANWEISUNGEN 2 1 Montage Entfernen Sie das Verpackungsmaterial Stellen Sie ein beschädigtes Gerät nicht auf und benutzen Sie es nicht Stellen Sie das Gerät nicht an einem Ort auf an dem die Temperatur unter 0 C absinken kann und benutzen Sie das Gerät nicht wenn die Temperatur unter 0 C absinkt Halten Sie sich an die mitgelieferte Montageanle...

Страница 25: ...rt den Netzstecker aus der Steckdose wenn der Wasserzulaufschlauch beschädigt ist Wenden Sie sich für den Austausch des Wasserzulaufschlauchs an den autorisierten Kundendienst 2 4 Gebrauch Setzen oder stellen Sie sich niemals auf die geöffnete Gerätetür Geschirrspüler Reinigungsmittel sind gefährlich Beachten Sie die Sicherheitsanweisungen auf der Reinigungsmittelverpackung Trinken Sie nicht das W...

Страница 26: ...ze 8 Klarspülmittel Dosierer 9 Reinigungsmittelbehälter 10 Unterkorb 11 Oberkorb 12 Besteckschublade 3 1 TimeBeam Der TimeBeam ist ein Lichtstrahl der unterhalb der Gerätetür auf den Boden projiziert wird Nach dem Start des Programms wird die Programmdauer angezeigt Nach Abschluss des Programms leuchten 0 00 und CLEAN Nach Einstellung der Zeitvorwahl leuchten die Zeitvorwahl und DELAY Im Fall eine...

Страница 27: ...Kontrolllampe Klarspülmittel Sie erlischt während des Programmbe triebs 5 PROGRAMME Programm Verschmutzungs grad Beladung Programmphasen Optionen P1 ECO 1 Normal versch mutzt Geschirr und Besteck Vorspülen Hauptspülgang 50 C Spülgänge Trocknen TimeSaver P2 AUTO 2 Alle Geschirr Bes teck Töpfe und Pfannen Vorspülen Hauptspülgang von 45 C bis 70 C Spülgänge Trocknen P3 70 Pro 3 Stark versch mutzt Ges...

Страница 28: ...r ben Es stellt dann automatisch die Wassertemperatur und menge den Energieverbrauch und die Programmdauer ein 3 Dieses Programm enthält eine Spülphase mit hoher Temperatur um hygienischere Spüler gebnisse zu liefern Während der Spülphase wird die Temperatur für mindestens 10 Minuten auf 70 C gehalten 4 Mit diesem Programm können Sie vor kurzem benutztes Geschirr spülen Sie erhalten gute Spülergeb...

Страница 29: ...titab ohne Klarspülmittel verwenden möchten Klarspülmittelstufe gemäß der erforderlichen Dosierung Diese Einstellungen bleiben gespeichert bis sie von Ihnen wieder geändert werden Einstellen des Programmwahlmodus Das Gerät befindet sich im Programmwahlmodus wenn im Display die Programmnummer P1 angezeigt wird Wenn Sie das Gerät einschalten befindet es sich normalerweise im Programmwahlmodus Andere...

Страница 30: ...trolllampe blinkt weiter Im Display wird die aktuelle Einstellung angezeigt z B Stufe 5 3 Drücken Sie wiederholt um die Einstellung zu ändern 4 Drücken Sie die Taste Ein Aus zum Bestätigen der Einstellung 6 3 Klarspülmittel Dosierer Klarspülmittel ermöglichen das Trocknen des Geschirrs ohne Streifen und Flecken Das Klarspülmittel wird automatisch während der heißen Spülphasen abgegeben Sie können ...

Страница 31: ...ich im Programmwahlmodus befinden 1 Halten Sie zum Aufrufen des Benutzermodus gleichzeitig und gedrückt bis die Kontrolllampen und blinken und das Display nichts anzeigt 2 Drücken Sie Die Kontrolllampen und erlöschen Die Kontrolllampe blinkt weiter Im Display wird die aktuelle Einstellung angezeigt Der Klarspülmittel Dosierer ist eingeschaltet Werkseinstellung 3 Drücken Sie zum Ändern der Einstell...

Страница 32: ...lllampen und blinken und das Display nichts anzeigt 2 Drücken Sie Die Kontrolllampen und erlöschen Die Kontrolllampe blinkt weiter Im Display werden eine Zahl und der Buchstabe C angezeigt Jede Zahl steht für eine andere Farbe TimeBeam ausgeschaltet 3 Drücken Sie wiederholt um die Farbe zu ändern Die verschiedenen Farben sehen Sie auf dem Küchenboden 4 Drücken Sie die Taste Ein Aus zur Bestätigung...

Страница 33: ...e ob die Einstellung des Wasserenthärters der Wasserhärte in Ihrem Gebiet entspricht Wenn nicht stellen Sie die Wasserenthärterstufe ein 2 Füllen Sie den Salzbehälter 3 Füllen Sie den Klarspülmittel Dosierer 4 Öffnen Sie den Wasserhahn 5 Starten Sie ein Programm um Fertigungsrückstände die sich möglicherweise noch im Gerät befinden können zu beseitigen Verwenden Sie kein Reinigungsmittel und belad...

Страница 34: ...bildung zu vermeiden 4 Schließen Sie den Deckel Achten Sie darauf dass der Deckel einrastet Füllen Sie den Klarspülmittel Dosierer auf wenn die Füllstandsanzeige für den Klarspüler A durchsichtig wird 9 TÄGLICHER GEBRAUCH 1 Öffnen Sie den Wasserhahn 2 Drücken Sie die Taste Ein Aus um das Gerät einzuschalten Stellen Sie sicher dass sich das Gerät im Programmwahlmodus befindet Füllen Sie den Salzbeh...

Страница 35: ...n Sie sicher dass sich das Gerät im Programmwahlmodus befindet 3 Drücken Sie wiederholt die Taste bis im Display die Zahl des gewünschten Programms erscheint Die Programmnummer wird etwa 3 Sekunden lang im Display angezeigt anschließend erscheint die Programmdauer Wenn Sie das Programm MyFavourite wählen möchten drücken Sie Die dem Programm MyFavourite zugeordneten Kontrolllampen der Optionen leuc...

Страница 36: ...ie ein neues Programm starten stellen Sie sicher dass der Reinigungsmittelbehälter gefüllt ist Programmende Wenn das Programm beendet ist und Sie die Tür öffnen schaltet sich das Gerät automatisch aus Schließen Sie den Wasserhahn 10 TIPPS UND HINWEISE 10 1 Allgemeines Die folgenden Hinweise stellen optimale Reinigungs und Trocknungsergebnisse im täglichen Gebrauch sicher und tragen auch zum Umwelt...

Страница 37: ... tun wenn Sie keine Multi Reinigungstabletten mehr verwenden möchten Vorgehensweise um zurück zur separaten Verwendung von Reinigungsmittel Salz und Klarspülmittel zu kehren 1 Stellen Sie die höchste Wasserenthärterstufe ein 2 Stellen Sie sicher dass der Salzbehälter und der Klarspülmittel Dosierer gefüllt sind 3 Starten Sie das kürzeste Programm mit einer Spülphase Verwenden Sie kein Reinigungsmi...

Страница 38: ...n Sie das Geschirr abkühlen bevor Sie es aus dem Gerät nehmen Heißes Geschirr ist stoßempfindlich 2 Entladen Sie zuerst den Unter und dann den Oberkorb Am Programmende kann sich noch Wasser an den Seitenwänden und der Gerätetür befinden 11 REINIGUNG UND PFLEGE WARNUNG Schalten Sie das Gerät immer aus und ziehen Sie den Netzstecker aus der Steckdose bevor Reinigungsarbeiten durchgeführt werden Vers...

Страница 39: ...Setzen Sie den Filter B in den flachen Filter A ein Drehen Sie ihn nach rechts bis er einrastet ACHTUNG Eine falsche Anordnung der Filter führt zu schlechten Spülergebnissen und kann das Gerät beschädigen 11 2 Reinigen der Sprüharme Bauen Sie die Sprüharme nicht aus Falls die Löcher in den Sprüharmen verstopft sind reinigen Sie sie mit einem dünnen spitzen Gegenstand 11 3 Reinigen der Außenseiten ...

Страница 40: ...ellt ist brechen Sie die Zeitvorwahl ab oder warten Sie bis sie abgelaufen ist Das Gerät regeneriert das Filterharz des Wasser enthärters Dieser Vorgang dauert ca 5 Minuten Es läuft kein Wasser in das Gerät Im Display erscheint Vergewissern Sie sich dass der Wasserzulauf geöffnet ist Vergewissern Sie sich dass der Wasserdruck der Wasserversorgung nicht zu niedrig ist Diese Informa tion erhalten Si...

Страница 41: ...ülmittels liegen Das Geschirr ist nass Das Programm enthält keine Trocknungsphase oder eine Trocknungsphase mit niedriger Temperatur Der Klarspülmittel Dosierer ist leer Die Ursache kann in der Qualität des Klarspülmittels liegen Die Ursache kann in der Qualität der Multi Reini gungstabletten liegen Probieren Sie eine andere Marke aus oder schalten Sie den Klarspülmittel Dosierer ein und verwenden...

Страница 42: ...ntie von 2 Jahren Ausweis durch Garantieschein Faktura oder Verkaufsbeleg Die Garantieleistung umfasst die Kosten für Material Arbeits und Reisezeit Die Garantieleistung entfällt bei Nichtbeachtung der Gebrauchsanweisung und Betriebsvorschriften unsachgerechter Installation sowie bei Beschädigung durch äussere Einflüsse höhere Gewalt Eingriffe Dritter und Verwendung von Nicht Original Teilen 15 UM...

Страница 43: ...DEUTSCH 43 ...

Страница 44: ...www electrolux com shop 117897361 A 332014 ...

Отзывы: