background image

4. CONTROL PANEL

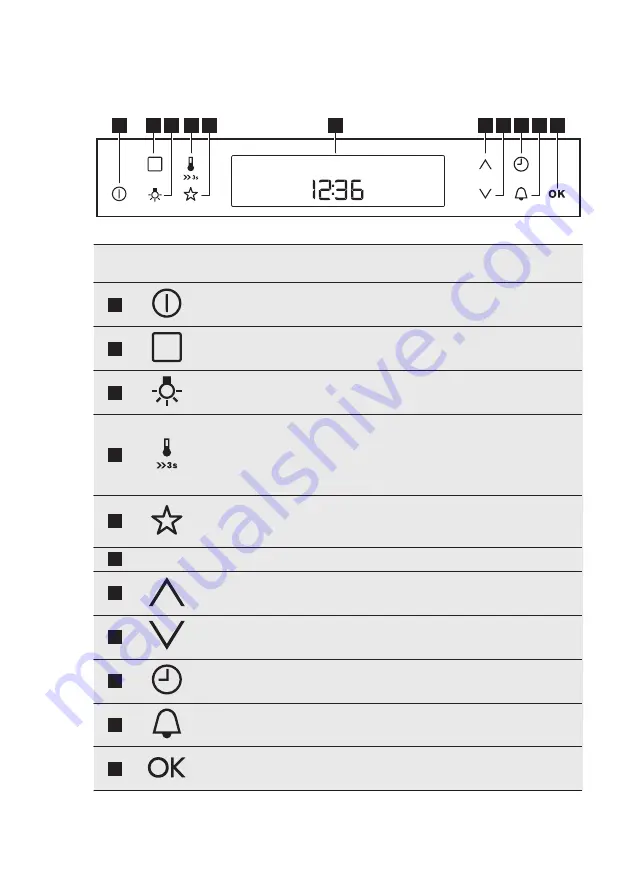
4.1 Electronic programmer

1

11

2

3

4

6

5

7

8

9 10

Use the sensor fields to operate the appliance.

Sensor

Field

Function

Description

1

ON / OFF

To activate and deactivate the appliance.

2

OPTIONS

To set an oven function, a cleaning function

or an automatic programme.

3

OVEN LIGHT

To activate or deactivate the oven lamp.

4

TEMPERATURE /

FAST HEAT UP

To set and examine the cavity temperature or

the core temperature sensor temperature (if

present). If you press it and hold for three

seconds, it turns the Fast heat up function

ON and OFF.

5

MY FAVOURITE

PROGRAMME

To store your favourite programme. Use it to

access your favourite programme directly, al‐

so when the appliance is off.

6

-

DISPLAY

Shows the current settings of the appliance.

7

UP

To move up in the menu.

8

DOWN

To move down in the menu.

9

CLOCK

To set the clock functions.

10

MINUTE MINDER To set the Minute Minder.

11

OK

To confirm the selection or setting.

www.electrolux.com

8

Содержание EEC5750AOX

Страница 1: ...EEC5750AOX EN Oven User Manual ...

Страница 2: ...So whenever you use it you can be safe in the knowledge that you ll get great results every time Welcome to Electrolux Visit our website for Get usage advice brochures trouble shooter service information www electrolux com webselfservice Register your product for better service www registerelectrolux com Buy Accessories Consumables and Original spare parts for your appliance www electrolux com sho...

Страница 3: ...rstand the hazards involved Do not let children play with the appliance Keep all packaging away from children and dispose of it appropriately Keep children and pets away from the appliance when it operates or when it cools down Accessible parts are hot If the appliance has a child safety device this should be activated Children shall not carry out cleaning and user maintenance of the appliance wit...

Страница 4: ...upport and then the rear end away from the side walls Install the shelf supports in the opposite sequence 2 SAFETY INSTRUCTIONS 2 1 Installation WARNING Only a qualified person must install this appliance Remove all the packaging Do not install or use a damaged appliance Follow the installation instruction supplied with the appliance Always take care when moving the appliance as it is heavy Always...

Страница 5: ...injury burns and electrical shock or explosion This appliance is for household use only Do not change the specification of this appliance Make sure that the ventilation openings are not blocked Do not let the appliance stay unattended during operation Deactivate the appliance after each use Be careful when you open the appliance door while the appliance is in operation Hot air can release Do not o...

Страница 6: ...y any excess food residues oil or grease spills deposits any removable objects including shelves side rails etc provided with the product particularly any non stick pots pans trays utensils etc Read carefully all the instructions for Pyrolytic cleaning Keep children away from the appliance while the Pyrolytic cleaning is in operation The appliance becomes very hot and hot air is released from the ...

Страница 7: ...ins electrical cable close to the appliance and dispose of it Remove the door catch to prevent children or pets from becoming trapped in the appliance 2 8 Service To repair the appliance contact an Authorised Service Centre Use original spare parts only 3 PRODUCT DESCRIPTION 3 1 General overview 7 5 6 5 4 3 2 1 2 1 4 3 1 Control panel 2 Electronic programmer 3 Heating element 4 Lamp 5 Fan 6 Shelf ...

Страница 8: ...examine the cavity temperature or the core temperature sensor temperature if present If you press it and hold for three seconds it turns the Fast heat up function ON and OFF 5 MY FAVOURITE PROGRAMME To store your favourite programme Use it to access your favourite programme directly al so when the appliance is off 6 DISPLAY Shows the current settings of the appliance 7 UP To move up in the menu 8 ...

Страница 9: ...the ap pliance Temperature fast heat up The function operates Temperature You can examine or change the tem perature Door lock The door lock function operates Minute minder The minute minder function operates 4 3 Heat up indicator If you activate an oven function the bars come on in the display The bars show that the temperature in the appliance increases or decreases When the appliance is at the ...

Страница 10: ...lication True Fan Cook ing To bake on up to three shelf positions at the same time and to dry food Set the temperature 20 40 C lower than for Top Bottom Heat Pizza Setting To bake food on one shelf position for a more inten sive browning and a crispy bottom Set the tempera ture 20 40 C lower than for Top Bottom Heat Top Bottom Heat To bake and roast food on one shelf position Slow Cooking To prepa...

Страница 11: ...t an oven function 3 Touch or the appliance starts automatically after five seconds If you activate the appliance and do not set an oven function or programme the appliance deactivates automatically after 20 seconds 6 4 Changing the temperature Touch or to change the temperature in steps of 5 C When the appliance is at the set temperature an acoustic signal sounds three times and the Heat up indic...

Страница 12: ...has no effect on the op eration of the appliance It is on immediately when the oven starts to heat The COUNT UP TIMER is not activated if DURATION and END are set 7 2 Setting and changing the time After the first connection to the mains wait until the display shows and 12 00 12 flashes 1 Touch or to set the hours 2 Touch 3 Touch or to set the minutes 4 Touch or The display shows the new time To ch...

Страница 13: ...e display The appliance deactivates automatically 8 Touch a sensor field or open the oven door to stop the acoustic signal 9 Turn off the appliance When the Time delay function is activated the display shows a static symbol of the oven function with a dot and The dot shows which clock function is on in the Clock residual heat display 7 6 Setting the MINUTE MINDER 1 Touch and 00 flash in the displa...

Страница 14: ...ic programmes with weight input If you set the weight of the meat the appliance calculates the roasting time 1 Activate the appliance 2 Touch 3 Touch or to set the weight programme The display shows the cooking time the duration symbol a default weight a unit of measurement kg g 4 Touch or the settings save automatically after five seconds The appliance activates 5 You can change the default weigh...

Страница 15: ...events cookware from slipping of the shelf 9 2 Telescopic Runners Keep the installation instructions for the telescopic runners for future use With telescopic runners you can put in and remove the shelves more easily CAUTION Do not clean the telescopic runners in the dishwasher Do not lubricate the telescopic runners 1 Pull out the right and left hand telescopic runners C 2 Put the wire shelf on t...

Страница 16: ... acoustic signal sounds SAFE comes on in the display The door is locked To deactivate the Child Lock function repeat step 2 10 3 Using the Function Lock You can activate the function only when the appliance operates The Function Lock prevents an accidental change of the oven function 1 To activate the function activate the appliance 2 Activate an oven function or setting 3 Touch and hold and at th...

Страница 17: ...ation End Time delay 10 6 Brightness of the display There are two modes of display brightness Night brightness when the appliance is deactivated the brightness of the display is lower between 10 PM and 6 AM Day brightness when the appliance is activated if you touch a sensor field during the night brightness apart from ON OFF the display goes back to the day brightness mode for the next 10 seconds...

Страница 18: ...ectly on the appliance floor and do not put aluminium foil on the components when you cook This can change the baking results and cause damage to the enamel 11 2 Baking cakes Do not open the oven door before 3 4 of the set cooking time is up If you use two baking trays at the same time keep one empty level between them 11 3 Cooking meat and fish Use a deep pan for very fatty food to prevent the ov...

Страница 19: ... cake moulds on a wire shelf Strudel 175 3 150 2 60 80 In a bak ing tray Jam tart 170 2 165 2 left and right 30 40 In a 26 cm cake mould Sponge cake 170 2 150 2 40 50 In a 26 cm cake mould Christmas cake Rich fruit cake1 160 2 150 2 90 120 In a 20 cm cake mould Plum cake1 175 1 160 2 50 60 In a bread tin Small cakes one lev el1 170 3 150 160 3 20 30 In a bak ing tray Small cakes two lev els1 140 1...

Страница 20: ...45 In a bak ing tray Meringues one level 120 3 120 3 80 100 In a bak ing tray Meringues two lev els1 120 2 and 4 80 100 In a bak ing tray Buns1 190 3 190 3 12 20 In a bak ing tray Eclairs one level 190 3 170 3 25 35 In a bak ing tray Eclairs two levels 170 2 and 4 35 45 In a bak ing tray Plate tarts 180 2 170 2 45 70 In a 20 cm cake mould Rich fruit cake 160 1 150 2 110 120 In a 24 cm cake mould V...

Страница 21: ...a bak ing tray 1 Preheat the oven for 10 minutes Flans Food Top Bottom Heat True Fan Cooking Time min Com ments Tempera ture C Shelf po sition Tempera ture C Shelf po sition Pasta flan 200 2 180 2 40 50 In a mould Vegetable flan 200 2 175 2 45 60 In a mould Quiches1 180 1 180 1 50 60 In a mould Lasagne1 180 190 2 180 190 2 25 40 In a mould Cannello ni1 180 190 2 180 190 2 25 40 In a mould 1 Prehea...

Страница 22: ...er of pork 180 2 170 2 120 150 With rind Shin of pork 180 2 160 2 100 120 2 pieces Lamb 190 2 175 2 110 130 Leg Chicken 220 2 200 2 70 85 Whole Turkey 180 2 160 2 210 240 Whole Duck 175 2 220 2 120 150 Whole Goose 175 2 160 1 150 200 Whole Rabbit 190 2 175 2 60 80 Cut in pieces Hare 190 2 175 2 150 200 Cut in pieces Pheasant 190 2 175 2 90 120 Whole Fish Food Top Bottom Heat True Fan Cooking Time ...

Страница 23: ...35 25 30 4 Kebabs 4 max 10 15 10 12 4 Breast of chicken 4 400 max 12 15 12 14 4 Hambur ger 6 600 max 20 30 4 Fish fillet 4 400 max 12 14 10 12 4 Toasted sandwich es 4 6 max 5 7 4 Toast 4 6 max 2 4 2 3 4 11 7 Turbo Grilling Beef Food Quantity Temperature C Time min Shelf position Roast beef or fillet rare1 per cm of thickness 190 200 5 6 1 or 2 Roast beef or fillet medium1 per cm of thickness 180 1...

Страница 24: ...g Temperature C Time min Shelf position Leg of lamb roast lamb 1 1 5 150 170 100 120 1 or 2 Saddle of lamb 1 1 5 160 180 40 60 1 or 2 Poultry Food Quantity kg Temperature C Time min Shelf position Poultry portions 0 2 0 25 each 200 220 30 50 1 or 2 Chicken half 0 4 0 5 each 190 210 35 50 1 or 2 Chicken pou lard 1 1 5 190 210 50 70 1 or 2 Duck 1 5 2 180 200 80 100 1 or 2 Goose 3 5 5 160 180 120 180...

Страница 25: ...tion is not applicable to such recipes as pot roast or fatty roast pork In the first 10 minutes you can set an oven temperature between 80 C and 150 C The default is 90 C After the temperature is set the oven continues to cook at 80 C Do not use this function for poultry Always cook without a lid when you use this function 1 Sear the meat in a pan on the hob on a very high setting for 1 2 minutes ...

Страница 26: ...yonet type lids or metal tins Use the first shelf from the bottom for this function Put no more than six one litre preserve jars on the baking tray Fill the jars equally and close with a clamp The jars cannot touch each other Put approximately 1 2 litre of water into the baking tray to give sufficient moisture in the oven When the liquid in the jars starts to simmer after approximately 35 60 minut...

Страница 27: ...me open the door and let it cool down for one night to complete the drying Vegetables Food Temperature C Time h Shelf position 1 position 2 positions Beans 60 70 6 8 3 1 4 Peppers 60 70 5 6 3 1 4 Vegetables for sour 60 70 5 6 3 1 4 Mushrooms 50 60 6 8 3 1 4 Herbs 40 50 2 3 3 1 4 Fruit Food Temperature C Time h Shelf position 1 position 2 positions Plums 60 70 8 10 3 1 4 Apricots 60 70 8 10 3 1 4 A...

Страница 28: ...away from the side wall 2 Pull the rear end of the shelf support away from the side wall and remove it 2 1 Install the shelf supports in the opposite sequence The retaining pins on the telescopic runners must point to the front 12 4 Pyrolysis CAUTION Remove all accessories and removable shelf supports The pyrolytic cleaning procedure cannot start if you did not fully close the oven door In some mo...

Страница 29: ...for the next 10 seconds The cleaning reminder goes out after the end of the pyrolytic cleaning when you deactivate it in the basic settings Refer to Using the settings menu 12 6 Cleaning the oven door The oven door has four glass panels You can remove the oven door and the internal glass panels to clean them The oven door can close if you try to remove the glass panels before you remove the oven d...

Страница 30: ...them out one by one Start from the top panel Make sure the glass slides out of the supports completely 11 Clean the glass panels with water and soap Dry the glass panels carefully When the cleaning is completed install the glass panels and the oven door Do the above steps in the opposite sequence Make sure that you put the glass panels A B and C back in the correct sequence The middle panel B has ...

Страница 31: ...e back lamp 1 Turn the lamp glass cover counterclockwise to remove it 2 Clean the glass cover 3 Replace the lamp with a suitable 300 C heat resistant lamp 4 Install the glass cover 13 TROUBLESHOOTING WARNING Refer to Safety chapters 13 1 What to do if Problem Possible cause Remedy You cannot activate or op erate the oven The oven is not connected to an electrical supply or it is connected incorrec...

Страница 32: ...in the user manual Steam and condensation settle on the food and in the cavity of the oven You left the dish in the oven for too long Do not leave the dishes in the oven for longer than 15 20 minutes after the cooking process ends The display shows C3 The cleaning function does not operate You did not fully close the door or the door lock is defective Fully close the door The display shows F102 Yo...

Страница 33: ...er or an Authorised Service Centre The necessary data for the service centre is on the rating plate The rating plate is on the front frame of the appliance cavity Do not remove the rating plate from the appliance cavity We recommend that you write the data here Model MOD Product number PNC Serial number S N 14 INSTALLATION WARNING Refer to Safety chapters 14 1 Building In 16 573 21 548 min 550 20 ...

Страница 34: ...5 maximum 2300 3 x 1 maximum 3680 3 x 1 5 The earth cord green yellow cable must be 2 cm longer than phase and neutral cables blue and brown cables 15 ENERGY EFFICIENCY 15 1 Product Fiche and information according to EU 65 66 2014 Supplier s name Electrolux Model identification EEC5750AOX Energy Efficiency Index 81 2 Energy efficiency class A Energy consumption with a standard load con ventional m...

Страница 35: ...tting to use residual heat and keep a meal warm The display shows the residual heat indicator or temperature Cooking with the lamp off Deactivate the lamp during cooking and activate only when you need it Moist Fan Baking Function designed to save energy during cooking It operates in such a way that the temperature in the oven cavity may differ from the temperature indicated on the display during ...

Страница 36: ...www electrolux com shop 867340786 C 262017 ...

Отзывы: