background image

• Cut off the mains cable and discard it.

• Remove the door catch to prevent

children and pets to get closed in the

appliance.

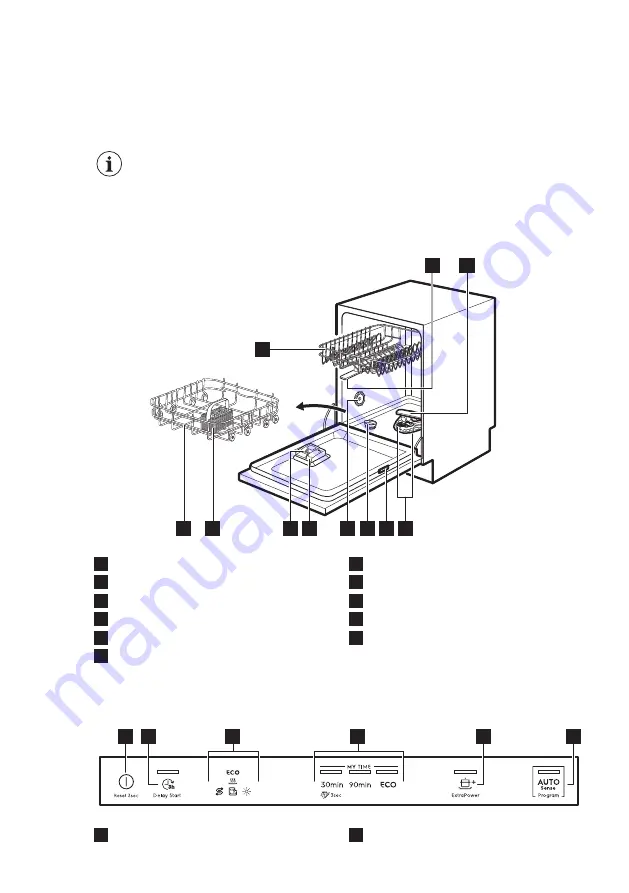
3. PRODUCT DESCRIPTION

The graphics below is just a

general product overview.

For more detailed

information, refer to other

chapters and/or documents

provided with the appliance.

4

3

7

10

9

5

6

11 

1

2

1

Upper spray arms

2

Lower spray arm

3

Filters

4

Rating plate

5

Salt container

6

Air vent

7

Rinse aid dispenser

8

Detergent dispenser

9

Cutlery basket

10

Lower basket

11

Upper basket

4. CONTROL PANEL

1

3

4

5

2

6

1

On/Off button

2

Delay Start button

www.electrolux.com

6

Содержание EEA22100L

Страница 1: ...EEA22100L EN Dishwasher User Manual ...

Страница 2: ...o Electrolux Visit our website to Get usage advice brochures trouble shooter service and repair information www electrolux com support Register your product for better service www registerelectrolux com Buy Accessories Consumables and Original spare parts for your appliance www electrolux com shop CUSTOMER CARE AND SERVICE Always use original spare parts When contacting our Authorised Service Cent...

Страница 3: ... be kept away from the appliance unless continuously supervised Children of less than 3 years of age should be kept away from the appliance unless continuously supervised Do not let children play with the appliance Keep detergents away from children Keep children and pets away from the appliance when the door is open Children shall not carry out cleaning and user maintenance of the appliance witho...

Страница 4: ...nstall this appliance Remove all the packaging Do not install or use a damaged appliance Do not use the appliance before installing it in the built in structure due to safety manner Follow the installation instructions supplied with the appliance Always take care when moving the appliance as it is heavy Always use safety gloves and enclosed footwear Do not install or use the appliance where the te...

Страница 5: ...ove the dishes from the appliance until the programme is complete Some detergent may remain on the dishes Do not store items or apply pressure on the open door of the appliance The appliance can release hot steam if you open the door while a programme operates 2 5 Service To repair the appliance contact the Authorised Service Centre Use original spare parts only Please note that self repair or non...

Страница 6: ...iew For more detailed information refer to other chapters and or documents provided with the appliance 4 3 7 8 10 9 5 6 11 1 2 1 Upper spray arms 2 Lower spray arm 3 Filters 4 Rating plate 5 Salt container 6 Air vent 7 Rinse aid dispenser 8 Detergent dispenser 9 Cutlery basket 10 Lower basket 11 Upper basket 4 CONTROL PANEL 1 3 4 5 2 6 1 On Off button 2 Delay Start button www electrolux com 6 ...

Страница 7: ...ing MY TIME selection bar you can select a suitable wash cycle based on programme duration ranging from 30 minutes to four hours B A C A 30min is the shortest programme suitable for washing a load with fresh and light soil Pre rinse 15min is a programme for rinsing off food remains from the dishes It prevents odours forming in the appliance Do not use detergent with this programme B 90min is a pro...

Страница 8: ...l degrees of soil Prewash 90min Crockery Cutlery Pots Pans Normal Lightly dried on Wash 60 C Intermediate rinse Final rinse 55 C Drying AirDry ECO Crockery Cutlery Pots Pans Normal Lightly dried on Prewash Wash 50 C Intermediate rinse Final rinse 55 C Drying AirDry AUTO Sense Crockery Cutlery Pots Pans The programme ad justs to all degrees of soil Prewash Wash 50 60 C Intermediate rinse Final rins...

Страница 9: ...egarding your dishwasher please refer to the service book provided with your appliance 6 BASIC SETTINGS You can configure the appliance by changing basic settings according to your needs Number Settings Values Description1 1 Water hard ness From level 1 to level 10 de fault 5 Adjust the level of the water softener ac cording to the water hardness in your area 2 Rinse aid level From level 0 to leve...

Страница 10: ... 90 8 4 9 0 58 63 10 43 46 76 83 7 6 8 3 53 57 9 37 42 65 75 6 5 7 5 46 52 8 29 36 51 64 5 1 6 4 36 45 7 23 28 40 50 4 0 5 0 28 35 6 19 22 33 39 3 3 3 9 23 27 5 1 15 18 26 32 2 6 3 2 18 22 4 11 14 19 25 1 9 2 5 13 17 3 4 10 7 18 0 7 1 8 5 12 2 4 7 0 7 5 1 2 1 Factory setting 2 Do not use salt at this level Regardless of the type of detergent used set the proper water hardness level to keep the sal...

Страница 11: ...oned in this section are determined in accordance with the currently applicable standard in laboratory conditions with water hardness 2 5mmol L according to the 2019 2022 regulation water softener level 3 The pressure and the temperature of water as well as the variations of the mains supply can change the values 6 2 The rinse aid level The rinse aid helps to dry the dishes without streaks and sta...

Страница 12: ...ME selection bar are on How to navigate in setting mode You can navigate in setting mode using MY TIME selection bar B A C A Previous button B OK button C Next button Use Previous and Next to switch between the basic settings and to change their value Use OK to enter the selected setting and to confirm changing its value How to change a setting Make sure the appliance is in setting mode 1 Press Pr...

Страница 13: ...sin in the water softener for up to 5 minutes The washing phase starts only after this procedure is complete The procedure is repeated periodically 7 1 The salt container CAUTION Use rough salt designed for dishwashers only Fine salt increases the risk of corrosion The salt is used to recharge the resin in the water softener and to assure good washing results in daily use How to fill the salt cont...

Страница 14: ...UTION Only use detergent designed specifically for dishwashers 1 Press the release button B to open the lid C 2 Put the detergent in the compartment A You can use detergent in tablets powder or gel 3 If the programme has a prewash phase put a small quantity of detergent on the inner part of the appliance door 4 Close the lid Make sure that the lid locks into position 8 2 How to select and start a ...

Страница 15: ... complete the programme starts 8 7 How to cancel the delay start while the countdown operates Press and hold for about 3 seconds The appliance returns to the programme selection If you cancel the delay start you have to select the programme again 8 8 How to cancel a running programme Press and hold for about 3 seconds The appliance returns to the programme selection Make sure that there is deterge...

Страница 16: ... water and energy consumption To prevent limescale buildup inside the appliance Refill the salt container whenever necessary Use the recommended dosage of the detergent and rinse aid Make sure that the current level of the water softener agrees with the hardness of the water supply Follow the instructions in the chapter Care and cleaning 9 2 Using salt rinse aid and detergent Only use salt rinse a...

Страница 17: ...appliance to wash dishwasher safe items only Do not wash in the appliance items made of wood horn aluminium pewter and copper as they could crack warp get discoloured or pitted Do not wash in the appliance items that can absorb water sponges household cloths Put hollow items cups glasses and pans with the opening facing downwards Make sure that glasses do not touch each other Put light items in th...

Страница 18: ...ng pads sharp tools strong chemicals scourer or solvents To maintain the performance of your appliance use a cleaning product designed specifically for dishwashers at least once every two months Carefully follow the instructions on the packaging of the product For optimal cleaning results start the Machine Care programme 10 3 Removal of foreign objects Check the filters and the sump after each use...

Страница 19: ...er B in the flat filter A Turn it clockwise until it locks CAUTION An incorrect position of the filters can cause bad washing results and damage to the appliance 10 6 Cleaning the lower spray arm We recommend to clean the lower spray arm regularly to prevent soil from clogging the holes Clogged holes can cause unsatisfactory washing results 1 To remove the lower spray arm pull it upwards 2 Wash th...

Страница 20: ...spray arms B are installed in the duct A with the mounting elements C A B C 1 Pull out the upper basket 2 To detach the spray arm turn the mounting element clockwise 3 Wash the spray arm under running water Use a thin pointed tool e g a toothpick to remove particles of soil from the holes 4 To install the spray arm back insert the mounting element in the spray arm and fix it in the duct by turning...

Страница 21: ...ocedure is approxi mately 5 minutes The appliance does not fill with water The lights related to MY TIME selection bar flash 1 time intermittent ly An acoustic signal sounds intermittently Make sure that the water tap is open Make sure that the pressure of the water supply is not too low For this information contact your local water authority Make sure that the water tap is not clogged Make sure t...

Страница 22: ...ntermit tently An acoustic signal sounds intermittently Make sure that the temperature of the inlet water does not exceed 60 C Switch the appliance off and on Technical malfunction of the appliance The lights related to MY TIME selection bar flash 12 times intermit tently An acoustic signal sounds intermittently Switch the appliance off and on The level of water inside the appliance is too high Th...

Страница 23: ...ker The amperage is insufficient to supply simultaneous ly all the appliances in use Check the socket amper age and the capacity of the meter or turn off one of the appliances in use Internal electrical fault of the appliance Contact an Authorised Service Centre Once you have checked the appliance deactivate and activate the appliance If the problem occurs again contact an Authorised Service Centr...

Страница 24: ... higher level The quality of the rinse aid can be the cause The interior of the appliance is wet This is not a defect of the appliance Humid air con densates on the appliance walls Unusual foam during wash ing Use the detergent designed specifically for dish washers There is a leak in the rinse aid dispenser Contact an Authorised Service Centre Traces of rust on cutlery There is too much salt in t...

Страница 25: ...etergent manufacturer Dull discoloured or chipped tableware Make sure that only dishwasher safe items are washed in the appliance Load and unload the basket carefully Refer to the basket loading leaflet Place delicate items in the upper basket Refer to Before first use Daily use or Hints and tips for other possible causes 12 TECHNICAL INFORMATION Dimensions Width height depth mm 446 818 898 550 El...

Страница 26: ... europa eu and the model name and product number that you can find on the rating plate of the appliance Refer to the chapter Product description For more detailed information about the energy label visit www theenergylabel eu 13 ENVIRONMENTAL CONCERNS Recycle materials with the symbol Put the packaging in relevant containers to recycle it Help protect the environment and human health by recycling ...

Страница 27: ......

Страница 28: ...www electrolux com shop 156940840 A 112020 ...

Отзывы: