16 www.electroluxaircomfort.com
NOTE
• First connect the connection pipe to the
indoor unit and then to the outdoor unit.
Handle the piping bending with care. Do not
damage the connection pipe. Firmly tighten
the joint nut to prevent leakage.
• The pipes connecting the indoor and out-
door unit are not included in the unit.
• In case the connective pipe length is longer
than 7.5m charge the unit with additional
refrigerant. Add 20g/m of R410A for mod-
els with a capacity of less than 6500W. Add
50g/m for the other models.
Outdoor unit
Electrical wiring
CAUTION
• Check the wiring to make sure that there is
no short circuit. Incorrect wiring can cause
malfunction.
1. Remove the handle (x2) on the right side
plate of outdoor unit.
2. Remove mains cord anchorage.
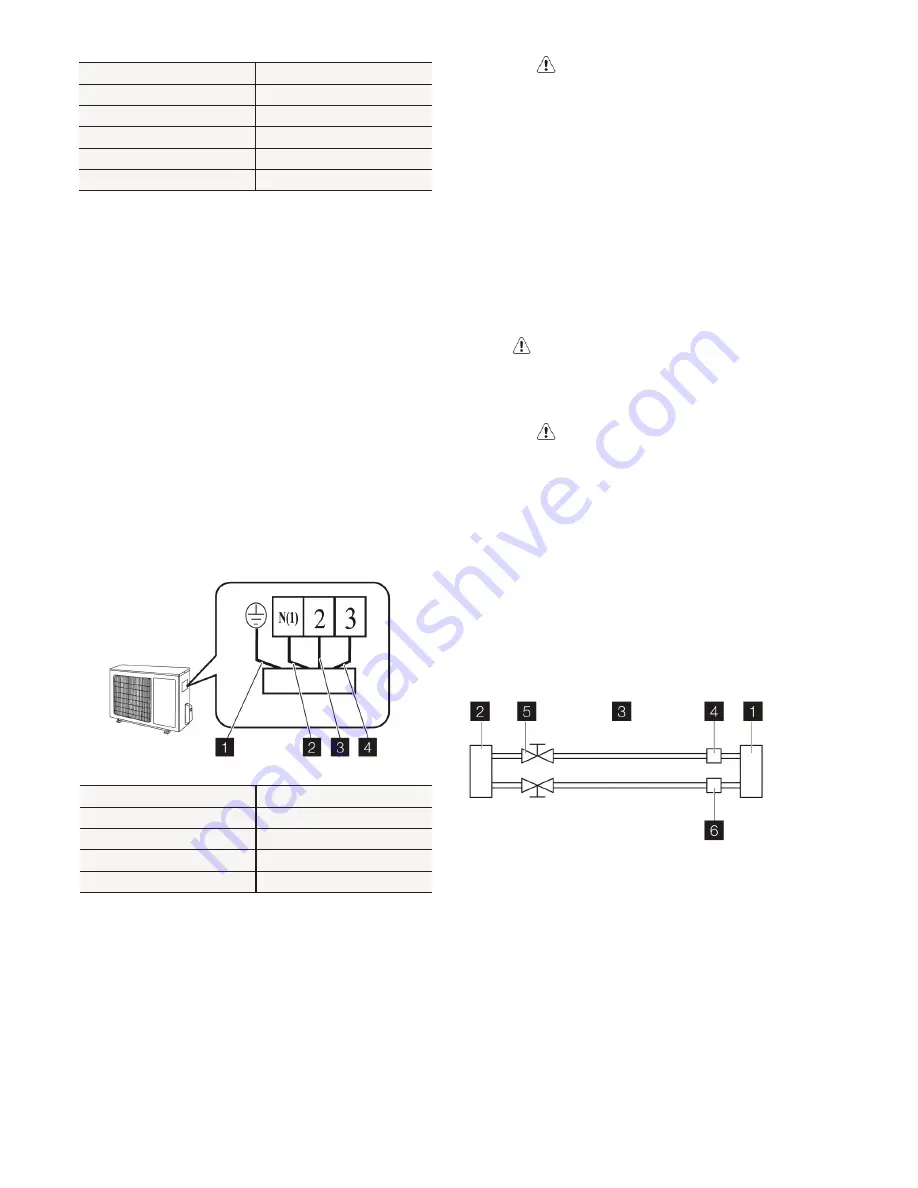
3. Connect the mains cord to the terminal
board.
4. Lock the position of the cord with wire
clamps.
5. Check for improper connections.
6. Reinstall the handle.
NOTE
• Check for free space between the connec-
tion and the lock positions.
CAUTION
• Open the stem of the packed valve until it
hits against the stopper. Do not try to open
it further. Close the stem of the packed valve
with a special tool. Close the cap of the
packed valve with a spanner.
NOTE
• The outdoor unit has two outlets, the low
side outlet and the high side outlet. Only the
low side outlet contains a charging port. The
low side outlet is shown below.
1 Indoor unit
2 Outdoor unit
3 Refrigerant
4 Gas
5 Packed valve
6 Half union
Hex nut diameter (mm)
Tightening torque (Nm)
Ø 6
15-20
Ø 9.52
30-40
Ø 12
45-55
Ø 16
60-65
Ø 19
70-75
No.
Colour
1
Blue (Neutral)
2
Black
3
Brown
4
Yellow (Ground)


