manualshive.com logo in svg
background image


H.R.UV-C SPA - CLASSIC 


Installation & Operating Manual 


                                                 HR-30-SPA 


Содержание CLASSIC H.R. UV-C SPA

Страница 1: ...H R UV C SPA CLASSIC Installation Operating Manual HR 30 SPA ...

Страница 2: ...on 6 3 4 Connection 7 3 6 Electrical connection 8 4 OPERATING INSTRUCTIONS 9 4 1 Flow requirements 9 4 2 Lamp life indicator 9 4 3 Water quality 9 5 MAINTENANCE 10 5 1 Essential parts to carry out annual maintenance including our reference codes 10 5 2 Lamp replacement and quartz sleeve cleaning 11 6 DISPOSAL OF ELECTRICAL ELECTRONIC EQUIPMENT 13 7 WARRANTY 14 ...

Страница 3: ...his unit must be earthed Power must be supplied through a Residual Current Device RCD with a rated residual operating current not exceeding 30mA Do not run this unit dry Do not cover this unit The unit must not be submerged in water Carefully examine the unit after installation It should not be powered on if there is water on any parts not intended to be wet If the unit shows any sign of water lea...

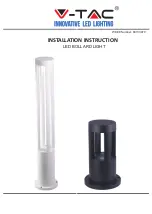
Страница 4: ...Fig 1 Dimensions Fig 2 ...

Страница 5: ...quired Both the lamps and the quartz sleeve can be replaced from either end of the unit if installing vertically the 1m clearance space must be above or below the unit if installing horizontally the 1m clearance space must be to the left or right of the unit WARNING The H R UV C SPA must be installed within a dry permanent weather proof area In any case where water or moisture enters the enclosure...

Страница 6: ...m after of any pumps filters and heating devices but upstream before of any chemical dosing or similar water treatment see Figs 4 Fig 4 3 3 Flow direction The H R UV C SPA is factory set to accept input water flow entering on the left and exiting on the right ...

Страница 7: ...m its housing and turned with force If the flow switch has been rotated it is important to ensure that it is finally locked in the correct orientation perpendicular at right angles to the flow of water 3 4 Connection The unit is supplied with unions to allow connection to 2 or 63 mm rigid pipe Reducers are also supplied to allow connection to 50 mm or 1 rigid pipe see Fig 7 For pipework 63 mm or 2...

Страница 8: ...e installed by a qualified Electrician following the instructions provided in this manual The manufacturer will not be liable for any issues caused by poor or improper installation Any alterations made to the unit unless stated will affect the warranty This also applies if components are changed for non standard components acquired anywhere other than direct from the manufacturer Incorrect install...

Страница 9: ...mber to indicate that the UV lamp s is getting near to its end of life At this point replacement lamp s should be ordered from your distributor When the timer reaches zero the LED indicator will change colour from Amber to Red to signal that the UV lamp s should be changed After changing the UV lamp s the timer is reset by pressing and holding the reset button until the LED indicator goes Off and ...

Страница 10: ...on and cleaning of quartz sleeve Replace if any cracks are discovered Fig 2 Replacing all O rings Fig 3 Replacing lamp connectors white plastic insert inside the blue lamp shroud if corroded wet damaged or overheated Fig 4 5 1 Essential parts to carry out annual maintenance including our reference codes WARNING Before performing any maintenance isolate from the main power supply turn off circulati...

Страница 11: ...ers Unclamping the clip from body 1 Pull the clip in shown direction to unlock from body 2 Pull the second side after unlocking the 1st side Remove Lamp holder Clip from Hard cap Unmount the Hard cap from Blue lamp Holder Carefully remove the blue lamp holder shroud and white plastic electrical end caps from the lamp end ...

Страница 12: ...ll limit the effectiveness of the UV lamp s Assembly process Firstly slide the clean dry quartz glass sleeve into the unit Locate the O rings carefully on the ends of the quartz sleeve Make sure the threads are clean wipe a little silicone grease onto the threads As these threads are only serviced periodically this lubrication will help to prevent them binding together Hand tighten the blue quartz...

Страница 13: ...ure they are not showing excessive wear and tear Replacement parts are available 6 DISPOSAL OF ELECTRICAL ELECTRONIC EQUIPMENT DO NOT dispose of this product as an unsorted municipal waste This symbol on the product or on the packaging indicates that this product should not be treated as household waste Instead it should be handed over to the applicable collection point for the recycling of electr...

Страница 14: ...r inspection Proof of purchase may be required The manufacturer will not be liable in cases of incorrect installation of the product inappropriate use or neglect Any damages occurred due to shipping must be reported within 48 hours of receipt of the product Any claims after this time will be considered as misuse or abuse of the product and will not be covered by the warranty The guarantee does not...

Страница 15: ...e Hertfordshire SG1 2BH United Kingdom __________________________________________________________________________________ Customer Information ATTACH TO HEATER Company Name Contact Name Daytime Telephone Number Email Address Return Address Post Zip Code Country Suspect Fault Description of problem ...

Страница 16: ...Unit 11 Gunnels Wood Park Stevenage Herts SG1 2BH Sales elecro co uk www elecro co uk 44 0 1438 749474 Copyright MANE321 EN H R UV C SPA CLASSIC Manual V1 29 09 2021 Elecro ...

Отзывы: