background image


ELASTIX 

developed by: PaloSanto Solutions 


+1-877-ELASTIX (352-7849) 


www.elastix.org 


LXP200

 Enterprise HD IP Phone 


For Warranty and RMA information, please visit www.elastix.org 

Quick Start Guide

Содержание LXP200

Страница 1: ...ELASTIX developed by PaloSanto Solutions 1 877 ELASTIX 352 7849 www elastix org LXP200 Enterprise HD IP Phone For Warranty and RMA information please visit www elastix org Quick Start Guide ...

Страница 2: ...Content English 1 简体中文 9 Español 15 Français 21 Deutsch 27 Italiano 33 ...

Страница 3: ...nce The LXP200 delivers superior HD audio quality rich and leading edge telephony features personalized information and customizable application service auto mated provisioning for easy deployment advanced security protection for pri vacy and broad interoperability with most 3rd party SIP devices and leading SIP NGN IMS platforms It is a perfect choice for small to medium businesses looking for a ...

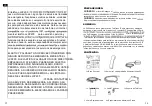
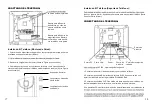
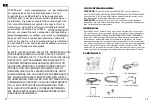
Страница 4: ...ers on the back of the phone 2 Attach the phone to the wall via the wall mount hole Headset Port PC Port LAN Port Power Headset Port Handset Port 4 Rotate the tab and plug it back into the slot with the extension up to hold the To setup the LXP200 follow the steps below 1 Connect the handset and main phone case with the phone cord Handset Rest 2 Connect the LAN port of the phone to the RJ 45 socke...

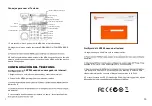
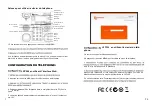
Страница 5: ...incoming call the phone goes off hook or when the MENU mode is left idle for 20 seconds PHONE CONFIGURATION User ID SIP Auth ID SIP Password 5 LXP200 using Web Browser 1 Ensure your phone is powered up and connected to the Internet 2 Press MENU button to go into menu of the phone 3 Press the down arrow button to Status and press MENU button to check the IP address 5 The default administrator passw...

Страница 6: ...to part 15 of the FCC Rules These limits are designed to provide reasonable protection against harmful interference in a residential installation This equipment generates uses and can radiate radio frequency energy and if not installed and used in accordance with the instructions may cause harmful interference to radio communications However there is no guarantee that interference will not occur i...

Страница 7: ...0拨打紧急电话以及没 有遵照前段文字描述而造成紧急通话失败的事 警告 请不要在设备启动未完成LED灯闪烁的时候或设备的升级软件的过程中断开 电源 因为如刚才所述的操作会导致话机本身的程序损坏 进而导致设备无法启 动 警告 请使用设备包装中的电源 因为使用其他没有经过认证的替代电源适配器有 可能对设备造成损害 产品概览 LXP200是一款功能丰富的中小型商务IP电话 它支持2个SIP账号 2条线路 通讯 180x60图形化灰度LCD显示屏 3个可编辑XML应用程序软按键 2个 10 100 Mbps 自适应交换式以太网接口 支持PoE供电 三方会议 LXP200 具有优异的高清晰语音质量和丰富完备的电话功能 它支持自动化的个人多媒体 信息服务 自动配置 先进的安全隐私保护设置 它广泛兼容其它第三方SIP设备 及主要SIP NGN IMS平台 对于追求性价比的企业用户来说 LXP200将是理想...

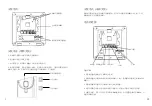
Страница 8: ...墙孔将电话固定在墙上 耳机 3 如下图所示 将话机手柄槽下方的扣机零件取出 PC端口 网络连接端口 5V电源 耳机 手柄 4 将该零件倒转 然后重新插入原处 此时零件凸出处在外 当电话使用墙体支 11 架固定在墙上时 手柄可以垂直地稳定扣入手柄槽中 不会滑落 话机手柄插槽 凸出处向上 凸出处向下 连线步骤 1 用手柄连线连接电话手柄和电话主机 2 用网线连接电话的网络接口和外部网络接口 如 集线器或交换机上的RJ 45网 络接口 3 用电源适配器连接电话电源接口和交流电源插座 4 电话屏幕将会显示设备启动或固件升级信息 请耐心等待至时间 日期显示 5 话机启动后 用户可以在主菜单或WEB浏览器进一步设置静态IP或者DHCP 从 而获得网络连接 12 ...

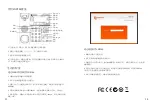
Страница 9: ...使用免提键或者电话处于菜单状态中20秒之 后 电话将自动退出菜单选项 电话的配置 通过WEB浏览器配置LXP200 1 确保电话处于空闲状态 2 按下菜单 确定按键进入菜单选项 3 选择菜单 设置 账号 输入SIP服务器 SIP用户名 密码等账号信息 注册新 的SIP账号 4 在菜单选项中进行电话其他设置 如设置电话的静态IP地址 请参考LXP200 产品用户手册获得更多详细配置信息 5 如有其他需要的设置 请联系您的服务提供商 1 请确保电话的电源及网络连接 2 按下菜单 确定按键进入菜单选项 3 使用 向下 方向键选择 状态 按下菜单 确定按键 此时电话屏幕显示话 机IP地址 4 在您电脑浏览器中输入话机IP地址 电话和您的电脑必须在同一个网段 5 如右图所示 请输入密码登陆 默认管理员密码是 admin 默认终端用户密 码是 123 13 14 ...

Страница 10: ...rvicios de emergencia ELASTIX Y PALOSANTO NO PROVEE CONEXIONES CON NINGUN SERVICIO DE EMERGENCIA MEDIANTE EL LXP200 NI ELASTIX NI PALOSANTO NI SUS DIRECTORES EMPLEADOS O AFILIADOS PUEDEN SER SUJETOS REPONSABLES POR NINGUN RECLAMO DAÑO O PERDIDA POR LO TANTO POR LA MEDIANTE USTED información personalizada y servicio de aplicaciones personalizables aprovis ionamiento automatizado para facilitar su i...

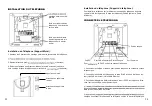
Страница 11: ... la Figura a continuación Puerto PC Puerto LAN Poder Puerto de Puerto de receptor de Auricular cabeza 4 Gire la lengüeta y vuelva a conectarlo en la ranura con la extensión hasta sostener el auricular cuando el teléfono está montado en la pared Ver la Figura LXP200 siga los siguientes pasos a continuación Soporte de Auricular Lengüeta con extensión hacia arriba 1 Conecte el auricular y la base pri...

Страница 12: ...odo MENU es dejado inactivo durante 20 segundos CONFIGURACIÓN DEL TELÉFONO LXP200 usando su navegador de Internet 1 Asegúrese de que su teléfono está encendido y conectado a Internet 2 Pulse el botón MENU para ingresar en el menú del teléfono la dirección IP a la derecha 5 La contraseña de administrador por defecto es admin la contraseña por de LXP200 usando el teclado 1 Asegúrese de que el teléfo...

Страница 13: ...s services de té services d urgence ELASTIX ET PALOSANTO NE FOURNIT PAS DE CONNEXIONS AUX SERVICES D URGENCE VIA LE LXP200 NI ELASTIX NI PALOSANTO NI SES DIRIGEANTS SES EMPLOYÉS OU SES FILIALES NE PEUVENT ETRE TENUS RE SPONSABLES DE TOUTE RÉCLAMATION DOMMAGE OU PERTE ET VOUS RENONCEZ À TOUTE RÉCLA MATION OU CAUSE D ACTION RESULTANT DE OU EN RELATION AVEC VOTRE INCAPACITE D UTILISER informations et...

Страница 14: ...ation Port du casque Port Combiné 3 Retirez l attache à partir ci dessous Pour LXP200 suivez les étapes ci dessous 4 Retournez l attache et rebranchez la dans la fente d extension jusqu à te nir le combiné lorsque le téléphone est monté sur le ci dessous Appui du combiné 1 Connectez le combiné et la base principale du téléphone en utilisant le cordon téléphonique 2 Connectez le port LAN du télépho...

Страница 15: ...écroché ou bien si le menu principale est inactif pour 20 secondes CONFIGURATION DU TELEPHONE LXP200 en utilisant l interface Web 2 Appuyez sur le bouton MENU pour accéder au menu du téléphone 4 Saisissez l adresse IP du téléphone dans le navigateur de votre PC Voir la à droite 5 Le mot de passe d administrateur est par défaut admin et pour l utilisateur est 123 2 Appuyez sur le bouton MENU pour a...

Страница 16: ...geschlossenen Netzadapter Die Verwendung eines alternativen nicht geeigneten Netzadapters kann vielleicht das Gerät beschädigen ÜBERBLICK Das LXP200 ist ein Telefon für kleine bis mittlere Unternehmen mit 2 Leitungen baren kontextsensitiven Softkeys Dual Netzwerk Ports mit PoE und Dreierkon ferenz Das LXP200 ermöglicht überlegene HD Audioqualität umfassende und fortschrittliche Telefonie Merkmale ...

Страница 17: ...nschluss Netz Kopfhörer Anschluss Hörer Anschluss 3 Stecker von der Hörergabel entfernen siehe Abbildung unten 4 Stecker drehen und ihn wieder in die Einbaustelle einstecken um den Hörer festzuhalten während das Telefon an die Wand angebracht wird sieh Abbildung unten Hörergabel Für das LXP200 Setup folgen Sie den Schritten unten 1 Schließen Sie den Hörer und das Haupttelefongehäuse an die Telefon...

Страница 18: ... das Telefon nicht richtig aufgelegt ist oder wenn Sie im MENÜ Modus 20 Sekun den keine Taste betätigen LXP200 mittels Web Browser 4 Folgen Sie den MENÜ Optionen um die Basismerkmale des Telefons zu Einzelheiten konsultieren Sie bitte das Benutzerhandbuch zur LXP200 1 Versichern Sie dass das Telefon angestellt ist und mit dem Internet verbunden 5 Bitte wenden Sie sich an Ihren ITSP Internet Telefo...

Страница 19: ...ia informazioni personalizzate e servizio applicativo personalizzabile auto provi sioning per agevolare la gestione protezione di sicurezza di livello avanzato per la privacy e vasta interoperabilità con la maggior parte dei dispositivi SIP di terzi e delle principali piattaforme SIP NGN IMS Si tratta di un opportunità perfetta per le piccole e medie imprese che cercano un alta qualità e un telefo...

Страница 20: ...Alimentazione Porta per auricolare Porta ricevitore 4 Ruotare l aletta e riposizionarla nell alloggiamento con l estensione verso l alto Per impostare il LXP200 seguire la seguente procedura in modo da poter sostenere il ricevitore mentre il telefono è montato a parete Si 1 Collegare il ricevitore e il case principale del telefono con il cavo telefonico 35 Supporto ricevitore Aletta con estensione...

Страница 21: ... la mo dalità MENU viene lasciata inattiva per 20 secondi il telefono esce automatica LXP200 utilizzando la tastiera 1 Assicurarsi che il telefono sia inattivo 2 Premere il pulsante MENU per accedere alle opzioni che consentono di con mente dalla modalità MENU CONFIGURAZIONE DEL TELEFONO LXP200 mediante un browser web 1 Assicurarsi che il telefono sia in corrente e collegato a internet 2 Premere i...

Отзывы: