eks S5US Скачать руководство пользователя страница 1


User Manual 

Product Name: SMART PHONE         

Brand: EKS 

Model:


S5US


Manufacture: ENCORP LIMITED


A56 User 

Содержание S5US

Страница 1: ...User Manual Product Name SMART PHONE Brand EKS Model S5US Manufacture ENCORP LIMITED ...

Страница 2: ... 1 2 Technical Specification 9 2 Phone Layout 11 2 1 Appearance 11 2 2 Icons and Indicators 12 3 Getting Started 13 3 1 Insert SIM card 13 3 2 Insert Memory card 15 3 3 Unlock the Phone 17 3 4 Using the Touch screen 19 3 5 Using the Phone s Buttons 21 ...

Страница 3: ...ceiving Calls 25 4 1 Make a Call 25 4 2 Disable Phone Calls Airplane mode 26 4 3 Disable SIM card 26 5 The Home Screen 27 5 1 Open and Close the Launcher 28 5 2 Switch to Recently Used Application 30 5 3 Customize Home Screen 30 6 Connect to the Internet 34 6 1 To configure your Internet 34 ...

Страница 4: ...the Notifications Panel 36 7 2 Respond to Notifications 37 7 3 Close Notifications Panel 37 8 Messaging 38 8 1 Message environment Settings 38 8 2 Using the Onscreen Keyboard 40 8 3 Create and Send Multimedia Message 41 8 4 Lock a Message 42 9 Multimedia 43 9 1 Camera 43 9 2 Gallery 43 ...

Страница 5: ...ens 47 10 Connect to Networks and Devices 48 10 1 Connect to PC 10 2 Connect to Internet 48 10 3 Connect to Wi Fi Networks 48 10 4 Pair With Bluetooth Devices 48 11 5 Connect to Internet via your Phone 49 10 6 Install Secure Certificate from SD Card 50 11 Download Applications 52 12 Phone Settings 53 48 ...

Страница 6: ...User Manual 6 13 Health and Safety Information 57 ...

Страница 7: ...becoming a proud owner of the Nougat Android mobile phone You have now joined the millions of satisfied customers spread across the Globe Your Nougat device offers you these exciting features and much more Android 7 0 5 0 inch Screen Cameras front and back 1 0GHz Dual core Processor ...

Страница 8: ...User Manual 8 External Memory Expandable to 32 GB Single SIM Multimedia player Wi Fi Bluetooth 2 1 EDR ...

Страница 9: ...cal Specification GENERAL Android 7 0 2200mAh Li ion battery SCREEN 5 0 FWVGA TN 480 854 pixels 16 7M of colors HARDWARE 1 0GHz Processor 8GB ROM 1GB RAM External SD card slot up to 32GB 500MPx Back Camera 300MPx Front Camera ...

Страница 10: ...User Manual 10 COMMUNICATION SINGLE SIM 2G 3G GSM850 900 1800 1900MHz HSDPA WCDMA 850 1900 Bluetooth 2 1 EDR Wi Fi 802 11 a b g n 3 5mm Jack Plug Micro USB 2 0 receiver ...

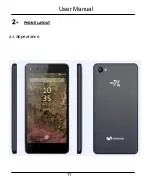
Страница 11: ...User Manual 11 2 2 P PH HO ON NE E L LA AY YO OU UT T 2 1 Appearance ...

Страница 12: ...s Indicators Icons Indicators Signal strength indicator Alarm has been set New missed calls Wi Fi is activated USB is connected Bluetooth is on The headphone is being used Battery charging symbol New message from SIM 1 Airplane mode is activated ...

Страница 13: ...SIM card The Nougat is a Single SIM mobile phone allowing you to use the facility of one network To insert SIM card s Switch off the mobile phone and remove the rear cover and battery Insert the SIM card correctly in the card slot s See figure below Insert SIM card carefully ...

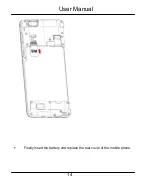
Страница 14: ...User Manual 14 Finally insert the battery and replace the rear cover of the mobile phone ...

Страница 15: ...nsert Memory card The phone allows you to expand external memory with a micro SD card up to 32GB Remove the rear cover Insert the memory card into the slot Finally insert the battery and the rear cover of the mobile phone ...

Страница 16: ...User Manual 16 Use only compatible memory cards approved by with this device Incompatible memory cards may damage the card or the device will corrupt the data stored in the card ...

Страница 17: ...7 3 3 Unlock the Phone You may need to provide PIN Password or draw a pattern to unlock your phone To unlock the screen Press the power key to wake up the phone Hold and drag the unlock icon to the upward to unlock ...

Страница 18: ...r phone based on the unlock method in settings To set the unlock method On the main menu touch Settings Security Touch Set up screen lock Choose the type of locking as desired You can set your screen lock on the basis of pattern PIN Password or none ...

Страница 19: ...bols using the onscreen keyboard or to press onscreen buttons Touch and hold Touch and hold an item on the screen until an action occurs Drag Touch and hold an item and move your finger on the screen until you reach the target position Swipe or slide Quickly slide your finger across the surface of the screen without dragging an item For example slide the screen up or down to scroll a list ...

Страница 20: ...can also double tap to control t zoom in Maps and in other applications Pinch In some applications Such as Maps Browser and Gallery you can zoom in and out by placing two fingers on the screen at once and pinching them together to zoom out or spreading them apart to zoom in Rotate the screen On most screens the orientation of the screen changes as you rotate it You can turn this feature on and off...

Страница 21: ...th further options and actions content depends directly on applications Home returns to Home screen Hold it to access the list of last used applications Back returns to the previous screen you were working in even if it was in a different The phone provides you with Context menus and Options menus for accessing the features in an intuitive way ...

Страница 22: ... Context Menus You can open context menu by touching key Not all screens have context menus If you touch key inside application that has no context menu nothing happens Examples of context menu from Contacts environment ...

Страница 23: ...ions menus contain tools that apply to specific items on the screen You can open an option by touching and holding an item on the screen Not all items have options menus When you touch and hold some items on a screen an Options menu opens ...

Страница 24: ...er Manual 24 3 8 Menu Icons You have the following menu icons to easily let you access its important features Opens the dialer Opens messaging Opens the main menu Opens the contacts list Opens the browser ...

Страница 25: ... the home screen to dial the desired number Touch the icon on main menu or the home screen to make a call from contact groups or favorites To dial an international number touch and hold the 0 key to enter the Plus symbol and then enter the international country prefix followed by the phone number Touch the icon to call with SIM 1 or SIM 2 Press the Volume Up Down keys to adjust the call volume You...

Страница 26: ...l touch the icon to end a call 4 2 Disable Phone Calls Airplane mode Some locations like airplanes may require you to turn off your mobile Wi Fi and Bluetooth wireless connections Press and hold the Power button Touch the Airplane mode ...

Страница 27: ...ens The Home screen is your starting point to access all the features on your phone Touch the main menu icon at the bottom of the screen to view all installed applications Touch and hold an empty spot to change wallpaper The status bar shows the time signal strength battery satus and notification ...

Страница 28: ...n menu You have access to all applications installed on your device and their widgets when available Touch an application to open and launch it To add an application shortcut to the desktop screen press and hold it until it vibrates and enters Home screen Place it and release your finger ...

Страница 29: ... Launcher left or right to bring more icons into view As soon as you install a new application it comes in this lis Widgets come when you press menu key on the home screen You can directly touch WIDGETS at below of the screen ...

Страница 30: ...reen Place it and release your finger A context menu opens to configure the widget or resize it naturally it depends on the widget Press Home icon or Back icon to close the Launcher 5 2 Switch to Recently Used Application Press click on this icon Touch an icon to open its application Or press to return to the current application 5 3 Customize Home Screen ...

Страница 31: ...ns Press to open the Home screen Touch the Launcher Icon to open the main menu To add an application shortcut to the desktop screen press and hold it until it vibrates and enters Home screen Place it and release your finger Widgets Press to open the Home screen Touch the Launcher Icon on your home screen Touch widgets on the top of screen ...

Страница 32: ...d to make further choices before the widget activates If there isn t room where you dropped it the widget won t get added to the Home Screen Wallpapers Wallpapers are images from Gallery still images included with the system and live images They take the place of the default background for your Home Screen Touch and hold anywhere on a desktop Home screen that s not occupied A list of options appea...

Страница 33: ...een for Gallery images or set wallpaper Folders You can very easily regroup desktop icons in a folder on screen to save space and access more applications Touch and hold any icon on desktop screen to move it Go on another icon and release to create a folder containing both icons Then add as many icons as folder can hold give it a name move it where you want You have all the tools to customize your...

Страница 34: ...SMS or it comes automatically with your SIM card You may need to install these settings After this you can choose from the listed access point names If the access point names are not listed by default please contact your network provider for the same To add any operator Access point Name go to settings More Mobile networks Access Point Name WARNING to avoid any over cost contact your operator to k...

Страница 35: ...age Tap Mobile Data to enable Internet connection 6 2 Access Internet via Wi Fi To browse the Internet via Wi Fi Go to Menu System settings wireless networks and then tap Wi Fi Next go to Menu settings wireless networks Wi Fi Settings and then enable Wi Fi Next select the WIFI connection listed under Wi Fi networks ...

Страница 36: ...ON NS S Notification icons inform you of new messages and events When you receive a notification its icon appears in the status bar along with a summary that appears only briefly 7 1 Open the Notifications Panel Drag the status bar down from the top of the screen as shown below ...

Страница 37: ...tifications Open the notification panel and touch a notification to respond to it What happens next depends on the notification 7 3 Close Notifications Panel Drag the tab at the bottom of the Notifications panel to the top of the screen Or just press the back button The panel also closes when you touch a notification to respond to it ...

Страница 38: ...S SA AG GI IN NG G 8 1 Message environment Settings You can use Messaging to exchange text messages and multimedia messages with your friends Touch to compose a new text or multimedia message Touch to open a messaging conversation ...

Страница 39: ... the context menu to work on messages and their settings The messages settings allow you to set SMS MMS limits notifications vibrate or ringtones delivery reports and many others Take a tour and explore messages settings you ll find interesting things ...

Страница 40: ... field where you want to enter text to open the keyboard Touch once to capitalize the next letter you type Touch double tap for CapsLock Secondary characters panel special symbols numbers Write your message here After typing press icon to close the keyboard Touch and hold the text field to open a menu and to copy cut texts ...

Страница 41: ...essage becomes an MMS if you send it to an email address or add multimedia media file s Recipient zone write the name the number or tap the icon on right to access contacts list This is to erase characters Chose the SIM card you want to send your message with ...

Страница 42: ...key to open the context menu Touch Attach to attach various types of files Send the MMS 8 4 Lock a Message You can lock a message so it won t be deleted if you reach your storage limits Touch and hold message in a message window Touch Lock message in the menu that opens Unlock a message by touching and holding it and then touch Unlock message ...

Страница 43: ...era s pictures and videos are stored in both the SD card and device You can copy pictures and videos from both the SD card and device to a PC and vice versa 9 2 Gallery Touch to take picture video or panoramic Touch to switch front and back camera Touch to change setting ...

Страница 44: ...n and view its contents Touch a picture or a video in an album to view it 9 3 Share an Album Open the main Gallery window Check or uncheck the albums you want to share Touch the icon at the top of screen to share via Bluetooth Email Or touch the message icon at the top of screen to Share via MMS You can share via email Bluetooth and so on 9 4 Music ...

Страница 45: ...rd and experience a whole world of interesting and melodious music Touch the key or the intuitive buttons and icons on the phone in music interface to enjoy the features of your music player Press the phone s volume up down keys on the left side of the mobile phone to adjust the volume ...

Страница 46: ...d as antenna Touch the key or the intuitive buttons and icons on the phone in Radio interface to explore and enjoy the features of your inbuilt FM radio Record sound Search FM stations Enable speaker Press the phone s volume up down keys on the left side of the mobile phone to adjust the volume 9 6 Record Sounds Touch the Sound Recorder in the main menu ...

Страница 47: ... Tap to start recording a voice clip Recording appears when it is recording a voice clip Tap to stop and save the recording 9 7 Make Screenshot Press and hold for 1 second both Volume Down and Power buttons together ...

Страница 48: ...an connect to a variety of networks and devices including Wi Fi GPRS Bluetooth devices such as headsets You can also transfer files to from your PC through the data cable 10 1 Connect to Internet Refer to section 6 for details 10 2 Connect to Wi Fi Networks Refer to Section 6 for details 10 3 Pair With Bluetooth Devices ...

Страница 49: ...tops scanning before you make the other device discoverable touch Scan for devices Touch the ID of the other device in the list Settings to pair them If you are prompted to for a password enter any password on one device and enter the same password you entered in the other device to be paired If the pairing is successful your phone connects to the device 10 4 Connect to Internet via your Phone You...

Страница 50: ...x Windows 7 and Vista OS the drivers get automatically installed However in case of Windows XP maybe you need to manually install the drivers 10 5 Install Secure Certificate from SD Card If your VPN or Wi Fi Network relies on secure certificates you must obtain the certificates and store them in your phone s storage before you can configure access to those VPN or Wi Fi networks on your phone You m...

Страница 51: ...ity Touch Install from SD card under Credential Storage Touch the file name of the certificate to install Only the names of certificates that you have not already installed on your phone are displayed If prompted enter the certificate s password and touch OK Enter a name for the certificate and touch OK ...

Страница 52: ...AT TI IO ON NS S The phone has a default configuration which includes some applications Discover all others apps by using play store You will be able to connect with 3G or Wi Fi for example and by signing in the application with just an email This is what it looks like ...

Страница 53: ...rks and devices by Using Wi Fi Bluetooth Lets you manage Bluetooth to communicate with other Bluetooth devices such as headsets and other portable devices SIM management Lets you turn on or turn off your SIM card and configure your SIM card to be used to voice call video call SMS send and data connection Data usage Data usage refers to the amount of data uploaded or downloaded by your device durin...

Страница 54: ...d other screen settings Storage Lets you see and manage available space on your phone and on your SD card Battery Lets you check the battery level and status Apps Lets you view all applications downloaded or on SD card and mange all running applications in devices Accounts sync Lets you add remove and manage your Google and other supported accounts Location Lets you set the location related settin...

Страница 55: ...just your phone s lock set SIM card lock etc Language input Lets you select the language for the text on your phone and for configuring the onscreen keyboard Backup reset Lets you backup your personal data and settings and reset your phone Date time Lets you choose preferences such as format and time zones Accessibility Enable your installed accessibility applications and adjust related settings ...

Страница 56: ...nual 56 Developer options Lets you enable or disable USB debug and set interface animation effect About phone View information about your phone such as signal strength status phone information and battery use ...

Страница 57: ...Information SAR Your phone is designed not to exceed the limits of emission of radio waves recommended by international guidelines These guidelines include safety margins designed to assure the protection of all persons regardless of age and health SAR specific absorption rate is the unit of body absorbed RF quantity when the phone is in use SAR value is ascertained according to the highest RF lev...

Страница 58: ...ding on factors such as how close you are to a network tower use of accessories and other enhancements The highest SAR value of the device is 0 417W kg head and 0 818 W kg body averaged over 10 gm of human tissue The SAR value may differ depending on national reporting testing requirements and the network band SAR Recommendations ...

Страница 59: ... whenever more convenient This advice applies especially to children adolescents and pregnant women Prefer to use your cell phone when the signal quality is good People having active medical implants should preferably keep the cell phone at least 10mm away from the implant Maintain a preferable distance of 10 mm from the device Safe Driving ...

Страница 60: ...ase do not put the phone onto any passenger seat or any place from which it may fall down in case of vehicular collision or emergency braking During Flight Flight is influenced by interference caused by the phone It is illegal to use a phone on the airplane Please turn off your phone or switch to flight mode during a flight ...

Страница 61: ... manufacturer of the medical device to determine whether they are adequately shielded from external Radio Frequency Switch off your device when regulations instruct you to do so Do not carry the wireless device in the breast pocket Turn off the phone if there is any reason to suspect that interference is taking place Unsafe Areas ...

Страница 62: ...e is a product of superior design and craftsmanship and should be handled with care The following suggestions will help you protect your phone Keep the device dry If your device gets wet remove the battery without turning on the device wipe it with a dry cloth and take it the service center Do not store the device in high or cold temperature High temperatures can shorten the life of electronic dev...

Страница 63: ...in this guide Repairing the phone by yourself other than our authorized service agents centers goes against the warranty rules Do not drop knock or shake the device Rough handling can break internal circuit boards and fine mechanics Do not use harsh chemicals cleaning solvents or strong detergents to clean the device Only use a soft clean dry cloth to clean the surface of the device ...

Страница 64: ...l ventilated place out of direct sunlight Charge the battery at room temperature range If the time span of the battery after charging becomes much shorter than usual the battery life is at an end Replace the battery with a new battery of the same make and specification Do not discard the battery with household trash Please dispose of used battery according to your local environmental laws and guid...

Страница 65: ...ries Recycle Your Phone The WEEE logo shown at the left appears on the product battery handset and charger to indicate that this product must not be disposed off or dumped with your other household wastes You are liable to dispose of all your electronic or electrical waste equipment by relocating over to the specified collection point for recycling of such hazardous waste ...

Страница 66: ...health and environment Disclaimers The colors and specifications shown mentioned in the user manual may differ from the actual product Images shown are for representation purpose only Other product logos and company names mentioned herein may be trademarks or trade names of their respective owners The content of this manual may vary from the actual content displayed in the mobile phone In such a c...

Страница 67: ...cket should be placed in short distance and easily accessible Using the wrong type battery replacement there is a danger of explosion be sure to follow the instructions disposal of used batteries Copyrights All rights reserved Reproduction transfer distribution or storage of part or all of the contents in this document in any form without the prior written permission of is strictly prohibited ...

Страница 68: ...ser Manual 68 To prevent possible hearing damage do not listen at high volume levels of long periods To use the device only with the earphones included never change the earphones included for another one ...

Страница 69: ...essly approved by the party responsible for compliance could void the user s authority to operate the equipment Note This equipment has been tested and found to comply with the limits for a Class B digital device pursuant to part 15 of the FCC Rules These limits are designed to provide reasonable protection against harmful interference in a residential installation This equipment generates uses an...

Страница 70: ...following measures Reorient or relocate the receiving antenna Increase the separation between the equipment and receiver Connect the equipment into an outlet on a circuit different from that to which the receiver is connected Consult the dealer or an experienced radio TV technician for help Specific Absorption Rate SAR information This SMART PHONE meets the government s requirements for exposure t...

Страница 71: ...or use at the ear is 0 417W kg and when properly worn on the body is 0 818W kg the Hotspot SAR value is 0 818W kg the simultaneous transmission SAR value is 0 950W kg on the head and 1 256W kg on the body This device was tested for typical body worn operations with the back of the handset kept 10mm from the body To maintain compliance with FCC RF exposure requirements use accessories that maintain...

Страница 72: ...ents a minimum separation distance of 10mm must be maintained between the user s body and the handset including the antenna Third party belt clips holsters and similar accessories used by this device should not contain any metallic components Body worn accessories that do not meet these requirements may not comply with RF exposure requirements and should be avoided Use only the supplied or an appr...

Отзывы: