background image

Originalbetriebsanleitung
Benzin-Rasenmäher

Original operating instructions

Petrol Lawn Mower

Mode d’emploi d’origine

Tondeuse à gazon à essence

Istruzioni per l’uso originali

Tosaerba a benzina

Originele handleiding

Benzinemaaier

Manual de instrucciones original

Cortacésped con motor a gasolina

O

Manual de instruções original 
Corta-relvas a gasolina 

z

Οδηγίες χρήσης
Χλοοκοπτικό βενζίνας

B

Originalne upute za uporabu

f

benzinske kosilice za travu

4

Originalna uputstva za upotrebu

Benzinska kosilica za travu

���

Art.-Nr.: 34.044.40

I.-Nr.: 11013

Art.-Nr.: 34.045.40

I.-Nr.: 11013

GE-PM

51 S-H B&S

GE-PM

51 S-F B&S

Anleitung_GE_PM_51_S_HF_BS_SPK7__  09.08.13  09:08  Seite 1

Содержание GE-PM 51S-F B&S

Страница 1: ...er Manual de instrucciones original Cortacésped con motor a gasolina O Manual de instruções original Corta relvas a gasolina z Οδηγίες χρήσης Χλοοκοπτικό βενζίνας B Originalne upute za uporabu f benzinske kosilice za travu 4 Originalna uputstva za upotrebu Benzinska kosilica za travu Art Nr 34 044 40 I Nr 11013 Art Nr 34 045 40 I Nr 11013 GE PM 51 S H B S GE PM 51 S F B S Anleitung_GE_PM_51_S_HF_B...

Страница 2: ...ikneming de handleiding en de veiligheidsvoorschriften lezen en in acht nemen Leer detenidamente las instrucciones de uso y las advertencias de seguridad antes de poner en marcha el aparato Leia e respeite as instruções de serviço e de segurança antes de colocar o aparelho em funcionamento ÚÈÓ ÙË ı ÛË ÛÂ ÏÂÈÙÔ ÚÁ È ÛÙÂ Î È ÎÔÏÔ ı ÛÙÂ ÙËÓ ËÁ Ú ÛË Î È ÙÈ À Ô Â ÍÂÈ ÛÊ ÏÂ Bf Prije puštanja u rad proči...

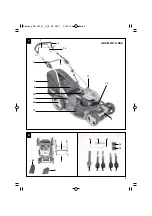
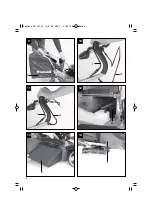
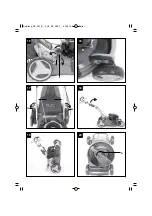
Страница 3: ...3 23 14 14 13 13 15 15 16 16 18 1 4 3 7 5 11 12 2 1 19 8 20 9 10 17 GE PM 51S H B S 2 5 2 21 22 Anleitung_GE_PM_51_S_HF_BS_SPK7__ 09 08 13 09 08 Seite 3 ...

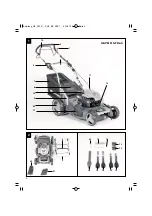
Страница 4: ...4 23 14 14 13 13 15 15 16 16 18 1 4 3 7 5 11 12 19 1 8 20 9 10 17 GE PM 51S F B S 2 2 5 2 21 22 Anleitung_GE_PM_51_S_HF_BS_SPK7__ 09 08 13 09 08 Seite 4 ...

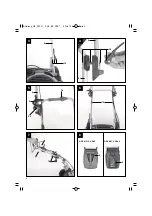
Страница 5: ...D 5 4 3 5 18 6 16 15 2 5 5 23 8 13 4 2 GE PM 51 S F B S GE PM 51 S H B S 7 16 6 6 Anleitung_GE_PM_51_S_HF_BS_SPK7__ 09 08 13 09 08 Seite 5 ...

Страница 6: ...6 12 11 9 10 7 13 21 22 1 1 19 19 14 9 Anleitung_GE_PM_51_S_HF_BS_SPK7__ 09 08 13 09 08 Seite 6 ...

Страница 7: ...7 16 17 18 19 20 15 D 15 15 9 Anleitung_GE_PM_51_S_HF_BS_SPK7__ 09 08 13 09 08 Seite 7 ...

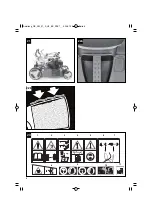
Страница 8: ...8 21 22a 22b 23 1 2 3 4 5 6 7 8 START RUN STOP 11 10 9 xx Anleitung_GE_PM_51_S_HF_BS_SPK7__ 09 08 13 09 08 Seite 8 ...

Страница 9: ...Lieferumfang 4 Bestimmungsgemäße Verwendung 5 Technische Daten 6 Vor Inbetriebnahme 7 Bedienung 8 Reiningung Wartung Lagerung Transport und Ersatzteilbestellung 9 Entsorgung und Wiederverwertung 10 Fehlersuchplan Anleitung_GE_PM_51_S_HF_BS_SPK7__ 09 08 13 09 08 Seite 9 ...

Страница 10: ...darf kein Versuch unternommen werden den Motor zu starten Statt dessen ist die Maschine von der benzin verschmutzten Fläche zu entfernen Jeglicher Zündversuch ist zu vermeiden bis sich die Benzindämpfe verflüchtigt haben aus Sicherheitsgründen sind Benzintank und andere Tankverschlüsse bei Beschädigung auszutauschen 4 Ersetzen Sie defekte Schalldämpfer 5 Vor dem Gebrauch ist immer durch Sichtkon t...

Страница 11: ... mit Benzin im Tank innerhalb eines Gebäudes auf in dem möglicherweise Benzindämpfe mit offenem Feuer oder Funken in Berührung kommen können 3 Lassen Sie den Motor abkühlen bevor Sie den Rasenmäher in geschlossenen Räumen ab stellen 4 Um Brandgefahr zu vermeiden halten Sie Motor Auspuff und den Bereich um den Kraftstofftank frei von Gras Blättern oder austretendem Fett Öl 5 Prüfen Sie regelmäßig d...

Страница 12: ...ht der Hersteller Der Benzin Rasenmäher ist für die private Benutzung im Haus und Hobbygarten geeignet Als Rasenmäher für den privaten Haus und Hobby garten werden solche angesehen deren jährliche Benutzung in der Regel 50 Stunden nicht über steigen und die vorwiegend für die Pflege von Gras oder Rasenflächen verwendet werden nicht jedoch in öffentlichen Anlagen Parks Sportstätten sowie nicht in d...

Страница 13: ...tellen Sie die korrekte Vorspannung des Schnellspanners durch Drehen des Schnellspannhebels in die jeweilige Richtung ein Rechtsdrehung fest Linksdrehung locker Achtung Stellen Sie die Vorspannung so ein dass der Schnellspannhebel unter leichter Spannung in die Endposition gedrückt werden kann 2 Montieren Sie den oberen Schubbügel Pos 2 mit dem Schnellspanner Pos 16 am unteren Schubbügel wie in Ab...

Страница 14: ...nn der Motor gestartet wird Wichtig Vor dem Starten des Motors bewegen Sie die Motorbremse mehrmals um zu Prüfen ob das Stopseil auch gut funktioniert Beachte Der Motor ist auf die Schnittgeschwin digkeit für Gras und Grasauswurf in den Fang korb und für eine lange Motor Lebenszeit ausge legt 4 Überprüfen Sie den Ölstand 5 Füllen Sie den Tank mit Benzin wenn er leer ist und verwenden Sie einen Tri...

Страница 15: ...äge dürfen mit dem Rasenmäher aus Sicherheitsgründen nicht gemäht werden Üben Sie besondere Vorsicht beim Rückwärtsbewegen und beim Ziehen des Rasenmähers Stolpergefahr 7 3 Das Mähen Nur mit scharfen einwandfreien Messern schneiden damit die Grashalme nicht ausfransen und der Rasen nicht gelb wird Zur Erzielung eines sauberen Schnittbildes den Rasenmäher in möglichst geraden Bahnen führen Dabei so...

Страница 16: ...ln z B Bürste oder Handbesen Zur Gewährleistung eines guten Aufsammelns müssen der Fangkorb und besonders das Luftgitter von innen nach der Benutzung gereinigt werden Fangkorb nur bei abgeschaltetem Motor und stillstehendem Schneidwerkzeug einhängen Auswurfklappe mit einer Hand anheben und mit der anderen Hand den Fangsack am Handgriff halten und von oben einhängen 7 5 Nach dem Mähen 1 Den Motor i...

Страница 17: ...ervalle zum Motor finden Sie in der beiligenden Motoranleitung von Briggs Stratton Verschmutztes Wartungsmaterial und Betriebsstoffe in einer dafür vorgesehenen Sammelstelle abgeben 8 2 1 Radachsen und Radnaben Sollten einmal pro Saison leicht eingefettet werden Dazu nehmen Sie die Radkappen mit einem Schrau bendreher ab und lösen die Befestigungsschrauben der Räder 8 2 2 Messer Lassen Sie ihr Mes...

Страница 18: ...mklappen die Seilzüge nicht geknickt werden 5 Bewahren Sie das Gerät an einem gutgelüfteten Platz oder Ort auf 8 4 Vorbereitung des Rasenmähers für den Transport 1 Entleeren Sie den Benzintank mit einer Benzin absaugpumpe 2 Lassen Sie den Motor solange laufen bis das restliche Benzin verbraucht ist 3 Entleeren Sie das Motoröl vom warmen Motor 4 Entfernen Sie den Zündkerzenstecker von der Zündkerze...

Страница 19: ... Ursache Behebung Unruhiger Lauf starkes vibrieren des Gerätes Schrauben lose Messerbefestigung lose Messer unwuchtig Schrauben prüfen Messerbefestigung prüfen Messer ersetzen Motor läuft nicht Bremshebel nicht gedrückt Kraftstofftank leer Bremshebel drücken Kraftstoff einfüllen Rasen wird gelb Schnitt unregelmäßig Messer ist unscharf Schnitthöhe zu gering Motordrehzahl zu gering Messer schärfen r...

Страница 20: ...s Gerät zusammen mit beiliegender Gerätekarte einzureichen und diese vollständig auszufüllen Wichtig ist hierbei eine genaue Fehlerbeschreibung anzugeben Beantworten Sie hierfür folgende Fragen n Hat das Gerät bereits einmal funktioniert oder war es von Anfang an defekt n Ist Ihnen vor dem Auftreten des Defektes etwas aufgefallen Symptom vor Defekt n Welche Fehlfunktion weist das Gerät Ihrer Meinu...

Страница 21: ... supplied 4 Intended use 5 Technical data 6 Before starting the equipment 7 Operation 8 Cleaning maintenance storage transport and ordering of spare parts 9 Disposal and recycling 10 Troubleshooting guide Anleitung_GE_PM_51_S_HF_BS_SPK7__ 09 08 13 09 08 Seite 21 ...

Страница 22: ... fumes have completely evaporated For safety reasons the petrol tank and other tank closures must be replaced if they are damaged 4 Replace defective mufflers 5 Before using the mower visually inspect it to ensure that the blade mounting bolts and the entire cutting apparatus are in good working order i e not worn out or damaged To prevent any imbalance replace worn out or damaged blades and mount...

Страница 23: ...ket for signs of wear and impaired functionality 6 For your own safety replace worn or damaged parts without delay 7 If the fuel tank should require emptying this should only be done in the open air using a petrol suction pump available from DIY shops CAUTION Read all safety regulations and instructions Any errors made in following the safety regulations and instructions may result in an electric ...

Страница 24: ...of misuse The user operator and not the manufacturer will be liable for any damage or injuries of any kind caused as a result of this The petrol lawn mower is intended for private use i e for use in home and gardening environments Private use of the lawn mower refers an annual operating time generally not exceeding that of 50 hours during which time the machine is primarily used to maintain small ...

Страница 25: ...e required direction Clockwise rotation tight fit counterclockwise rotation loose fit Important Adjust the pre tension so that the quick release lever can be pushed into the end position using light pressure 2 Using the quick release Item 16 mount the upper push bar Item 2 to the bottom push bar as shown in Fig 4 and 5 Assemble the lug Item 23 between the upper push bar and the washer Important Ad...

Страница 26: ...Note Use only unleaded petrol as fuel Warning Never use more than one safety petrol can Do not smoke when refueling Switch off the engine before refueling and allow the engine to cool down for a few minutes Mulching In the mulching mode the cuttings are shredded in the enclosed mower housing and then spread back onto the lawn It is not necessary to gather and dispose of the grass Important Mulchin...

Страница 27: ...ngth of the grass If the lawn has grown quite a bit mow over it several times so that no more than 4 cm of grass are cut at one time Switch off the engine before doing any checks on the blade Keep in mind that the blade continues to rotate for a few seconds after the engine has been switched off Never attempt to manually stop the blade Regularly check to see if the blade is securely attached is in...

Страница 28: ...g a petrol suction pump 9 Tell your children not to use the mower It is not a toy 10 Never place petrol near an ignition source Always use a can that is approved to store petrol Keep petrol away from children 11 Oil and maintain the machine 8 Cleaning maintenance storage transport and ordering of spare parts Important The enclosed engine manual from Briggs Stratton provides maintenance information...

Страница 29: ... to the lawn mower Important There is a risk of injury if you work with a damaged blade Resharpening the blade The blades can be resharpened with a metal file In order to avoid imbalance the blade should be resharpened by an authorized service workshop 8 2 3 Care and adjustment of the cables Oil the cables at regular intervals and check that they move easily 8 2 4 Inspecting the V belt To inspect ...

Страница 30: ...and the engine to prevent chafing 8 5 Ordering replacement parts Please quote the following data when ordering replacement parts 앬 Type of machine 앬 Article number of the machine 앬 Identification number of the machine 앬 Replacement part number of the part required For our latest prices and information please go to www isc gmbh info 9 Disposal and recycling The unit is supplied in packaging to prev...

Страница 31: ...equipment together with the fully completed warranty card supplied with the equipment It is important that you fill in an exact description of the defect To do so answer the following questions n Did the equipment work at all or was it defective from the beginning n Did you notice anything symptom or defect prior to the failure n What malfunction does the equipment have in your opinion main sympto...

Страница 32: ...ton Fault Possible cause Remedy Loud while running machine vibrates heavily Screws are loose Blade fasteners are loose Blade is unbalanced Check screws Check blade fasteners Replace blade Engine does not start Brake lever not pressed Fuel tank is empty Press brake lever Refill with fuel Uneven mowing results Blade is blunt Cutting height is too low Engine speed is too low Sharpen the blade Set cor...

Страница 33: ...Utilisation conforme à l affectation 5 Données techniques 6 Avant la mise en service 7 Commande 8 Nettoyage maintenance stockage transport et commande de pièces de rechange 9 Mise au rebut et recyclage 10 Plan de recherche des erreurs Anleitung_GE_PM_51_S_HF_BS_SPK7__ 09 08 13 09 08 Seite 33 ...

Страница 34: ... remplir de carburant si de l essence déborde il ne faut surtout pas essayer de mettre le moteur en marche Au lieu de cela il faut éloigner la machine de l endroit sali d essence Tout essai de démarrage doit être évité jusqu à ce que les vapeurs d essence soient complètement volatilisées pour des raisons de sécurité remplacez toujours le réservoir à essence et autres fermetures de réservoir dès qu...

Страница 35: ...tockage 1 Veillez à ce que tous les écrous goujons et vis soient bien serrées et á ce que l appareil soit dans un état de fonctionnement sûr 2 Ne gardez jamais la tondeuse à gazon avec du carburant dans le réservoir à l intérieur d un bâtiment dans lequel probablement des vapeurs d essence peuvent rencontrer du feu ouvert ou des étincelles 3 Laissez refroidir le moteur avant de stocker la tondeuse...

Страница 36: ... à essence n Guidon supérieur et guidon inférieur n Adaptateur d éjection latérale n Adaptateur de paillage n Panier collecteur n Clé à bougie n 2x attaches de câble n Guide câble n 2x serrages rapides pour guidon supérieur avec ressort n 2x serrages rapides pour guidon inférieur n Manuel de service essence n Mode d emploi d origine 4 Utilisation conforme à l affectation L appareil doit uniquement...

Страница 37: ...n un récipient doseur d un litre résistant à l huile à l essence n un bidon d essence n un entonnoir convenant aux tubulures de remplissage d essence du réservoir n des chiffons ménagers pour essuyer les restes d huile d essence les remettre à une station d essence pour leur élimination n une pompe d aspiration à carburant en plastique à acheter dans les grandes surfaces de matériaux de constructi...

Страница 38: ...aintenez le levier en position de travail fig 10 Avant de commencer vraiment à tondre contrôlez plusieurs fois le levier de démarrage d arrêt Assurez vous que le câble est bien accessible 2 levier de commande levier d accouplement fig 11 Pos 19 lorsque vous l actionnez fig 11 l accouplement de l organe de transmission se ferme et la tondeuse à gazon commence à se déplacer le moteur en marche Relâc...

Страница 39: ...Consignes pour tondre le gazon correctement Attention N ouvrez jamais le clapet d éjection lorsque le dispositif de ramassage va être vidé et que le moteur tourne La lame en rotation peut entraîner des blessures Fixez le clapet d éjection et le sac collecteur d herbe toujours minutieusement En cas d éloignement arrêtez avant le moteur La distance de sécurité donnée par les longerons du guidon entr...

Страница 40: ...ig 22b Videz le panier collecteur et nettoyez le canal d éjection Pour décrocher le sac collecteur levez le clapet d éjection avec une main avec l autre main prenez le sac collecteur par la poignée Fig 9 Conformément aux prescriptions de sécurité le clapet d éjection se ferme au décrochage du sac collecteur et bouche l orifice d éjection arrière Si des restes d herbe sont accrochés dans l ouvertur...

Страница 41: ... d un nettoyeur haute pression Le moteur doit rester sec Les produits nettoyants agressifs comme un produit nettoyant à froid ou du white spirit ne doivent pas être utilisés Attention n Ne laissez la tondeuse en position de nettoyage verticale que le temps nécessaire car cette position représente un risque de blessures important n Ne laissez jamais la tondeuse sans surveillance n Tenez les enfants...

Страница 42: ...rnis 4 Décrochez la corde de démarrage du guide câble fig 5 pos 23 Desserrez le serrage rapide sur le guidon et rabattez le guidon comme montré sur la figure 21 Ce faisant veillez à ne pas plier les câbles de transmission 5 Stockez l appareil dans un endroit ou un lieu bien aéré 8 4 Préparation de la tondeuse pour le transport 1 Videz le réservoir à essence à l aide d une pompe d aspiration à esse...

Страница 43: ...brations de l appareil vis desserrées fixation des lames desserrée lame non équilibrée contrôlez les vis contrôlez la fixation des lames remplacez la lame Moteur ne démarre pas levier du frein non appuyé réservoir à essence vide ppuyez sur le levier du frein remplissez de carburant Le gazon vire au jaune coupe irrégulière lame émoussée hauteur de coupe trop basse vitesse de rotation du moteur trop...

Страница 44: ...l et la fiche l accompagnant ci jointe et de la remplir entièrement Il est important de donner une description des défauts aussi précise que possible Pour cela répondez aux questions suivantes n L appareil a t il déjà fonctionné ou est il défectueux depuis le début n Avez vous déjà remarqué quelque chose avant l apparition du défaut symptômes avant la panne n Selon vous quel dysfonctionnement prés...

Страница 45: ...zzo proprio 5 Caratteristiche tecniche 6 Prima della messa in esercizio 7 Utilizzo 8 Pulizia manutenzione conservazione trasporto e ordinazione dei pezzi di ricambio 9 Smaltimento e riciclaggio 10 Tabella per l eliminazione delle anomalie Anleitung_GE_PM_51_S_HF_BS_SPK7__ 09 08 13 09 09 Seite 45 ...

Страница 46: ...fin a che i vapori della benzina non si siano dileguati per motivi di sicurezza in caso di danneggiamento è necessario sostituire il tappo della benzina o di altri serbatoi 4 Sostituite i silenziatori danneggiati 5 Prima di ogni utilizzo bisogna sempre eseguire un controllo visivo per accertarsi che le lame i bulloni di bloccaggio e tutta l unità di taglio non siano consumati o danneggiati Per evi...

Страница 47: ... 5 Controllate regolarmente che il dispositivo di raccolta non presenti segni di usura o di perdita della funzionalità 6 Per motivi di sicurezza è necessario sostituire i pezzi consumati o danneggiati 7 In caso fosse necessario svuotare il serbatoio l operazione va compiuta all aria aperta con una pompa di aspirazione della benzina disponibile nei centri del fai da te AVVERTIMENTO Leggete tutte le...

Страница 48: ...e per lo scopo a cui è destinato Ogni altro tipo di uso che esuli da quello previsto non è conforme L utilizzatore l operatore e non il costruttore è responsabile dei danni e delle lesioni di ogni tipo che ne risultino Il tosaerba a benzina è adatto all uso privato nei giardini di piccole dimensioni Sono considerati tosaerba per l uso privato in giardini di piccole dimensioni quegli apparecchi che...

Страница 49: ...va di serraggio rapido nella rispettiva direzione rotazione verso destra significa serrato rotazione verso sinistra allentato Attenzione Impostate la pretensione in modo che la leva di serraggio rapido possa venire premuta nella posizione finale con una leggera tensione 2 Montate il manico superiore Pos 2 con il serraggio rapido Pos 16 sul manico inferiore come mostrato nella Fig 4 e 5 Montate la ...

Страница 50: ...ia pulita Nota bene Utilizzate solamente della benzina normale senza piombo Avvertimento usate sempre solo una tanica di sicurezza per la benzina Non fumate nel riempire la benzina Spegnete il motore prima di mettere la benzina e lasciatelo raffreddare alcuni minuti Pacciamatura Con la pacciamatura l erba tagliata viene sminuzzata all interno del tosaerba e poi distribuiti di nuovo sull erba L erb...

Страница 51: ... di evitare strisce di erba non tagliata Tenete pulita la parte inferiore della scocca del tosaerba e togliete assolutamente i depositi di erba I depositi rendono più difficile l operazione di avvio e influiscono negativamente sulla qualità del taglio e sullo scarico dell erba Sui pendii le corsie formate dal taglio devono essere trasversali rispetto alla pendenza Per evitare che il tosaerba scivo...

Страница 52: ...io Non depositare altri oggetti sul tosaerba 3 Prima di usarlo di nuovo controllate tutti le viti e i dadi Le viti allentate devono venire serrate bene 4 Svuotate il sacco di raccolta dell erba prima di usarlo di nuovo 5 Staccate il connettore della candela per evitare l uso da parte di persone non autorizzate 6 Fate attenzione che il tosaerba non venga tenuto vicino ad una sorgente di pericoli Le...

Страница 53: ...a sostituzione delle lame si devono utilizzare solo ricambi originali Il codice delle lame deve corrispondere con il numero indicato nell elenco dei pezzi di ricambio Non montare mai lame diverse Lame danneggiate Se malgrado tutte le precauzioni prese le lame entrano in contatto con un ostacolo spegnete subito il motore e togliete il connettore della candela Inclinate il tosaerba sul lato e contro...

Страница 54: ...l involucro 6 Sganciate la fune di avvio dalla linguetta Fig 5 Pos 23 Allentate i serraggi rapidi sul manico e ripiegatelo come mostrato nella Fig 21 Nell eseguire tale operazione fate attenzione che i cavi flessibili non vengano piegati 7 Inserite alcuni strati di cartone fra il manico inferiore e superiore e il motore per evitare che sfreghino l uno contro l altro 8 5 Commissione dei pezzi di ri...

Страница 55: ...tate Serraggio delle lame allentato Lame squilibrate Controllare le viti Controllare il serraggio delle lame Sostituire le lame Il motore non funziona Leva del freno non premuta Serbatoio del carburante vuoto Premere la leva del freno Riempire di carburante Il prato ingiallisce taglio irregolare Lame non affilate Altezza del taglio insufficiente Numero di giri del motore insufficiente Affilare le ...

Страница 56: ... presentare l apparecchio con il certificato di garanzia accluso compilato in tutte le sue parti In questo caso è importante che riportiate una precisa descrizione del difetto A tal fine rispondete alle seguenti domande n L apparecchio ha già funzionato una volta o era difettoso fin dall inizio n Avete notato qualcosa prima che si manifestasse il difetto sintomo prima del difetto n A vostro parere...

Страница 57: ... 3 Omvang van de levering 4 Doelmatig gebruik 5 Technische gegevens 6 Vóór inbedrijfstelling 7 Bediening 8 Reiniging onderhoud opbergen transport en bestellen van wisselstukken 9 Verwijdering en recyclage 10 Foutopsporing Anleitung_GE_PM_51_S_HF_BS_SPK7__ 09 08 13 09 09 Seite 57 ...

Страница 58: ...aan Elke ontstekingspoging moet worden vermeden tot de benzinedampen vervluchtigd zijn veiligheidsredenen moeten de benzinetank en andere tanksluitingen bij beschadiging worden vervangen 4 Vervang defecte geluidsdempers 5 Voor gebruik dient u zich steeds door een visuele controle ervan te vergewissen dat de maaigereedschappen bevestigingsbouten en de gehele maai eenheid niet afgesleten of beschadi...

Страница 59: ... de uitlaat en de zone rond om de brandstoftank vrij te worden gehouden van gras bladeren of ontsnappend vet olie 5 Controleer regelmatig of de grasopvanginrichting slijtageverschijnsels vertoont resp of hij naar behoren werkt 6 Om veiligheidsredenen dienen versleten of beschadigde onderdelen te worden vervangen 7 Als de brandstoftank moet worden geleegd moet dit in open lucht gebeuren m b v een b...

Страница 60: ...tvloeiende schade of letsel van welke aard dan ook is de gebruiker bediener niet de fabrikant aansprakelijk De benzinemaaier is geschikt voor particulier gebruik in de huis en hobbytuin Als grasmaaiers voor de particuliere huis en hobbytuin worden diegene beschouwd die doorgaans niet langer dan 50 uur jaarlijks overwegend worden gebruikt voor het verzorgen van gras en gazonvlakten maar niet in ope...

Страница 61: ...spanner af door de snelspanhendel in de respectievelijke richting te draaien Naar rechts draaien aangehaald naar links draaien los LET OP Stel de voorspanning zodanig af dat de snelspanhendel onder lichte spanning naar de eindstand kan worden gebracht 2 Breng de bovenste schuifbeugel pos 2 op de onderste schuifbeugel aan m b v de snelspanner pos 16 zoals getoond in fig 4 en 5 Monteer de las pos 23...

Страница 62: ...l loodvrije normale benzine Waarschuwing gebruik altijd enkel een veiligheidsbenzineblik Rook niet bij het ingieten van benzine Zet de motor af en laat de motor enkele minuten afkoelen voordat u de tank vult Mulchen Bij het mulchen wordt het maaigoed in de gesloten behuizing van de maaier verkleind en terug over het gazon verdeeld Het opnemen en het verwijderen van het gras valt weg Let op Mulchen...

Страница 63: ...erplaatsen worden voorkomen Kies de maaihoogte naargelang de werkelijke lengte van het gras Maai in meerdere beurten zodat het gras per beurt maximaal 4 cm korter wordt gereden Voordat u controles van welke aard dan ook aan het mes uitvoert dient u de motor af te zetten Denk eraan dat het mes na het afzetten van de motor nog enkele seconden blijft draaien Probeer nooit het mes te stoppen Controlee...

Страница 64: ...e fabrikant goedgekeurde onderdelen mogen bij herstellingen worden gebruikt zie adres op het garantiebewijs 8 Als de maaier een tijdje niet wordt gebruikt dient u de benzinetank te ledigen m b v een benzinezuigpomp 9 Draag kinderen op de maaier niet te gebruiken Het is geen speelgoed 10 Bewaar nooit benzine in de buurt van een vonkenbron Gebruik altijd een goedgekeurde jerrycan Hou kinderen weg va...

Страница 65: ...ontact komen met een hindernis onmiddellijk de motor afzetten en de stekker van de ontstekingskabel aftrekken Maaier opzij kantelen en mes op beschadiging controleren Beschadigde of kromgebogen messen moeten worden vervangen Nooit een kromgebogen mes weer rechtbuigen Nooit met een kromgebogen of flink versleten mes werken want dat veroorzaakt trillingen en kan verdere beschadigingen van de maaier ...

Страница 66: ...tarttrekkabel los uit de las fig 5 pos 23 Zet de snelspanners op de schuifbeugel los en klap de schuifbeugel in zoals getoond in fig 21 Let er wel op dat de trekkabels bij het omklappen niet worden geknikt 7 Wind enkele lagen golfkarton tussen de bovenste en onderste schuifbeugel en de motor om het schuren te voorkomen 8 5 Bestellen van wisselstukken Gelieve bij het bestellen van wisselstukken vol...

Страница 67: ...k Verhelpen Maaier loopt onrustig of vibreert hevig Schroeven los Mes zit los Onbalans van het mes Schroeven controleren Bevestiging van het mes controleren Mes vervangen Motor draait niet Remhefboom niet gedrukt Brandstoftank leeg Remhefboom drukken Brandstof ingieten Gazon wordt geel en wordt onregelmatig gesneden Mes bot Maaihoogte te gering Motortoeren te gering Mes slijpen Correcte maaihoogte...

Страница 68: ...e samen met de bijgaande garantiekaart te bezorgen en deze kaart volledig in te vullen Belangrijk is hierbij een nauwkeurige beschrijving van de fout op te geven Gelieve daarvoor onderstaande vragen te beantwoorden n Heeft het toestel reeds eenmaal gewerkt of was het vanaf het begin defect n Is u iets opgevallen voordat het defect zich voordeed symptoom voor het defect n Welke foutieve werkwijze v...

Страница 69: ...e entrega 4 Uso adecuado 5 Características técnicas 6 Antes de la puesta en marcha 7 Manejo 8 Limpieza mantenimiento almacenamiento transporte y pedido de piezas de repuesto 9 Eliminación y reciclaje 10 Plan para localización de averías Anleitung_GE_PM_51_S_HF_BS_SPK7__ 09 08 13 09 09 Seite 69 ...

Страница 70: ...otor En lugar de esto se ha de limpiar la superficie de la máquina que se haya ensuciado con la gasolina Es preciso evitar todo intento de arranque hasta que los vapores de la gasolina se hayan volatilizado por motivos de seguridad es necesario cambiar el depósito de gasolina y demás tapas del depósito en caso de que presenten daños 4 Sustituir los amortiguadores de sonido que estén defectuosos 5 ...

Страница 71: ... Asegurarse de que todas las tuercas pernos y tornillos se hallen fijos y de que la máquina se encuentre en condiciones para trabajar de forma segura 2 No guardar nunca el cortacésped con gasolina en el depósito en el interior de un edificio dado que los vapores de la gasolina podrían entrar en contacto con llamas o chispas y encenderse 3 Dejar que el motor se enfríe antes de guardar el cortacéspe...

Страница 72: ...son un juguete No permitir que los niños jueguen con bolsas de plástico láminas y piezas pequeñas Riesgo de ingestión y asfixia n Cortacésped con motor de gasolina n Arco superior de empuje y arco inferior de empuje n Adaptador de expulsión lateral n Adaptador para sustancia orgánica n Bolsa de recogida n Llave de bujía de encendido n 2 pinzas sujetacables n Brida n 2 tensores rápidos para arco de...

Страница 73: ...as siguientes instrucciones Atención Para el montaje y para los trabajos de mantenimiento se precisa de las siguientes herramientas adicionales que no están incluidas en el volumen de suministro n una bandeja de recogida de aceite plana para el cambio de aceite n una cubeta de medida de 1 litro n un bidón de gasolina n un embudo adecuado para el tubo de alimentación de gasolina del tanque n bayeta...

Страница 74: ...0 pos 1 Utilizar la palanca para parar el motor Si se suelta la palanca el motor y la cuchilla se detendrán automáticamente Para cortar el césped mantener la palanca en la posición de trabajo fig 10 Antes de comenzar a cortar el césped comprobar repetidamente la palanca ON OFF Asegurarse de que el cable de tracción se mueva con suavidad 2 Palanca de maniobra palanca de embrague fig 11 pos 19 Al ac...

Страница 75: ...d 10 No cortar nunca el césped cuando la visibilidad no sea suficiente 11 Antes de cortar el césped recoger cualquier objeto que se encuentre sobre el césped 7 2 Instrucciones para cortar el césped de manera adecuada Atención No abrir nunca la compuerta del expulsor cuando se esté vaciando el dispositivo colector y el motor esté todavía funcionando Cuando la cuchilla se encuentre en funcionamiento...

Страница 76: ...minar el césped y demás residuos acumulados apagar el motor y extraer el cable de encendido del enchufe 10 No eliminar nunca componentes que sirvan como dispositivos de seguridad 11 No repostar nunca gasolina cuando esté caliente el motor o en funcionamiento 7 4 Vaciado de la bolsa de recogida de césped Si la bolsa de recogida está llena el caudal de aire será inferior y el indicador del nivel de ...

Страница 77: ...e 90 grados Posición de limpieza en vertical fig 17 19 Atención Antes de poner el cortacésped en la posición de limpieza en vertical apagar el motor y desenchufar la bujía de encendido Atención Colocar el cortacésped solo sobre una base fija y plana 1 Abrir la palanca del tensor rápido pos 15 2 Desencajar el arco de empuje inferior y abrirlo fig 18 3 Poner el cortacésped en la posición de limpieza...

Страница 78: ...ados por una reparación irregular o cuando las piezas de repuesto no sean piezas originales o piezas autorizadas por nosotros Del mismo modo no nos hacemos responsables de las reparaciones mal realizadas Solicite al servicio de asistencia técnica o a un especialista autorizado que lleve a cabo las reparaciones Lo mismo afecta a los accesorios 8 2 6 Tiempos de servicio Está permitido utilizar los c...

Страница 79: ...protegido por un embalaje para evitar daños producidos por el transporte Este embalaje es materia prima y por eso se puede volver a utilizar o llevar a un punto de reciclaje El aparato y sus accesorios están compuestos de diversos materiales como p ej metal y plástico Depositar las piezas defectuosas en un contenedor destinado a residuos industriales Informarse en el organismo responsable al respe...

Страница 80: ...ión El aparato funciona mal y vibra con fuerza Tornillos sueltos Fijación de cuchilla suelta Cuchilla desequilibrada Comprobar tornillos Comprobar fijación de cuchilla Cambiar cuchilla El motor no funciona Palanca de freno no pulsada Depósito de combustible vacío Pulsar palanca de freno Rellenar de combustible El césped se amarillea el corte es irregular Cuchilla desafilada Altura de corte demasia...

Страница 81: ...s el aparato con la tarjeta que lo acompaña completamente cumplimentada Es importante indicar una descripción exacta del fallo Para ello es preciso responder a las siguientes preguntas n Ha funcionado el aparato en algún momento o estaba defectuoso desde el principio n Le ha llamado algo la atención antes de surgir el fallo indicio antes del fallo n Que fallo de funcionamiento le parece que presen...

Страница 82: ...lização adequada 5 Dados técnicos 6 Antes da colocação em funcionamento 7 Operação 8 Limpeza manutenção armazenagem transporte e encomenda de peças sobressalentes 9 Eliminação e reciclagem 10 Plano de localização de falhas 82 P Anleitung_GE_PM_51_S_HF_BS_SPK7__ 09 08 13 09 09 Seite 82 ...

Страница 83: ...Deverá evitar qualquer tentativa de ignição até os vapores de gasolina terem dissipado por motivos de segurança troque o tampão do depósito da gasolina e os tampões de outros depósitos que estiverem danificados 4 Substitua os silenciadores avariados 5 Antes da utilização deve efectuar sempre um controlo visual para verificar se os acessórios de corte o perno de fixação e a unidade de corte estão g...

Страница 84: ...ispositivo de recolha da relva quanto a desgaste ou perda da operacionalidade 6 Por motivos de segurança substitua as peças desgastadas ou danificadas 7 Caso seja necessário esvaziar o depósito de combustível isto deve ser feito ao ar livre e com a ajuda de uma bomba de sucção de gasolina à venda no mercado AVISO Leia todas as instruções de segurança e indicações O incumprimento das instruções de ...

Страница 85: ...só pode ser utilizado para os fins a que se destina Qualquer outro tipo de utilização é considerado inadequado Os danos ou ferimentos de qualquer tipo daí resultantes são da responsabilidade do utilizador operador e não do fabricante O corta relvas a gasolina destina se à utilização doméstica em quintais e jardins particulares Considera se que os corta relvas para utilização doméstica e de jardina...

Страница 86: ...a rápida no respectivo sentido rotação para a direita para apertar rotação para a esquerda para soltar Atenção Ajuste a pré tensão de modo a que a alavanca de abertura rápida possa ser pressionada sob uma ligeira pressão na posição final 2 Monte a barra de condução superior pos 2 com o dispositivo de abertura rápida pos 16 na barra de condução inferior como representado na fig 4 e 5 Monte a lingue...

Страница 87: ...do para uma velocidade de corte para relva para a expulsão da relva para o cesto de recolha e para um vida útil do motor mais longa 4 Verifique o nível do óleo 5 Ateste o depósito com gasolina quando este estiver vazio utilizando um funil e um recipiente de medição Certifique se de que a gasolina está limpa Atenção Utilize apenas gasolina sem chumbo Aviso Utilize sempre apenas uma lata de gasolina...

Страница 88: ...cuar e ao puxar o corta relvas Existe o perigo de tropeçar 7 3 Corte da relva Trabalhe apenas com uma lâmina afiada e em perfeitas condições para que as pontas da relva não fiquem retalhadas e a relva seque ficando amarela Para conseguir um corte uniforme da relva conduza o corta relvas em linhas rectas As linhas devem sobrepor se sempre em alguns centímetros para eliminar eventuais marcas Mantenh...

Страница 89: ...arado Eleve a portinhola de expulsão com uma mão e com a outra segure o saco de recolha junto ao punho engatando o a partir de cima 7 5 Depois de cortar a relva 1 Deixe sempre arrefecer primeiro o motor antes de arrumar o corta relvas num local fechado 2 Antes de arrumar remova a relva folhas secas massa de lubrificação e o óleo Não coloque outros objectos em cima do corta relvas 3 Antes de uma no...

Страница 90: ... afastadas 8 2 Manutenção Atenção As informações relativas à manutenção e aos intervalos de manutenção do motor encontram se nas instruções da Briggs Stratton para o motor Entregue o material para manutenção que estiver sujo e os consumíveis num local de recolha adequado 8 2 1 Eixos e cubos das rodas Devem ser lubrificados uma vez por estação Para tal retire os tampões das rodas com uma chave de p...

Страница 91: ...pida na barra de condução e rebata a barra de condução como representado na fig 21 Ao fazê lo tenha atenção para que os cabos de tracção não fiquem dobrados 5 Armazene o aparelho num local bem ventilado 8 4 Preparação do corta relvas para o transporte 1 Esvazie o depósito da gasolina com uma bomba de sucção 2 Deixe o motor funcionar até consumir a gasolina restante 3 Esvazie o óleo do motor quente...

Страница 92: ...ada Verifique os parafusos Verifique a fixação da lâmina Substitua a lâmina O motor não funciona Alavanca do travão não está premida Depósito de combustível vazio Prima a alavanca do travão Ateste com combustível A relva fica amarela corte irregular Lâmina não está afiada Altura de corte demasiado reduzida Velocidade de rotação do motor demasiado reduzida Afie a lâmina Ajuste a altura correcta Col...

Страница 93: ... juntamente com a ficha em anexo totalmente preenchida É importante fornecer uma descrição precisa do erro Para isso responda às seguintes questões n O aparelho já funcionou alguma vez ou possui o defeito desde o início n Antes do surgimento do defeito apercebeu se de algo estranho sintoma antes do defeito n Na sua opinião que erro de funcionamento apresenta o aparelho sintoma principal Descreva e...

Страница 94: ...ιγμένη χρήση 5 Τεχνικά χαρακτηριστικά 6 Πριν τη θέση σε λειτουργία 7 Χειρισμός 8 Καθαρισμός συντήρηση αποθήκευση μεταφορά και παραγγελία ανταλλακτικών 9 Διάθεση στα απορρίμματα και επαναχρησιμοποίηση 10 Πίνακας αναζήτησης αιτίας βλάβης Anleitung_GE_PM_51_S_HF_BS_SPK7__ 09 08 13 09 09 Seite 94 ...

Страница 95: ...προσπαθήσετε να εκκινήσετε τον κινητήρα Μεταφέρτε τη μηχανή μακριά από το σημείο που λερώθηκε από την ξεχειλισμένη βενζίνη να αποφεύγετε κάθε προσπάθεια ανάφλεξης μέχρι να εξαφανισθούν οι ατμοί της βενζίνης για λόγους ασφαλείας να αντικαθίστανται τα ελαττωματικά ρεζερβουάρ και τα πώματά τους 4 Να αντικαθίστανται οι ελαττωματικοί σιγαστήρες 5 Πριν τη χρήση να γίνεται πάντα οπτικός έλεγχος για διαπί...

Страница 96: ...ενων κοπτικών εργαλείων και των σταθερών εξαρτημάτων της μηχανής Συντήρηση και φύλαξη 1 Φροντίστε να είναι καλά σφιγμένα όλα τα παξιμάδια τα μπουλόνια και οι βίδες και η συσκευή να είναι σε καλή κατάσταση για ασφαλή εργασία 2 Μη φυλάγετε ποτέ το χλοοκοπτικό που έχει βενζίνη στο ρεζερβουάρ εντός κτιρίων όπου οι ατμοί της βενζίνης θα μπορούσαν να έλθουν σε επαφή με ανοικτή φωτιά ή σπινθήρες 3 Να αφή...

Страница 97: ...νες ζημιές από τη μεταφορά n Φυλάξτε τη συσκευασία αν γίνεται μέχρι την πάροδο της προθεσμάις της εγγύησης ΠΡΟΣΟΧΗ H συσκευή και τα υλικά συσκευασίας δεν είναι παιχνίδια Τα παιδιά δεν επιτρέπεται να παίζουν με πλαστικές σακούλες πλαστικές μεμβράνες και μικροαντικείμενα Υφίσταται κίνδυνος κατάποσης και ασφυξίας n Χλοοκοπτικό βενζίνας n Επάνω και κάτω βραχίονας ώθησης n Προσαρμογέας πλευρικής εξαγωγ...

Страница 98: ...ριν τη θέση σε λειτουργία 6 1 Συναρμολόγηση εξαρτημάτων Κατά την παράδοση ορισμένα τμήματα είναι αποσυναρμολογημένα Η συναρμολόγηση είναι απλή εφόσον ακολουθήσετε τις εξής υποδείξεις Προσοχή Για τη συναρμολόγηση και για εργασίες συντήρησης χρειάζεστε τα ακόλουθα πρόσθετα εργαλεία που δεν συμπαραδίδονται 앬 μία λεκάνη συλλογής λαδιού για αλλαγή λαδιού 앬 ένα δοσομετρικό κύπελλο 1 λίτρου ανθεκτικό σε ...

Страница 99: ...εύθερο το μοχλό σταματάει αυτόματα ο κινητήρας και το μαχαίρι Για να κόψετε τη χλόη να κρατάτε το μοχλό σε θέση εργασίας εικ 10 Πριν από το κόψιμο της χλόης πρέπει να ελέγχετε περισσότερες φορές το μοχλό εκκίνησης και διακοπής Σιγουρευτείτε πως κινείται εύκολα το σχοινί εκκίνησης 2 Μοχλός κίνησης μοχλός συμπλέκτη εικ 11 αρ 19 Όταν τον χειριστείτε εικ 11 κλείενται ο συμπλέκτης για την μετάδοση της ...

Страница 100: ...από το χλοοκοπτικό 10 Ποτέ μην κόβετε τη χλόη όταν δεν έχετε καλή ορατότητα 11 Να σηκώνετε αντικείμενα που βρίσκονται στο έδαφος πριν αρχίζετε να κόβετε τη χλόη 7 2 Υποδείξεις για σωστό κόψιμο χλόης Προσοχή Ποτέ μην ανοίγετε το κάλυμμα εξαγωγής όταν αδειάζεται το καλάθι και κινείται ακόμη ο κινητήρας Το περιστρεφόμενο μαχαίρι μπορεί να προκαλέσει τραυματισμούς Να στερεώνετε πάντα προσεκτικά το κάλ...

Страница 101: ...ινητήρα όταν είναι πολύ ζεστός ή όταν λειτουργεί 7 4 Άδειασμα του σάκου συλλογής χόρτων Όταν γεμίσει το καλάθι συλλογής μειώνεται η ροή του αέρα και ο δείκτης πληρότητας του σάκου συλλογής 6 εφαρμόζει στο σάκο συλλογής εικ 22a εικ 22b Αδειάστε το σάκο συλλογής και καθαρίστε το χώρο εξόδου των κομμένων χόρτων Για την αφαίρεση του καλαθιού συλλογής ανασηκώστε με ένα χέρι το κάλυμμα του ανοίγματος εξ...

Страница 102: ... θέση καθαρισμού σβήστε τη μηχανή και βγάλτε το μπουζόκλειδο Προσοχή Να ακουμπάτε το χλοοκοπτικό μόνο σε σταθερή επιφάνεια 1 Ανοίξτε το ταχύκλειδο εικ 15 2 Πιέστε τον κάτω βραχίονα προς τα έξω και ξεδιπλώστε τον βραχίονα εικ 18 3 Στήστε το χλοοκοπτικό σε κάθετη θέση καθαρισμού εικ 19 4 Καθαρίστε την κάτω πλευρά του χλοοκοπτικού με τον καθαριστήρα ξύστρα εικ 2 αρ 18 Προσοχή Αιχμηρά μαχαίρια Κατά το...

Страница 103: ...ρτήματα Προσοχή Σύμφωνα με το νόμο ευθύνης για προϊόντα δεν ευθυνόμαστε για βλάβες που οφείλονται σφαλμένη επισκευή ή σε περίπτωση που χρησιμοποιούνται όχι πρωτότυπα ή από εμάς εγκεκριμένα εξαρτήματα Επίσης δεν ευθυνόμαστε για βλάβες που οφείλονται σε εσφαλμένες επισκευές Αναθέστε τις επισκευές σε τμήμα εξυπηρέτησης πελατών ή σε συμβεβλημένο εξειδικευμένο τεχνίτη Το ίδιο ισχύει και για αξεσουάρ 8 ...

Страница 104: ...και πληροφορίες στην ιστοσελίδα www isc gmbh info 9 Διάθεση στα απορρίμματα και επαναχρησιμοποίηση Η συσκευή βρίσκεται σε μία συσκευασία προς αποφυγή ζημιών κατά τη μεταφορά Αυτή η συσκευασία αποτελείται από πρώτες ύλες και έτσι μπορεί να επαναχρησιμοποιηθεί ή να ανακυκλωθεί Η συσκευή και τα εξαρτήματά της αποτελούνται από διάφορα υλικά όπως π μέταλλο και πλαστικά υλικά Να παραδίδετε τα ελαττωματι...

Страница 105: ...ευής χαλαρές βίδες χαλαρή στερέωση μαχαιριού ανισόρροπη λειτουργία μαχαιριού ελέγξτε τις βίδες ελέγξτε τη στερέωση του μαχαιριού αντικαταστήστε το μαχαίρι Δεν λειτουργεί ο κινητήρας δεν έχει πιεστεί ο μοχλός πέδησης κενό ρεζερβουάρ καυσίμου πιέστε τον μοχλό πέδησης γεμίστε καύσιμο Το γκαζόν κιτρινίζει κόβεται ανομοιόμορφα το μαχαίρι δεν είναι τροχισμένο χαμηλό ύψος κοπής χαμηλός αριθμός στροφών το...

Страница 106: ... μαζί με την επισυναπτόμενη κάρτα εγγύησης την οποία πρέπει να έχετε συμπληρώσει Σημαντικό ρόλο παίζει μία αναλυτική περιγραφή του σφάλματος Για το λόγο αυτό παρακαλούμε να απαντήσετε στις ακόλουθες ερωτήσεις n Λειτούργησε σωστά η συσκευή ή είχε από την αρχή κάποιο ελάττωμα n Μήπως προσέξατε κάτι περίεργο προτού παρουσιαστεί το ελάττωμα σύμπτωμα ή βλάβη n Ποια δυσλειτουργία παρατηρείται στη συσκευ...

Страница 107: ...uke 4 Namjenska uporaba 5 Tehnički podaci 6 Prije puštanja u rad 7 Rukovanje 8 Čišćenje održavanje skladištenje transport i narudžba rezervnih dijelova 9 Zbrinjavanje u otpad i recikliranje 10 Plan traženja grešaka Anleitung_GE_PM_51_S_HF_BS_SPK7__ 09 08 13 09 09 Seite 107 ...

Страница 108: ...ika 4 Zamijenite neispravne prigušnike buke 5 Prije uporabe morate vizualnom kontrolom provjeriti jesu li rezaći alati pričvrsni vijci i cijela rezaća jedinica istrošeni ili oštećeni Da biste spriječili neuravnoteženost morate istrošene ili oštećene rezaće alate kao i pričvrsne svornjake zamijeniti u kompletima 6 Kod uređaja s više noževa obratite pažnju na to da se zbog okretanja jednog noža mogu...

Страница 109: ...a gorivo učinite to na otvorenom pomoću pumpe za isisavanje goriva može se nabaviti u dućanima s gradjevinskim potrepštinama UPOZORENJE Pročitajte sve sigurnosne napomene i upute Propusti kod pridržavanja sigurnosnih napomena i uputa mogu uzrokovati el udar požar i ili teška ozljeđivanja Sačuvajte sve sigurnosne napomene i upute za buduće korištenje T umačenje simbola na uređaju slika 23 1 Pročita...

Страница 110: ...nim i šumskim dobrima Molimo da obratite pažnju na to da naši uređaji nisu konstruirani za korištenje u komercijalne svrhe kao ni u obrtu i industriji Ne preuzimamo jamstvo ako se uređaj koristi u obrtničkim ili industrijskim pogonima i sličnim djelatnostima Pretpostavka za pravilnu uporabu kosilice za travu je pridržavanje priloženih proizvodjačevih uputa za uporabu Upute za uporabu sadrže i uvje...

Страница 111: ...e poz 4 u spojnicu 4 Pričvrstite sajlu pomoću stezaljke kabela poz 13 kao što je prikazano na sl 6 Podešavanje ručke za guranje sl 7 Otvorite oba brza pritezača poz 16 Stavite ručku za guranje u jedan od 3 položaja za uglavljivanje Zatvorite brzi pritezač Montaža košare za sakupljanje trave sl 8 9 Zakvačite košaru za sakupljanje na kosilicu kao što je prikazano na sl 9 6 2 Podešavanje visine rezan...

Страница 112: ...lica dok radi Kad se tijekom košnje poklopac zatvori znači da je sabirna vreća puna i treba je isprazniti Da bi prikaz napunjenosti besprijekorno funkcionirao rupice ispod poklopca moraju uvijek biti čiste i prozirne 7 1 Prije košnje Važne napomene 1 Prikladno se obucite Obucite čvrstu obuću nipošto sandale ili tenisice 2 Provjerite nož Nož koji je savijen ili oštećen na neki drugi način morate za...

Страница 113: ... Prije nego ćete ukloniti travu ili ostala začepljenja iz kosilice ugasite motor i izvadite kabel za paljenje 11 Nikad ne uklanjajte sigurnosne sklopove Nikad ne punite motor koji je još vruć ili radi 7 4 Pražnjenje košare za sakupljanje trave AKo je košara puna protok zraka je manji i pokazatelj napunjenosti košare 6 nalazi se tik uz košaru sl 22a sl 22b Ispraznite košaru i oslobodite kanal za iz...

Страница 114: ...te čistiti mlazom vode ili uređajem za čišćenje pod visokim tlakom Motor treba uvijek ostati suh Ne smiju se koristiti agresivna sredstva za čišćenje kao što su hladna čistila ili benzin za čišćenje Pozor 앬 Kosilica može biti u okomitom položaju samo koliko je potrebno jer u tom položaju postoji povećan rizik od ozljeđivanja 앬 Nikada ne ostavljajte kosilicu bez nadzora 앬 Djecu držite podalje 8 2 O...

Страница 115: ... pritezač na ručki za guranje i zaklopite ručku kao što je prikazano na slici 21 Prilikom zaklapanja pazite da se sajle ne prelome 5 Uredjaj čuvajte na dobro prozračenom mjestu 8 4 Priprema kosilice za transport 1 Ispraznite tank za benzin 2 Pustite da motor radi tako dugo dok se ne potroši ostatak benzina 3 Ispraznite motorno ulje iz toplog motora 4 Redovito čistite uređaj 5 Očistite otvore za hl...

Страница 116: ...emiran rad jako vibriranje uredjaja labavi vijci olabavljen nož neuravnotežen nož provjeriti vijke provjeriti pričvršćenost noža zamijeniti nož Motor ne radi nije pritisnuta poluga kočnice tank za gorivo je prazan pritisnuti polugu kočnice napuniti gorivo Nepravilno rezanje trave nož je tup premala visina rezanja premali broj okretaja motora nabrusiti nož podesiti pravu visinu polugu staviti na ma...

Страница 117: ...s da nam u slučaju jamstva pošaljete uređaj zajedno s priloženim i potpuno ispunjenim jamstvenim listom karticom Pritom je važno da se greška točno opiše Za to odgovorite na sljedeća pitanja n Je li uređaj već jednom radio ispravno ili je otpočetka neispravan n Jeste li uočili nešto prije pojave kvara simptom prije kvara n U čemu je po vašem mišljenju kvar u funkcioniranju uređaja glavni simptom O...

Страница 118: ...ruke 4 Namenska upotreba 5 Tehnički podaci 6 Pre puštanja u rad 7 Rukovanje 8 Čišćenje održavanje skladištenje transport i poručivanje rezervnih delova 9 Bacanje u otpad i reciklovanje 10 Plan traženja grešaka Anleitung_GE_PM_51_S_HF_BS_SPK7__ 09 08 13 09 09 Seite 118 ...

Страница 119: ...menite rezervoar benzina i druge čepove rezervoara 4 Zamenite neispravne prigušivače buke 5 Pre upotrebe morate da vizuelnom kontrolom proverite da li su rezni alati pričvrsni zavrtnji i cela rezna jedinica istrošeni ili oštećeni Da biste sprečili neuravnoteženost morate da istrošene ili oštećene rezne alate kao i pričvrsne zavornje zamenite u kompletu 6 Kod uređaja s više noževa obratite pažnju n...

Страница 120: ...šene ili oštećene delove 7 Ako treba da se isprazni rezervoar za gorivo učinite to na otvorenom pomoću pumpe za usisavanje benzina može da se nabavi u prodavnicama s građevinskim materijalom UPOZORENJE Pročitajte sve bezbednosne napomene i uputstva Propusti kod pridržavanja bezbednosnih napomena i uputstava mogu da prouzroče el udar požar i ili teške povrede Sačuvajte sve bezbednosne napomene i up...

Страница 121: ...li travnjaka ali ne na javnim terenima parkovima sportskim terenima kao niti na poljoprivrednim i šumskim dobrima Molimo da obratite pažnju na to da naši uređaji nisu konstruisani za korišćenje u komercijalne svrhe kao ni u zanatu i industriji Ne preuzimamo garanciju ako se uređaj koristi u zanatskim ili industrijskim pogonima i sličnim delatnostima Pretpostavka za pravilnu upotrebu kosilice za tr...

Страница 122: ...anje poz 2 na donju dršku kao što je prikazano na sl 4 i 5 Montirajte spojnicu poz 23 između gornje drške za guranje i podloške Pažnja Podesite ispravnu prednapetost Vidi tačku 1 3 Okačite sajlu za startovanje poz 4 u spojnicu 4 Pričvrstite sajlu pomoću stezaljke kabla poz 13 kao što je prikazano na sl 6 Podešavanje drške za guranje sl 7 Otvorite oba brza pritezača poz 16 Stavite dršku za guranje ...

Страница 123: ...2 Zakačite adapter za bočno izbacivanje sl 13 poz 21 kao što se vidi na slici 13 Indikator napunjenosti sabirne kese Sabirna kesa ima indikator napunjenosti sl 2 poz 6 On se otvara strujom vazduha koju stvara kosilica dok radi Kad se tokom košnje poklopac zatvori znači da je sabirna kesa puna i treba da se isprazni Da bi indikator napunjenosti besprekorno funkcionirao rupice ispod poklopca moraju ...

Страница 124: ...icu nož i druge delove 6 Ne menjajte podešenost i ne provodite popravke bez da ste prethodno isključili motor Izvucite utikač kabela za svećicu 7 Na ili u blizini ceste obratite pažnju na cestovni saobraćaj Liniju izbacivanja trave držite podalje od ceste 8 Izbegavajte mesta koja točkovi ne mogu da zahvate ili je na njima kosilica nestabilna Pre nego izvršite kretnju kosilicom unazad proverite da ...

Страница 125: ...e kosilica treba temeljito da se očisti Naročito donja strana i zahvatač noža Napomena Pre nego što ćete izvrnuti kosilicu u vertikalni položaj za čišćenje pomoću pumpe za usisavanje potpuno ispraznite rezervoar za gorivo Kosilica ne sme da se izvrne za više od 90 stepeni Vertikalna pozicija za čišćenje sl 17 19 Pažnja Pre nego što kosilicu stavite u vertikalni položaj za čišćenje ugasite motor i ...

Страница 126: ...ogli prouzroče povrede čuvajte na mestu nepristupačnom za decu i druge osobe Pažnja prema zakonu o odgovornosti za proizvod ne dajemo garanciju za štete koje nastanu zbog nestručne popravke ili ako se ne koriste originalni rezervni delovi ili oni koje smo mi odobrili Isto tako ne garantujemo za štete koje nastanu zbog nestručnih popravki Za popravku potražite pomoć servisne službe ili ovlašćenog s...

Страница 127: ... reciklovanje Uredjaj se nalazi u pakovanju koje ga štiti od oštećenja tokom transporta Ovo pakovanje je sirovina i zato može ponovno da se upotrebi ili pošalje na reciklovanje Uredjaj i njegov pribor izradjeni su od različitih materijala kao npr metala i plastike Neispravne sastavne delove otpremite na mesta za zbrinjavanje posebnog otpada Informacije potražite u specijalizovanoj trgovini ili nad...

Страница 128: ... rad jako vibriranje uredjaja labavi zavrtnji Olabavljen nož Neuravnotežen nož Proveriti zavrtnje Proveriti učvršćenost noža Zameniti nož Motor ne radi Nije pritisnuta poluga kočnice Rezervoar za gorivo je prazan Pritisnuti polugu kočnice Sipati gorivo Nepravilno rezanje trave Nož je tup Premala visina rezanja Premali broj obrtaja motora Nabrusiti nož Podesiti pravu visinu Polugu staviti na maks N...

Страница 129: ...as da nam u slučaju garancije pošaljete uređaj zajedno s priloženim i u celosti ispunjenim garantnim listom Pri tom je važno da se tačno opiše greška Za to odgovorite na sledeća pitanja n Da li je uređaj već jednom radio ispravno ili je neispravan od samog početka n Da li ste uočili nešto pre pojave kvara simptom pre kvara n U čemu je po vašem mišljenju kvar u funkcionisanju uređaja glavni simptom...

Страница 130: ...form directivei UE şi normelor pentru articolul z δηλώνει την ακόλουθη συμμόρφωση σύμφωνα με την Οδηγία ΕΚ και τα πρότυπα για το προϊόν B potvrđuje sljedeću usklađenost prema smjernicama EU i normama za artikl f potvrđuje sljedeću usklađenost prema smjernicama EU i normama za artikl 4 potvrđuje sledeću usklađenost prema smernicama EZ i normama za artikal T следующим удостоверяется что следующие пр...

Страница 131: ...form directivei UE şi normelor pentru articolul z δηλώνει την ακόλουθη συμμόρφωση σύμφωνα με την Οδηγία ΕΚ και τα πρότυπα για το προϊόν B potvrđuje sljedeću usklađenost prema smjernicama EU i normama za artikl f potvrđuje sljedeću usklađenost prema smjernicama EU i normama za artikl 4 potvrđuje sledeću usklađenost prema smernicama EZ i normama za artikal T следующим удостоверяется что следующие пр...

Страница 132: ...e della documentazione o dei documenti d accompagnamento dei prodotti è consentita solo con l esplicita autorizzazione da parte della ISC GmbH Nadruk of andere reproductie van documentatie en geleidepapieren van de producten geheel of gedeeltelijk enkel toegestaan mits uitdrukkelijke toestemming van ISC GmbH La reimpresión o cualquier otra reproducción de documentos e información adjunta a product...

Страница 133: ...133 Anleitung_GE_PM_51_S_HF_BS_SPK7__ 09 08 13 09 09 Seite 133 ...

Страница 134: ... external influences e g damage caused by the device being dropped and normal wear resulting from proper operation of the device This applies in particular to rechargeable batteries for which we nevertheless issue a guarantee period of 12 months The guarantee is rendered null and void if any attempt is made to tamper with the device 3 The guarantee is valid for a period of 2 years starting from th...

Страница 135: ... prescriptions de maintenance et de sécurité l infiltration de corps étrangers dans l appareil comme par exemple du sable des pierres ou de la poussière l emploi de la force ou l influence extérieure comme par exemple les dommages dus à une chute ainsi que l usure normale conforme à l utilisation Ceci est particulièrement valable pour les accumulateurs pour lesquels nous offrons toutefois une péri...

Страница 136: ...entiti dalla mancata osservanza delle norme di sicurezza e di manutenzione dalla penetrazione di corpi estranei nell apparecchio come per es sabbia pietre o polvere dall impiego della forza o dall influsso esterno come per es danni dovuti a caduta e dall usura normale e dovuta all impiego Ciò vale particolarmente per batterie per esse concediamo tuttavia 12 mesi di garanzia Il diritti di garanzia ...

Страница 137: ...n veiligheidsbepalingen binnendringen van vreemde voorwerpen in het apparaat zoals b v zand stenen of stof gebruikmaking van geweld of invloeden van buitenaf zoals b v schade door neervallen alsmede door normale slijtage die zich bij het doelmatig gebruik van het apparaat voordoet Dit geldt vooral voor accu s waarop wij 12 maanden garantie geven Er kan geen aanspraak op garantie worden gemaakt als...

Страница 138: ...esorios no homologados no observancia de las disposiciones de mantenimiento y seguridad introducción de cuerpos extraños en el aparato como p ej arena piedras o polvo uso violento o influencias externa como p ej daños por caídas así como por el desgaste habitual por el uso Esto se aplica especialmente en aquellas baterías para las que ofrecemos un plazo de garantía de 12 meses El derecho a garantí...

Страница 139: ...penetração de corpos estranhos no aparelho por exemplo areia pedras ou pó do uso da força ou de impactos externos como por exemplo danos causados pela queda do aparelho bem como do desgaste normal resultante da utilização do aparelho Isto é válido especialmente para os acumuladores aos quais concedemos uma garantia de 12 meses O direito de garantia extingue se no caso de já ter havido uma tentativ...

Страница 140: ...ική επίδραση όπως π χ βλάβες από πτώση καθώς και βλάβες που οφείλονται σε κοινή φθορά Αυτό ισχύει ιδιαίτερα για συσσωρευτές για τους οποίους παρ όλα αυτά παρέχουμε εγγύηση 12 μηνών Η αξίωση εγγύησης εκπίπτει σε περίπτωση που έγιναν ήδη ξένες επεμβάσεις στη συσκευή 3 Η διάρκεια της εγγύησης ανέρχεται σε 2 έτη και αρχίζει από την ημερομηνία αγοράς της συσκευής Οι αξιώσεις εγγύησης πρέπει να κατισχυθ...

Страница 141: ...a za održavanje i sigurnosnih odredbi zbog prodiranja stranih tijela u uređaj npr pijeska kamenja ili prašine nasilne primjene ili vanjskih utjecaja kao npr oštećenja zbog pada kao i zbog uobičajenog trošenja tijekom korištenja To naročito vrijedi za baterije za koje ipak dajemo jamstvo od 12 mjeseci Zahtjev za jamstvo prestaje biti valjan ako su na uređaju već izvršeni neki zahvati 3 Jamstveni ro...

Страница 142: ...vanja uputstava za održavanje i bezbednosnih odredaba zbog prodiranja stranih tela u uređaj npr peska kamenja ili prašine nasilne primene ili spoljnih uticaja kao npr oštećenja zbog pada kao i zbog uobičajenog habanja tokom korišćenja To naročito vredi za baterije za koje ipak dajemo garanciju od 12 meseci Zahtev za garanciju prestaje važiti ako su na uređaju već izvršeni neki zahvati 3 Garantni r...

Страница 143: ...aub Gewaltanwendung oder Fremdeinwirkungen wie z B Schäden durch Herunterfallen sowie durch verwendungsgemäßen üblichen Verschleiß ausgeschlossen Dies gilt insbesondere für Akkus auf die wir dennoch eine Garantiezeit von 12 Monaten gewähren Der Garantieanspruch erlischt wenn an dem Gerät bereits Eingriffe vorgenommen wurden 3 Die Garantiezeit beträgt 2 Jahre und beginnt mit dem Kaufdatum des Gerät...

Страница 144: ...ioniert nicht oder Gerät defekt verzögert hingegen die Bearbeitung erheblich Service Hotline kontaktieren oder bei iSC Webadresse anmelden es wird Ihnen eine Retourennummer zugeteilt l Ihre Anschrift eintragen l Fehlerbeschreibung und Art Nr und I Nr angeben l Garantiefall JA NEIN ankreuzen sowie Kaufbeleg Nr und Datum angeben und eine Kopie des Kaufbeleges beilegen Service Hotline 01805 011 843 w...

Отзывы: