Eiki EFD-46 Скачать руководство пользователя страница 16

16

Controlling the Monitor via LAN

Controlling the Monitor
Using Internet Explorer

(Version 5.0 or later)

Complete connections to external equipment
before starting the operation. (See pages 15-
19 on the owner’s manual of the monitor.)
Complete the AC cord connection. (See page
20 on the owner’s manual of the monitor.)

1

Start Internet Explorer (version 5.0
or later) on the computer.

2

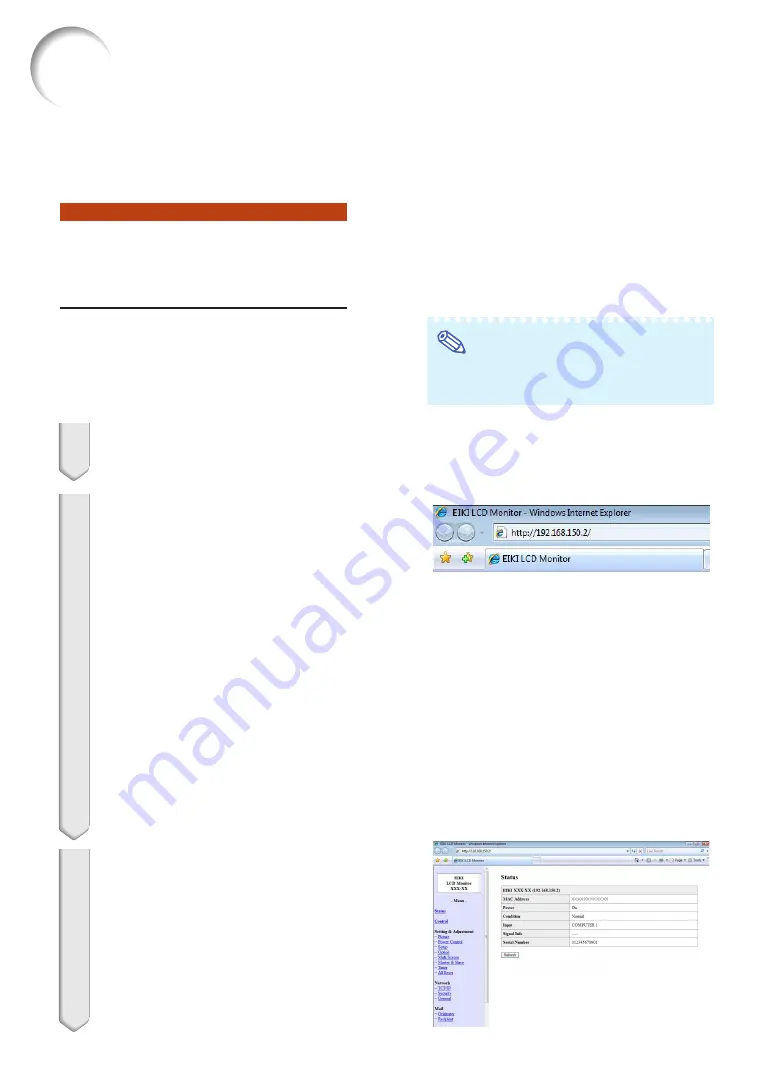
Enter “http://” followed by the
monitor  IP address set by the
procedure on page 

15

 followed

by  “/” in “Address”, and then
press the “Enter” key.

When “DHCP Client” is set to “OFF” on
the monitor, IP address is
192.168.150.2. If you did not change
the IP address in 

“3. Setting up a

Network Connection for the Monitor”

(pages 

14

-

15

), enter “http://

192.168.150.2/”.

When “DHCP Client” is set to “ON” on
the monitor, you can confirm the IP
address that is given by the DHCP
server in the menu operation of the
monitor. For details, refer to the owner’s
manual of the monitor. (See page 

36

.)

3

A screen for controlling the
monitor appears, ready for per-
forming various status condi-
tions, control, and settings.

After connecting the monitor to your network, enter the monitor IP address in “Address” on
Internet Explorer (version 5.0 or later) using a computer on the network to start a setup
screen that will enable control of the monitor via the network.

Note

When connecting the monitor to the LAN
and a hub, use a supplied LAN cable.

Содержание EFD-46

Страница 1: ...ail List V View All Setting 24 Set Items 24 Save Settings and Quit S Save Quit 25 Quit without Saving Settings Q Quit Unchanged 25 IP Address Setting 1 IP Address 26 Subnet Mask Setting 2 Subnet Mask...

Страница 2: ...and and then receiving an OK response code the monitor may take some time to process the command If a second command is sent while the monitor is still processing the first command you may receive an...

Страница 3: ...ERR ERR ERR ERR ERR ERR ERR ERR ERR ERR ERR ERR ERR ERR ERR ERR ERR OK OK or ERR 1 0 Normal 1 Temp High 32 Backlight Ignition Failure 0 99999 Integer EFD52 EFD46 EFD 52 EFD 46 Serial No OK or ERR OK o...

Страница 4: ...or ERR OK or ERR OK or ERR OK or ERR OK or ERR OK or ERR OK or ERR OK or ERR OK or ERR OK or ERR OK or ERR OK or ERR OK or ERR OK or ERR OK or ERR OK or ERR OK or ERR OK or ERR OK or ERR OK or ERR OK...

Страница 5: ...R OK or ERR OK or ERR OK or ERR OK or ERR OK or ERR OK or ERR OK or ERR OK or ERR OK or ERR OK or ERR OK or ERR OK or ERR OK or ERR OK or ERR OK or ERR OK or ERR OK or ERR OK or ERR OK or ERR OK or ER...

Страница 6: ...V V D D D D D D D D D D D D D D D D D D D D D D D D D D D D D D D D M M M M M M A A A A A A A A A A A A A A A A A A A A A A A A A A A A A A A P P P P P O O O B P B C T S R G B C N N N F F B B M M R S...

Страница 7: ...3 0 1 1 1 1 1 2 0 1 0 1 1 1 2 1 2 3 1 0 0 1 2 0 0 0 1 0 1 2 3 4 V V V V V V V V V V V V V V V V V V V V V V V V V V V V V V V I I I I I I I I T T H H H H A A A A A A S S S A A P P P A A A E C C C C C...

Страница 8: ...M M M M M M S S S P P E E E E E E M M E E O M M M M E E E M M M A A B B C C D D A A B B A A A B B B C C C D D D D D A A A B B B E E E E E E E T T T O O S S S S S S B B D D W R R I I Y Y Y C C C S S S...

Страница 9: ...W O O L F A A A A A A A A A A A A A A A A A A A A A A A A A A A T T R T L L L L L L L L L L L L L L L L L L L L L L L S S L L M M E M S S S S S S S P P P P P P P P P P P P P P P P H V H V OK or ERR O...

Страница 10: ...2 13 2 Setting an IP address for the computer Adjust the IP settings of the computer to enable one to one communications with the monitor Page 14 3 Setting up a network connection for the monitor Adju...

Страница 11: ...LAN terminal and connect the other end of the cable to the computer s LAN ter minal 3 Plug the power cord into the AC socket of the monitor 4 Turn on the computer Info Confirm that the LINK LED on th...

Страница 12: ...inistrator s account for the computer 2 Click start and click Control Panel 3 Click View network status and tasks of Network and Internet and click View sta tus in the new window This manual uses exam...

Страница 13: ...IP ad dress Subnet mask and Default gate way as you will be required to reset them later 2 Set temporarily as follows IP address 192 168 150 3 Subnet mask 255 255 255 0 Default gateway Do not input an...

Страница 14: ...et Explorer version 5 0 or later on the computer and enter http 192 168 150 2 in Address and then press the Enter key 2 If a user name and a password have not yet been set just click the OK button If...

Страница 15: ...tting items wait for 10 seconds and then re access Change the IP address of the setting computer back to its original address which you have noted down in Step 6 1 on page 13 and then connect the comp...

Страница 16: ...If you did not change the IP address in 3 Setting up a Network Connection for the Monitor pages 14 15 enter http 192 168 150 2 When DHCP Client is set to ON on the monitor you can confirm the IP addr...

Страница 17: ...to the owner s manual of the monitor Controlling the Monitor via LAN Controlling the Monitor Control On this screen you can perform monitor con trol You can control the following items Power Input Se...

Страница 18: ...gs relat ing to security Note User Name and Password can be up to 8 characters You can input the characters below a z A Z 0 9 _ Description Setting of user name for security protection Setting of pass...

Страница 19: ...25 to 65535 Items Monitor Name Auto Logout Time Data Port Search Port Items SMTP Server Originator E mail Address Originator Name Setting example Remarks Setting an SMTP server address for e mail tran...

Страница 20: ...s below a z A Z 0 9 _ You can input only one time For details about error items refer to the owner s manual of the monitor Description Set addresses to which error notification e mail is sent You can...

Страница 21: ...press the Enter key If a user name has not yet been set just press the Enter key 6 Password is displayed Input the password and press the Enter key If a password has not yet been set just press the En...

Страница 22: ...been set just press the Enter key 6 Input setup and press the Enter key SETUP MENU will be displayed Note If the IP address has been changed be sure to enter the new IP address in step 2 User name an...

Страница 23: ...t work connection Page 28 2 Data Port Factory default setting 10002 Setting the TCP port number used when exchang ing data Page 28 5 Network Ping Test It is possible to confirm that a network connecti...

Страница 24: ...iew All Setting S Save Quit Q Quit Unchanged setup 1 IP Address 192 168 150 2 Please Enter 192 168 150 3 change 192 168 150 3 SETUP MENU 1 IP Address 2 Subnet Mask 3 Default Gateway 4 User Name 5 Pass...

Страница 25: ...up s All Connection will be disconnect Continue y n y Apply New setting Done 1 2 Quit without Saving Set tings Q Quit Unchanged Quit menu without saving setting values 1 1 1 1 1 Enter q and press the...

Страница 26: ...ing default gateway 1 1 1 1 1 Enter 3 and press the Enter key 2 2 2 2 2 Enter numerical value to be set and press the Enter key Display gateway address after change Note If the values for IPAddress Su...

Страница 27: ...2 Enter monitor name Display set monitor name Note Monitor name can be up to 12 characters You can input the characters below A Z 0 9 _ space When a z are input they are converted to A Z automaticall...

Страница 28: ...nter numerical value and press the Enter key Display set numerical value Note If the set value is made 0 the Auto Logout func tion is disabled If an invalid number is entered an error message Paramete...

Страница 29: ...the Enter key 2 2 2 2 2 Enter numerical value and press the Enter key Display set numerical value Note To invalidate the Accept IP Address being cur rently set enter 0 0 0 0 If there is one or more A...

Страница 30: ...r have been returned to the default settings via Telnet the computer cannot be connected to the monitor depending on the computer s network settings Return to Main Menu ADVANCED Q Return to Main Menu...

Страница 31: ...s with an RGB cable in connection The monitor comes with the Multi Screen function You can display one large image using up to 16 4 X 4 monitors Note The availability of Multi Screen modes depending o...

Страница 32: ...lable Monitor 3 Monitor 4 Distributor COMPUTER IN 1 terminal COMPUTER IN 1 terminal COMPUTER IN 1 terminal 5BNC to mini D sub 15 pin cable commercially available S VIDEO cable commercially available I...

Страница 33: ...2 Selects a number of positions where the multi screen is divided 3 3 3 3 3 Displays the currently selected position for the multi screen setup 4 4 4 4 4 Adjust the bezel size of the picture that is...

Страница 34: ...page 33 allows you to create the wide multi screen To create the wide multi screen with three monitors lining up in single file from left to right as shown above select 3 X 1 on Status select a positi...

Страница 35: ...ith one remote control The buttons below can control both the master and the slave at one time ON button AUTO SYNC button STANDBY button RESIZE button DIRECT INPUT buttons AV MODE button COMPUTER1 COM...

Страница 36: ...quipment in the same network be careful about the IP address overlap or other network settings Consult your network administrator for as sistance with the network settings 3 Connect the computer and t...

Страница 37: ...t Master on Master Slave Setting Slave Address display will appear 8 Make the IP address for each moni tor as shown below Slave 1 192 168 150 4 Slave 2 192 168 150 5 Slave 3 192 168 150 6 9 Click the...

Страница 38: ...to 12 for the monitor 3 and 4 14 Select inputs as specified in the table on the right See page 34 on the owner s manual of the monitor Note Set input terminals you will use to ON Set input terminals...

Страница 39: ...onitor is 0 0 0 0 Not Used or the gateway setting for the monitor and the default gateway setting for the computer are the same The subnet masks for the monitor and the computer should be the same The...

Страница 40: ...unching the command prompt enter the command ipconfig and press the Enter key Note Communication may not be established even after carrying out the network settings for the computer In such cases rest...

Страница 41: ...yed Check the network setting again If communication can still not be established properly contact your network administrator 5 To return to the Windows screen enter exit and then press the Enter key...

Отзывы: