T017 ADJUSTABLE INCLINE MANUAL TREADMILL WITH ARM EXERCISERS USER
MANUAL
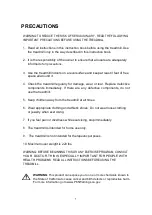
IMPORTANT
!
Read all instructions carefully before using this product. Retain
this manual for future reference. For customer service, contact
[email protected].
Страница 1: ...E INCLINE MANUAL TREADMILL WITH ARM EXERCISERS USER MANUAL IMPORTANT Read all instructions carefully before using this product Retain this manual for future reference For customer service contact serv...
Страница 2: ...any defective components do not use the treadmill 5 Keep children away from the treadmill at all times 6 Wear appropriate clothing and athletic shoes Do not wear loose clothing or jewelry when exercis...
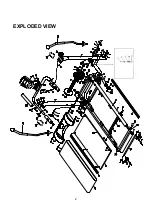
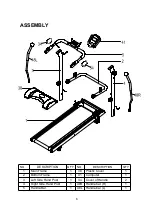
Страница 3: ...2 EXPLODED VIEW...
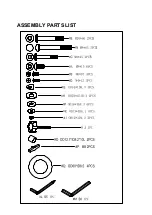
Страница 4: ...Bolt M5 20L 6 15 Nut 2 16 Bolt M3 10L 2 17 Sensor wire connector 1 18 Bolt M8 45L 1 19 Bolt M5 20L 1 20 Bolt M6 1 21 Bolt M8 40L 2 22 Sensor wire connector 1 23 Nut M8 4 24 Sensor 1 25 Hand pulse sens...
Страница 5: ...A Bolt M8 15L 6 B Bolt M6 10L 4 C Bolt M8 45L 4 D Bolt M4 12L 2 E Bolt M10 60L 2 F Washer OD16 ID8 3 6 G Arc washer OD16 ID8 3 4 H Washer OD22 ID10 3 2 I Washer OD12 ID4 2 2 J Knob M8 60L 1 K Washer...
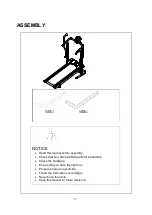
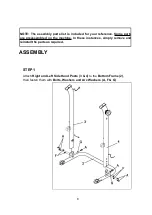
Страница 6: ...mble Follow the instructions accordingly Never force the joints Keep this manual with you NOTICE Read this manual before assembly Check that you have all the parts for assembly Check the hardware Ensu...
Страница 7: ...IPTION Q TY NO DESCRIPTION Q TY 1 Main Frame 1 38 Plastic Cover 1 2 Bottom Frame 1 41 Computer 1 3 Left Side Hand Post 1 34 Cover of Handle 2 4 Right Side Hand Post 1 48R Handle bar R 1 5 Handle Bar 1...
Страница 8: ...7 ASSEMBLY PARTS LIST...
Страница 9: ...3 4 to the Bottom Frame 2 then fasten them with Bolts Washers and Arc Washers A F G NOTE The assembly parts list is included for your reference Some parts are preassembled on the machine In these inst...
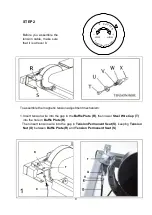
Страница 10: ...ism 1 Insert tension wire into the gap in the Baffle Plate R then lower Steel Wire Cap T into the hole in Baffle Plate R Then insert tension wire into the gap in Tension Permanent Seat S keeping Tensi...
Страница 11: ...sion Nut U clockwise in order to tighten Tension Nut U and Tension Bolt V well 2 Pull Tension Sleeve X downward to bring Baffle Plate R close to Tension Permanent Seat S then insert V into Tension Per...
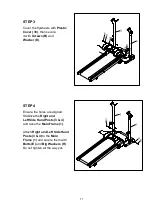
Страница 12: ...crews B and Washer K STEP 4 Ensure the holes are aligned Stabilize the Right and Left Side Hand Posts 3 4 and raise the Main Frame 1 Attach Right and Left Side Hand Posts 3 4 to the Main Frame 1 and s...
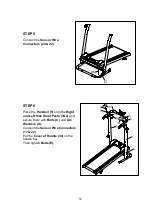
Страница 13: ...ectors 24 22 STEP 6 Place the Handrail 5 onto the Right and Left Side Hand Posts 3 4 and secure them with Bolts C and Arc Washers G Connect the Sensor Wire Connectors 17 22 Put the Cover of Handle 34...
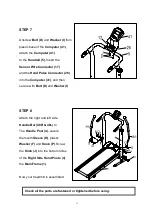
Страница 14: ...r 26 into the Computer 41 and then secure with Bolt D and Washer I STEP 8 Attach the right and left side Handle Bar 48R 48L to The Handle Post 4 secure them with Sleeve O plastic Washer F and Knob P S...
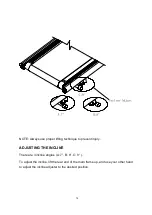
Страница 15: ...ng technique to prevent injury ADJUSTING THE INCLINE There are 3 incline angles A 7 B 8 C 9 To adjust the incline lift the rear end of the main frame up and use your other hand to adjust the incline a...
Страница 16: ...machine will be noisy If the belt is too tight too loose or not centered use the 5mm wrench to adjust it 1 If the belt drifts to the right turn the right screw 1 or 2 turns 2 If the belt drifts to th...
Страница 17: ...below To decrease the tension turn Bolt 13 clockwise To increase the tension turn Bolt 13 counterclockwise After adjusting the Bolt 13 check if the tension wire is too loose If necessary adjust the Bo...
Страница 18: ...oving handlebars as shown in the picture below You can exercise with just the handlebars or use them while walking on the treadmill HOW TO SET UP THE TENSION OF THE HANDLEBARS Use Knob P to adjust the...
Страница 19: ...e surface is dry to the touch lift one edge of the Belt and spray or apply lubricant to the Treadboard Make sure to walk on your treadmill at a slow speed for the first 3 4 minutes of use after applyi...
Страница 20: ...has been properly folded The Knob J must be tightened Start by placing two hands at position 25 to support the treadmill Next please place one foot at position 39 to hold the bottom end of the treadm...
Страница 21: ...arts blinking FUNCTIONS 1 TIME Press the MODE key until pointer is set to TIME The total working time will be shown 2 SPEED Press the MODE key until pointer is set to SPEED The current speed will be s...