background image

41 

Installation and Service Guide: Printer Controller EB-34

Replacing Parts

2

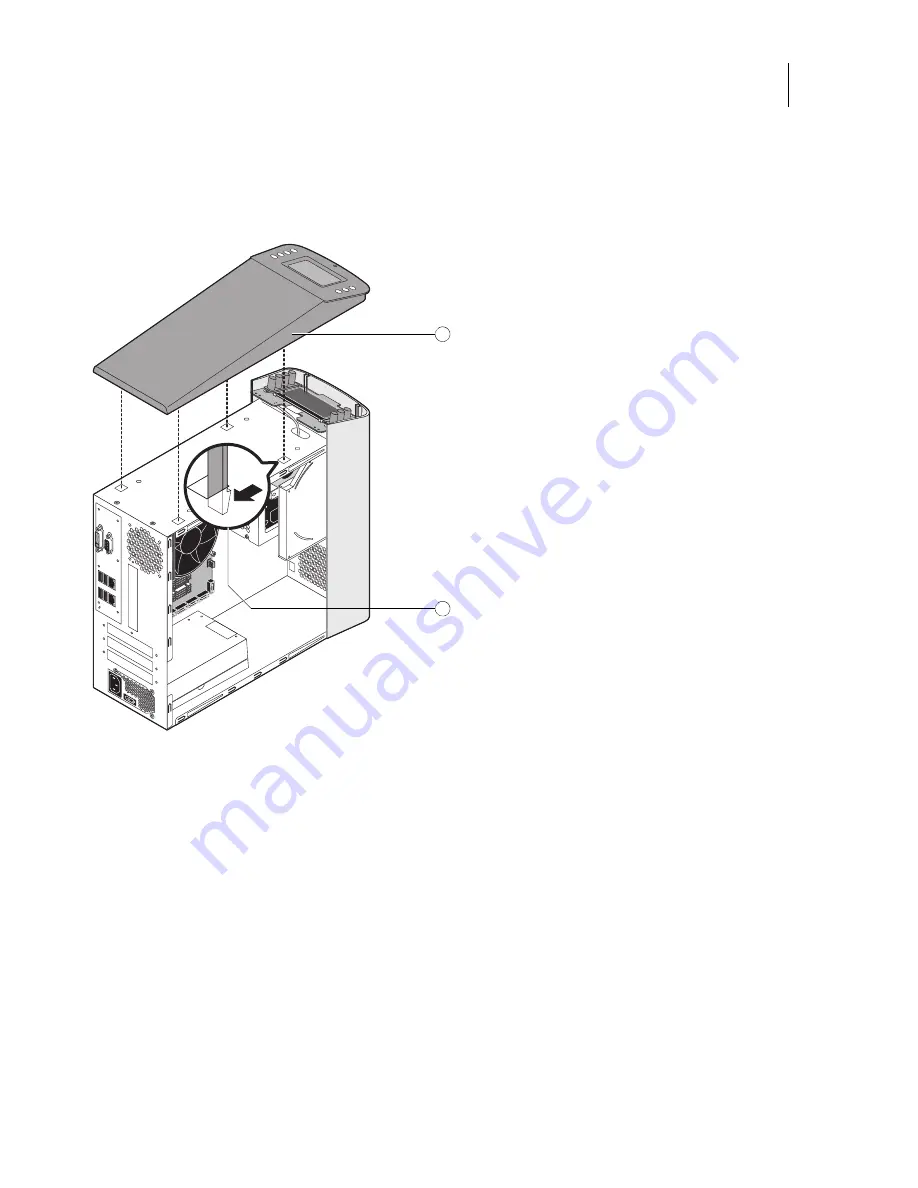
From inside the chassis, bend the four tabs that secure the top panel to the chassis until they disengage the slots in 

the chassis, and then lift the top panel away from the chassis.

It may help to partially loosen the tabs one at a time as you disengage them from the chassis.

Figure 12:

Removing/replacing the top panel

3

To replace the top panel, align the tabs on the underside of the panel with the slots on the top of the chassis.

4

Press the top panel against the chassis and snap it into place.

Snap the tabs into place one at a time until all four tabs have engaged the chassis.

To remove and replace the front panel

Note: 

To remove the front panel, you must first remove the side and top panels.

1

Shut down the EB-34 (see 

page 38

).

1

Top panel

2

Tab and slot (1 of 4)

1

2

Содержание EB-34

Страница 1: ...Controller EB 34 Installation and Service Guide A guide for service technicians Replacement parts and specifications are subject to change For a current parts list contact your authorized service support center ...

Страница 2: ...is subject to change without notice and does not represent a commitment on the part of EFI The documentation is further covered by Legal Notices distributed with this product The documentation may be provided in conjunction with EFI Software Software and any other EFI product described in the documentation The Software is furnished under license and may only be used or copied in accordance with th...

Страница 3: ...n process 13 Checking the customer site 14 Setting customer expectations 15 Unpacking the EB 34 16 Connecting the EB 34 17 Configuring a static IP address for the EB 34 20 Completing installation and starting up 20 Using the EB 34 22 EB 34 control panel 22 Activity light 22 Buttons 23 Functions menu 23 Using the copier touch panel 23 Main tab 24 PrintMe tab 24 Job List tab 24 Tools tab 24 Scan tab...

Страница 4: ... and transferring options 54 Replacing parts on the motherboard 56 DIMM s 56 CPU and CPU cooling assembly 58 Chassis fan 62 Power supply 63 Hard disk drive 66 DVD drive 70 Restoring and verifying functionality after service 72 Performing Backup and Restore 74 Backup recommendations 75 When backing up an existing EB 34 installation 76 Backing up the system configuration 76 Restoring the system conf...

Страница 5: ...Downloads Site 89 Installing and activating Fiery options 91 Activating a server based Fiery option 91 Installing a client based Fiery option 91 Troubleshooting 93 Troubleshooting process 93 Preliminary on site checkout 93 Checking external connections 94 Checking internal components 94 Inspecting the system 96 Normal startup sequence 100 Error messages and conditions 101 Specifications 112 Hardwa...

Страница 6: ...lacing the front panel 42 Figure 14 Copier interface board 43 Figure 15 Diagram of the User Interface Board front and back 45 Figure 16 Removing replacing the User Interface Board 46 Figure 17 Motherboard battery 47 Figure 18 Cable connections for power button 49 Figure 19 Diagram of the EB 34 motherboard 49 Figure 20 Removing the motherboard from the chassis 51 Figure 21 Removing or replacing a D...

Страница 7: ... of Figures Figure 29 Removing replacing the hard disk drive from the hard disk drive bracket 68 Figure 30 Removing replacing the DVD drive bracket 71 Figure 31 Removing replacing the DVD drive 71 Figure 32 Software Download Site example page varies by product 90 ...

Страница 8: ...opier interface board is a custom board and allows the EB 34 to communicate with the copier The CPU controls the transfer of image data to and from the motherboard and runs the PostScript interpreter DIMMs hold image data during printing The interpreter rasterizes the page description file and compresses the image pattern into memory using compression technology The interpreter outputs the compres...

Страница 9: ...d any related service bulletins Precautions Always observe the following general precautions when installing or servicing the EB 34 Only use the power cable that shipped with the EB 34 or an appropriate replacement power cable available from an authorized provider Important Avoid touching magnetic tools to storage media such as hard disk drives Contact between magnetic tools and magnetic storage m...

Страница 10: ...ou come in contact with the liquid crystal immediately wash it off your skin with soap and water Use care when handling parts of the EB 34 as some edges on the unit may be sharp Do not install third party applications onto the EB 34 Third party applications are not supported and can cause system problems Although virus scans are permitted on the EB 34 antivirus software should not be loaded in mem...

Страница 11: ...ving standard precautions you may avoid extra service calls and save the cost of a new board When possible work on a ground connected antistatic mat Wear an antistatic grounding strap grounded at the same place as the antistatic mat If that is not possible do the following Attach a grounding strap to your wrist Attach the other end to a good ground When you unpack the EB 34 from the carton for the...

Страница 12: ...sily accessible Caution There is a danger of explosion if the battery is replaced with an incorrect type Replace a battery only with the same type recommended by the manufacturer Dispose of used batteries according to local regulations Warning This product relies on the building s installation for short circuit overcurrent protection Ensure that a fuse or circuit breaker no larger than 120 VAC 15A...

Страница 13: ...the customer s network be sure to coordinate your installation schedule with the network administrator at the customer site For information about network setup refer the network administrator to Configuration and Setup which is part of the user documentation set Note You can change the default language that is preinstalled at the factory if needed see Changing the factory default language on page ...

Страница 14: ...rt see page 17 Network cable straight through Ethernet cable from the upper Ethernet port see page 19 6 Complete the installation see page 20 Remind site administrator to install current user software on client computers that print to the EB 34 see Printing and Utilities which are part of the user documentation set Checking the customer site Before you install the EB 34 check site conditions and i...

Страница 15: ...ay be unavailable during service The network administrator must be available during the installation for network connectivity Equipment downtime and impact on the network can be minimized if the network administrator installs a network connector for the EB 34 and confirms network functionality with the connector in place before the date scheduled for the EB 34 installation The network administrato...

Страница 16: ...s from the top accessory tray Inspect the contents for visible damage 3 Give the media pack to the customer or network administrator Let the customer or network administrator know that in order to take full advantage of the EB 34 the user software must be installed on computers that will print to the EB 34 4 Remove the top accessory tray and any packing material Set aside the packing material and ...

Страница 17: ...to power 1 Connect one end of the EB 34 power cable to the power connector on the back of the EB 34 see Figure 6 on page 34 2 Connect the other end of the EB 34 power cable to a power outlet To connect to the copier 1 Make sure that the Gigabit Ethernet board is installed in the copier Important For more information about installing the Gigabit Ethernet board and the Fiery key on the copier and ch...

Страница 18: ...pier see Figure 6 on page 34 To verify the cable type align the connectors on each end of the cable as shown in Figure 3 On a straight through cable the wire arrangements are identical on both ends on a crossover cable the wire arrangements are different Caution The copier interface cable included with the EB 34 is a crossover Ethernet cable that connects to the lower crossover Ethernet port on th...

Страница 19: ...network cables are supported 10BaseT Category 3 or higher 100BaseTX Category 5 or higher 4 pair 8 wire short length 1000BaseT Category 5e or higher 4 pair 8 wire short length Note Make sure that the network cable is a straight through Ethernet cable For more information see Figure 3 on page 19 After power on the site administrator should perform network setup verify the network connection verify t...

Страница 20: ...Press OK Type Fiery 1 exactly as shown The password is case sensitive for example fiery 1 will not work 7 On the Setup screen do the following Press WINS If enabled yellow press Use WINS to disable this feature Press Save Press DNS If enabled yellow press Get DNS address automatically to disable this feature Press Save Press IP Address IPv4 Address Manual Configuration 8 On the Manual Configuratio...

Страница 21: ...re choose Fiery Server Regional Settings Check all the settings under Date Time When you make changes on the settings make sure to click Save and reboot the EB 34 Note When you access WebTools a security certificate error occurs A common security certificate that works for all network environments cannot be installed on the EB 34 which results in the certificate error This is expected behavior You...

Страница 22: ...lso displays the current status of the EB 34 Figure 4 EB 34 control panel Activity light The activity light indicates the status of the EB 34 the following ways Flashing amber The EB 34 is starting up and the BIOS has established communication with the User Interface Board UIB Flashing green The EB 34 is continuing startup and the Windows operating system has established communication with the UIB...

Страница 23: ...ent IP address of the EB 34 Restart Server includes options to Restart soft reset or Reboot hard reset the EB 34 Selecting Restart resets the EB 34 server software but does not reboot the entire system Selecting Reboot shuts down all EB 34 activity and reboots the system When you select Restart or Reboot network access to the EB 34 is temporarily interrupted and all currently processing jobs are a...

Страница 24: ...es Tools tab The Tools tab allows you to perform tray alignment Scan tab The Scan tab allows you to scan documents Depending on the copier model Scanning may not be supported and the Scan tab may not appear on the copier touch panel For more information see Utilities Suspend Printing Suspend print activity between the EB 34 and the copier Use this command to interrupt the current EB 34 job so that...

Страница 25: ...ess of the EB 34 Custom Paper Instruction Prints a procedure for creating a custom paper entry Job Log Prints a list of the last 55 jobs E mail Log Prints a list of recent e mail activity FTP Log Prints a list of recent FTP activity Note To print the E mail or FTP Log you must first enable the appropriate service For more information see Configuration and Setup Setup Enters the Setup menu to chang...

Страница 26: ...of the EB 34 The Configuration page also provides version information for the BIOS chip and information about any options installed in the EB 34 Printing the Configuration page can be helpful during installation Setup and service After installing the EB 34 including connecting to the network and before default settings are changed in Run Setup you can obtain a record of the defaults by printing th...

Страница 27: ...owing ways When you access Configure from an Internet browser in WebTools on the Configure tab click the Help icon When you access Configure from Command WorkStation see Command WorkStation Help To access Configure from an Internet browser 1 Open an Internet browser and type the IP address of the EB 34 2 In WebTools on the Configure tab click Launch Configure 3 Log on with Administrator privileges...

Страница 28: ...n the copier touch panel Restart Server on the control panel Resets the EB 34 server software but does not reboot the entire system Network access to the EB 34 is temporarily interrupted and all currently processing jobs are aborted and may be lost If you choose this option you may need to wait 1 minute or more for the server software to reset Restart System on the copier touch panel Reboot System...

Страница 29: ...operate unpredictably Use the reset button only if the system is unresponsive to keyboard or mouse actions To start the EB 34 1 Make sure that the copier is turned on 2 Make sure that the power cable is attached and that the power switch is in the ON position 3 Press the power button 4 Check the Activity light on the control panel The power supply automatically senses the correct voltage Allow sta...

Страница 30: ...tton 3 On the Functions menu select one of the following Restart Server On the next screen select one of the following Restart Server Restarts the EB 34 system software but not the Windows operating system software on the EB 34 Reboot Server Completely restarts the EB 34 both the EB 34 system software and the Windows operating system software on the EB 34 Shut Down System Completely shuts down the...

Страница 31: ... If you shut down the EB 34 do the following Press the orange Operation button on the top of the copier after shutting down the EB 34 Turn off the copier using the main power switch inside the front of the copier To shut down restart or reboot from the Fiery Advanced Controller Interface FACI Note FACI is available as an option with this product but is not a standard feature 1 Make sure that the E...

Страница 32: ...r authorized service representative The terms replace and replacing are used throughout this document to mean the reinstallation of existing components Install new components only when necessary If you determine that a component you have removed is not faulty make sure to reinstall it Replacement parts and specifications are subject to change When ordering replacement parts refer to the current pa...

Страница 33: ... Guide Printer Controller EB 34 Replacing Parts EB 34 diagrams The following figures provide an overview of EB 34 components Figure 5 EB 34 front panel 1 Control panel 4 Reset button 2 DVD drive 5 Power button 3 USB ports 1 2 3 4 ...

Страница 34: ... EB 34 connector panel 1 DVI port unused 6 Copier interface port crossover Ethernet port 2 Monitor VGA port 7 Video interface port not used 3 USB ports x2 8 Power cable 4 Network port straight through Ethernet port 9 Power switch I Power ON O Power OFF 5 USB ports x2 1 2 3 4 5 6 7 8 9 ...

Страница 35: ...placing Parts Figure 7 Internal side view of the EB 34 1 Power supply 5 Chassis fan 2 Copier interface board slot 6 DVD drive 3 DIMM slots 7 Hard disk drive 4 CPU cooling assembly 8 Motherboard Note Cables UIB or front panel USB port are not shown 1 2 3 4 5 6 7 8 ...

Страница 36: ...et 0 Motherboard 18 DVD drive bracket 3 Hard disk drive 11 Power supply 19 DVD drive 4 Side panel 12 Chassis fan 20 DVD drive power data combo cable 5 DIMMs 13 Chassis 21 UIB cable 6 CPU cooling assembly 14 Top panel 22 Front panel USB port and cable 7 CPU 15 UIB 8 Battery 16 UIB buttons Note Tie wraps cable clamps dongle s or external cables not shown 19 5 1 8 12 17 10 13 21 20 3 2 4 9 11 7 18 22...

Страница 37: ...de the EB 34 Cable From To 1 UIB cable User Interface Board Motherboard connector USB A1 2 Hard disk drive data cable Hard disk drive Motherboard connector SATA1 3 DVD data combo cable DVD drive Motherboard connector SATA0 4 Front panel USB port cable Front panel USB port Motherboard connector USB A2 4 4 1 1 3 2 ...

Страница 38: ...hutting down restarting and rebooting on page 28 Cable From To 1 Power supply cable Power supply a 4 pin motherboard connector J24 b 20 pin motherboard connector ATX24P_1 c DVD drive power connector d Hard disk drive power connector 2 Reset cable Reset button Motherboard connector J20 pins 5 green cable and 7 white cable see Figure 18 on page 49 3 Power cable Power button Motherboard connector J20...

Страница 39: ...use the following order Side panel see page 39 Top panel see page 40 Front panel see page 41 Note When replacing panels reverse the order 4 Place the EB 34 on a flat surface Attach an ESD wrist strap before handling internal parts see Precautions on page 9 5 Carefully position the EB 34 so that it is resting on its side and the internal components are facing up Place removed components on a ground...

Страница 40: ...lled 5 To replace the side panel fit the front edge of the panel under the front panel and then slide the side panel in place Replace the screws that you removed earlier Make sure not to damage cables as you replace the panel Fold all cables inside the chassis before closing the panel against the chassis To remove and replace the top panel Note To remove the top panel you must first remove the sid...

Страница 41: ...isengage them from the chassis Figure 12 Removing replacing the top panel 3 To replace the top panel align the tabs on the underside of the panel with the slots on the top of the chassis 4 Press the top panel against the chassis and snap it into place Snap the tabs into place one at a time until all four tabs have engaged the chassis To remove and replace the front panel Note To remove the front p...

Страница 42: ...D drive power and reset buttons and USB port 4 Press the panel against the chassis and snap it into place Snap the tabs into place one at a time until all four tabs have engaged the chassis Removing and replacing EB 34 components Before replacing costly components be sure to verify the connections between the copier and the EB 34 Also verify the connections of each replaceable EB 34 component For ...

Страница 43: ... board To remove the copier interface board 1 Shut down and open the EB 34 see pages 38 To remove the copier interface board you must remove the side panel 2 Remove the two mounting bracket screws that attach the copier interface board to the chassis 3 Remove the copier interface board from the motherboard Grasp the board at the front and back edges and gently pull the board straight out of its mo...

Страница 44: ... Secure the copier interface board to the chassis with the two mounting bracket screws that you removed earlier 3 Reassemble the EB 34 and verify its functionality see page 72 User Interface Board The User Interface Board UIB provides the interface between the EB 34 and the user The front of the UIB contains circuitry for the following Activity lights amber green and red LEDs Display window LCD Fo...

Страница 45: ...down and open the EB 34 see pages 38 To access the User Interface Board you must remove the side top and front panels 2 Detach the UIB cable from the connector on the top of the UIB Detach the UIB cable by grasping the cable connector Avoid pulling on the cable 3 Remove the four screws that secure the UIB to the mount on the top panel A Front B Back 1 Up button pad 4 Display window 7 UIB cable con...

Страница 46: ...ved earlier 8 If you are replacing the UIB cable with a new cable attach the new UIB cable to the connector on the top of the UIB and then route the cable through the hole in the top of chassis and connect it to a USB port on the motherboard 9 Replace the top panel see page 40 10 Reassemble the EB 34 and verify its functionality see page 72 Motherboard This section describes the battery and defaul...

Страница 47: ...ér det brugte batteri tilbage til leverandøren VAROITUS Paristo voi räjähtää los se on virheellisesti asennettu Vaihda paristo ainoastaan laitevalmistajan suosittelemaan tyyppiin Hävitä Käytetty paristo valmistajan ohjeiden mukaisesti ADVARSEL Eksplosjonsfare ved feilaktig skifte av batteri Benytt samme batteritype eller en tilsvarende type anbefalt av apparatfabrikanten Brukte batterier kasseres ...

Страница 48: ...e tab 4 Click Launch Configure type the Administrator password for the EB 34 and then click OK The default Administrator password is Fiery 1 However the network administrator may have configured a new password for the EB 34 5 Expand the Server item in the left pane and click Regional Settings 6 Click the Set button next to Date and Time 7 In the dialog box that appears specify the current date and...

Страница 49: ...s fan connector SYSFAN J23 3 Battery BT1 9 Network connector 10 100 1000BaseT USB connectors x2 15 DVI VGA port 4 Copier interface board PCIE x16 16 For front panel USB port USB A2 5 Power and reset button pins J20 10 CPU and cooling assembly 17 For UIB cable USB A1 6 DIMM DIMM A1 11 24 pin power connector ATX24P_1 18 For hard disk drive data cable SATA1 7 DIMM DIMM A0 12 4 pin power connector J24...

Страница 50: ...e page 43 To remove the motherboard 1 Remove the power supply see page 64 2 Remove the five mounting screws that secure the motherboard to the base of the chassis see Figure 19 on page 49 for the screw locations on the motherboard To minimize tension on the motherboard loosen all the screws partially before removing any one screw completely 3 Remove the two screws from the coverplate on the unused...

Страница 51: ...e the following procedure to install the motherboard in the EB 34 chassis Troubleshooting cautions Before deciding to install a new motherboard consult Troubleshooting on page 93 Also review Motherboard cautions on page 52 Inspect all cables and internal components see page 94 If these inspections do not solve the problem locate symptoms in the troubleshooting table beginning on page 102 and perfo...

Страница 52: ...old motherboard onto the new motherboard BIOS chips are not interchangeable Replacing both in the wrong order without updating the system will cause the system to malfunction For the correct order see Troubleshooting cautions on page 51 Do not reinstall system software at this time Reinstalling system software is not necessary when installing a new motherboard and can result in an error if done be...

Страница 53: ...ntly slide the motherboard into the chassis see Figure 20 on page 51 3 Align the mounting holes on the motherboard with the screw holes located in the base of the chassis see Figure 19 on page 49 for the mounting hole locations 4 Insert the five mounting screws that attach the motherboard to the chassis Partially tighten each screw before completely tightening any one screw Do not overtighten the ...

Страница 54: ...llation and transferring options After you install a new motherboard and reassemble the system do the following Verify all functionality by using the motherboard replacement dongle to enter Service Mode Service Mode is not indicated on the monitor or LCD but is entered once you power on with a new motherboard installed and the motherboard replacement dongle installed on a USB port Service Mode is ...

Страница 55: ...keyboard and mouse that may be currently connected to any other USB port Reconnect other dongles and USB devices only after you verify that the EB 34 starts up successfully in Service Mode 4 Power on the EB 34 and allow it to boot without interruption At this point the EB 34 is in Service Mode so you can verify that the new motherboard solves the problem that you are trying to troubleshoot Service...

Страница 56: ...ntil the FieryBar reaches Idle 4 On the EB 34 control panel select MB Replacement The control panel displays Reading dongle then displays the number of licenses left to apply to the transfer 5 Select Yes to confirm the license transfer The control panel displays Applying to indicate the transfer of options and the backup BIOS from the hard disk drive to the BIOS chip on the replacement motherboard...

Страница 57: ...M position the DIMM in the socket and press the DIMM straight down into the socket so the levers lock the DIMM into place Note DIMMs fit in the socket only one way The notch on the bottom of each DIMM should line up with the notch in the socket Make sure that the levers close securely around the ends of the DIMM and each DIMM is fully seated in its socket 5 Reassemble the EB 34 and verify function...

Страница 58: ...nect the CPU fan cable from the motherboard and remove the cooling assembly from the CPU socket see page 58 The CPU cooling assembly consists of a fan and a heatsink Note Do not remove the CPU fan from the heatsink Figure 22 CPU cooling assembly To remove a CPU 1 Access and open the EB 34 as described on page 39 2 Remove the motherboard components see page 50 1 CPU fan 4 Socket lever 2 Heatsink 5 ...

Страница 59: ...mbly off the CPU socket and set it aside 8 Unlock the CPU socket lever and raise it into the open position flex the lever away from the retention post and then raise it Caution Be aware that both the cooling assembly and the CPU may be very hot You may need to allow the components to cool before you attempt to remove them Important You may need to use moderate force to pull the pegs and pins out o...

Страница 60: ... residue A thermal pad is preinstalled on the underside of the new CPU cooling assembly If you are installing the existing CPU and CPU cooling assembly on a new motherboard clean the contact surfaces of the CPU and cooling assembly as described above Then apply fresh thermal compound to the contact surface of the CPU using the applicator provided with the new motherboard 2 Prepare the CPU socket b...

Страница 61: ...tatic work surface Apply the fresh thermal compound square as described in step 1 on page 60 Align the cooling assembly so that when it is installed the fan cable easily reaches the CPU fan power connector CPUFAN on the motherboard 7 Place the cooling assembly on the CPU Make sure that the thermal pad on the underside of the heatsink is positioned on top of the CPU Align the four screws with the f...

Страница 62: ...inside the chassis blows air out of the EB 34 to cool components The chassis fan runs continuously when the system is on You should hear the chassis fan start as soon as you power on the EB 34 If you do not hear the chassis fan there may be a faulty power connection see Figure 10 on page 38 The following procedures describe how to remove and replace the chassis fan To remove and replace the chassi...

Страница 63: ... out of the vents in the connector panel when the system is reassembled and powered on see Figure 26 5 Verify EB 34 functionality see page 72 Power supply This section describes how to remove and replace the EB 34 power supply For more information on the power supply see Specifications on page 112 You can check power supply functionality using a multimeter at the power cable connectors supplying p...

Страница 64: ... DVD drive and hard disk drive SATA cables UIB cable and front panel USB port cable 3 Remove the power cable from the hard disk drive 4 Disconnect the power supply cable from the DVD drive power and data combination cable 5 Remove the 20 pin motherboard power cable from the motherboard 6 Remove the 4 pin CPU power cable from the motherboard 7 Remove the power supply cables secured by the cable har...

Страница 65: ...e five screws that you removed earlier see Figure 27 on page 65 If you are installing a new power supply make sure to use the screws that came with it to attach the new power supply to the chassis 4 Connect the 4 pin CPU power cable to the motherboard for location see Figure 19 on page 49 5 Connect the 20 pin motherboard power cable to the motherboard for location see Figure 19 on page 49 1 Power ...

Страница 66: ...system software installed It is unlikely that both the hard disk drive and the motherboard are defective Avoid replacing both to solve one problem If troubleshooting strategies such as checking cables and connections see pages 94 and 94 do not solve the problem and you suspect the hard disk drive or the motherboard is at fault use the following order to troubleshoot replace the hard disk drive ins...

Страница 67: ...print to the EB 34 To remove the hard disk drive 1 If you are removing the hard disk drive in order to install a new drive give the network administrator the opportunity to print the Job Log and save any custom simulations If possible print the Configuration page and the Font Lists If desired back up the system configuration see page 80 2 Shut down and open the EB 34 see pages 38 To access the har...

Страница 68: ... replacing the hard disk drive bracket 8 Remove the four screws that attach the hard disk drive to the hard disk drive bracket see Figure 29 on page 68 Figure 29 Removing replacing the hard disk drive from the hard disk drive bracket Caution Avoid striking the motherboard as you remove the hard disk drive bracket 1 Hard disk drive 2 Hard disk drive bracket 1 2 ...

Страница 69: ...disk drive 1 If you are installing a new hard disk drive unpack the drive Do not drop jar or bump the hard disk drive Do not touch the hard disk drive with magnetic objects or place objects sensitive to magnets near the hard disk drive 1 Screw 1 of 4 2 Hard disk drive 3 Hard disk drive bracket Caution Do not unscrew the screws on the hard disk drive cover Loosening these hard disk drive screws bre...

Страница 70: ... panel when you power on the EB 34 check the connections 10 If you installed a new hard disk drive make sure to reset the date and time in Setup For more information see Configure Help 11 Verify functionality see page 72 DVD drive The DVD drive is attached to a bracket mounted to the hard disk drive bracket and the chassis The DVD drive is used to install system software onto the hard disk drive a...

Страница 71: ...drive to the bracket Set aside the screws so that you can replace them later 7 Lift the DVD drive out of the bracket Figure 31 Removing replacing the DVD drive To replace the DVD drive 1 Position the DVD drive inside the bracket and align the mounting holes on the DVD drive with the four holes in the bracket see Figure 30 on page 71 1 Screw 1 of 3 2 DVD drive attached to the bracket 1 DVD drive 2 ...

Страница 72: ... EB 34 and verify functionality 1 Reseat all boards cables connectors and other parts loosened or removed during service When routing cables inside the EB 34 make sure that Cables are securely installed after routing cables Cable routing does not interfere with the operation of internal components nor interfere with removing or replacing components Cables are not tangled nor looped around internal...

Страница 73: ...nterface cables are properly connected see printing problems on page 110 If image quality is poor test the copier See the service documentation that accompanies the copier 8 Connect to the network see page 19 9 Ask the network administrator to download a test job over the network If the job does not print or has poor image quality see printing problems on page 110 and the Troubleshooting sections ...

Страница 74: ...restore using Fiery System Installer and Fiery System Restore Backup method Description of backup image Bootable option Possible destination Restore method Fiery System Restore in WebTools Home Tab Fiery System Restore Create Backup Fiery factory image Factory default image manually backed up Includes factory default version of software and configuration settings Does not include print job informa...

Страница 75: ...staller on DVD Fiery System Installer Backup Hard Disk Drive s Customized image manually backed up Includes contents of C drive except for items excluded by standard Windows back up process such as items in recycle bin Includes software updates and current configuration settings If jobs option is selected also includes print jobs job log and job settings such as paper size Can create a bootable or...

Страница 76: ... and jobs you can recover them from your backup media you have created with Fiery System Installer Use a descriptive and consistent naming convention when saving image files such as date product name product version and short description After creating a backup image file it is recommended that you transfer the image file to an external location such as a network location or external drive Backing...

Страница 77: ...rator may have changed the password 3 Select Device Center General Tools Backup Restore and click Backup Next 4 In the Backup Restore dialog box select the settings you want to back up 5 Enter a file name and location specify if you want to add the date to the file name and then click Backup 6 Click Finish To save the system configuration using Configure 1 Ask the site administrator to print the J...

Страница 78: ... Select the item to restore and click Next You can specify the backup file using the Browse button or you can select a recent backup 4 Select settings to restore and click Next 5 Click Finish To restore the system configuration using Configure 1 Start a web browser and access the EB 34 by entering the server name or IP address of the EB 34 2 From WebTools select Configure tab Launch Configure 3 Lo...

Страница 79: ...kup process on the EB 34 Note The backup process takes more than an hour to complete and it requires the EB 34 to be Idle status If the EB 34 is not in Idle status the backup process does not start 3 Click Save To create a backup 1 In the WebTools Home tab select one of the options below Create Backup USB Select this option when you create a backup on a USB drive flash drive or hard disk drive If ...

Страница 80: ...e a backup image stored on the USB drive be sure to attached the USB drive to one of the USB drive on the EB 34 3 Select one of the following restore options Restore from a local image Restore from a USB storage device Restore from the factory default image 4 If you select a restore from a USB drive make sure to connect the USB drive to the USB connector on the EB 34 5 Click Continue To restore th...

Страница 81: ...oard attached if available Backup with Fiery System Installer You must back up your system and create a backup image to recover from any unexpected system crashes and the hard disk drive failure To create a system backup 1 Start Fiery System Installer Insert the System Software DVD 1 into the DVD drive of the EB 34 Reboot the EB 34 see page 28 When the server finishes the reboot select the languag...

Страница 82: ...he specified backup setting for a subsequent Load Only the specified setting is saved 4 If you select USB Drive or External Hard Disk as a destination in step 3 make sure you attach the appropriate device to the EB 34 5 Click Start backup to begin the backup process If there is a need to stop the backup process press the cancel icon Fiery System Installer displays a message allowing you to restart...

Страница 83: ...sh Import backup history or Search network 4 Select the source of the backup and click OK When a message appears indicating that all the data will be erased click Continue to proceed the restore Using bootable backup media to restore Use the following procedure when you restore the system without using the System Software DVD 1 or when the EB 34 does not boot from the built in hard disk drive You ...

Страница 84: ...e same language that the backup was created in You cannot choose another language 7 Follow the instruction on the screen to complete the restoration Platform Utilities Use Fiery System Installer for advanced procedures such as erasing hard disks or launching Windows Task Manager These utilities are available when you select Platform Utilities Erase data from hard disk drive s If selected the follo...

Страница 85: ...ny customer supplied fonts must be reinstalled by the site administrator see Command WorkStation Help To determine which additional fonts were downloaded to the EB 34 print the Font List before you reinstall the system software and again after you complete the system software installation Any fonts not listed after installation will need to be reinstalled For more information about managing fonts ...

Страница 86: ...tem and user software with Fiery System installer on page 86 After installing or updating the system software on page 87 Verify the EB 34 operation on page 88 Before you leave the customer site on page 88 Before you install or upgrade system and user software 1 Before you proceed do the following Ask the site administrator to Print the Job Log Server Configuration page and Font List if possible If...

Страница 87: ...ing the contents to the hard drive the EB 34 reboots to begin the software installation 9 Wait while the EB 34 complete the installation This will take about 45 minutes The following steps are for use with the Fiery Advanced Controller Interface If you are not using this interface skip to step 12 10 When the EB 34 becomes Idle click the mouse to show the login screen on monitor Enter the Administr...

Страница 88: ...nting problems in Table 4 EB 34 error messages and conditions on page 102 If image quality is poor test the copier see the service documentation that accompanies the copier 2 Verify that the EB 34 is connected to the network see page 27 3 Ask the site administrator to download a test job over the network If the job does not print or has poor image quality look up print problems in Table 4 EB 34 er...

Страница 89: ...nitor that software updates are available for the EB 34 You can also check for system updates by choosing Start arrow button Fiery System Updates and then clicking Check Now Depending on how it is configured System Updates operates manually or automatically For more information about how to schedule System Updates see Configuration and Setup which is part of the user documentation Since you can ob...

Страница 90: ...navailable through System Updates and or are not approved for all users Updates that may already be installed on some EB 34 print servers To help you choose which updates to download compare the list displayed with the EB 34 print server s Configuration Page Updates log Figure 32 Software Download Site example page varies by product 2 For each update that you want to download click the file name u...

Страница 91: ...ery 1 but may have been changed by the site administrator 4 Go to Device Center General General Info and click Manage 5 Use the controls in the activation window to activate the Fiery option You will need the License Activation Code LAC that is provided with the Fiery option kit For help with the activation process click the link in the activation window If the EB 34 has an Internet connection see...

Страница 92: ...computer has an Internet connection see the help topic on activating the Fiery option automatically If the computer has an Internet connection but cannot connect to the licensing server see the help topic on configuring a proxy server If the computer does not have an Internet connection see the help topic on activating the Fiery option manually To install Acrobat and PitStop Edit 1 If needed unins...

Страница 93: ...ent parts and specifications are subject to change Refer to the current parts list maintained by your authorized service support center Install the correct parts as directed by your authorized service support center Preliminary on site checkout Most problems with the EB 34 are caused by loose board or cable connections This section describes the quick checks you can do to locate and fix obvious pr...

Страница 94: ...blems Make sure that All interface cables to the system are plugged into the proper connectors see Figure 6 on page 34 The power cable is plugged into the wall power outlet The LED on the network port is blinking to indicate network activity If all the connectors are properly in place and the power is on proceed to the next stage of troubleshooting Checking internal components To check the interna...

Страница 95: ...D drive power data combination cable to motherboard connector Hard disk drive data cable to motherboard connector Look for obviously loose boards and reseat each board securely in its connector on the motherboard Look for obviously loose cables and reseat each cable connector firmly Make sure that each connector is properly aligned with its mating connector If the pins are offset from each other t...

Страница 96: ...s verify that Power cable is connected properly into the power outlet Chassis fan is operating Network link activity LED on network port is blinking All external cables required are present in correct connectors and well seated Cables cable connectors and mating connectors appear undamaged External connectors chassis fan and power button Checking external connections on page 94 and Checking intern...

Страница 97: ...MM edge connectors are not oxidized DIMM s for EB 34 page 56 Copier interface board is Present Well seated and installed in the correct slot5 Appears undamaged Copier interface board page 43 User Interface Board UIB is Present Correctly attached to its bracket Appears undamaged UIB cable is Present Firmly connected in the correct connector on the motherboard and the back of the UIB Appears undamag...

Страница 98: ...ve data cable is Present Firmly connected to the correct motherboard connector see page 37 Appears undamaged Hard disk drive page 66 The drive required is Present Correctly installed Appears undamaged Jumpered as the master secondary according to label Activity LED lights on power up DVD drive power data combination cable Data segment is firmly connected to the correct motherboard connector see pa...

Страница 99: ...nectors UIB cable Figure 9 on page 37 Hard disk drive data cable Figure 9 on page 37 DVD drive power and data combination cable Figure 9 on page 37 Network cable straight through Ethernet cable Figure 6 on page 34 Copier interface cable crossover Ethernet cable Figure 6 on page 34 Power cable s Figure 10 on page 38 Table 2 Verifying the system Conditions to verify Part and additional page referenc...

Страница 100: ...If included in the system the required mouse monitor and keyboard are present and appear undamaged The mouse and keyboard are connected to the correct ports on the EB 34 connector panel The cables required are Present Installed in the correct connector Well seated Appear undamaged including connectors For the following items see the document that accompanies the optional components if applicable M...

Страница 101: ...a faulty hard disk drive with a new hard disk drive Transferring a hard disk drive from one EB 34 to another is incorrect and strongly discouraged If the problem persists reinstall the original hard disk drive in the system and then replace the motherboard Process Control Panel FACI or Monitor 1 EB 34 is powered on No backlight Black screen 2 Code in the motherboard BIOS tests initializes and conf...

Страница 102: ...pply are not connected to the correct prongs on the connector panel power switch UIB cable is not connected to the motherboard the user interface board or both Faulty power cable Faulty power supply power supply may not be supplying power to the motherboard The CMOS jumper is not in the default position Faulty motherboard motherboard power plane may not be supplying power to components 1 Recheck a...

Страница 103: ... reboot to synchronize with the firmware on the new User Interface Board Wait 5 minutes power off using the power button wait 10 seconds and then press the power button to power on again NOT following installation of a new User Interface Board system stops responding at this screen Possibly one of the following Faulty BIOS Faulty motherboard 1 Recheck all cables and connections 2 Reboot the EB 34 ...

Страница 104: ... media may be damaged Try another DVD or CD 3 If the problem persists replace the motherboard see page 51 Control panel screen and Activity light appear as follows Possibly one of the following Faulty or incorrectly connected hard disk drive data cable Hard disk drive power cable disconnected Faulty hard disk drive Faulty motherboard 1 Recheck all cables and connections Make sure that the hard dis...

Страница 105: ...ts try connecting another UIB cable see Figure 9 on page 37 6 If the problem persists replace the motherboard see page 51 The system takes a long time to start up Possibly one of the following The system may be taking longer to boot up in order to finalize installation of a patch or update The hard disk drive may have fallen to the bottom of the boot order in the BIOS This can happen if the system...

Страница 106: ...power the Control panel is not black but the buttons on the control panel do not function Possibly one of the following Problem with the Fiery application Faulty User Interface Board 1 Recheck all cables and connections 2 Reboot the EB 34 3 If the problem persists reinstall the system software see page 78 4 If the problem persists replace the User Interface Board see page 44 DVD drive DVD drive is...

Страница 107: ...battery was removed from the EB 34 motherboard during service and the time and date were not configured in Setup afterward the EB 34 will hang during system software installation One of the System Software DVDs is corrupted The DVD drive is faulty The hard disk drive is faulty 1 Set the time and date in the BIOS Power off the EB 34 and remove any media from the DVD drive If not already connected c...

Страница 108: ...ty 1 Make sure that the correct cables are connected to the correct ports on the EB 34 connector panel The upper Ethernet port is for the network straight through cable the lower Ethernet port is for the scan cable crossover Ethernet 2 If the green LED on the upper Ethernet network port is not lit check the cable connection of the upper Ethernet network port and the network Make sure that the cabl...

Страница 109: ...ble crossover Ethernet 2 If the green LED on the upper Ethernet network port is not lit check the cable connection of the upper Ethernet network port and the network Make sure that the cable is a straight through cable not a crossover cable see page 94 3 If the network cable is a straight through cable and not a crossover cable and is properly connected to the upper Ethernet network port connect a...

Страница 110: ...ng 10 seconds and then powering the EB 34 back on see page 30 3 If the problem persists replace the copier interface cable see page 37 4 If the problem persists replace the copier interface board see page 43 5 If the problem persists you may need to service the copier EB 34 appears in the list of printers on the customer s workstation but certain jobs do not print A PostScript error Make sure that...

Страница 111: ...age 51 Quality is inconsistent A copier problem Test the copier and if necessary service it see the documentation that accompanies the copier Print quality is poor Possibly one of the following A file or application problem A missing or outdated printer description file 1 Print the EB 34 Test Page 2 If the quality of the EB 34 Test Page is good the error condition may be a file or application prob...

Страница 112: ...ive An Ethernet connector for 10BaseT 100BaseTX 1000BaseT Mbs connectivity over twisted pair cable upper port Built in DVD RW drive Physical specifications Operating environment Temperature 5 C to 40 C Relative Humidity 10 85 non condensing Power supply rating 100 240V 50 60Hz 3A Rated Power Consumption 180W Dimensions height x depth x width 32 0 cm 12 5 in x 35 5 cm 14 0 in x 14 0 cm 5 5 in Weigh...

Страница 113: ...34 Safety and emissions compliance The EB 34 has been certified to meet or surpass the following government standards Safety approvals UL 60950 1 2007 TUV NRTL CAN CSA 22 2 60950 1 07 EN 60950 1 2006 A11 A1 A12 CB scheme IEC 60950 1Amd1 2nd edition CCC EMI EMC approvals VCCI Class A FCC Part 15 Verification NA Class A ICES 003 NA Class A EN55022 2010 EU Class A EN55024 2010 EU EN 60950 1 2006 A11 ...

Страница 114: ...13 chassis fan 38 62 97 check for product updates 89 checklist for service calls 14 20 72 Clear Server command 25 clearing the CMOS 48 clock 107 closing the system 72 CMOS 48 components checking 94 exploded view of 36 configuration backing up 86 restoring 78 saving 77 Configuration page 26 printing 25 Configure 27 saving system configuration 77 Configure tool using to change the server s default l...

Страница 115: ...ting 26 Font list printing 67 fonts printer fonts on server 25 printing font list 25 front panel removing 41 FTP Log 25 27 Functions menu 23 Configuration page 26 Font List 26 Job Log 26 H hard disk drive HDD 66 69 bracket 67 70 capacity 112 caution about replacing 69 101 data cable 67 70 description 66 mounting screws 68 70 proper handling 66 removing 67 replacing 69 heatsink CPU 59 I installatio...

Страница 116: ...erver 87 software install 78 reset and power buttons 23 29 49 reset button 33 Restore Fiery Settings 78 restoring the configuration 78 Resume Printing command 24 Run Diagnostics command 25 S saving the configuration 86 service calls checklist 14 20 72 Service Mode 54 54 56 service procedures overview 32 Setup options recording 85 shutting down 30 side panel removing 39 replacing 39 software system...

Страница 117: ...activity light 44 description 44 display window 44 line selection buttons 44 menu button 44 removing 45 up down buttons 44 user software 15 52 86 113 troubleshooting problems during installation 107 User Software DVD 86 using check for product updates 89 V verifying functionality 72 verifying new motherboard installation 54 voltages checking 20 29 63 ...

Отзывы: