background image


85


Anschlüsse herstellen und Treiber installieren (Windows)


Español

Italiano

Français

Deutsch

English


Überprüfung der Soundausgabe


Als nächstes spielen Sie die Beispieldaten ab, um sicherzustellen, dass die 
Verbindungen, die Treiberinstallation und Einstellungen korrekt sind.


Abspielen der Beispieldaten


In diesem Beispiel wird Standard-Windows-Funktionalität für die 
Wiedergabe der Beispieldaten verwendet. Die Beispieldaten befinden sich 
auf der CD-ROM.


1


Halten Sie die CD-ROM bereit.

Legen Sie die CD-ROM in das CD-ROM-Laufwerk Ihres Computers ein.


2


Öffnen Sie den Ordner 


DemoSong


 der CD-ROM und ziehen Sie die Datei 


Demo01


(.MID) auf Ihren Desktop, um sie zu kopieren.


fig.2-31_80


3


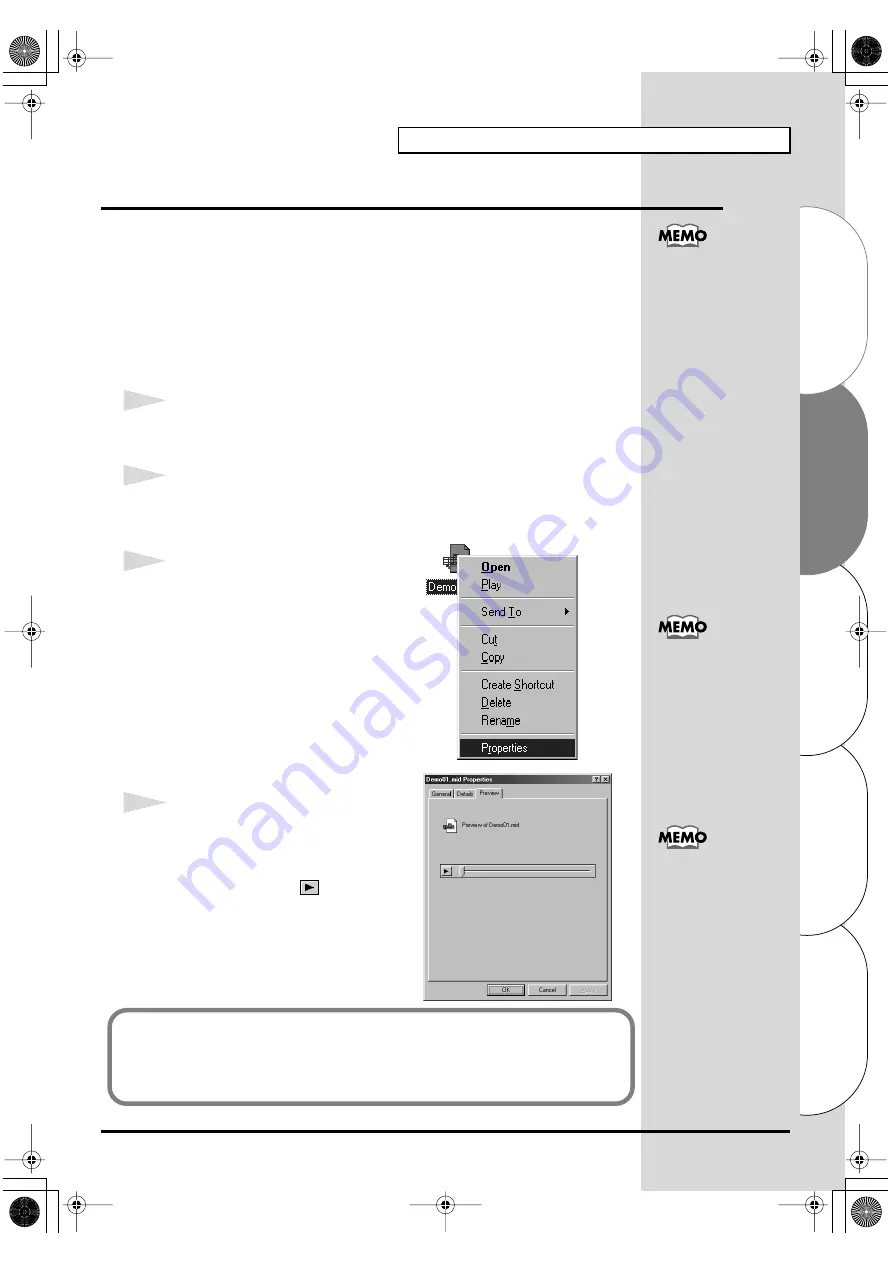
Klicken Sie mit der rechten Maustaste auf 
die kopierte Datei 


Demo01


(.MID) und 

wählen Sie 


Eigenschaften


 (


Wiedergabe


unter Windows XP/2000/Me).


fig.2-32_30


4


Spielen Sie die Beispieldaten ab.

Klicken Sie auf die Registerkarte 


Vorschau


 und klicken Sie 

anschließend auf die  


Schaltfläche.
Die Musikwiedergabe beginnt.

Die Verwendung von 
Songdaten, die mit diesem 
Produkt ausgeliefert 
werden, für andere als 
private Zwecke oder 
persönlichen Gebrauch 
sind ohne Genehmigung 
des Urheberrechtsinhabers 
gesetzlich verboten. 
Darüber hinaus dürfen 
diese Daten nicht kopiert 
oder in einem sekundären 
urheberrechtsgeschützten 
Werk ohne Genehmigung 
des Urheberrechtsinhabers 
verwendet werden.

Die tatsächlich 
angezeigten Optionen 
auf Ihrem PC können 
abhängig von Ihrer PC-
Umgebung und dem 
von Ihnen verwendeten 
Betriebssystem 
unterschiedlich sein. 

Wenn die Wiedergabe 
nicht einwandfrei 
erfolgte, lesen Sie bitte 

Troubleshooting


(S. 232), um den Grund 
festzustellen. Dieser 
Abschnitt enthält 
Informationen dazu, 
wie Probleme wie z.B. 
fehlender Sound oder 
nicht einwandfreie 
Wiedergabe gelöst 
werden können.

Wurden die Beispieldaten wiedergegeben?

Wenn die Beispieldaten einwandfrei wiedergegeben wurden, bedeutet das, 
dass Ihr PC und das SD-20 richtig angeschlossen sind und die Treiber 
vorschriftsmäßig installiert wurden.

SD-20e.book 85 ページ 2005年3月24日 木曜日 午後2時8分

Содержание StudioCanvas SD-20

Страница 1: ... Lilleakerveien 2 Postboks 95 Lilleaker N 0216 Oslo NORWAY TEL 2273 0074 POLAND MX MUSIC SP Z O O UL Gibraltarska 4 PL 03664 Warszawa POLAND TEL 022 679 44 19 PORTUGAL Roland Iberia S L Portugal Office Cais das Pedras 8 9 1 Dto 4050 465 Porto PORTUGAL TEL 22 608 00 60 ROMANIA FBS LINES Piata Libertatii 1 535500 Gheorgheni ROMANIA TEL 266 364 609 RUSSIA MuTek 3 Bogatyrskaya Str 1 k l 107 564 Moscow...

Страница 2: ...te radio frequency energy and if not installed and used in accordance with the instructions may cause harmful interference to radio communications However there is no guarantee that interference will not occur in a particular installation If this equipment does cause harmful interference to radio or television reception which can be determined by turning the equipment off and on the user is encour...

Страница 3: ... in combination with an amplifier and headphones or speakers may be capable of producing sound levels that could cause permanent hearing loss Do not operate for a long period of time at a high volume level or at a level that is uncom fortable If you experience any hearing loss or ringing in the ears you should immediately stop using the unit and consult an audiol ogist 011 Do not allow any objects...

Страница 4: ...on the cord to heat up and eventually melt through 016 Before using the unit in a foreign country consult with your retailer the nearest Roland Service Center or an authorized Roland distributor as listed on the Information page 023 DO NOT play a CD ROM disc on a conven tional audio CD player The resulting sound may be of a level that could cause permanent hearing loss Damage to speakers or other ...

Страница 5: ...intenance 401a For everyday cleaning wipe the unit with a soft dry cloth or one that has been slightly dampened with water To remove stubborn dirt use a cloth impreg nated with a mild non abrasive detergent After wards be sure to wipe the unit thoroughly with a soft dry cloth 402 Never use benzine thinners alcohol or solvents of any kind to avoid the possibility of discoloration and or deformation...

Страница 6: ... drivers Windows 17 USB connection 18 Serial connection 29 Settings and checking 39 Enabling background services 41 Checking for sound output 42 Getting connected and installing drivers Macintosh 43 USB connection 44 Serial connection 51 Deutsch Anschlüsse herstellen und Treiber installieren Windows 58 USB Verbindung 59 Serielle Verbindung 71 Einstellungen und Überprüfung 82 Aktivierung der Hinter...

Страница 7: ...o 170 Collegamenti e installazione dei driver Macintosh 171 Collegamento USB 172 Collegamento seriale 180 Español Conexión e instalación de los controladores Windows 189 Conexión USB 190 Conexión en serie 201 Configuración y comprobación 212 Habilitación de servicios en segundo plano 214 Comprobación de la salida de sonido 215 Conexión e instalación de los controladores Macintosh 216 Conexión USB ...

Страница 8: ...s or simply connect through USB for Mac or PC ADD XG and XGlite are trademarks of YAMAHA Corporation 203 GS is a registered trademark of Roland Corporation 204 Microsoft and Windows are registered trademarks of Microsoft Corporation 206c Windows 98 is known officially as Microsoft Windows 98 operating system 206e Screen shots in this documents are reprinted with permission from Microsoft Corporati...

Страница 9: ...ll also find a PDF file containing detailed information that should prove helpful if you intend to make full use of the SD 20 s advanced functionality Appendix pdf fig 0 6a DO NOT play a CD ROM disc on a conventional audio CD player The resulting sound may be of a level that could cause permanent hearing loss Damage to speakers or other system components may result fig 0 7 USB cable Conversion cab...

Страница 10: ...or This will light in four stages to indicate the output level of the sound module E MODE Indicator This indicates the sound module mode that s been selected using the MODE button F VOLUME Knob This adjusts the volume that is output from the headphone jack and the OUTPUT jacks G Headphone Jack A set of headphones can be connected to this jack Sound will still be output from the OUTPUT jacks even i...

Страница 11: ...omputer sound card or audio device to this jack The sound that is input here will be mixed with the sound of the SD 20 and output from the OUTPUT jacks and the headphone jack K OUTPUT Jacks These jacks output the sound produced by the SD 20 sound generator in combination with the sound that is input through the INPUT jack L OPTICAL OUT Jack This jack outputs the sound of the SD 20 sound generator ...

Страница 12: ...e board or adaptor if you intend to use the MIDI connector fig flow The number of sound generator parts that can be controlled will depend on your software Refer to the owner s manual for the software you are using USB If using a USB connection Mac If using a serial connection to Macintosh PC If using a serial connection to Windows MIDI If connected to an external MIDI device Never connect a USB c...

Страница 13: ... with a built in resistor to connect with the SD 90 Doing so may make the sound extremely weak or inaudible For details on your cable please contact its manufacturer fig connect Powered speaker Stereo set Personal computer Computer cable USB connector To turn off the power To use BUS power Power switch Computer switch MD DIGITAL INPUT USB cable MIDI keyboard etc MIDI OUT LINE OUT AC adaptor MIDI c...

Страница 14: ... consist of three variations which are classified according to their characteristics fig 1 Classical This is the basic sound set that blends well into an ensemble This set is also used when GM2 data compatibility is important Contemporary This sound set emphasizes the realism of each individual instrument It contains numerous sounds that use velocity switching for expressive dynamics Solo This sou...

Страница 15: ...n to the General MIDI functionality this format expands the sound set and also enhances compatibility by providing detailed specifications for functionality such as sound editing and effects reverb and chorus For flexibility in meeting future needs it also provides for the addition of new sounds and expanded functionality Since the GS format is compatible with GM it allows GM scores to be played i...

Страница 16: ...he MIDI messages received at MIDI IN will be passed to the Group A parts For example MIDI messages arriving on channel 5 at MIDI IN will sound part 5 of group A A05 at the default settings When using the MIDI IN connector to play the SD 20 it is not possible to play the Group B parts Polyphony and voices Each of the SD 20 s sounds consist of units called voices There is a limit to the number of vo...

Страница 17: ... the POWER switch ON Which type of connection You can either use the USB cable or use the computer cable to make a serial connection Depending on the type of connection you are using install the appropriate driver and make the appropriate settings USB connection p 18 Serial connection p 29 What is a driver fig 2 0 A driver is software that transfers data between the SD 20 and application software ...

Страница 18: ... System icon fig 2 1 3 Open the Driver Signing Options dialog box Click the Hardware tab and then click Driver Signing The installation procedure will differ depending on your system Please proceed to one of the following sections depending on the system you use Windows XP users p 18 Windows 2000 users p 23 Windows Me 98 users p 27 If you are using Windows XP Professional you must log on using a u...

Страница 19: ...he CD ROM drive of your computer 8 Open the Run dialog box Click the Windows start button From the menu that appears select Run fig 2 3_30 9 In the dialog box that appears input the following into the Open field and click OK D DRIVER USB_XP2K SETUPINF EXE The drive name D may be different for your system Specify the drive name of your CD ROM drive If you changed What action do you want Windows to ...

Страница 20: ...e Found New Hardware wizard will appear Make sure that the screen indicates EDIROL SD 20 select Install from a list or specific location Advanced and click Next fig 2 7 14The screen will indicate Please choose your search and installation options Select Don t search I will choose the driver to install and click Next If a message of The driver is already installed appears you can connect the SD 20 ...

Страница 21: ...Windows to take setting was not set to Ignore a Digital signature not found dialog box will appear fig 2 5 If What action do you want Windows to take is set to Warn 1 Click Continue Anyway 2 Continue the installation If What action do you want Windows to take is set to Block 1 Click OK 2 When the Found New Hardware Wizard appears click Finish 3 Perform the installation as described in the Troubles...

Страница 22: ...p 5 restore the original setting after Windows restarts 1 If you are using Windows XP Professional log on to Windows using the user name of an administrative account e g Administrator 2 Click the Windows start menu and from the menu select Control Panel 3 In Pick a category click Performance and Maintenance 4 In or pick a Control Panel icon click the System icon The System Properties dialog box wi...

Страница 23: ...el In Control Panel double click the System icon fig 2 12 4 Open the Driver Signing Options dialog box Click the Hardware tab and then click Driver Signing fig 2 13_50 5 Make sure that File signature verification is set to Ignore If it is set to Ignore simply click OK If it is not set to Ignore make a note of the current setting Warn or Block Then change the setting to Ignore and click OK 6 Close ...

Страница 24: ...dy to install the driver Do not click OK at this time 12Connect the SD 20 1 Set the computer switch of the SD 20 to USB 2 With the SD 20 s power switch turned off connect it to the AC adaptor 3 Plug the AC adaptor into an AC power outlet 4 Use the USB cable to connect the SD 20 to your computer 13Set the SD 20 s power switch to the ON position In this manual the location of folders and files is gi...

Страница 25: ...e File signature verification setting was not set to Ignore a Digital signature not found dialog box will appear fig 2 16_30 If File signature verification is set to Warn 1 Click Yes 2 Continue the installation If File signature verification is set to Block 1 Click OK 2 When the New hardware detection wizard appears click Finish 3 Perform the installation as described in the Troubleshooting sectio...

Страница 26: ...th administrative privileges such as Administrator 2 In the Windows desktop right click the My Computer icon and from the menu that appears select Properties The System Properties dialog box will appear 3 Click the Hardware tab and then click Driver signature The Driver Signing Options dialog box will appear 4 Return the File signature verification setting to the original setting either Warn or Bl...

Страница 27: ...en the Run dialog box Click the Windows Start button From the menu that appears select Run fig 2 19a_30 5 In the dialog box that appears input the following into the Open field and click OK D DRIVER USB_ME98 SETUPINF EXE The drive name D may be different for your system Specify the drive name of your CD ROM drive fig 2 19_30 6 The SETUPINF dialog box will appear You are now ready to install the dr...

Страница 28: ...rdware Found dialog box will close In the SETUPINF dialog box click OK The SETUPINF dialog box will close Even if you will normally be using the SD 20 with BUS power please use the AC adaptor while you are installing the driver and making settings This unit is equipped with a protection circuit A brief interval a few seconds after power up is required before the unit will operate normally If you a...

Страница 29: ...System Properties dialog box 1 Click the Windows start menu and from the menu select Control Panel 2 In Pick a category click Performance and Maintenance 3 In or pick a Control Panel icon click the System icon The installation procedure will differ depending on your system Please proceed to one of the following sections depending on the system you use Windows XP users p 29 Windows 2000 users p 33 ...

Страница 30: ...the System Properties dialog box Click OK 11Exit all currently running software applications Also close any open windows If you are using virus checking or similar software be sure to exit it as well 12Prepare the CD ROM Insert the CD ROM into the CD ROM drive of your computer 13Open the Run dialog box Click the Windows start button From the menu that appears select Run If you changed What action ...

Страница 31: ...n in terms of the file path using as the delimiter For example SER_XP2K SETUP EXE indicates the SETUP EXE file found in the SER_XP2K folder If in step 9 the What action do you want Windows to take setting was not set to Ignore a Hardware Installation dialog box will appear fig 2 22c_30 If What action do you want Windows to take is set to Warn 1 Click Continue Anyway 2 Continue the installation If ...

Страница 32: ...s to take setting in step 5 restore the original setting after Windows restarts 1 If you are using Windows XP Professional log on to Windows using the user name of an administrative account e g Administrator 2 Click the Windows Start menu and from the menu select Control Panel 3 In Pick a category click Performance and Maintenance 4 In or pick a Control Panel icon click the System icon The System ...

Страница 33: ...power outlet 6 Turn on the power of the SD 20 and your computer and start up Windows 7 Open the System Properties dialog box 1 Click the Windows Start menu and from the menu that appears select Settings Control Panel 2 In Control Panel double click the System icon fig 2 12 8 Open the Driver Signing Options dialog box Click the Hardware tab and then click Driver Signing Log on to Windows using a us...

Страница 34: ...t as well 12Prepare the CD ROM Insert the CD ROM into the CD ROM drive of your computer 13Open the Run dialog box Click the Windows Start button From the menu that appears select Run fig 2 24_40 14In the dialog box that appears input the following into the Open field and click OK D DRIVER SER_XP2K SETUP EXE The drive name D may be different for your system Specify the drive name of your CD ROM dri...

Страница 35: ...at the right of the Sound module field and select SD 20 Do not check Activate CTS RTS Flow Control If in step 9 the File signature verification setting was not set to Ignore a Digital signature not found dialog box will appear fig 2 16b_40 If File signature verification is set to Warn 1 Click Yes 2 Continue the installation If File signature verification is set to Block 1 Click OK 2 When the New h...

Страница 36: ... with administrative privileges such as Administrator 2 In the Windows desktop right click the My Computer icon and from the menu that appears select Properties The System Properties dialog box will appear 3 Click the Hardware tab and then click Driver signing The Driver Signing Options dialog box will appear 4 Return the File signature verification setting to the original setting either Warn or B...

Страница 37: ...ou are using virus checking or similar software be sure to exit it as well 8 Prepare the CD ROM Insert the CD ROM into the CD ROM drive of your computer 9 Open the Run dialog box Click the Windows Start button From the menu that appears select Run fig 2 25_40 10In the dialog box that appears input the following into the Open field and click OK D DRIVER SER_ME98 DISK1 SETUP EXE The drive name D may...

Страница 38: ...Next 14The Installation information dialog box will appear Check the displayed contents and click Next 15The Computer Switch Setting dialog box will appear Make sure that the computer switch on the rear of the SD 20 is set to PC and click Next If it is not set to PC perform this procedure again from step 1 16When driver installation has been completed the Restart Computer dialog box will appear Re...

Страница 39: ...ox Windows XP In Pick a category click Sounds Speech and Audio Devices Next in or pick a Control Panel icon click the sounds and Audio Devices icon 3 Click the Audio tab fig 2 28_30 4 For MIDI music playback click the located at the right of Preferred device or in Windows XP Default device and select the following from the list that appears 5 Click OK to complete the settings For a USB connection ...

Страница 40: ...l double click the Multimedia icon to open the Multimedia Properties dialog box 3 Click the MIDI tab fig 2 29_30 4 Set MIDI output Select Single instrument and choose one of the following from the list that appears 5 Click OK to complete the settings For a USB connection EDIROL SD 20 PART A For a serial connection Roland Serial MIDI Out A Proceed to the following page Checking for sound output p 4...

Страница 41: ...l 2 In Pick a category click Performance and Maintenance 3 In or pick a Control Panel icon click the System icon 4 Click the Advanced tab 5 At the right of the Performance field click Settings The Performance Options dialog box will appear 6 Click the Advanced tab fig 2 30 7 In the Processor Scheduling field select Background services and click OK 8 In the System Properties dialog box click OK The...

Страница 42: ... The music starts playing Use of the song data supplied with this product for any purpose other than private personal enjoyment without the permission of the copyright holder is prohibited by law Additionally this data must not be copied nor used in a secondary copyrighted work without the permission of the copyright holder What you actually see on your computer screen may be different depending o...

Страница 43: ...when you install the driver Which type of connection You can either use the USB cable or use the computer cable to make a serial connection Depending on the type of connection you are using install the appropriate driver and make the appropriate settings USB connection p 44 Serial connection p 51 What is a driver fig 2 0 A driver is software that transfers data between the SD 20 and application so...

Страница 44: ...he power of the SD 20 at this time If the power of the SD 20 is turned on a message like the following will appear when the Macintosh is started up Perform the steps described below as appropriate for the message that is displayed If the screen indicates Driver required for USB device unknown device is not available Search for driver on the Internet click Cancel If the screen indicates Software re...

Страница 45: ...0 USB Installer icon found in the Driver OMS Driver of the CD ROM to start up the installer 4 Verify the installation location and click Install fig 3 2_40 5 If a message like the following is displayed click Continue The other currently running applications will exit and installation will continue 6 A dialog box will indicate Installation completed Click Restart to restart your Macintosh 7 Use th...

Страница 46: ...5_35 3 If a dialog box like the one shown here appears click Turn It Off A confirmation dialog box will then appear so click OK fig 3 6_35 4 The Create New Setup dialog box will appear Click Cancel If you accidentally clicked OK click Cancel in the next screen fig 3 7 5 Choose Open from the File menu From the OMS Settings folder that you copied in step 1 select the SD 20 USB file and click Open fi...

Страница 47: ...y been applied and you may continue to the next step fig 3 11_50 8 Verify that MIDI transmission and reception can be performed correctly From the Studio menu choose Test Studio fig 3 22_50 9 When you move the mouse cursor near the sound generator icon the cursor will change to a shape Click on the sound generator icons that are encircled in the following illustration If sound is heard from the SD...

Страница 48: ... check whether the volume of the SD 20 or your speaker system has been lowered If the OUTPUT level meter does not move check the connections and OMS settings once again After you have made settings correctly choose Test once again from the Studio menu and perform step 9 If the SD 20 does not produce sound refer to No sound p 237 This completes connections for the SD 20 and Macintosh and installati...

Страница 49: ...ROM to start up the installer 4 Verify the installation location and click Install fig 3 2_40 5 If a message like the following is displayed click Continue The other currently running applications will exit and installation will continue 6 A dialog box will indicate Installation completed Click Restart to restart your Macintosh 7 Use the USB cable to connect the SD 20 to your computer 8 Switch ON ...

Страница 50: ...hear sound MIDI messages are being sent from the Macintosh to the SD 20 11Once again choose the MIDI menu command Check Connections to end the test 12From the File menu choose Quit to exit FreeMIDI Setup If the SD 20 does not produce sound refer to No sound p 237 Does the OUTPUT level indicator of the SD 20 move If the OUTPUT level meter in the SD 20 s display is moving but you do not hear sound c...

Страница 51: ... to use it OMS must already be installed on the hard disk from which you started up If you would like to learn more about OMS refer to OMS_2 3_Mac pdf online manual in the OMS2 3 8 folder within the OMS folder of the CD ROM 1 Exit all currently running software applications If you are using a virus checker or similar software be sure to exit this as well 2 Prepare the CD ROM Insert the CD ROM into...

Страница 52: ...cintosh OMS settings 1 From the CD ROM drag the Driver OMS Driver OMS Settings folder to the hard disk of your Macintosh to copy it fig 3 4 2 In the Opcode OMS Application folder where you installed OMS double click OMS Setup to start it up fig 3 5_35 3 If a dialog box like the one shown here appears click Turn It Off A confirmation dialog box will then appear so click OK fig 3 6_35 4 The Create N...

Страница 53: ...reen like the one shown here will appear fig 3 15_90 6 From the Edit menu select OMS MIDI Setup In the OMS MIDI Setup dialog box that appears check Run MIDI in background and click OK fig 3 18 Opening the SD 20 Modem Port file Opening the SD 20 Printer Port file When connecting to a combined modem printer port such as on PowerBooks select the SD 20 Modem Port file Opening the SD 20 Modem Port file...

Страница 54: ...wing illustration If sound is heard from the SD 20 the settings are correct If MIDI is not being transmitted the Macintosh will produce an alert sound Opening the SD 20 Modem Port file Opening the SD 20 Printer Port file A diamond mark indicates the settings are enabled Does the OUTPUT level indicator of the SD 20 move If the OUTPUT level meter in the SD 20 s display is moving but you do not hear ...

Страница 55: ...e Exit If the AppleTalk confirmation dialog box appears click OK to close the dialog box If the SD 20 does not produce sound refer to No sound p 237 This completes connections for the SD 20 and Macintosh and installation of the MIDI driver Now MIDI data can be input and output recorded and played SD 20e book 55 ページ 2005年3月24日 木曜日 午後2時8分 ...

Страница 56: ...he CD ROM to start up the installer 4 Click Install 5 A dialog box will inform you that you will need to restart your Macintosh when installation is finished Click Continue 6 When the installation is complete click Restart FreeMIDI settings 1 From the CD ROM copy the Driver FreeMIDI Driver Settings folder onto the hard disk of your Macintosh 2 Open the FreeMIDI Applications folder from the locatio...

Страница 57: ...0Once again choose the MIDI menu command Check Connections to end the test 11From the File menu choose Quit to exit FreeMIDI Setup Does the OUTPUT level indicator of the SD 20 move If the OUTPUT level meter in the SD 20 s display is moving but you do not hear sound check whether the volume of the SD 20 or your speaker system has been lowered If the OUTPUT level meter does not move check the connec...

Страница 58: ...und den POWER Schalter einschalten Welche Anschlussart Sie können entweder das USB Kabel verwenden oder mit Hilfe des Computerkabels eine serielle Verbindung herstellen Die Installation der Treiber und die Konfiguration der Einstellungen erfolgt entsprechend dem verwendeten Anschlusstyp USB Verbindung S 59 Serielle Verbindung S 71 Was ist ein Treiber fig 2 0 Ein Treiber ist Software die Daten zwis...

Страница 59: ...g und Wartung 3 Klicken Sie in oder wählen Sie ein Symbol der Systemsteuerung auf das Symbol System Die Vorgehensweise bei der Installation hängt von Ihrem System ab Bitte lesen Sie abhängig von dem von Ihnen verwendeten System in einem der folgenden Abschnitte weiter Windows XP Anwender S 59 Windows 2000 Anwender S 65 Windows Me 98 Anwender S 69 Wenn Sie Windows XP Professional verwenden müssen S...

Страница 60: ...orieren und klicken Sie auf OK 5 Schließen Sie das Dialogfeld Systemeigenschaften Klicken Sie auf OK 6 Beenden Sie alle aktuell ausgeführten Programme Anwendungen Schließen Sie außerdem alle noch geöffneten Programmfenster Wenn Sie ein Virenschutzprogramm oder ähnliche Software verwenden müssen Sie diese ebenfalls beenden 7 Halten Sie die CD ROM bereit Legen Sie die CD ROM in das CD ROM Laufwerk I...

Страница 61: ... mit einer elektrischen Steckdose 4 Verwenden Sie das USB Kabel um das SD 20 mit Ihrem Computer zu verbinden 12Bringen Sie den Netzschalter des SD 20 in die Position ON Der Computer zeigt neben der Task Leiste folgende Meldung an Neue Hardware gefunden Bitte warten Sie einen Moment In diesem Dokument wird die Position der Ordner und Dateien als Dateipfade unter Verwendung von als Trennzeichen ange...

Страница 62: ... Erweitert und klicken Sie auf Weiter fig 2 7 14Im Bildschirm wird folgende Meldung angezeigt Bitte wählen Sie Optionen für die Suche und Installation Wählen Sie Nicht suchen Ich werde den Treiber für die Installation auswählen und klicken Sie auf Weiter fig 2 8_20 15Prüfen Sie ob das Feld Modell EDIROL SD 20 anzeigt und klicken Sie auf Weiter Die Installation des Treibers beginnt SD 20e book 62 ペ...

Страница 63: ...Hardware gefunden in der Nähe der Task Leiste angezeigt wird Wenn in Schritt 4 für Welche Aktion soll Windows durchführen Ignorieren nicht aktiviert wurde erscheint ein Dialogfeld mit der Meldung Digitalsignatur nicht gefunden fig 2 5 Wenn für Welche Aktion soll Windows durchführen Warnen aktiviert wurde 1 klicken Sie auf Fortfahren 2 Setzen Sie die Installation fort Wenn für Welche Aktion soll Wi...

Страница 64: ... Schaltfläche Start und wählen Sie im daraufhin angezeigten Menü Systemsteuerung 3 Klicken Sie in Wählen Sie eine Kategorie aus auf Leistung und Wartung 4 Klicken Sie in oder wählen Sie ein Symbol der Systemsteuerung auf das Symbol System Daraufhin werden die Systemeigenschaften angezeigt 5 Klicken Sie auf die Registerkarte Hardware und klicken Sie anschließend auf Treibersignierung Daraufhin werd...

Страница 65: ...s System Symbol fig 2 12 4 Öffnen Sie das Dialogfeld Treibersignaturoptionen Klicken Sie auf die Registerkarte Hardware und klicken Sie anschließend auf Treibersignierung fig 2 13_50 5 Stellen Sie sicher dass für Dateisignaturverifizierung Ignorieren aktiviert ist Wenn Ignorieren bereits aktiviert ist klicken Sie auf OK Wenn Ignorieren nichtaktiviert ist notieren Sie sich die aktuelle Einstellung ...

Страница 66: ...tart Wählen Sie im daraufhin angezeigten Menü die Option Ausführen fig 2 14_40 10Geben Sie im angezeigten Dialogfeld Folgendes in das Feld Öffnen ein und klicken Sie auf OK D DRIVER USB_XP2K SETUPINF EXE Der Name des Laufwerks D kann abhängig von Ihrem System anders lauten Geben Sie statt dessen den Laufwerknamen Ihres CD ROM Laufwerks an fig 2 15_40 11Das Dialogfeld SETUPINF wird angezeigt Jetzt ...

Страница 67: ...ngen vornehmen Dieses Gerät wurde mit einem Schutzschaltkreis ausgestattet Nach dem Einschalten benötigt das Gerät eine kurze Zeitspanne einige Sekunden bis es den normalen Betrieb aufnimmt Wenn in Schritt 5 für Dateisignaturverifizierung Ignorieren nicht aktiviert wurde erscheint die Meldung Digitalsignatur nicht gefunden fig 2 16_30 Wenn für Dateisignaturverifizierung Warnen aktiviert ist 1 klic...

Страница 68: ...che Einstellung nach dem Neustart von Windows wiederherstellen 1 Nachdem Windows neu gestartet ist melden Sie sich als Benutzer mit Administratorrechten an z B als Administrator 2 Klicken Sie auf dem Windows Desktop mit der rechten Maustaste auf das Symbol Arbeitsplatz und wählen Sie im daraufhin angezeigten Menü Eigenschaften Das Dialogfeld Systemeigenschaften wird angezeigt 3 Klicken Sie auf die...

Страница 69: ...das Dialogfeld Ausführen Klicken Sie auf die Windows Schaltfläche Start Wählen Sie im daraufhin angezeigten Menü die Option Ausführen fig 2 19a_30 5 Geben Sie im angezeigten Dialogfeld Folgendes in das Feld Öffnen ein und klicken Sie auf OK D DRIVER USB_ME98 SETUPINF EXE Der Name des Laufwerks D kann abhängig von Ihrem System anders lauten Geben Sie statt dessen den Laufwerknamen Ihres CD ROM Lauf...

Страница 70: ...ardware gefunden geschlossen Klicken Sie im Dialogfeld SETUPINF auf OK Das Dialogfeld SETUPINF wird geschlossen Auch wenn Sie normalerweise das SD 20 mit BUS Spannung betreiben werden verwenden Sie bitte den Wechselstromadapter während Sie den Treiber installieren und Einstellungen vornehmen Dieses Gerät wurde mit einem Schutzschaltkreis ausgestattet Nach dem Einschalten benötigt das Gerät eine ku...

Страница 71: ...in und starten Sie Windows 7 Öffnen Sie das Dialogfeld Systemeigenschaften 1 Klicken Sie auf die Windows Schaltfläche Start und wählen Sie im daraufhin angezeigten Menü Systemsteuerung 2 Klicken Sie in Wählen Sie eine Kategorie aus auf Leistung und Wartung 3 Klicken Sie in oder wählen Sie ein Symbol der Systemsteuerung auf das Symbol System Die Vorgehensweise bei der Installation hängt von Ihrem S...

Страница 72: ...en Sie alle aktuell ausgeführten Programme Anwendungen Schließen Sie außerdem alle noch geöffneten Programmfenster Wenn Sie ein Virenschutzprogramm oder ähnliche Software verwenden müssen Sie diese ebenfalls beenden 12Halten Sie die CD ROM bereit Legen Sie die CD ROM in das CD ROM Laufwerk Ihres Computers ein Abhängig von der Konfiguration Ihres Systems kann es vorkommen dass das Symbol System nic...

Страница 73: ... SER_XP2K SETUP EXE Der Name des Laufwerks D kann abhängig von Ihrem System anders lauten Geben Sie statt dessen den Laufwerknamen Ihres CD ROM Laufwerks an 15Das Dialogfeld Welcome wird angezeigt Klicken Sie auf Next fig 2 22b_30 16Ein Dialogfeld ähnlich dem folgenden wird angezeigt Klicken Sie auf Next In diesem Dokument wird die Position der Ordner und Dateien als Dateipfade unter Verwendung vo...

Страница 74: ... wurde wird das Dialogfeld Computer neu starten angezeigt Starten Sie Ihren Computer neu Wenn in Schritt 9 für Welche Aktion soll Windows durchführen nicht Ignorieren aktiviert wurde erscheint die Meldung Hardware Installation fig 2 22c_30 Wenn für Welche Aktion soll Windows durchführen Warnen aktiviert wurde 1 klicken Sie auf Trotzdem fortsetzen 2 Setzen Sie die Installation fort Wenn für Welche ...

Страница 75: ...ten Menü Systemsteuerung 3 Klicken Sie in Wählen Sie eine Kategorie aus auf Leistung und Wartung 4 Klicken Sie in oder wählen Sie ein Symbol der Systemsteuerung auf das Symbol System Daraufhin werden die Systemeigenschaften angezeigt 5 Klicken Sie auf die Registerkarte Hardware und klicken Sie anschließend auf Treibersignierung Daraufhin werden die Treibersignaturoptionen angezeigt 6 Stellen Sie d...

Страница 76: ...eder ein und starten Sie Windows 7 Öffnen Sie das Dialogfeld Systemeigenschaften 1 Klicken Sie in Windows auf Start und wählen Sie im daraufhin angezeigten Menü Einstellungen Systemsteuerung 2 Doppelklicken Sie in der Systemsteuerung auf das System Symbol fig 2 12 8 Öffnen Sie das Dialogfeld Treibersignaturoptionen Klicken Sie auf die Registerkarte Hardware und klicken Sie anschließend auf Treiber...

Страница 77: ...amm oder ähnliche Software verwenden müssen Sie diese ebenfalls beenden 12Halten Sie die CD ROM bereit Legen Sie die CD ROM in das CD ROM Laufwerk Ihres Computers ein 13Öffnen Sie das Dialogfeld Ausführen Klicken Sie auf die Windows Schaltfläche Start Wählen Sie im daraufhin angezeigten Menü die Option Ausführen fig 2 24_40 14Geben Sie im angezeigten Dialogfeld Folgendes in das Feld Öffnen ein und...

Страница 78: ...ung Digitalsignatur nicht gefunden fig 2 16b_40 Wenn für Dateisignaturverifizierung Warnen aktiviert wurde 1 Klicken Sie auf Ja 2 Setzen Sie die Installation fort Wenn für Dateisignaturverifizierung Sperren aktiviert ist 1 Klicken Sie auf OK 2 Wenn der Assistent Suche nach neuen Hardwarekomponenten erscheint klicken Sie auf Beenden 3 Führen Sie die Installation aus wie im Abschnitt Fehlerbehebung ...

Страница 79: ...rverifizierung in Schritt 5 geändert haben sollten Sie die ursprüngliche Einstellung nach dem Neustart von Windows wiederherstellen 1 Nachdem Windows neu gestartet ist melden Sie sich als Benutzer mit Administratorrechten an z B als Administrator 2 Klicken Sie auf dem Windows Desktop mit der rechten Maustaste auf das Symbol Arbeitsplatz und wählen Sie im daraufhin angezeigten Menü Eigenschaften Da...

Страница 80: ...liche Software verwenden müssen Sie diese ebenfalls beenden 8 Halten Sie die CD ROM bereit Legen Sie die CD ROM in das CD ROM Laufwerk Ihres Computers ein 9 Öffnen Sie das Dialogfeld Ausführen Klicken Sie auf die Windows Schaltfläche Start Wählen Sie im daraufhin angezeigten Menü die Option Ausführen fig 2 25_40 10Geben Sie im angezeigten Dialogfeld Folgendes in das Feld Öffnen ein und klicken Sie...

Страница 81: ...gezeigt Wählen Sie SD 20 und klicken Sie auf Next 14Das Dialogfeld Installation information wird angezeigt Prüfen Sie den angezeigten Inhalt und klicken Sie auf Next 15Das Dialogfeld Computer Switch Setting wird angezeigt Prüfen Sie ob der Computerschalter auf der Rückseite des SD 20 auf PC eingestellt ist und klicken Sie auf Next Wenn der Schalter nicht auf PC steht führen Sie die angegebenen Sch...

Страница 82: ...prache und Audiogeräte Als nächstes klicken Sie in oder wählen Sie ein Symbol in der Systemsteuerung auf das SymbolSounds und Audiogeräte 3 Klicken Sie auf die Registerkarte Audio fig 2 28_30 4 Klicken Sie bei MIDI Musikwiedergabe auf das das sich rechts von Bevorzugtes Gerät befindet oder in Windows XP Standardgerät und wählen Sie folgende Optionen aus der angezeigten Liste aus 5 Klicken Sie auf ...

Страница 83: ...ystemsteuerung auf das Symbol Multimedia um das Dialogfeld Eigenschaften für Multimedia zu öffnen 3 Klicken Sie auf das Register MIDI fig 2 29_30 4 Konfigurieren Sie die MIDI Ausgabe Wählen Sie Einzelnes Instrument und wählen Sie eine der folgenden Optionen aus der angezeigten Liste 5 Klicken Sie auf OK um die Konfiguration abzuschließen Für eine USB Verbindung EDIROL SD 20 PART A Für eine seriell...

Страница 84: ...d Wartung 3 Klicken Sie in oder wählen Sie ein Symbol der Systemsteuerung auf das Symbol System 4 Klicken Sie auf die Registerkarte Erweitert 5 Klicken Sie auf Einstellungen rechts vom Feld Leistung Daraufhin wird das Dialogfeld Systemleistungsoptionen angezeigt 6 Klicken Sie auf die Registerkarte Erweitert fig 2 30 7 Wählen Sie im Feld Prozessorzeitplanung die Option Hintergrunddienste und klicke...

Страница 85: ...schau und klicken Sie anschließend auf die Schaltfläche Die Musikwiedergabe beginnt Die Verwendung von Songdaten die mit diesem Produkt ausgeliefert werden für andere als private Zwecke oder persönlichen Gebrauch sind ohne Genehmigung desUrheberrechtsinhabers gesetzlich verboten Darüber hinaus dürfen diese Daten nicht kopiert oder in einem sekundären urheberrechtsgeschützten Werk ohne Genehmigung ...

Страница 86: ...erwenden wenn Sie den Treiber installieren Welche Anschlussart Sie können entweder das USB Kabel verwenden oder mit Hilfe des Computerkabels eine serielle Verbindung herstellen Die Installation der Treiber und die Konfiguration der Einstellungen erfolgt entsprechend dem Typ Anschluss den Sie verwenden USB Verbindung S 87 Serielle Verbindung S 95 Was ist ein Treiber fig 2 0 Ein Treiber ist Software...

Страница 87: ...acintosh ein Schalten Sie zu diesem Zeitpunkt das SD 20 noch nicht ein Wenn das SD 20 eingeschaltet wird wird eine Nachricht ähnlich der folgenden angezeigt wenn der Macintosh hochgefahren wird Gehen Sie abhängig von der angezeigten Nachricht vor wie nachfolgend beschrieben Wenn die Meldung lautet Driver required for USB device unknown device is not available Search for driver on the Internet Klic...

Страница 88: ... um das Installationsprogramm zu starten 4 Prüfen Sie ob der richtige Installationsordner ausgewählt ist und klicken Sie auf Install fig 3 2_40 5 Falls eine Nachricht wie abgebildet angezeigt wird klicken Sie auf Continue Alle anderen aktuell ausgeführten Anwendungen werden anschließend beendet und die Installation wird fortgesetzt 6 Ein Dialogfeld zeigt Folgendes an Installation completed Klicken...

Страница 89: ...dem abgebildeten Dialogfeld angezeigt wird klicken Sie auf Turn It Off Anschließend wird ein Dialogfeld für die Bestätigung angezeigt Klicken Sie hier auf OK fig 3 6_35 4 Daraufhin wird das Dialogfeld Create New Setup angezeigt Klicken Sie auf Cancel Wenn Sie versehentlich auf OK geklickt haben klicken Sie im nächsten Bildschirm auf Cancel fig 3 7 5 Wählen Sie im Menü File die Option Open Wählen S...

Страница 90: ... Sie können mit dem nächsten Schritt weiterarbeiten fig 3 11_50 8 Prüfen Sie ob die MIDI Übertragung und der MIDI Empfang fehlerfrei funktionieren Wählen Sie im Menü Studio die Option Test Studio fig 3 22_50 9 Wenn Sie den Mauszeiger über das Soundgenerator Symbol bewegen ändert sich der Mauszeiger zu einem Klicken Sie auf die Soundgeneratorsymbole die in der Abbildung mit einem Kreis markiert wur...

Страница 91: ...utstärke des SD 20 oder Ihres Lautsprechersystems zurückgedreht wurde Wenn sich die OUTPUT Pegel Messanzeige nicht bewegt prüfen Sie noch einmal die Anschlüsse und die OMS Einstellungen Nachdem Sie die erforderlichen Einstellungen vorgenommen haben wählen Sie erneut Test aus dem Menü Studio und führen Schritt 9 aus Wenn das SD 20 keinen Sound ausgibt lesen Sie bitte No sound S 237 Damit wurden die...

Страница 92: ... ein 3 Doppelklicken Sie auf das Symbol SD 20 USB Installer das sich im Ordner Driver FreeMIDI USB Connection auf der CD ROM befindet um das Installationsprogramm zu starten 4 Prüfen Sie ob der richtige Installationsordner ausgewählt ist und klicken Sie auf Install fig 3 2_40 5 Falls eine Nachricht wie abgebildet angezeigt wird klicken Sie auf Continue Alle anderen aktuell ausgeführten Anwendungen...

Страница 93: ...e auf Continue 5 Wenn das Dialogfeld FreeMIDI Preferences angezeigt wird klicken Sie auf Cancel 6 Wenn das Dialogfeld About Quick Setup angezeigt wird klicken Sie auf Cancel 7 Wählen Sie im Menü File die Option Open 8 Wählen Sie im Ordner FreeMIDI Settings den Sie in Schritt 1 kopiert haben die Datei SD 20 USB und klicken Sie auf Open 9 Prüfen Sie ob die MIDI Übertragung und der MIDI Empfang fehle...

Страница 94: ...n Sie ob die Lautstärke des SD 20 oder Ihres Lautsprechersystems zurückgedreht wurde Wenn sich die OUTPUT Pegel Messanzeige nicht bewegt prüfen Sie noch einmal die Anschlüsse und die OMS Einstellungen Nachdem Sie die erforderlichen Einstellungen vorgenommen haben wählen Sie erneut Test aus dem Menü Studio und führen Schritt 10 aus Damit wurden die Anschlüsse des SD 20 und des Macintosh sowie die I...

Страница 95: ... mit OMS Damit Sie dieses Modul verwenden können muss OMS auf der Festplatte von der der Computer gestartet wird bereits installiert sein Wenn Sie mehr über OMS erfahren möchten lesen Sie bitte die Datei OMS_2 3_Mac pdf Online Handbuch im Ordner OMS2 3 8 der sich im Ordner OMS der CD ROM befindet 1 Beenden Sie alle aktuell ausgeführten Programme Anwendungen Wenn Sie ein Virenschutzprogramm oder äh...

Страница 96: ... und die Installation wird fortgesetzt 6 Ein Dialogfeld zeigt Folgendes an Installation completed Klicken Sie auf Restart um den Macintosh neu zu starten OMS Einstellungen 1 Ziehen Sie den Ordner Driver OMS Driver OMS Settings auf der CD ROM auf die Festplatte Ihres Macintosh um ihn zu kopieren fig 3 4 2 Doppelklicken Sie im Ordner Opcode OMS Application in dem Sie OMS installiert haben auf OMS Se...

Страница 97: ... Sie im Menü File die Option Open Öffnen Sie den Ordner OMS Settings der in Schritt 1 kopiert wurde wählen Sie die Datei für den Anschluss mit dem das SD 20 verbunden ist und klicken Sie auf Open Ein Dialogfeld ähnlich dem hier gezeigten Dialogfeld wird angezeigt fig 3 15_90 Opening the SD 20 Modem Port file Opening the SD 20 Printer Port file Beim Anschluss an einen kombinierten Modem Druckeransc...

Страница 98: ...tion Make Current nicht auswählen können wurde sie bereits angewendet und Sie können mit dem nächsten Schritt weiterarbeiten fig 3 20_90 fig 3 11_50 8 Prüfen Sie ob die MIDI Übertragung und der MIDI Empfang fehlerfrei funktionieren Wählen Sie im Menü Studio die Option Test Studio Opening the SD 20 Modem Port file Opening the SD 20 Printer Port file Opening the SD 20 Modem Port file Opening the SD ...

Страница 99: ...nden können muss FreeMIDI auf der Festplatte installiert sein von der Sie den Computer gestartet haben 1 Beenden Sie alle aktuell ausgeführten Programme Anwendungen Wenn Sie ein Virenschutzprogramm oder ähnliche Software verwenden müssen Sie diese ebenfalls beenden Bewegt sich die OUTPUT Pegelanzeige des SD 20 Wenn sich die Output Pegel Messanzeige in der Anzeige des SD 20 bewegt aber kein Sound z...

Страница 100: ...ings auf der CD ROM auf die Festplatte Ihres Macintosh um ihn zu kopieren 2 Öffnen Sie den Ordner FreeMIDI Applications an dem Ort an dem Sie FreeMIDI installiert haben und doppelklicken Sie auf das Symbol FreeMIDI Setup um die Installation zu starten 3 Wenn OMS is installed on this computer angezeigt wird klicken Sie auf FreeMIDI 4 Wenn die Software zum ersten Mal ausgeführt wird wird das Dialogf...

Страница 101: ... FreeMIDI Setup zu beenden Bewegt sich die OUTPUT Pegelanzeige des SD 20 Wenn sich die Output Pegel Messanzeige in der Anzeige des SD 20 bewegt aber kein Sound zu hören ist prüfen Sie ob die Lautstärke des SD 20 oder Ihres Lautsprechersystems zurückgedreht wurde Wenn sich die OUTPUT Pegel Messanzeige nicht bewegt prüfen Sie noch einmal die Anschlüsse und die OMS Einstellungen Nachdem Sie die erfor...

Страница 102: ...rupteur POWER sur ON Quel est le type de connexion Vous pouvez utiliser soit un câble USB soit un câble série pour réaliser une connexion série Selon le type de connexion que vous utilisez installez le pilote correspondant et configurez le de manière adaptée Connexion USB p 103 Connexion série p 115 Qu est ce qu un pilote fig 2 0 Un pilote est un logiciel qui sert à transférer les données entre le...

Страница 103: ...ne catégorie cliquez sur Performances et maintenance 3 Dans ou choisissez une icône du Panneau de configuration cliquez sur l icône Système La procédure d installation dépend de votre système d exploitation Veuillez lire la section qui vous concerne Windows XP p 103 Windows 2000 p 109 Windows Me 98 p 113 Si vous utilisez Windows XP Professional vous devez ouvrir une session avec un nom d utilisate...

Страница 104: ... la boîte de dialogue Propriétés Système Cliquez sur OK 6 Quittez tous les logiciels applications actifs Fermez également toutes les fenêtres éventuellement ouvertes Si vous utilisez un anti virus quittez le également 7 Munissez vous du CD ROM Introduisez le dans le lecteur de CD de votre ordinateur 8 Ouvrez la boîte de dialogue Exécuter Cliquez sur le bouton Démarrer de Windows Dans le menu qui s...

Страница 105: ...secteur 4 Utilisez le câble USB pour relier le SD 20 à votre ordinateur 12Placez l interrupteur d alimentation du SD 20 sur la position ON Près de la barre des tâches votre ordinateur indique Nouveau matériel détecté Veuillez patienter Dans ce document l emplacement des dossiers et des fichiers est donné en termes de chemin avec comme délimiteur Par exemple USB_XP2K SETUPINF EXE signifie le fichie...

Страница 106: ...ste ou d un emplacement spécifique Avancé puis cliquez sur Suivant fig 2 7 14L écran indiquera Veuillez choisir vos options de recherche et d installation Sélectionnez Ne pas rechercher Je vais choisir le pilote à installer puis cliquez sur Suivant fig 2 8_20 15Vérifiez que le champ Modèle indique EDIROL SD 20 puis cliquez sur Suivant L installation du pilote commence SD 20e book 106 ページ 2005年3月24...

Страница 107: ...quez sur Terminer Attendez que Nouveau matériel détecté s affiche près de la barre des tâches Si à l étape 4 l option Que voulez vous faire était définie sur Ignorer la boîte de dialogue Signature numérique introuvable s affiche fig 2 5 Si Que voulez vous faire est définie sur Avertir 1 Cliquez sur Continuer 2 Poursuivez l installation Si Que voulez vous faire est définie sur Bloquer 1 Cliquez sur...

Страница 108: ... menu Démarrer de Windows puis dans le menu qui s affiche choisissez Panneau de configuration 3 Dans Choisissez une catégorie cliquez sur Performances et maintenance 4 Dans ou choisissez une icône du Panneau de configuration cliquez sur l icône Système La boîte de dialogue Propriétés système s affiche 5 Cliquez sur l onglet Matériel puis cliquez sur Signature du pilote La boîte de dialogue Options...

Страница 109: ... Panneau de configuration cliquez deux fois sur l icône Système fig 2 12 4 Ouvrez la boîte de dialogue Options de signature des pilotes Cliquez sur l onglet Matériel puis cliquez sur Signature du pilote fig 2 13_50 5 Assurez vous que l option Vérification des signatures de fichiers est définie sur Ignorer Si c est le cas Ignorer cliquez sur OK Si elle n est pas définie sur Ignorer notez le paramèt...

Страница 110: ...rdinateur Tapez la lettre affectée au lecteur de CD de votre ordinateur par exemple E ou F fig 2 15_40 11La boîte de dialogue SETUPINF s affiche Vous êtes maintenant prêt à installer le pilote Ne cliquez pas sur OK maintenant 12Branchez le SD 20 1 Placez l interrupteur informatique du SD 20 sur USB 2 Le SD 20 étant éteint hors tension branchez le à l adaptateur secteur 3 Branchez l adaptateur sect...

Страница 111: ...Vérification de la signature des pilotes n a pas été définie sur Ignorer une boîte de dialogue Signature numérique introuvable s affiche fig 2 16_30 Si Vérification des signatures des fichiers est défini sur Avertir 1 Cliquez sur Oui 2 Poursuivez l installation Si Vérification des signatures des fichiers est défini sur Bloquer 1 Cliquez sur OK 2 Lorsque l écran Assistant ajout de nouveau matériel ...

Страница 112: ...arré ouvrez une session Windows avec des privilèges d administration par exemple en ouvrant une session Administrateur 2 Sur le bureau Windows cliquez avec le bouton droit de la souris sur l icône Poste de travail puis dans le menu qui s affiche sélectionnez Propriétés La boîte de dialogue Propriétés Système s affiche 3 Cliquez sur l onglet Profils matériels puis cliquez sur Signature des pilotes ...

Страница 113: ...émarrer de Windows Dans le menu qui s affiche sélectionnez Exécuter fig 2 19a_30 5 Dans la boîte de dialogue qui s affiche tapez ce qui suit dans le champ Ouvrir puis cliquez sur OK D DRIVER USB_ME98 SETUPINF EXE La lettre du lecteur D n est pas forcément celle de votre ordinateur Tapez la lettre affectée au lecteur de CD de votre ordinateur par exemple E ou F fig 2 19_30 6 La boîte de dialogue SE...

Страница 114: ...e Nouveau matériel détecté se ferme Dans la boîte de dialogue SETUPINF cliquez sur OK La boîte de dialogue SETUPINF se ferme Même si vous utiliserez ensuite le SD 20 avec l alimentation BUS utilisez l alimentation secteur pour l installation du pilote et sa configuration Cet appareil est équipé d un circuit de protection Après la mise sous tension attendez quelques secondes avant d utiliser l appa...

Страница 115: ...uis dans le menu qui s affiche choisissez Panneau de configuration 2 Dans Choisissez une catégorie cliquez sur Performances et maintenance 3 Dans ou choisissez une icône du Panneau de configuration cliquez sur l icône Système La procédure d installation dépend de votre système d exploitation Veuillez lire la section qui vous concerne Windows XP p 115 Windows 2000 p 119 Windows Me 98 p 123 Si vous ...

Страница 116: ...la boîte de dialogue Propriétés Système Cliquez sur OK 11Quittez tous les logiciels applications actifs Fermez également toutes les fenêtres éventuellement ouvertes Si vous utilisez un anti virus quittez le également 12Munissez vous du CD ROM Introduisez le dans le lecteur de CD de votre ordinateur 13Ouvrez la boîte de dialogue Exécuter Cliquez sur le bouton Démarrer de Windows Dans le menu qui s ...

Страница 117: ... emplacement des dossiers et des fichiers est donné en termes de chemin avec comme délimiteur Par exemple SER_XP2K SETUP EXE signifie le fichier SETUP EXE se trouvant dans le dossier SER_XP2K Si à l étape 9 l option Que voulez vous faire était définie sur Ignorer la boîte de dialogue Installation du matériel s affiche fig 2 22c_30 Si Que voulez vous faire est définie sur Avertir 1 Cliquez sur Cont...

Страница 118: ... paramètre d origine après le redémarrage de Windows 1 Si vous utilisez Windows XP Professional vous devez ouvrir une session avec un nom d utilisateur disposant des droits d administrateur 2 Cliquez sur le menu Démarrer de Windows puis dans le menu qui s affiche choisissez Panneau de configuration 3 Dans Choisissez une catégorie cliquez sur Performances et maintenance 4 Dans ou choisissez une icô...

Страница 119: ...ogue Propriétés Système 1 Cliquez sur le menu Démarrer de Windows puis dans le menu qui s affiche choisissez Paramètres Panneau de configuration 2 Dans Panneau de configuration cliquez deux fois sur l icône Système fig 2 12 8 Ouvrez la boîte de dialogue Options de signature du pilote Cliquez sur l onglet Matériel puis cliquez sur Signature du pilote Ouvrez une session Windows avec un nom d utilisa...

Страница 120: ...Munissez vous du CD ROM Introduisez le dans le lecteur de CD de votre ordinateur 13Ouvrez la boîte de dialogue Exécuter Cliquez sur le bouton Démarrer de Windows Dans le menu qui s affiche sélectionnez Exécuter fig 2 24_40 14Dans la boîte de dialogue qui s affiche tapez ce qui suit dans le champ Ouvrir puis cliquez sur OK D DRIVER SER_XP2K SETUP EXE La lettre du lecteur D n est pas forcément celle...

Страница 121: ...une boîte de dialogue Signature numérique introuvable s affiche fig 2 16b_40 Si Vérification des signatures des fichiers est définie sur Avertir 1 Cliquez sur Oui 2 Poursuivez l installation Si Vérification des signatures des fichiers est définie sur Bloquer 1 Cliquez sur OK 2 Lorsque l écran Assistant ajout de nouveau matériel s affiche cliquez sur Terminer 3 Procédez à l installation comme décri...

Страница 122: ...ification des signatures des fichiers à l étape 5 restaurez le paramètre original après le redémarrage de Windows 1 Une fois Windows redémarré ouvrez une session Windows avec des privilèges d administration par exemple en ouvrant une session Administrateur 2 Sur le bureau Windows cliquez avec le bouton droit de la souris sur l icône Poste de travail puis dans le menu qui s affiche sélectionnez Pro...

Страница 123: ...OM Introduisez le dans le lecteur de CD de votre ordinateur 9 Ouvrez la boîte de dialogue Exécuter Cliquez sur le bouton Démarrer de Windows Dans le menu qui s affiche sélectionnez Exécuter fig 2 25_40 10Dans la boîte de dialogue qui s affiche tapez ce qui suit dans le champ Ouvrir puis cliquez sur OK D DRIVER SER_ME98 DISK1 SETUP EXE La lettre du lecteur D n est pas forcément celle de votre ordin...

Страница 124: ...nstallation information s affiche Vérifiez le contenu et cliquez sur Suivant 15La boîte de dialogue Computer Switch Setting s affiche Vérifiez que l interrupteur informatique à l arrière du SD 20 est placé sur PC puis cliquez sur Suivant S il n est pas placé sur PC recommencez la procédure à partir de l étape 1 16Une fois l installation du pilote terminée la boîte de dialogue Restart your computer...

Страница 125: ...tés Sons et multimédia Windows XP Dans Choisissez une catégorie cliquez sur Son voix et périphériques audio Dans ou choisissez une icône du Panneau de configuration cliquez sur l icône Sons et périphériques audio 3 Cliquez sur l onglet Audio fig 2 28_30 4 Pour Lecture MIDI cliquez sur le situé à droite de Périphérique par défaut avec Windows XP Périphérique par défaut puis sélectionnez ce qui suit...

Страница 126: ...u de configuration cliquez deux fois sur l icône Multimédia pour ouvrir la boîte de dialogue Propriétés de multimédia 3 Cliquez sur l onglet MIDI fig 2 29_30 4 Spécifiez la Sortie MIDI Sélectionnez Instrument unique puis choisissez en dans la liste qui s affiche 5 Cliquez sur OK pour confirmer Pour une connexion USB EDIROL SD 20 PART A Pour une connexion série Roland Serial MIDI Out A Passez à la ...

Страница 127: ...liquez sur Performances et maintenance 3 Dans ou choisissez une icône du Panneau de configuration cliquez sur l icône Système 4 Cliquez sur l onglet Avancé 5 A droite du champ Performances cliquez sur Paramètres La boîte de dialogue Options des performances s affiche 6 Cliquez sur l onglet Avancé fig 2 30 7 Dans le champ Planification du processeur sélectionnez Ressources système puis cliquez sur ...

Страница 128: ...es Cliquez sur l onglet Aperçu puis cliquez sur le bouton La musique démarre L utilisation des données musicales fournies avec ce produit à des fins autres que personnelles et privées sans l autorisation du propriétaire des droits d auteur est interdite De plus ces données ne doivent ni être copiées ni être utilisées pour un produit dérivé protégé par copyright sans l autorisation du propriétaire ...

Страница 129: ...hez l adaptateur secteur pour installer le pilote Quel est le type de connexion Vous pouvez utiliser soit un câble USB soit un câble série pour réaliser la connexion Selon le type de connexion que vous utilisez installez le pilote correspondant et configurez le de manière adaptée Connexion USB p 130 Connexion série p 138 Qu est ce qu un pilote fig 2 0 Un pilote est un logiciel qui sert à transfére...

Страница 130: ... message similaire à celui présenté ici s affiche à la mise sous tension du Macintosh Suivez une des procédures décrites ci après selon le message qui s affiche Si l écran affiche Driver required for USB device unknown device is not available Search for driver on the Internet Cliquez sur Annuler Si l écran affiche Software required for using device unknown device cannot be found Please refer to th...

Страница 131: ...OMS Driver du CD ROM pour lancer l installeur 4 Vérifiez l emplacement de l installation et cliquez sur Install fig 3 2_40 5 Si un message du type suivant s affiche cliquez sur Continuer Les autres applications actives se ferment et l installation continue 6 Une boîte de dialogue s affiche Installation completed Cliquez sur Redémarrer pour redémarrer le Macintosh 7 Utilisez le câble USB pour relie...

Страница 132: ...ogue similaire à celle présentée ici s affiche cliquez sur Turn It Off Une boîte de confirmation s affiche cliquez sur OK fig 3 6_35 4 La boîte de dialogue Create New Setup s affiche Cliquez sur Annuler Si vous avez cliqué sur OK par erreur cliquez sur Annuler dans la boîte suivante fig 3 7 5 Choisissez Open dans le menu File Dans le dossier OMS Settings que vous avez copié à l étape 1 sélectionne...

Страница 133: ...a signifie qu il est déjà activé et que vous pouvez passer à l étape suivante fig 3 11_50 8 Vérifiez que l envoi et la réception MIDI fonctionnent correctement Dans le menu Studio sélectionnez Make Current Rendre actif fig 3 22_50 9 Lorsque vous déplacez le curseur de la souris sur l icône du générateur de sons il se transforme en Cliquez sur les icônes du générateur de sons entourées d un cercle ...

Страница 134: ...réglé sur le SD 20 ou sur votre système audio Si le vumètre OUTPUT n est pas actif vérifiez à nouveau les connexions et les paramètres OMS Après avoir réglé les paramètres choisissez à nouveau Test dans le menu Studio puis exécutez l étape 9 Si le SD 20 ne produit aucun son reportez vous à la section No sound p 237 Les procédures de connexion du SD 20 au Macintosh et d installation du pilote MIDI ...

Страница 135: ... le CD ROM dans le lecteur de CD ROM 3 Cliquez deux fois sur l icône SD 20 USB Installer dans le dossier Driver FreeMIDI USB Connection du CD ROM pour lancer l installeur 4 Vérifiez l emplacement de l installation et cliquez sur Install fig 3 2_40 5 Si un message du type suivant s affiche cliquez sur Continuer Les autres applications actives se ferment et l installation continue 6 Une boîte de dia...

Страница 136: ...ferences s affiche cliquez sur Annuler 6 Quand la boîte de dialogue About Quick Setup s affiche cliquez sur Annuler 7 Dans le menu File sélectionnez Open 8 Sélectionnez SD 20 USB dans le dossier FreeMIDI Settings que vous avez copié à l étape 1 puis cliquez sur Open 9 Vérifiez que l envoi et la réception MIDI fonctionnent correctement Dans le menu MIDI sélectionnez Check Connections fig 3 13_40 10...

Страница 137: ...s que vous n entendez rien vérifiez que le volume est bien réglé sur le SD 20 ou sur votre système audio Si le vumètre OUTPUT n est pas actif vérifiez à nouveau les connexions et les paramètres OMS Après avoir réglé les paramètres choisissez à nouveau Test dans le menu Studio puis exécutez l étape 10 Les procédures de connexion du SD 20 au Macintosh et d installation du pilote MIDI sont terminées ...

Страница 138: ... 2 Placez l interrupteur informatique du SD 20 sur Mac 3 Utilisez un câble informatique série pour relier le port modem ou le port d imprimante de votre Macintosh au SD 20 4 Le SD 20 étant éteint branchez le à l adaptateur secteur 5 Branchez l adaptateur secteur sur une prise secteur 6 Allumez le SD 20 et le Macintosh Cet appareil est équipé d un circuit de protection Après la mise sous tension at...

Страница 139: ...cteur de CD ROM fig 3 14_40 3 Cliquez deux fois sur l icône SD 20 Serial Installer dans le dossier Driver OMS Driver du CD ROM pour lancer l installeur 4 Vérifiez l emplacement de l installation et cliquez sur Install fig 3 2_40 5 Si un message du type suivant s affiche cliquez sur Continuer Les autres applications actives se ferment et l installation continue 6 Une boîte de dialogue s affiche Ins...

Страница 140: ...îte de dialogue similaire à celle présentée ici s affiche cliquez sur Turn It Off Une boîte de confirmation s affiche cliquez sur OK fig 3 6_35 4 La boîte de dialogue Create New Setup s affiche Cliquez sur Annuler Si vous avez cliqué sur OK par erreur cliquez sur Annuler dans la boîte suivante fig 3 7 5 Choisissez Open dans le menu File Ouvrez le dossier OMS Settings que vous avez copié à l étape ...

Страница 141: ...urrent Rendre actif Si vous ne pouvez pas sélectionner Make Current cela signifie qu il est déjà activé et que vous pouvez passer à l étape suivante fig 3 20_90 Opening the SD 20 Modem Port file Opening the SD 20 Printer Port file Si vous réalisez une connexion sur un port combiné modem imprimante comme sur les PowerBook sélectionnez le fichier SD 20 Modem Port Opening the SD 20 Modem Port file Op...

Страница 142: ...le choisissez Exit Si la boîte de dialogue AppleTalk confirmation s affiche cliquez sur OK pour la fermer Le vumètre OUTPUT du SD 20 est il actif Si le vumètre OUTPUT du SD 20 est actif mais que vous n entendez rien vérifiez que le volume est bien réglé sur le SD 20 ou sur votre système audio Si le vumètre OUTPUT n est pas actif vérifiez à nouveau les connexions et les paramètres OMS Après avoir r...

Страница 143: ...l installeur 4 Cliquez sur Install 5 Une boîte de dialogue vous informe que vous devez redémarrer le Macintosh une fois l installation terminée Cliquez sur Continue 6 Une fois l installation terminée cliquez sur Restart Paramètres FreeMIDI 1 Depuis le CD ROM copiez le dossier Driver FreeMIDI Driver Settings sur le disque dur du Macintosh 2 Ouvrez le dossier FreeMIDI Applications à l emplacement où...

Страница 144: ...3 25 f 10Choisissez à nouveau la commande MIDI Check Connections pour terminer le test 11Dans le menu File choisissez Quit pour quitter FreeMIDI Setup Le vumètre OUTPUT du SD 20 est il actif Si le vumètre OUTPUT du SD 20 est actif mais que vous n entendez rien vérifiez que le volume est bien réglé sur le SD 20 ou sur votre système audio Si le vumètre OUTPUT n est pas actif vérifiez à nouveau les c...

Страница 145: ...necessario collegare l adattatore AC e spostare l interruttore POWER su ON Tipi di collegamento disponibili Si potrà utilizzare un cavo USB o il cavo del computer per un collegamento seriale A seconda del tipo di collegamento installare il driver appropriato e configurarlo in modo opportuno Collegamento USB pag 146 Collegamento seriale pag 157 Definizione di un driver fig 2 0 Un driver è un progra...

Страница 146: ...tema fig 2 1 3 Aprire la finestra di dialogo Opzioni firma driver Fare clic sulla scheda Hardware e poi sul pulsante Firma driver La procedura d installazione dipenderà dal sistema utilizzato Passare ad una delle sezioni seguenti a seconda del sistema utilizzato Utenti Windows XP pag 146 Utenti Windows 2000 pag 151 Utenti Windows Me 98 pag 155 Se si utilizza Windows XP Professional è necessario co...

Страница 147: ...ra di dialogo Esegui Fare clic sul pulsante Start di Windows Nel menu visualizzato selezionare Esegui fig 2 3_30 9 Nella finestra di dialogo che appare immettere quanto segue nel campo Apri e fare clic su OK D DRIVER USB_XP2K SETUPINF EXE L identificativo dell unità D potrebbe essere diverso da quello del sistema utilizzato In questo caso specificare il nome dell unità CD ROM utilizzata Se al pass...

Страница 148: ...logo Installazione guidata nuovo hardware Accertarsi che sullo schermo appaia EDIROL SD 20 selezionare Installa da un elenco o percorso specifico per utenti esperti e fare clic su Avanti fig 2 7 14La finestra visualizzerà il seguente messaggio Selezionare le opzioni di ricerca e di installazione Selezionare Non effettuare la ricerca La scelta del driver da installare verrà effettuata manualmente e...

Страница 149: ...R USB_XP2K e fare clic su OK Se al passo 4 l impostazione Scegliere una delle seguenti opzioni non è stata impostata su Ignora comparirà il messaggio Firma digitale non trovata fig 2 5 Se Scegliere una delle seguenti opzioni è impostato su Avvisa 1 Fare clic su Continuare 2 Continuare l installazione Se Scegliere una delle seguenti opzioni è impostato su Blocca 1 Fare clic su OK 2 Quando appare la...

Страница 150: ... 1 Se si utilizza Windows XP Professional collegarsi con un nome utente dotato di privilegi di tipo amministrativo ad esempio Administrator 2 In Windows fare clic sul pulsante Start e nel menu selezionare Pannello di controllo 3 In Scegliere una categoria fare clic su Prestazioni e manutenzione 4 In o un icona del Pannello di controllo fare clic sull icona Sistema Viene visualizzata la finestra di...

Страница 151: ...c sull icona Sistema fig 2 12 4 Aprire la finestra di dialogo Opzioni firma driver Fare clic sulla scheda Hardware e poi sul pulsante Firma driver fig 2 13_50 5 Accertarsi che Verifica firma file sia impostato su Ignora Se è attivata l opzione Ignora fare clic su OK Se non è impostata su Ignora prendere nota dell impostazione corrente di avviso o di blocco Modificare quindi l impostazione su Ignor...

Страница 152: ...n fare clic su OK adesso 12Collegare l SD 20 1 Impostare l interruttore di selezione computer dell SD 20 su USB 2 Dopo aver spostato l interruttore di alimentazione dell SD 20 su OFF collegare l adattatore AC 3 Inserire l adattatore AC in una presa di corrente 4 Utilizzare il cavo USB per collegare l SD 20 al computer 13Spostare l interruttore di alimentazione dell SD 20 in posizione ON In questo ...

Страница 153: ...asso 5l impostazione Verifica firma file non è stata impostata su Ignora verrà visualizzato il messaggio Firma digitale non trovata fig 2 16_30 Se Verifica firma digitale è impostato su Avvisa 1 Fare clic su Sì 2 Continuare l installazione Se Verifica firma digitale è impostato su Blocca 1 Fare clic su OK 2 Quando appare la finestra Installazione guidata nuovo hardware fare clic su Fine 3 Eseguire...

Страница 154: ...mministrazione ad esempio come Administrator 2 Sul desktop di Windows fare clic con il pulsante destro del mouse su Risorse del computer e nel menu visualizzato selezionare Proprietà Viene visualizzata la finestra di dialogo Proprietà del sistema 3 Fare clic sulla scheda Hardware e poi sul pulsante Firma driver Verrà visualizzata la finestra di dialogo Opzioni firma driver 4 Ripristinare l imposta...

Страница 155: ...lsante Start di Windows Nel menu visualizzato selezionare Esegui fig 2 19a_30 5 Nella finestra di dialogo che appare immettere quanto segue nel campo Apri e fare clic su OK D DRIVER USB_ME98 SETUPINF EXE L identificativo dell unità D potrebbe essere diverso da quello del sistema utilizzato In questo caso specificare il nome dell unità CD ROM utilizzata fig 2 19_30 6 Appare la finestra di dialogo S...

Страница 156: ...tra Trovato nuovo hardware si chiude Nella finestra di dialogo SETUPINF fare clic su OK Appare la finestra di dialogo SETUPINF Anche se si prevede di utilizzare l alimentazione tramite BUS si consiglia di utilizzare l adattatore AC durante l installazione del driver e le procedure di configurazione Questo apparecchio è provvisto di un circuito di protezione È necessario aspettare qualche secondo d...

Страница 157: ...ulsante Start e nel menu selezionare Pannello di controllo 2 In Scegliere una categoria fare clic su Prestazioni e manutenzione 3 In o un icona del Pannello di controllo fare clic sull icona Sistema La procedura d installazione dipenderà dal sistema utilizzato Passare ad una delle sezioni seguenti a seconda del sistema utilizzato Utenti Windows XP pag 157 Utenti Windows 2000 pag 161 Utenti Windows...

Страница 158: ...o Proprietà del sistema Fare clic su OK 11Chiudere tutti i programmi in corso di esecuzione Chiudere anche le altre finestre aperte Se si utilizza un programma antivirus o simile accertarsi che sia anch esso chiuso 12Preparare il CD ROM Inserire il CD nell unità CD ROM del computer 13Aprire la finestra di dialogo Esegui Fare clic sul pulsante Start di Windows Nel menu visualizzato selezionare Eseg...

Страница 159: ...dei file è indicata nel percorso del file utilizzando il carattere come delimitatore Ad esempio SER_XP2K SETUP EXE indica che il file Setupinf exe si trova nella cartella SER_XP2K Se al passo 9 l impostazione Scegliere una delle seguenti opzioni non è stata impostata su Ignora comparirà il messaggio Installazione guidata hardware fig 2 22c_30 Se Scegliere una delle seguenti opzioni è impostato su ...

Страница 160: ...parametro d origine dopo aver riavviato Windows 1 Se si utilizza Windows XP Professional collegarsi con un nome utente dotato di privilegi di tipo amministrativo ad esempio Administrator 2 In Windows fare clic sul pulsante Start e nel menu selezionare Pannello di controllo 3 In Scegliere una categoria fare clic su Prestazioni e manutenzione 4 In o un icona del Pannello di controllo fare clic sull ...

Страница 161: ... il computer e avviare Windows 7 Aprire la finestra di dialogo Proprietà del sistema 1 In Windows fare clic sul menu Start e nel menu selezionare Impostazioni Pannello di controllo 2 Nel Pannello di controllo fare doppio clic sull icona Sistema fig 2 12 8 Aprire la finestra di dialogo Opzioni firma driver Fare clic sulla scheda Hardware e poi sul pulsante Firma driver Collegarsi a Windows con un n...

Страница 162: ...ROM Inserire il CD nell unità CD ROM del computer 13Aprire la finestra di dialogo Esegui Fare clic sul pulsante Start di Windows Nel menu visualizzato selezionare Esegui fig 2 24_40 14Nella finestra di dialogo che appare immettere quanto segue nel campo Apri e fare clic su OK D DRIVER SER_XP2K SETUP EXE L identificativo dell unità D potrebbe essere diverso da quello del sistema utilizzato In quest...

Страница 163: ...sualizzato il messaggio Firma digitale non trovata fig 2 16b_40 Se Verifica firma digitale è impostato su Avvisa 1 Fare clic su Sì 2 Continuare l installazione Se Verifica firma digitale è impostato su Blocca 1 Fare clic su OK 2 Quando appare la finestra Installazione guidata nuovo hardware fare clic su Fine 3 Eseguire l installazione come descritto nella sezione Troubleshooting relativa a Device ...

Страница 164: ...stata cambiata al passo 5 ripristinare l impostazione originale dopo aver avviato Windows 1 Dopo aver riavviato Windows collegarsi a Windows come un utente dotato di privilegi di amministrazione ad esempio come Administrator 2 Sul desktop di Windows fare clic con il pulsante destro del mouse su Risorse del computer e nel menu visualizzato selezionare Proprietà Viene visualizzata la finestra di dia...

Страница 165: ...iuso 8 Preparare il CD ROM Inserire il CD nell unità CD ROM del computer 9 Aprire la finestra di dialogo Esegui Fare clic sul pulsante Start di Windows Nel menu visualizzato selezionare Esegui fig 2 25_40 10Nella finestra di dialogo che appare immettere quanto segue nel campo Apri e fare clic su OK D DRIVER SER_ME98 DISK1 S ETUP EXE L identificativo dell unità D potrebbe essere diverso da quello d...

Страница 166: ...finestra di dialogo Installation information Controllare il contenuto della finestra e fare clic su Avanti 15Viene visualizzata la finestra di dialogo Computer Switch Setting Accertarsi che l interruttore di selezione computer sul retro dell SD 20 sia impostato su PC e fare clic su Avanti Se non è impostato su PC ripetere la procedura a partire dal passo 1 16Alla fine dell installazione del driver...

Страница 167: ... voce e periferiche audio Successivamente in o un icona del Pannello di controllo fare clic sull icona Suoni e periferiche audio 3 Fare clic sulla scheda Audio fig 2 28_30 4 In Riproduzione musica MIDI fare clic su a destra di Periferica preferenziale o in Windows XP Periferica predefinita e selezionare quanto segue nell elenco visualizzato 5 Fare clic su OK per completare le impostazioni Per una ...

Страница 168: ...rollo fare doppio clic sull icona Multimedia per aprire la finestra Proprietà multimediali 3 Fare clic sulla scheda MIDI fig 2 29_30 4 Specificare l Uscita MIDI Selezionare Strumento singolo e scegliere una delle opzioni visualizzate 5 Fare clic su OK per completare le impostazioni Per una connessione USB EDIROL SD 20 PART A Per una connessione seriale Roland Serial MIDI Out A Passare alla pagina ...

Страница 169: ...oria fare clic su Prestazioni e manutenzione 3 In o un icona del Pannello di controllo fare clic sull icona Sistema 4 Fare clic sulla scheda Avanzate 5 A destra del campo Prestazioni fare clic su Impostazioni Verrà visualizzata la finestra di dialogo Opzioni prestazioni 6 Fare clic sulla scheda Avanzate fig 2 30 7 Nell area Pianificazione processore selezionare Servizi in background e fare clic su...

Страница 170: ...n questo prodotto per scopi diversi dalla riproduzione privata e personale senza autorizzazione del titolare dei diritti di copyright è proibito dalla legge Inoltre questi dati non possono essere copiati né utilizzati in un lavoro secondario protetto da diritti di copyright senza l autorizzazione del titolare dei diritti di copyright Le finestre effettivamente visualizzate sullo schermo del comput...

Страница 171: ...comunque di collegare l adattatore AC all SD 20 anche se si utilizza l alimentazione tramite bus Tipi di collegamento disponibili Si potrà utilizzare un cavo USB o il cavo del computer per un collegamento seriale A seconda del tipo di collegamento installare il driver appropriato e configurarlo in modo opportuno Collegamento USB pag 172 Collegamento seriale pag 180 Definizione di un driver fig 2 0...

Страница 172: ... Per il momento non accendere l SD 20 Se l SD 20 è acceso comparirà un messaggio come quello sotto illustrato quando viene avviato il Macintosh Seguire una delle procedure sotto indicate a seconda del messaggio visualizzato Se appare il seguente messaggio Driver required for USB device unknown device is not available Search for driver on the Internet fare clic su Cancel Se appare il seguente messa...

Страница 173: ...r avviare il programma d installazione 4 Controllare la destinazione dell installazione e fare clic su Install fig 3 2_40 5 Se appare un messaggio come quello visualizzato fare clic su Continue Le applicazioni in corso di esecuzione verranno chiuse e l installazione proseguirà 6 Verrà visualizzata una finestra di dialogo indicante Installation completed Fare clic su Restart per riavviare il Macint...

Страница 174: ...alogo come quella illustrata fare clic su Turn It Off Verrà visualizzata una finestra di dialogo di conferma fare clic su OK fig 3 6_35 4 Appare la finestra di dialogo Create New Setup Fare clic su Cancel Se si è premuto accidentalmente il pulsante OK fare clic su Cancel nella finestra successiva fig 3 7 5 Selezionare Open nel menu File Nella cartella OMS Settings copiata al passo 1 selezionare il...

Страница 175: ...attivata e si può quindi passare all operazione successiva fig 3 11_50 8 Accertarsi che la trasmissione e la ricezione MIDI siano corrette Nel menu Studio selezionare Test Studio fig 3 22_50 9 Quando il cursore del mouse passa vicino all icona del generatore di suoni il cursore assumerà la forma di una nota Fare clic sulle icone del generatore di suoni evidenziate nella figura che segue Se l SD 20...

Страница 176: ...olume dell SD 20 o degli altoparlanti è al minimo Se l indicatore di livello OUTPUT non si sposta ricontrollare i collegamenti e le impostazioni OMS Dopo aver apportato le modifiche necessarie selezionare di nuovo Test nel menu Studio e seguire la procedura illustrata al passo 9 Se l SD 20 non emette alcun suono fare riferimento alla sezione No sound pag 237 La procedura per collegare l SD 20 e il...

Страница 177: ... CD ROM 3 Fare doppio clic sull icona SD 20 USB Installer che si trova nella cartella Driver FreeMIDI USB Connection del CD ROM per avviare il programma d installazione 4 Controllare la destinazione dell installazione e fare clic su Install fig 3 2_40 5 Se appare un messaggio come quello visualizzato fare clic su Continue Le applicazioni in corso di esecuzione verranno chiuse e l installazione pro...

Страница 178: ...Nella finestra di dialogo FreeMIDI Preferences fare clic su Cancel 6 Nella finestra di dialogo About Quick Setup fare clic su Cancel 7 Nel menu File selezionare Open 8 Selezionare SD 20 USB nella cartella FreeMIDI Settings copiata al passo 1 e fare clic su Open 9 Controllare che l invio e la ricezione MIDI siano corrette Nel menu MIDI selezionare Check Connections fig 3 13_40 10Il cursore del mous...

Страница 179: ...sposta ma non viene emesso alcun suono controllare se il volume dell SD 20 o degli altoparlanti è al minimo Se l indicatore di livello OUTPUT non si sposta ricontrollare i collegamenti e le impostazioni OMS Dopo aver apportato le modifiche necessarie selezionare di nuovo Test nel menu Studio e seguire la procedura illustrata al passo 10 La procedura per collegare l SD 20 e il Macintosh ed eseguire...

Страница 180: ...re di selezione computer dell SD 20 su MAC 3 Tramite un cavo da computer collegare la porta del modem o quella della stampante del Macintosh all SD 20 4 Dopo aver spostato l interruttore di alimentazione dell SD 20 su OFF collegare l adattatore AC 5 Inserire l adattatore AC in una presa di corrente 6 Accendere l SD 20 e il Macintosh Questo apparecchio è provvisto di un circuito di protezione È nec...

Страница 181: ...3 14_40 3 Fare doppio clic sull icona SD 20 Serial Installer che si trova nella cartella Driver OMS Driver del CD ROM per avviare il programma d installazione 4 Controllare la destinazione dell installazione e fare clic su Install fig 3 2_40 5 Se appare un messaggio come quello visualizzato fare clic su Continue Le applicazioni in corso di esecuzione verranno chiuse e l installazione proseguirà 6 ...

Страница 182: ... finestra di dialogo come quella illustrata fare clic su Turn It Off Verrà visualizzata una finestra di dialogo di conferma fare clic su OK fig 3 6_35 4 Appare la finestra di dialogo Create New Setup Fare clic su Cancel Se si è premuto accidentalmente il pulsante OK fare clic su Cancel nella finestra successiva fig 3 7 5 Selezionare Open nel menu File Aprire la cartella OMS Settings copiata al pas...

Страница 183: ...up Nella finestra di dialogo OMS MIDI Setup visualizzata selezionare Run MIDI in background e fare clic su OK fig 3 18 Opening the SD 20 Modem Port file Opening the SD 20 Printer Port file Se il collegamento viene effettuato su una porta modem stampante come su PowerBooks selezionare il file SD 20 Modem Port Opening the SD 20 Modem Port file Opening the SD 20 Printer Port file SD 20e book 183 ページ ...

Страница 184: ...ionare Test Studio fig 3 22_50 9 Quando il cursore del mouse passa vicino all icona del generatore di suoni il cursore assumerà la forma di una nota Fare clic sulle icone del generatore di suoni evidenziate nella figura che segue Se l SD 20 emette dei suoni le impostazioni sono corrette Se i segnali MIDI non vengono trasmessi il Macintosh emetterà un segnale di avvertimento Opening the SD 20 Modem...

Страница 185: ...o controllare se il volume dell SD 20 o degli altoparlanti è al minimo Se l indicatore di livello OUTPUT non si sposta ricontrollare i collegamenti e le impostazioni OMS Dopo aver apportato le modifiche necessarie selezionare di nuovo Test nel menu Studio e seguire la procedura illustrata al passo 9 Se l SD 20 non emette alcun suono fare riferimento alla sezione No sound pag 237 La procedura per c...

Страница 186: ...in corso di esecuzione Se si utilizza un programma antivirus o simili accertarsi che sia anch esso chiuso 2 Preparare il CD ROM Inserire il CD ROM nell unità CD ROM 3 Fare doppio clic sull icona SD 20 Serial Installer che si trova nella cartella Driver FreeMIDI Driver Serial Connection del CD ROM per avviare il programma d installazione 4 Fare clic su Install 5 Verrà visualizzata una finestra di d...

Страница 187: ... FreeMIDI Fare clic su Continue 5 Nella finestra di dialogo FreeMIDI Preferences fare clic su Cancel 6 Nella finestra di dialogo About Quick Setup fare clic su Cancel 7 Nel menu File selezionare Open Aprire la cartella FreeMIDI Settings copiata al passo 1 selezionare il file corrispondente al nome della porta cui è collegato l SD 20 e fare clic su Open 8 Controllare che l invio e la ricezione MIDI...

Страница 188: ...ume dell SD 20 o degli altoparlanti è al minimo Se l indicatore di livello OUTPUT non si sposta ricontrollare i collegamenti e le impostazioni OMS Dopo aver apportato le modifiche necessarie selezionare di nuovo Test nel menu Studio e seguire la procedura illustrata al passo 9 Se l SD 20 non emette alcun suono fare riferimento alla sezione No sound pag 237 La procedura per collegare l SD 20 e il M...

Страница 189: ...ente alterna y disponer el interruptor POWER en ON Qué tipos de conexión puede utilizar Puede utilizar tanto un cable USB como un cable de PC para realizar la conexión en serie Instale el controlador apropiado y efectúe las configuraciones pertinentes en función del tipo de conexión que utilice Conexión USB pág 190 Conexión en serie pág 201 Qué es un controlador fig 2 0 Un controlador es software ...

Страница 190: ... 3 Abra el cuadro de diálogo Opciones de firma del controlador Haga clic en la ficha Hardware y a continuación haga clic en Firma del controlador El procedimiento de instalación variará en función del sistema Continúe con uno de los siguientes pasos en función del sistema que utilice Usuarios de Windows XP pág 190 Usuarios de Windows 2000 pág 195 Usuarios de Windows Me 98 pág 199 Si utiliza Window...

Страница 191: ...M en la unidad de CD ROM del PC 8 Abra el cuadro de diálogo Ejecutar Haga clic en el botón Inicio de Windows En el menú que aparece seleccione Ejecutar fig 2 3_30 9 En el cuadro de diálogo que aparece escriba lo siguiente en el campo Abrir y haga clic en Aceptar D DRIVER USB_XP2K SETUPINF EXE El nombre de la unidad D puede ser diferente para su sistema Especifique el nombre de la unidad de su CD R...

Страница 192: ...utilizar normalmente el SD 20 con la alimentación por bus utilice el adaptador de corriente alterna mientras instala el controlador y efectúe las configuraciones pertinentes Esta unidad viene equipada con un circuito de protección Para que la unidad funcione correctamente es necesario dejar pasar un pequeño intervalo de unos segundos después de encenderla Si en el paso 4 la configuración de Qué ac...

Страница 193: ...ecífica Avanzada y haga clic en Siguiente fig 2 7 14La pantalla indicará Elija sus opciones de búsqueda e instalación Seleccione No buscar Seleccionaré el controlador para instalar y haga clic en Siguiente fig 2 8_20 15Asegúrese de que el campo Modelo indique EDIROL SD 20 y haga clic en Siguiente Entonces empezará la instalación del controlador fig 2 9_30 16Aparecerá el cuadro de diálogo Insertar ...

Страница 194: ...indows se reinicie 1 Si utiliza Windows XP Professional debe iniciar la sesión de Windows utilizando un nombre de usuario con cuenta administrativa por ejemplo Administrador 2 Haga clic en el botón Inicio de Windows y en el menú que aparece seleccione Panel de control 3 En Elegir una categoría haga clic en Rendimiento y mantenimiento 4 En o elegir un icono del Panel de control haga clic en el icon...

Страница 195: ...el icono Sistema fig 2 12 4 Abra el cuadro de diálogo Opciones de firma del controlador Haga clic en la ficha Hardware y a continuación haga clic en Firma del controlador fig 2 13_50 5 Asegúrese de que Verificación de la firma del archivo esté establecido en Ignorar Si está establecido en Ignorar sólo tiene que hacer clic en Aceptar Si no está establecido en Ignorar anótese la configuraciónactual ...

Страница 196: ...ione Ejecutar fig 2 14_40 10En el cuadro de diálogo que aparece escriba lo siguiente en el campo Abrir y haga clic en Aceptar D DRIVER USB_XP2K SETUPINF EXE El nombre de la unidad D puede ser diferente para su sistema Especifique el nombre de la unidad de su CD ROM fig 2 15_40 11Aparece el cuadro de diálogo SETUPINF Ahora ya está preparado para instalar el controlador No haga clic en Aceptar todav...

Страница 197: ...raciones pertinentes Esta unidad viene equipada con un circuito de protección Para que la unidad funcione correctamente es necesario dejar pasar un pequeño intervalo de unos segundos después de encenderla Si en el paso 5 la configuración de Verificación de la firma del archivo no se estableció en Ignorar aparecerá el cuadro de diálogo No se ha encontrado la firma digital fig 2 16_30 Si Verificació...

Страница 198: ...guración original después de que se reinicie Windows 1 Una vez que Windows se haya reiniciado inicie la sesión en Windows como usuario con privilegios administrativos por ejemplo Administrador 2 En el escritorio de Windows haga clic con el botón secundario en el icono Mi PC y en el menú que aparece seleccione Propiedades Aparecerá el cuadro de diálogo Propiedades del sistema 3 Haga clic en la fich...

Страница 199: ...ic en el botón Inicio de Windows En el menú que aparece seleccione Ejecutar fig 2 19a_30 5 En el cuadro de diálogo que aparece escriba lo siguiente en el campo Abrir y haga clic en Aceptar D DRIVER USB_ME98 SETUPINF EXE El nombre de la unidad D puede ser diferente para su sistema Especifique el nombre de la unidad de su CD ROM fig 2 19_30 6 Aparece el cuadro de diálogo SETUPINF Ahora ya está prepa...

Страница 200: ...logo Hardware nuevo encontrado En el cuadro de diálogo SETUPINF haga clic en Aceptar El cuadro de diálogo SETUPINF se cerrará Incluso si tiene la intención de utilizar normalmente el SD 20 con la alimentación por bus utilice el adaptador de corriente alterna mientras instala el controlador y efectúe las configuraciones pertinentes Esta unidad viene equipada con un circuito de protección Es necesar...

Страница 201: ...io de Windows y en el menú que aparece seleccione Panel de control 2 En Elegir una categoría haga clic en Rendimiento y mantenimiento 3 En o elegir un icono del Panel de control haga clic en el icono Sistema El procedimiento de instalación variará en función del sistema Continúe con uno de los siguientes pasos en función del sistema que utilice Usuarios de Windows XP pág 201 Usuarios de Windows 20...

Страница 202: ...ar A continuación cambie la configuración a Ignorar y haga clic en Aceptar 10Cierre el cuadro de diálogo Propiedades del sistema Haga clic en Aceptar 11Salga de todo el software que se esté ejecutando aplicaciones Cierre cualquier ventana que esté abierta Si utiliza software como programas antivirus también debe cerrarlo 12Prepare el CD ROM Inserte el CD ROM en la unidad de CD ROM del PC Si ha mod...

Страница 203: ...EXE El nombre de la unidad D puede ser diferente para su sistema Especifique el nombre de la unidad de su CD ROM 15Aparecerá el cuadro de diálogo Welcome Bienvenido Haga clic en Next Siguiente fig 2 22b_30 16Aparecerá un cuadro de diálogo como el que se muestra Haga clic en Next Siguiente En este manual la ubicación de las carpetas y archivos se da en términos de la ruta del archivo y se utiliza c...

Страница 204: ...TS 18Una vez finalizada la instalación del controlador aparecerá el cuadro de diálogo Restart your computer Reiniciar el PC Reinicie el PC Si en el paso 9 la configuración de Qué acción desea que realice Windows no se estableció en Ignorar aparecerá el cuadro de diálogo Instalación de hardware fig 2 22c_30 Si Qué acción desea que realice Windows está establecido en Advertir 1 Haga clic en Continua...

Страница 205: ...e seleccione Panel de control 3 En Elegir una categoría haga clic en Rendimiento y mantenimiento 4 En o elegir un icono del Panel de control haga clic en el icono Sistema Aparecerá el cuadro de diálogo Propiedades del sistema 5 Haga clic en la ficha Hardware y a continuación haga clic en Firma del controlador Aparecerá el cuadro de diálogo Opciones de firma del controlador 6 Restablezca la configu...

Страница 206: ...ndows 7 Abra el cuadro de diálogo Propiedades del sistema 1 Haga clic en el botón Inicio de Windows y en el menú que aparece seleccione Configuración Panel de control 2 En Panel de control haga doble clic en el icono Sistema fig 2 12 8 Abra el cuadro de diálogo Opciones de firma del controlador Haga clic en la ficha Hardware y a continuación haga clic en Firma del controlador Inicie una sesión en ...

Страница 207: ...ue esté abierta Si utiliza software como programas antivirus también debe cerrarlo 12Prepare el CD ROM Inserte el CD ROM en la unidad de CD ROM del PC 13Abra el cuadro de diálogo Ejecutar Haga clic en el botón Inicio de Windows En el menú que aparece seleccione Ejecutar fig 2 24_40 14En el cuadro de diálogo que aparece escriba lo siguiente en el campo Abrir y haga clic en Aceptar D DRIVER SER_XP2K...

Страница 208: ... un cuadro de diálogo No se ha encontrado la firma digital fig 2 16b_40 Si Verificación de la firma del archivo está establecido en Advertir 1 Haga clic en Sí 2 Continúe con la instalación Si Verificación de la firma del archivo está establecido en Bloquear 1 Haga clic en Aceptar 2 Cuando aparezca el Asistente para detectar hardware nuevo haga clic en Finalizar 3 Efectúe la instalación como se des...

Страница 209: ...erificación de la firma del archivo Si modificó la configuración de Verificación de la firma del archivo en el paso 5 restaure la configuración original después de que se reinicie Windows 1 Una vez que Windows se haya reiniciado inicie la sesión en Windows como usuario con privilegios administrativos por ejemplo Administrador 2 En el escritorio de Windows haga clic con el botón secundario en el ic...

Страница 210: ...ware como programas antivirus también debe cerrarlo 8 Prepare el CD ROM Inserte el CD ROM en la unidad de CD ROM del PC 9 Abra el cuadro de diálogo Ejecutar Haga clic en el botón Inicio de Windows En el menú que aparece seleccione Ejecutar fig 2 25_40 10En el cuadro de diálogo que aparece escriba lo siguiente en el campo Abrir y haga clic en Aceptar D DRIVER SER_ME98 DISK1 SETUP EXE El nombre de l...

Страница 211: ... 20 y haga clic en Next Siguiente 14Aparecerá el cuadro de diálogo Installation information Información de la instalación Verifique el contenido mostrado y haga clic en Next Siguiente 15Aparecerá el cuadro de diálogo System Settings Change Cambio de configuración del sistema Asegúrese de que el interruptor de sistema del panel posterior del SD 20 esté establecido en PC y haga clic en Next Siguient...

Страница 212: ...ispositivos de audio A continuación en o elegir un icono del Panel de control haga clic en el icono Sonidos y dispositivos de audio 3 Haga clic en la ficha Audio fig 2 28_30 4 Para la Reproducción de música MIDI haga clic en el símbolo que aparece a la derecha de Dispositivo preferido o en Windows XP Dispositivo predeterminado y seleccione lo siguiente en la lista que aparece 5 Haga clic en Acepta...

Страница 213: ...haga doble clic en el icono Multimedia para abrir el cuadro de diálogo Propiedades de multimedia 3 Haga clic en la ficha MIDI fig 2 29_30 4 Especifique la Salida de MIDI Seleccione Instrumento único y escoja una de las siguientes opciones en la lista que aparece 5 Haga clic en Aceptar para completar la configuración Para una conexión USB EDIROL SD 20 PARTE A Para una conexión en serie Roland Seria...

Страница 214: ...ntenimiento 3 En o elegir un icono del Panel de control haga clic en el icono Sistema 4 Haga clic en la ficha Avanzada 5 A la derecha del campo Rendimiento haga clic en Configuración Aparecerá el cuadro de diálogo Opciones de rendimiento 6 Haga clic en la ficha Avanzada fig 2 30 7 En el campo Planificación del procesador seleccione Servicios de segundo plano y haga clic en Aceptar 8 En el cuadro d...

Страница 215: ... y a continuación haga clic en el botón La música empezará a sonar La utilización de los datos musicales proporcionados con este producto para cualquier fin que no sea el disfrute personal o privado sin el permiso del propietario del copyright está prohibida por la ley Además estos datos no deben ser copiados ni utilizados para otro trabajo con copyright propio sin el permiso del propietario del c...

Страница 216: ...rna cuando instale el controlador Qué tipos de conexión puede utilizar Puede utilizar tanto un cable USB como un cable de PC para realizar la conexión en serie Instale el controlador apropiado y efectúe las configuraciones pertinentes en función del tipo de conexión que utilice Conexión USB pág 217 Conexión en serie pág 224 Qué es un controlador fig 2 0 Un controlador es software que transfiere da...

Страница 217: ...nectados al Macintosh excepto el SD 20 A continuación encienda el Macintosh No encienda el SD 20 todavía Si el SD 20 está encendido cuando se inicie el Macintosh aparecerá un mensaje como el siguiente Realice los siguientes pasos según el mensaje que se muestre Si la pantalla indica Driver required for USB device unknown device is not available Search for driver on the Internet haga clic en Cancel...

Страница 218: ...Driver del CD ROM para iniciar el instalador 4 Verifique la ubicación de la instalación y haga clic en Install fig 3 2_40 5 Si aparece un mensaje como el siguiente haga clic en Continue Saldrá de todas las aplicaciones que se estén ejecutando y seguirá la instalación 6 Aparecerá un cuadro de diálogo que le indicará que la instalación ha finalizado Haga clic en Restart para reiniciar el Macintosh 7...

Страница 219: ... 3 5_35 3 Si aparece un cuadro de diálogo como éste haga clic en Turn It Off Aparecerá un cuadro de diálogo de confirmación haga clic en OK fig 3 6_35 4 Aparecerá el cuadro de diálogo Create New Setup Haga clic en Cancel Si por equivocación hace clic en OK haga clic en Cancel en la siguiente pantalla fig 3 7 5 Elija Open del menú File En la carpeta OMS Settings que ha copiado en el paso 1 seleccio...

Страница 220: ... continuar con el siguiente paso fig 3 11_50 8 Compruebe que la transmisión y la recepción MIDI se realicen correctamente En el menú Studio seleccione Test Studio fig 3 22_50 9 Cuando mueve el cursor del ratón cerca del icono del generador de sonido el cursor se convierte en una Haga clic en los iconos del generador de sonido rodeados por un círculo en la siguiente ilustración Si se oye sonido del...

Страница 221: ...ningún sonido compruebe si se ha bajado el volumen del SD 20 o sus altavoces Si el medidor de nivel OUTPUT no se mueve vuelva a comprobar las conexiones y la configuración de OMS Una vez realizada la configuración correcta vuelva a seleccionar Test del menú Studio y lleve a cabo el paso 9 Si el SD 20 no emite ningún sonido consulte el apartado No sound pág 237 Con esto finalizan las conexiones del...

Страница 222: ...M en la unidad de CD ROM 3 Haga doble clic en el icono SD 20 USB Installer que se encuentra en la carpeta Driver FreeMIDI USB Connection del CD ROM para iniciar el instalador 4 Verifique la ubicación de la instalación y haga clic en Install fig 3 2_40 5 Si aparece un mensaje como el siguiente haga clic en Continue Saldrá de todas las aplicaciones que se estén ejecutando y seguirá la instalación 6 ...

Страница 223: ... Cuando aparezca el cuadro de diálogo FreeMIDI Preferences haga clic en Cancel 6 Cuando aparezca el cuadro de diálogo About Quick Setup haga clic en Cancel 7 En el menú File elija Open 8 Seleccione SD 20 USB de la carpeta FreeMIDI Settings que ha copiado en el paso 1 y haga clic en Open 9 Compruebe que la transmisión y la recepción MIDI se realicen correctamente En el menú MIDI seleccione Check Co...

Страница 224: ...ente alterna 5 Conecte el adaptador de corriente alterna en un enchufe de toma de corriente alterna 6 Encienda el SD 20 y el Macintosh Se mueve el indicador de nivel de salida OUTPUT del SD 20 Si el medidor de nivel OUTPUT de la pantalla del SD 20 se mueve pero no oye ningún sonido compruebe si se ha bajado el volumen del SD 20 o sus altavoces Si el medidor de nivel OUTPUT no se mueve vuelva a com...

Страница 225: ...D ROM en la unidad de CD ROM fig 3 14_40 3 Haga doble clic en el icono SD 20 Serial Installer que se encuentra en la carpeta Driver OMS Driver del CD ROM para iniciar el instalador 4 Verifique la ubicación de la instalación y haga clic en Install fig 3 2_40 5 Si aparece un mensaje como el siguiente haga clic en Continue Saldrá de todas las aplicaciones que se estén ejecutando y seguirá la instalac...

Страница 226: ..._35 3 Si aparece un cuadro de diálogo como éste haga clic en Turn It Off Aparecerá un cuadro de diálogo de confirmación haga clic en OK fig 3 6_35 4 Aparecerá el cuadro de diálogo Create New Setup Haga clic en Cancel Si por equivocación hace clic en OK haga clic en Cancel en la siguiente pantalla fig 3 7 5 Elija Open del menú File Abra la carpeta OMS Settings copiada en el Paso 1 seleccione el nom...

Страница 227: ...urrent Si no puede seleccionar Make Current significa que ya se ha aplicado y puede continuar con el siguiente paso fig 3 20_90 Opening the SD 20 Modem Port file Opening the SD 20 Printer Port file Si se conecta a un puerto combinado de módem e impresora como el de los PowerBooks seleccione el archivo SD 20 Modem Port Opening the SD 20 Modem Port file Opening the SD 20 Printer Port file Opening th...

Страница 228: ...ece el cuadro de diálogo AppleTalk confirmation haga clic en OK para cerrarlo Se mueve el indicador de nivel de salida OUTPUT del SD 20 Si el medidor de nivel OUTPUT de la pantalla del SD 20 se mueve pero no oye ningún sonido compruebe si se ha bajado el volumen del SD 20 o sus altavoces Si el medidor de nivel OUTPUT no se mueve vuelva a comprobar las conexiones y la configuración de OMS Una vez r...

Страница 229: ...ión 1 Salga de todo el software que se esté ejecutando aplicaciones Si utiliza software como programas antivirus debe cerrarlo también 2 Prepare el CD ROM Coloque el CD ROM en la unidad de CD ROM 3 Haga doble clic en el icono SD 20 Serial Installer que se encuentra en la carpeta Driver FreeMIDI Driver Serial Connection del CD ROM para iniciar el instalador 4 Haga clic en Install 5 Aparecerá un cua...

Страница 230: ...Cuando aparezca el cuadro de diálogo FreeMIDI Preferences haga clic en Cancel 6 Cuando aparezca el cuadro de diálogo About Quick Setup haga clic en Cancel 7 En el menú File elija Open Abra la carpeta FreeMIDI Settings copiada en el Paso 1 seleccione el nombre del puerto en el que esté conectado el SD 20 y haga clic en Open 8 Compruebe que la transmisión y la recepción MIDI se realicen correctament...

Страница 231: ...o no oye ningún sonido compruebe si se ha bajado el volumen del SD 20 o sus altavoces Si el medidor de nivel OUTPUT no se mueve vuelva a comprobar las conexiones y la configuración de OMS Una vez realizada la configuración correcta vuelva a seleccionar Test del menú Studio y lleve a cabo el paso 9 Si el SD 20 no emite ningún sonido consulte el apartado No sound pág 237 Con esto finalizan las conex...

Страница 232: ...ete unneeded files to increase the amount of free space After deleting the unneeded files empty the recycling bin Is the SD 20 connected correctly Make sure that the USB connector of your computer is connected to the SD 20 by a USB cable Check this and if you are using Windows close the Sound and Multimedia Properties dialog box Multimedia Properties in Windows 98 re open the same dialog box once ...

Страница 233: ... OMS or FreeMIDI settings Is the SD 20 detected Turn the power of the SD 20 off then on again Reconnect the USB cable If other USB devices are connected connect only the SD 20 It is possible that the Macintosh did not correctly detect and initialize the SD 20 Leave the SD 20 s USB cable connected and restart your Macintosh If it is still not detected shut down your Macintosh and then restart it Th...

Страница 234: ...her device Universal Serial Bus Controller Unknown device and then restart your computer 1 In the Windows Control Panel double click System The System Properties dialog box will appear 2 Click the Device Manager tab For Windows XP 2000 click the Hardware tab and then click the Device Manager button 3 Double click Other device or Universal Serial Bus Controller to display a list of devices 4 From t...

Страница 235: ...nnected except for keyboard and mouse 2 After Windows restarts use a USB cable to connect the SD 20 to your computer 3 Turn on the power of SD 20 4 Click the Windows Start button and from the menu that appears choose Settings Control Panel 5 Double click the System icon The System Properties dialog box will appear 6 Click the Device Manager tab 7 Check whether you can see an indication of Composit...

Страница 236: ...have taken the above measures please refer also to the Readme file for the USB driver The Readme file is on the CD ROM Location Windows 2000 users In the CD ROM Driver Win2000 WDM README_E if using the WDM driver Driver Win2000 MME README_E if using the MME driver Windows Me 98 users In the CD ROM Driver Win98ME WDM README_E SD 20e book 236 ページ 2005年3月24日 木曜日 午後2時8分 ...

Страница 237: ...eously an error message may be displayed If this occurs click OK and exit the other applications Even if an application window is closed it is still running if it appears in the taskbar Be sure to exit unneeded applications displayed in the taskbar Was the driver installed correctly In order for you to play back MIDI data via the SD 20 the driver must be installed For installation and settings ref...

Страница 238: ...e modem port or turn Apple Talk off and restart your Macintosh Is the OMS setup enabled If a diamond shaped symbol is not displayed at the left edge of the title area in the OMS setup window the setup is not enabled From the OMS File menu choose Make Current OMS settings p 46 p 52 Has your computer been set to enter Sleep mode If your computer enters Sleep mode exit the software you are using and ...

Страница 239: ...ks to which no MIDI playback device is assigned will not be heard If you want to play back a MIDI track you must make sure that the MIDI device you want to use is displayed in your software as the MIDI output port For details refer to the owner s manual for your software Is it possible that you have the Computer switch set to MIDI even though the SD 20 is connected via USB If you intend to use a U...

Страница 240: ...vileges such as Administrator 3 After connecting the SD 20 to your computer via a USB cable turn on the power of the SD 20 4 Exit all applications before deleting the driver 5 Open the Control Panel and double click System 6 Click the Hardware tab and in the Device Manager area click Device Manager 7 Double click Sound Video and Game Controllers to view the list of devices 8 From the list click ED...

Страница 241: ...isplay tab In Windows 98 click Start Settings Folder Options 12 In Detailed Settings of the Display tab remove the check mark for Don t display extensions of associated files click Show all files and folders and then click OK In Windows 98 this will be Show all files 13 Click Start Find Files or folders 14 In Search location select Local hard drive Then in Name of file or folder type 0022 and clic...

Страница 242: ...ick MIDI Devices and Instruments Under that select Roland Serial MIDI Driver and click Properties 6 In the Roland Serial MIDI Driver Properties dialog box click Settings 7 The Roland Serial MIDI Driver Settings dialog box will appear Make settings for each item as described on the next page and following Windows Me and Windows 98 users 1 In the Control Panel double click the Sound and Multimedia i...

Страница 243: ...onnector may not be connected to any of the serial ports COM1 COM4 In this case refer to the owner s manual for your computer and change the settings How many MIDI OUT ports can I use If Use multiple ports is checked you will be able to use the multiple ports of the SD 20 from your computer via the Roland serial MIDI driver When you use multiple ports you will be able to use two MIDI OUT devices a...

Страница 244: ... The change in the computer switch setting won t take effect until the next time the unit is powered up Specifying the MIDI data output destination The MIDI data output destination MIDI output device setting may be inadvertently changed when you install another MIDI driver If the sound module connected to your computer fails to sound or if you decide to use a different output device you can change...

Страница 245: ... in the Start menu 3 Click the Hardware tab 4 In the Device Manager area click Device Manager 5 Double click Sound video and game controllers A list of device will appear 6 Right click Roland Serial MIDI Driver and choose Uninstall from the menu that appears 7 A dialog box will ask you to confirm device removal Click OK 8 Close the Device Manager and click OK in the System Properties dialog box 9 ...

Страница 246: ...erties in the lower right of the dialog box The Roland Serial MIDI Out A Properties dialog box will appear 6 In the lower right of the dialog box click Remove Several dialog boxes will appear asking you to confirm the operation When Windows restarts the serial MIDI driver will be deleted Macintosh users 1 Switch off the SD 20 s power If you re running the SD 20 on BUS power disconnect the USB cabl...

Страница 247: ...2 1 Pulse Clav 1 AnalogClav 1 1 AnalogClav 2 2 Chromatic percussion PC LSB Classic Set Voices Contemp Set Voices Solo Set Voices MSB 96 MSB 97 MSB 98 9 0 Celesta 1 Celesta 2 2 St Celesta 3 10 0 Glockenspiel 1 Glocken 2 2 St Glocken 3 11 0 Music Box 1 Music Box 2 2 St Music Box 3 12 0 Vibraphone 1 Vibraphone 2 2 St Vibra 2 1 Vibraphone w 1 Vibraphone2w 2 St Vibra w 2 13 0 Marimba 1 Marimba 2 2 St M...

Страница 248: ... 1 Gt Harm 2 2 Gt OctHarm 2 1 Gt Feedback 1 FeedbackOct 2 FeedbackHarm 2 Bass PC LSB Classic Set Voices Contemp Set Voices Solo Set Voices MSB 96 MSB 97 MSB 98 33 0 Acoustic Bs 1 Rockabilly 2 Fat Aco Bass 2 34 0 Fingered Bs 1 Fingered Bs2 1 Jazz Bass 1 1 FingerJ Bass 2 FingerP Bass 2 Finger Slap 2 35 0 Picked Bass 1 Picked Jz Bs 1 Picking Bass 2 36 0 Fretless Bs 1 Fretless Bs2 2 PhaseFrtless 3 37 ...

Страница 249: ...a vib 2 60 0 MuteTrumpet 1 MuteTrumpet2 1 Solo MutedTp 2 1 MuteTrumpet2 1 Harmon Mute 2 Harmon Mute2 2 61 0 French Horns 1 FrenchHorns2 2 St Fr Horns 3 1 Fr Horn 2 MildFr Horns 2 St Fr Horns2 3 62 0 Brass 1 2 Brass FF 2 St Brass 2 1 Brass 2 2 BrassSection 3 St Brass 2 4 63 0 SynthBrass 1 2 JP Syn Brass 3 Hyper Brass 4 1 SynthBrass 3 2 JPSyn Brass2 2 Stack Brass 4 2 Oct SynBrass 2 OctSynBrass2 3 Oc...

Страница 250: ... 2 Warm Pad 2 2 Warm Pad 3 4 1 Sine Pad 2 Sine Pad 2 2 Sine Pad 3 3 91 0 Polysynth 2 Polysynth 2 2 Polysynth 3 3 92 0 SpaceVoices 1 SpaceVoices 2 3 SpaceVoices 3 4 1 Itopia 2 Itopia 2 3 Itopia 3 4 93 0 BowedGlass 2 BowedGlass 2 3 BowedGlass 3 3 94 0 Metal Pad 3 Metal Pad 2 4 Metal Pad 3 4 95 0 Halo Pad 3 Halo Pad 2 4 Halo Pad 3 4 96 0 Sweep Pad 2 Sweep Pad 2 2 Sweep Pad 3 4 Synth SFX PC LSB Classi...

Страница 251: ...se Cym 1 SFX PC LSB Classic Set Voices Contemp Set Voices Solo Set Voices MSB 96 MSB 97 MSB 98 121 0 GtFret Noise 1 1 Gt Cut Noise 1 2 Slap_St Bass 1 122 0 Breath Noise 1 1 Fl Key Click 1 123 0 Seashore 2 1 Rain 2 2 Thunder 2 3 Wind 2 4 Stream 2 5 Bubble 2 124 0 Bird Tweet 2 1 Dog 1 2 Horse Gallop 1 3 Bird Tweet 2 1 125 0 Telephone 1 1 Telephone 2 1 2 Door Creak 1 3 Door 1 4 Scratch 1 5 Wind Chime...

Страница 252: ...031 000 Dist Gt 1 008 Feedback Gt 2 032 000 Gt Harmonix 1 008 Gt Feedback 1 Bass PC CC00 GS Set Voices 033 000 Acoustic Bs 1 034 000 Fingered Bs 1 035 000 Picked Bass 1 036 000 Fretless Bs 1 037 000 Slap Bass 1 1 038 000 Slap Bass 2 1 039 000 Syn Bass 1 1 001 Syn Bass101 1 008 Syn Bass 3 1 040 000 Syn Bass 2 2 008 Syn Bass 4 2 016 Rubber Bass 2 Strings orchestra PC CC00 GS Set Voices 041 000 Violi...

Страница 253: ...00 Bagpipe 1 111 000 Fiddle 1 112 000 Shanai 1 Percussive PC CC00 GS Set Voices 113 000 Tinkle Bell 1 114 000 Agogo 1 115 000 Steel Drums 1 116 000 Woodblock 1 008 Castanets 1 117 000 Taiko 1 008 Concert BD 1 118 000 Melo Tom 1 1 008 Melo Tom 2 1 119 000 Synth Drum 1 008 808 Tom 1 009 Elec Perc 1 120 000 Reverse Cym 1 SFX PC CC00 GS Set Voices 121 000 Gt FretNoiz 1 001 Gt CutNoise 1 002 String Sla...

Страница 254: ...mbalom 2 026 000 Steel Guitar 1 035 12 string Guitar 2 040 Nylon Steel Guitar 2 041 Steel Guitar with Body Sound2 096 Mandolin 2 027 000 Jazz Guitar 1 032 Jazz Amp 2 028 000 Clean Guitar 1 032 Chorus Guitar 2 029 000 Muted Guitar 1 040 Funk Guitar 1 2 041 Muted Steel Guitar 2 045 Jazz Man 1 030 000 Overdriven Guitar 1 043 Guitar Pinch 2 031 000 Distortion Guitar 1 040 Feedback Guitar 2 041 Feedbac...

Страница 255: ...66 Itopia 2 093 000 Bowed Pad 2 094 000 Metallic Pad 2 095 000 Halo Pad 2 096 000 Sweep Pad 2 Synth SFX PC CC00 XG Set Elements 097 000 Rain 2 065 African Wind 2 066 Carib 2 098 000 Sound Track 2 027 Prologue 2 099 000 Crystal 2 012 Synth Drum Comp 2 014 Popcorn 2 018 Tiny Bells 2 035 Round Glockenspiel 2 040 Glockenspiel Chimes 2 041 Clear Bells 2 042 Chorus Bells 2 065 Soft Crystal 2 070 Air Bel...

Страница 256: ...Room Set 105 Room Set 2 106 St Room 017 104 Power Set 105 Power Set 2 106 St Power 025 104 Electric Set 105 Dance Set 106 Rust Set 026 104 Analog Set 105 Rave Set 106 Analog2 Set 033 104 Jazz Set 105 Jazz Set 2 106 St Jazz 041 104 Brush Set 105 Brush Set 2 106 St Brush 049 104 OrchestraSet 105 106 057 104 SFX Set 105 106 SD 20e book 256 ページ 2005年3月24日 木曜日 午後2時8分 ...

Страница 257: ...m 1 Ana Mid Tom1 High Tom 2 Room Hi Tom2 Power HiTom2 E Hi Tom 2 Ana Hi Tom2 CrashCymbal1 Ana Cymbal High Tom 1 Room Hi Tom1 Power HiTom1 E Hi Tom 1 Ana Hi Tom1 Ride Cymbal1 China Cymbal Reverse Cym Ride Bell Tambourine SplashCymbal Cowbell CrashCymbal2 Vibra slap Ride Cymbal2 High Bongo Low Bongo MuteHi Conga Ana Hi Conga OpenHi Conga Ana MidConga Low Conga Ana LowConga High Timbale Low Timbale H...

Страница 258: ...idTom1 Timpani B GtFret Noise Brush HiTom2 Timpani c Cut Noise Up Brush Crash1 Timpani c Cut Noise Dw Brush HiTom1 Timpani d Slap_St Bass Brush Ride 1 Timpani d Fl Key Click Timpani e Laughing BrushRideBel Timpani f Scream Punch Heart Beat Footsteps 1 Footsteps 2 Applause Door Creak Door Scratch Wind Chimes Car Engine Car Stop Car Pass Car Crash Siren Train Jetplane Helicopter Starship Gun Shot Ma...

Страница 259: ...MidTom 1 High Tom 2 Room Hi Tom2 Power HiTom2 Ana Hi Tom2 808Hi Tom 2 CrashCymbal1 Ana Cymbal High Tom 1 Room Hi Tom1 Power HiTom1 Ana Hi Tom1 808Hi Tom 1 Ride Cymbal1 China Cymbal Reverse Cym Ride Bell Tambourine SplashCymbal Cowbell Ana Cowbell CrashCymbal2 Vibra slap Ride Cymbal2 High Bongo Low Bongo MuteHi Conga Ana Hi Conga OpenHi Conga Ana MidConga Low Conga Ana LowConga High Timbale Low Tim...

Страница 260: ...ll BrushMidTom1 Timpani B GtFret Noise Brush HiTom2 Timpani c Cut Noise Up Brush Crash1 Timpani c Cut Noise Dw Brush HiTom1 Timpani d Slap_St Bass Brush Ride 1 Timpani d Fl Key Click Timpani e Laughing BrushRideBel Timpani f Scream Punch Heart Beat Footsteps 1 Footsteps 2 Applause Door Creak Door Scratch Wind Chimes Car Engine Car Stop Car Pass Car Crash Siren Train Jetplane Helicopter Starship Gu...

Страница 261: ...1 Ana Mid Tom1 High Tom 2 Room Hi Tom2 Power HiTom2 Elec Tom H2 Ana Hi Tom2 CrashCymbal1 High Tom 1 Room Hi Tom1 Power HiTom1 Elec Tom H1 Ana Hi Tom1 Ride Cymbal1 China Cymbal Reverse Cym Ride Bell Tambourine SplashCymbal Cowbell Ana Cowbell CrashCymbal2 Vibra slap Ride Cymbal2 High Bongo Low Bongo MuteHi Conga Ana Hi Conga OpenHi Conga Ana MidConga Low Conga Ana LowConga High Timbale Low Timbale ...

Страница 262: ...m1 Timpani B GtFret Noise Brush HiTom2 Timpani c Cut Noise Up Brush Crash1 Timpani c Cut Noise Dw Brush HiTom1 Timpani d Slap_St Bass Brush Ride 1 Timpani d Fl Key Click Timpani e Laughing BrushRideBel Timpani f Scream Punch Heart Beat Footsteps 1 Brush Crash2 Footsteps 2 Applause Brush Ride 2 Door Creak Door Scratch Wind Chimes Car Engine Car Stop Car Pass Car Crash Siren Train Jetplane Helicopte...

Страница 263: ...263 Appendices Drum set list GS mode PC GS Set 001 STANDARD 009 ROOM 017 POWER 025 ELECTRONIC 026 TR 808 033 JAZZ 041 BRUSH 049 ORCHESTRA 057 SFX SD 20e book 263 ページ 2005年3月24日 木曜日 午後2時8分 ...

Страница 264: ...m Mid Tom1 Room Mid Tom1 Elec Mid Tom1 808 Mid Tom1 Timpani B High Tom2 Room Hi Tom2 Room Hi Tom2 Elec Hi Tom2 808 Hi Tom2 Timpani c Crash Cymbal1 808 Cymbal Timpani c High Tom1 Room Hi Tom1 Room Hi Tom1 Elec Hi Tom1 808 Hi Tom1 Timpani d Ride Cymbal1 Timpani d Chinese Cymbal Reverse Cymbal Timpani e Ride Bell Timpani f Tambourine Splash Cymbal Cowbell 808 Cowbell Crash Cymbal2 Concert Vibra slap ...

Страница 265: ...tsteps2 Applause Door Creaking Door Scratch Wind Chimes Car Engine Car Stop Car Pass Car Crash Siren Train Jetplane Helicopter Starship Gun Shot Machine Gun Lasergun Explosion Dog Horse Gallop Birds Rain Thunder Wind Seashore Stream Bubble 35 39 40 41 43 45 47 42 44 46 36 38 37 87 88 84 86 85 51 52 53 55 57 59 54 56 58 48 50 49 63 64 65 67 69 71 66 68 70 60 62 61 75 76 77 79 81 83 78 80 82 72 74 7...

Страница 266: ...G Set 001 127 0 Standard Kit 126 0 SFX Kit 1 002 127 0 Standard Kit 2 126 0 SFX Kit 2 009 127 0 Room Kit 017 127 0 Rock Kit 025 127 0 Electro Kit 026 127 0 Analog Kit 033 127 0 Jazz Kit 041 127 0 Brush Kit 049 127 0 Classic Kit SD 20e book 266 ページ 2005年3月24日 木曜日 午後2時8分 ...

Страница 267: ...Clap Snare Tight Snare Tight H Snare Tight Snappy Snare Rock Rim Snare Noisy 3 Floor Tom L Tom Room 1 Tom Rock 1 Tom Electro 1 Hi Hat Closed Floor Tom H Tom Room 2 Tom Rock 2 Tom Electro 2 Hi Hat Pedal Low Tom Tom Room 3 Tom Rock 3 Tom Electro 3 Hi Hat Open Mid Tom L Tom Room 4 Tom Rock 4 Tom Electro 4 Mid Tom H Tom Room 5 Tom Rock 5 Tom Electro 5 Crash Cymbal 1 High Tom Tom Room 6 Tom Rock 6 Tom ...

Страница 268: ...t Kick Analog Short Gran Cassa Kick Kick Analog Kick Jazz Kick Small Gran Cassa Mute Side Stick Side Stick Analog Snare Snare Analog Brush Slap 3 Band Snare Hand Clap Snare Tight Snare Analog 2 Brush Tap 2 Band Snare 2 Floor Tom L Tom Analog 1 Tom Jazz 1 Tom Brush 1 Tom Jazz 1 Hi Hat Closed Hi Hat Closed Ana Floor Tom H Tom Analog 2 Tom Jazz 2 Tom Brush 2 Tom Jazz 2 Hi Hat Pedal Hi Hat Closed Ana ...

Страница 269: ...ute Conga Analog H Conga H Open Conga Analog M Conga L Conga Analog L Timbale H Timbale L Agogo H Agogo L Cabasa Maracas Maracas 2 Samba Whistle H Samba Whistle L Guiro Short Guiro Long Claves Claves 2 Wood Block H Wood Block L Cuica Mute Scratch H 2 Cuica Open Scratch L 3 Triangle Mute Triangle Open Shaker Jingle Bells Bell Tree 53 55 57 59 54 56 58 63 64 65 67 69 71 66 68 70 60 62 61 75 76 77 79...

Страница 270: ...es Squeal Car Passing Car Crash Siren Train Jet Plane Starship Burst Roller Coaster Submarine Shower Laugh Thunder Scream Wind Punch Stream Heart Beat Bubble Foot Steps Dog Machine Gun Horse Laser Gun Bird Tweet 2 Explosion Firework Ghost 39 40 41 43 45 47 42 44 46 36 38 37 87 88 84 86 85 51 52 53 55 57 59 54 56 58 48 50 49 63 64 65 67 69 71 66 68 70 60 62 61 75 76 77 79 81 83 78 80 82 72 74 73 C2...

Страница 271: ... O O O O O Reverb O Chorus O O X O X X X X X X X X X O X 1 16 1 16 Mode 3 Mode 3 4 M 1 O O 0 127 0 127 O 1 O 1 O 1 O 1 0 127 O 1 X X X X X O 120 126 127 O X O 123 127 O X Bank select Modulation Portamento time Data entry Volume Panpot Expression Hold 1 Portamento Sostenuto Soft Resonance Release Time Attack Time Cutoff Decay Time Vibrato Rate Vibrato Depth Vibrato Delay Portamento control General ...

Страница 272: ... OPTICAL type conforms to S P DIF Audio Input jack stereo miniature phone type Audio Output jacks L R RCA phono type Headphones jack stereo miniature phone type Power Supply DC 9 V AC adaptor Current Draw 500 mA Dimensions 203 W x 159 D x 35 H mm 8 W x 6 5 16 D x 1 7 16 H inches Weight 0 4 kg 15 oz Accessories USB cable Conversion cable stereo miniature phone type RCA phono type AC adaptor Owner s...

Страница 273: ...273 MEMO SD 20e book 273 ページ 2005年3月24日 木曜日 午後2時8分 ...

Страница 274: ...274 MEMO SD 20e book 274 ページ 2005年3月24日 木曜日 午後2時8分 ...

Страница 275: ...te radio frequency energy and if not installed and used in accordance with the instructions may cause harmful interference to radio communications However there is no guarantee that interference will not occur in a particular installation If this equipment does cause harmful interference to radio or television reception which can be determined by turning the equipment off and on the user is encour...

Страница 276: ... delle Industrie 8 20020 Arese Milano ITALY TEL 02 937 78300 NORWAY Roland Scandinavia Avd Kontor Norge Lilleakerveien 2 Postboks 95 Lilleaker N 0216 Oslo NORWAY TEL 2273 0074 POLAND MX MUSIC SP Z O O UL Gibraltarska 4 PL 03664 Warszawa POLAND TEL 022 679 44 19 PORTUGAL Roland Iberia S L Portugal Office Cais das Pedras 8 9 1 Dto 4050 465 Porto PORTUGAL TEL 22 608 00 60 ROMANIA FBS LINES Piata Libe...

Отзывы: