background image

Check Box for These Contents 

In the event of missing or defective parts please call our customer service 
dept. at 

1 800 282 9346, ext #20


(Mon. to Fri. 8:00 AM to 4:00 PM EST)

.

    1.  

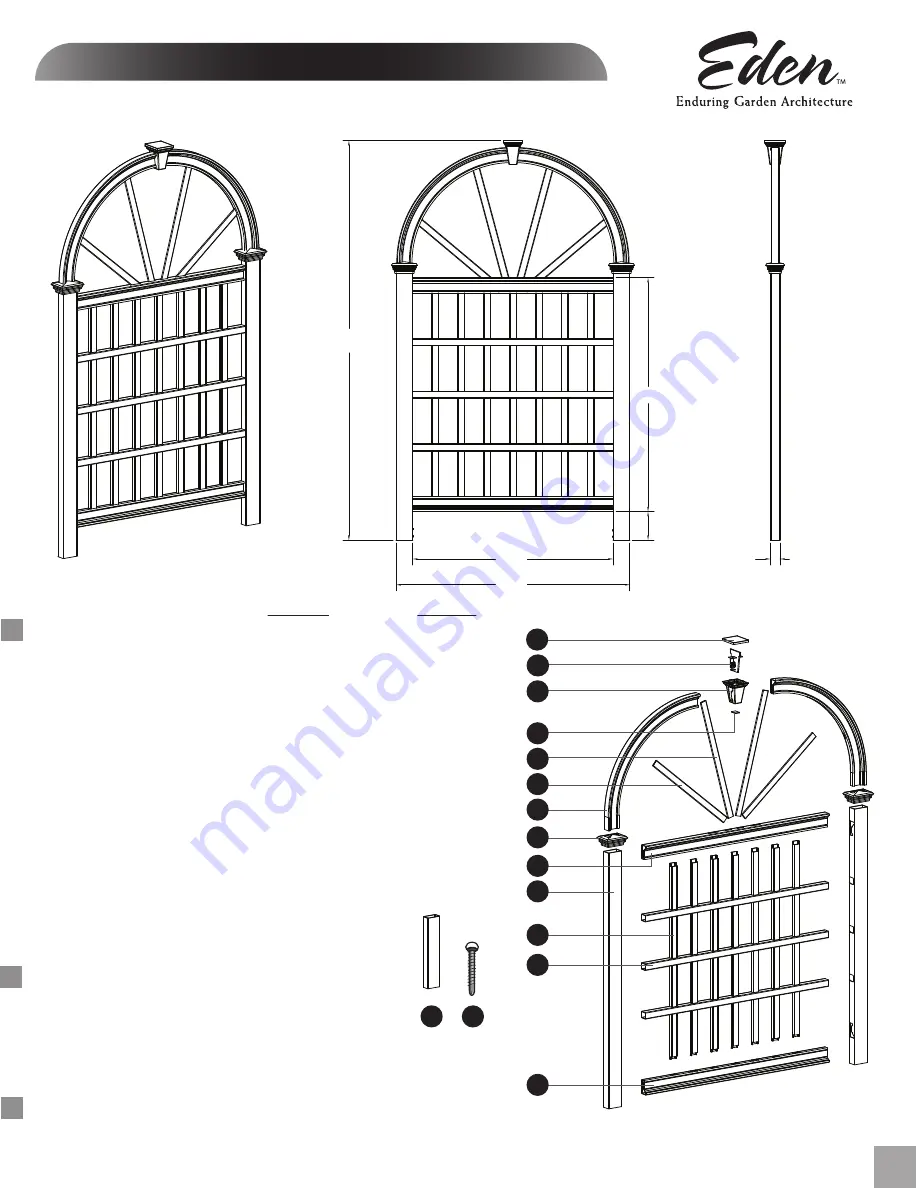
Keystone Lid

 (1)


    2. 

 Keystone Insert 

(1)

    3. 

 Keystone Body 

(1)


    4. 

 Keystone Bottom Plate 

(1)


    5. 

 Arch Spindle - Long 

(2)

    6. 

 Arch Spindle - Short 

(2)

    7. 

 Arches 

(2)

    8. 

 Post Caps 

(2)


    9. 

 Top Rail 

(1)

 10. 

 Posts 

(2)

 11. 

 Vertical Spindles 

(7)

 12. 

 Horizontal Spindles 

(3)

 13. 

 Bottom Rail 

(1)

 14. 

 Ground Stakes 

(2)

 15. 

 1 1/2” Self-Auguring Stainless Steel Screw 

(20)


Tools You Will Need

    •  Cordless Drill
    •  Hammer 
    •  Tape Measure
    •  Level 
    •  Shovel 

General Information

    • 

 Read Instructions through carefully before beginning assembly.

    •  When assembling components, place on a non-abrasive surface 

(i.e. shipping box) 

to avoid scratching. 

    •  We recommend an area approx 5’x 8’ for unobstructed assembling.
    •  You should not need to use excessive force when assembling component.

The Vienna Trellis

Please read through before starting assembly.

A S S E M B LY   I N S T R U C T I O N S

1

www.edenarbors.com 

1

2

15

Not to Scale

6

3

4

5

IMPORTANT:  CHECK THE INSIDE OF YOUR POSTS FOR ALL MATERIALS.

Ver 1/Aug 2011

14

83.75 in

49 in

42 in

6 in

49 in

2 in

7

8

9

10

11

12

13

Содержание The Vienna Trellis

Страница 1: ...s Steel Screw 20 Tools You Will Need Cordless Drill Hammer Tape Measure Level Shovel General Information Read Instructions through carefully before beginning assembly When assembling components place on a non abrasive surface i e shipping box to avoid scratching We recommend an area approx 5 x 8 for unobstructed assembling You should not need to use excessive force when assembling component The Vi...

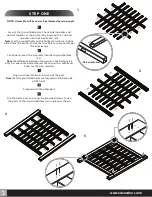
Страница 2: ...sembly into the top and bottom rails Note the difference between the two rails The bottom rail only has one routed side whereas the top rail has additional holes for the arch spindles Align and insert the rails into one of the post Note that the pre drilled holes are located on the back side of the trellis Proceed with the other post Flip the trellis over and using the provided screws fasten the p...

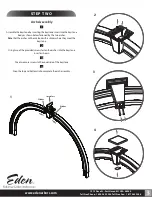
Страница 3: ...keystone body as shown below followed by the two arches Note that the arches will be marked with a sticker where they meet the keystone Using two of the provided screws fasten the arches into the keystone insert as shown Drive two more screws to the underside of the keystone Snap the top and bottom lid to complete the arch assembly Arch Assembly 1 Insert first 2 3 4 1 2 3 4 Sticker Sticker ...

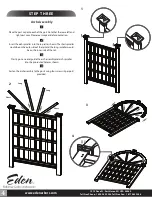
Страница 4: ...e image aside for orientation Insert the arch spindles into the top rail as shown The short spindles would be on the outer side of the rail and the long spindles would be on the inner side of the rail Starting on one end guide the arch assembly and arch spindles into the pre routed holes as shown Fasten the arch assembly to the posts using four screws 2 per post provided Arch Assembly 1 2 3 4 1 Lo...

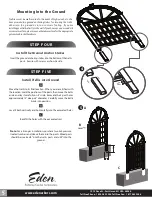
Страница 5: ...onawooddeck orconcretesurface pleaseseeyourhardwarestorefortheappropriate galvanized bracket hardware STEP FIVE Move the trellis to its final location When you are satisfied with the location mark the positions of the posts then move the trellis aside and lay it carefully on it s side Excavate the 2 post holes approximately 12 deep x 6 diameter Carefully move the trellis back into position Level i...

Отзывы: