© 2022
Order #XXXXX
Locked layer contains
placeholder marks.
Plan View
10’
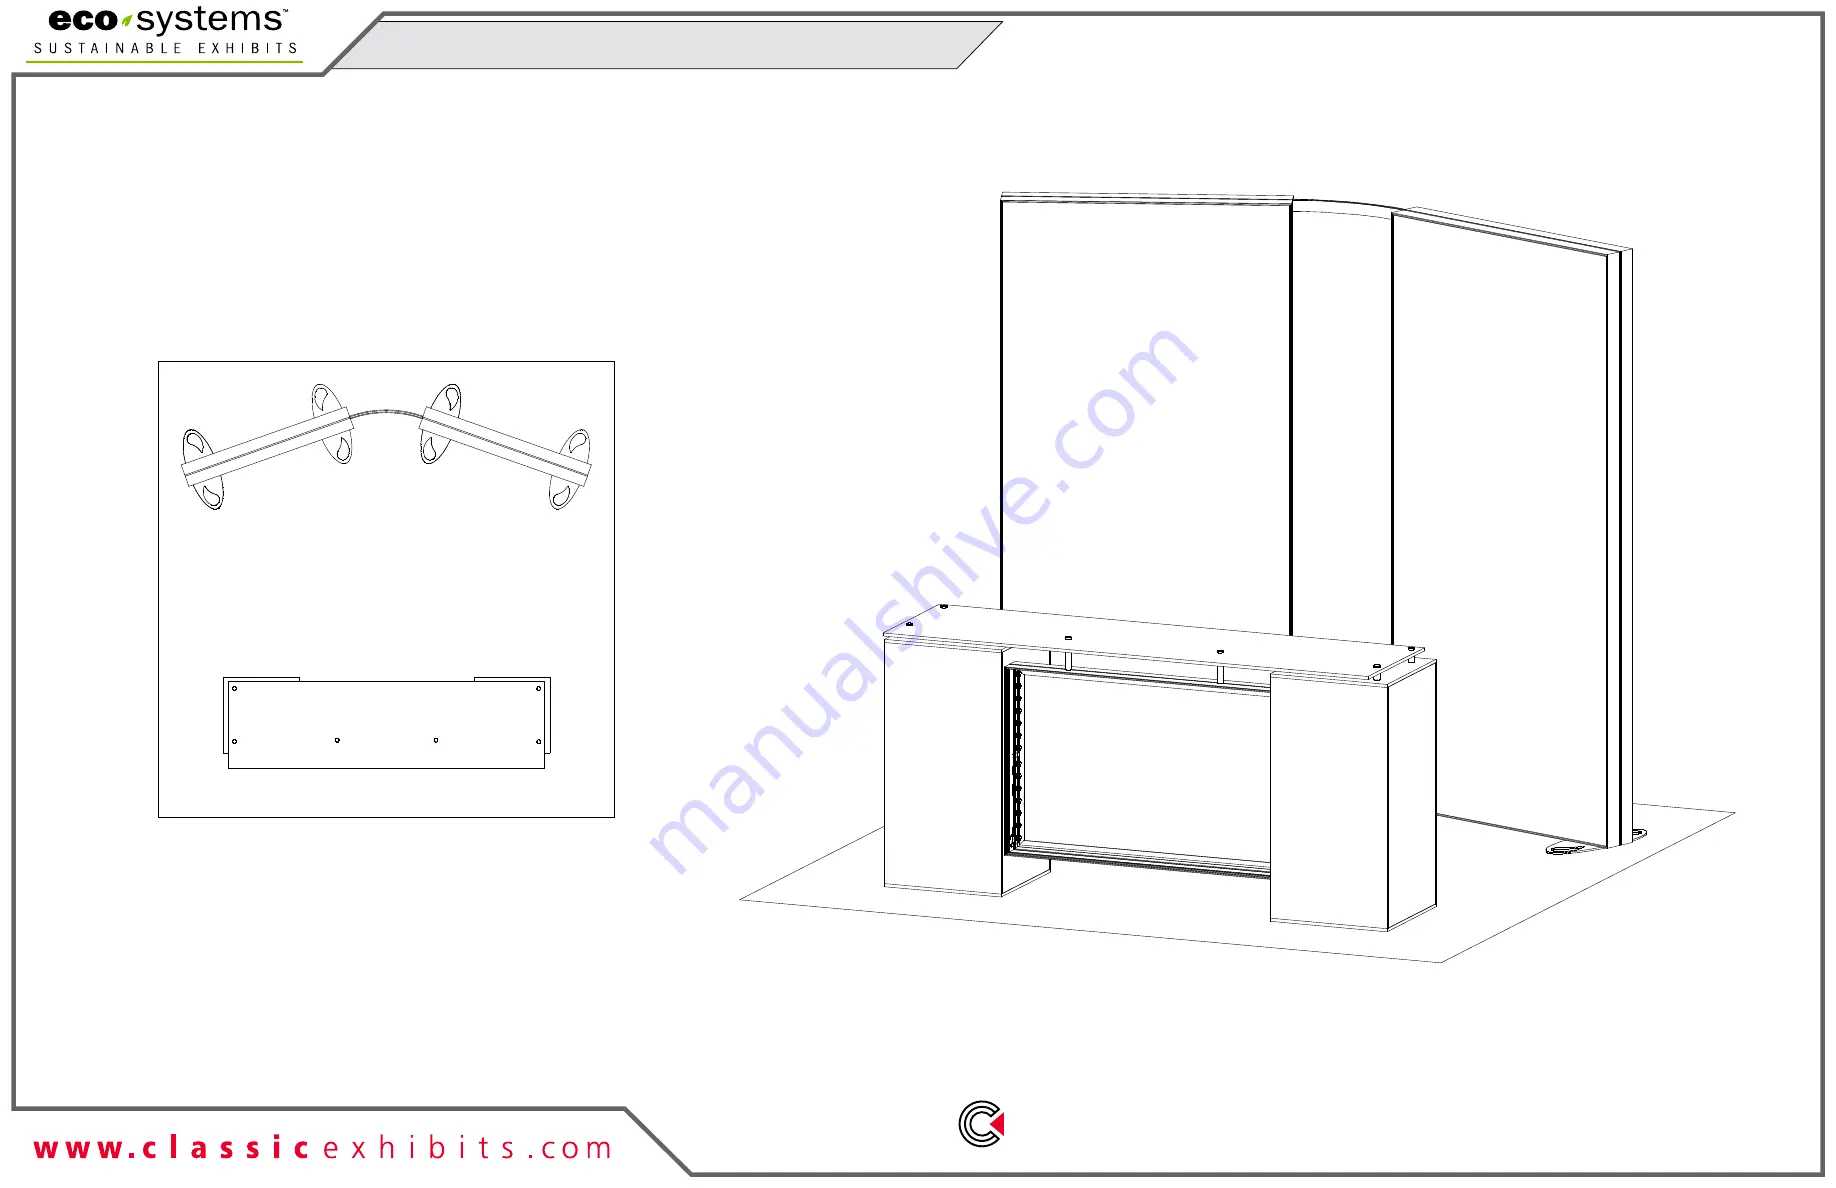
ECO-1094 - 10’ x 10’ Display
If you would like to tell us about your experience with your setup instructions please email us at
[email protected]
SETUP INSTRUCTIONS
Страница 1: ... 2022 Order XXXXX Plan View 10 10 ECO 1094 10 x 10 Display If you would like to tell us about your experience with your setup instructions please email us at info classicexhibits com SETUP INSTRUCTIONS ...
Страница 2: ... 2022 Order XXXXX 1 sq foot Grid View ...
Страница 3: ...ailed explanation for assembly WARNING Cleaning Packing For Cleaning Metal Plex Laminate Parts Use a MILD NON ABRASIVE cleanser and soft cloth paper towel to clean all surfaces Keep exhibit components away from heat and prolonged sun exposure Heat and UV exposure will warp and fade components Retain all provided Packing Materials All provided packing materials are for ease of repacking component p...
Страница 4: ...of components contain panel locks that are located at the top of the panel for extra stability and seamless connection When disassembling panels twist top connection slightly and lift right panel upward Panel Lock When Required Color Coded Clip w assembly number is top of panel Left Hand Grasps Panel Firmly With Right Hand Thumb Close to Seam Squeeze Push Forward And Lift General Setup Instruction...
Страница 5: ...Completed Assembly Secure extrusion using remaining set screws Set Screws Straight Bracket Installation TS RV 2 Upper Horizontal Lower Horizontal Upper Horizontal Lower Horizontal TS RV 2 Insert L Brackets into the Interior Center Slot outer interior grooves of extrusion Slide verticals over brackets of lower horizontal then slide upper horizontal brackets into grooves center slots of verticals 12...
Страница 6: ...t Connection Corner Connection TS RV 2 Upper Horizontal Lower Horizontal Upper Horizontal Lower Horizontal TS RV 2 8 Brackets Total 4 TS RV 2 4 A1 L Brackets A1 A1 Slide verticals over brackets of lower horizontal then slide upper horizontal brackets into grooves center slots of verticals Completed Assembly Insert L Brackets into the Interior Center Slot outer interior grooves of extrusion Disasse...
Страница 7: ...tep 1 for opposite corner C then insert corner B followed by corner D to complete the installation of the corners Step 3 Once all corners are inserted press one silicon edge into channel from corners and work toward the center Make sure welt is fully inserted into channel Continue until all sides are done Smooth out edges of graphic It is important to first insert graphic into each alternate corne...
Страница 8: ... 2022 Crate 1 of 1 Order XXXXX CRATE PACKING Crate Packing ...
Страница 9: ...formation page 1 Install U Channel to horizontal 15 See U Channel Attachment detail 2 Connect verticals 13 14 between horizontals 15 16 3 Install Base Plates 17 to bottom of horizontal 15 using bolts wing nuts Hole for wire management U Channel Attachment Slide V4 connectors into top groove of horizontal extrusion Tighten set screws to secure Use bolts to connect U Channel to horizontal V4 connect...
Страница 10: ...ormation page 1 Install U Channel to horizontal 20 See U Channel Attachment detail 2 Connect verticals 18 19 between horizontals 20 21 3 Install Base Plates 22 to bottom of horizontal 20 using bolts wing nuts AS VIEWED FROM INSIDE THE BOOTH U Channel Attachment Slide V4 connectors into top groove of horizontal extrusion Tighten set screws to secure Use bolts to connect U Channel to horizontal V4 c...
Страница 11: ... Steps 1 Connect power cords to Supernova lights as shown Transformers Power Female Transformer 144W 6 Amp 24V Lights Male Light to Light Attachment Maximum of 7 lights per chain 11 lights per Transformer Light to Transformer Attachment Lightbox Wiring ...
Страница 12: ...trusion Infill 10 14 19 10 Steps 1 Assemble horizontals 10 between verticals 14 19 inserting Infill 2 Apply SEG Graphics to lightbox frames Refer to the SEG Installation general information page Completed Assembly SEG Graphic SEG Graphic SEG Blocker SEG Blocker Lightbox Connection Graphics ...
Страница 13: ... Light Attachment Maximum of 7 lights per chain 7 lights per Transformer Light to Transformer Attachment Steps 1 Connect horizontals 3 4 between verticals 1 2 sliding backer panel between verticals See CEI 110 Corner Connection detail 2 Attach left right cabinets to frame assembly 1 2 3 4 using bolts wing nuts 3 Install Counter Top to assembly using standoff barrels See Standoff Barrel Attachment ...