background image

194

194

Using the iPod

®

 Player

How to operate portable audio devices

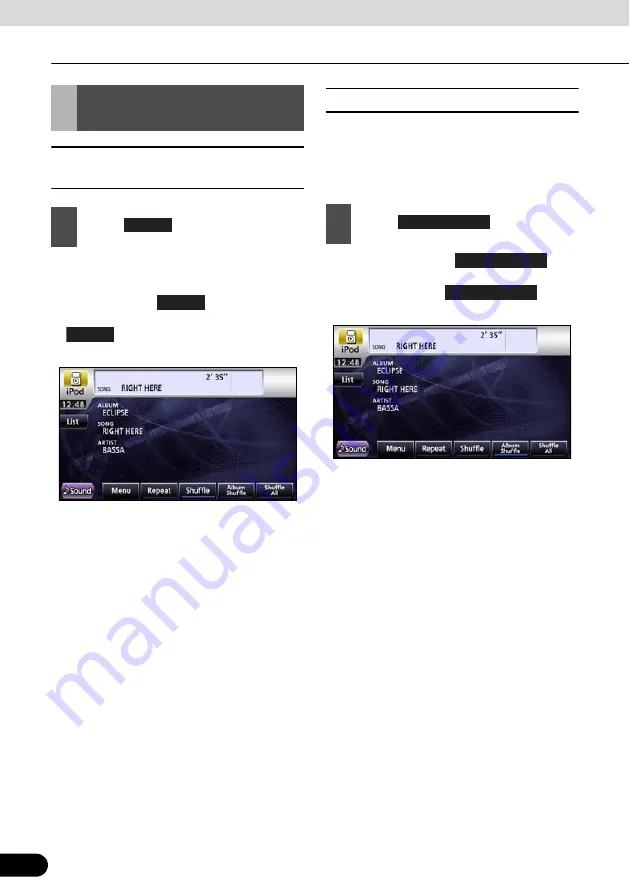
Listen randomly from the list that
is playing

All the files will playback randomly from the
playlist.

Once you touch 

 , the random play

continues until you cancel it. Touch

 again to cancel the random

playback of all files in the playlist.

Listen to an album randomly

The selected album can be played back
randomly. However, the music files in the
album will be played back in order from the
beginning. 

Once you touch 

, the

random play continues until you cancel it.
When you touch 

 again,

the random play for the album is cancelled.

Random Play of Music 
Files

1

Touch .

Shuffle

Shuffle

Shuffle

1

Touch .

Album Shuffle

Album Shuffle

Album Shuffle

Содержание AVN76D

Страница 1: ...unit Please read through this manual for correct operation We suggest that after reading it you keep this manual in a safe place for future reference DVD Video USB Multi Source Receiver 7 Wide Screen Monitor Navigation Built in Bluetooth wireless technology ...

Страница 2: ...ondensation forms inside them In such a case do not attempt to operate them until the condensation has disappeared CAUTION This sign indicates a situation in which incorrect handling through disregard of a sign might result in personal injury or may result solely in damage to property IMPORTANT Follow this advice to prevent malfunctions or damage to the main unit Perform the indicated action in th...

Страница 3: ... Display Angle 24 About SD memory card slot 25 About Modes of this Receiver 26 Starting each Mode 27 Navigation screen 27 Audio operations screen 27 About screen display 27 Operation Conditions of this Receiver 28 4 Main Unit Settings 29 Camera Setting 29 Guide Tone Setting 30 Color Pattern Setting 30 Button Illumination Setting 31 Navi Voice Output Setting 32 VTR Input Setting 32 Screen Adjustmen...

Страница 4: ... Entering the telephone number to make the call 39 Calling from call history 39 Calling from the telephone book 40 Receiving a call 41 Ending a call call refusal 41 Adjusting the ringtone volume 41 Adjusting the talking volume 41 Hands free settings 42 Auto Answer settings 42 Ringtone settings 42 Auto Connect settings 42 PIN Code setting 42 Starting Out 1 About GPS Navigation 43 Before Using the G...

Страница 5: ...reen color in tunnels 58 Volume settings 58 Map Display 59 Present location display 59 Cursor menu 60 Position menu 62 Checking vicinity information 62 Map menu operations 63 Map screen status information and hiding operation 65 Using the Cursor at selected position 69 Present location and route tracking 70 Returning to normal Map screen 70 Position determination Cursor 71 Displaying original posi...

Страница 6: ...ting 86 Setting from Map Scroll 86 Setting from Address 87 Entering Address 87 Entering addresses for repeating house number allocation 88 Entering address without knowing district or suburb 89 Selecting from intersection 90 Selecting from city center 91 Selecting from ZIP code 92 Entering quick address 93 Setting from Favorites 93 Setting from Facility Information 93 Selecting from facility infor...

Страница 7: ...ion Demo 101 Viewing a route demonstration 101 2 Storing Locations 102 Managing Favorites 102 3 What to Do When 103 About GPS Satellite Quality and Status 103 About Speed Warnings 104 About Road Safety Cameras 104 Saving road safety cameras 104 Camera warning 105 Road Safety Camera types 105 Road Safety Camera directions 106 Optional Features 1 Rear View Camera Operations 107 Imaging with the Rear...

Страница 8: ...te Guidance 114 Starting Out 1 Before Use 116 About Discs 118 Operation 1 Switching Audio Source 121 Switching the Audio Source 121 Display of Audio Operations Screen 121 Stopping audio mode 121 2 Source Operations Screen 122 3 Volume Control 124 Main Volume Control 124 4 Adjusting sound quality 125 Display of Audio Settings Screen 125 Adjusting audio balance 125 Sub Woofer Settings 126 Setting su...

Страница 9: ...Auto Tuning 133 Selecting from preset switch 133 Selecting Radio Band 133 Saving Station in Memory 134 Manual saving 134 Automatic saving 134 2 Using HD Radio 135 Using HD Radio 135 Listening to Radio 135 Select Desired Station 136 Manual Tuning 136 Auto Tuning 136 Selecting from preset switch 136 Selecting a Radio Band 136 Saving Station in Memory 137 Manual Saving 137 Automatic saving 137 Displa...

Страница 10: ... Broadcast 144 4 How to Use XM Satellite Radio 145 Using XM Satellite Radio 145 Listening to XM satellite radio 145 Checking RADIO ID 146 Changing XM Band 146 Selecting Channel to Listen to 146 Selecting from category 146 Manually selecting channel 147 Automatically selecting channel 147 Selecting a channel by entering it directly 147 Saving Channels 148 Selecting Preset Channel 148 Displaying Inf...

Страница 11: ...ID3 WMA tags 158 About supported media types 158 About format of discs 158 About file names 159 Multi sessions 160 About playing MP3 WMA 160 About MP3 WMA playing time display 160 Creating and Playing MP3 WMA Files 160 Downloading from MP3 WMA music sites on the Internet 160 Converting music CD into MP3 WMA files 161 Writing MP3 WMA files on CD R RW disc 161 Playing back CD R RW 161 7 Using USB Mu...

Страница 12: ...unction 168 Multi Angle Function 168 Subtitle Display Function 168 Discs 169 Types of Playable Discs 169 Region Code of Playable Disc 169 Mark Indicated on Disc 170 Disc Configuration 170 Products equipped with Macrovision 171 Operation Flow 171 2 Using the DVD Player 172 Using the DVD Player 172 Watching a DVD Video 172 Video Operations 173 Playing a Video 173 Fast Forward Rewind 173 Fast Forward...

Страница 13: ...ifying the Audio Language 181 Entering the Code 181 Specifying the Subtitle Language 182 Entering the Code 182 Specifying the Menu Language 183 Entering the Code 183 Setting display of multi angle mark 184 Specifying the Parental Screening Level 184 Switching the Video Output 185 Language Code List 186 3 Using the VTR 187 Using the VTR 187 Playing the VTR 187 Changing the VTR Setting Screen 188 Ho...

Страница 14: ...ng Bluetooth Audio 196 Registration of portable devices 196 Registration from the portable device 196 Register by searching for a portable device on this receiver 197 Connection of the portable device 198 Cancelling a portable device connection 199 Listening to the portable device 199 Stop the playback 200 Selecting a Desired Music 200 Fast forward rewind 200 Repeating the Same Track 200 Random Pl...

Страница 15: ...13 Reference 1 Necessary Information 206 If the Following Messages Appear 206 When You Think There Is a Malfunction 209 2 Glossary 211 3 Specifications 212 ...

Страница 16: ...ks electrical arcing fires and damage to vehicle wiring and the main unit you are installing Secure wiring with non conductive tape or plastic ties so that wires do not interfere with vehicle operation including the brake pedal gear shifter and steering Position wires so that they will not be rubbed abraded or damaged by moving vehicle components including power seats To avoid damage to the main u...

Страница 17: ... damage If foreign objects or water enters the main unit smoke or a strange odor may be emitted If this occurs stop using the main unit immediately and contact your dealer Accidents fire or shocks may result if you continue to use the main unit under these conditions The driver should not change the Disc or iPod USB memory while driving Doing so may result in as accident You must first stop or par...

Страница 18: ... result from disconnection and electrical shorts Install wiring in a manner in which cables will not come in contact with metal parts The wiring may be be damaged by contact with metal parts resulting in fire and shocks Avoid all contact with hot surfaces when wiring the main unit High temperatures may damage wiring causing shorts arcing and fires When changing the installation location for this m...

Страница 19: ...This device is precision engineered equipment and the information that you record on it after purchase can be lost as a result of static electricity electrical noise vibration and other influences It is recommended that you keep a separate record of the information you store in the main unit Note that the following events are not covered by the warranty a Corruption or loss of the data stored in t...

Страница 20: ... button names are shown as etc When a touch switch is to be touched switch names are shown as or ccc A title is assigned for each section Section title A title is assigned for each operation Operation title A number and title is assigned for each item Item title A screen showing the operation will appear Operation screen A title is assigned for each detailed operation Detailed operation title Desc...

Страница 21: ...r 1 second or more d NAVI button Press to display the navigation menu screen e MENU button Press to display the audio info menu screen f TUNE TRACK button For radio mode Press to select station manually Press to select station automatically Press for 1 second or more For CD MP3 WMA USB and iPod mode Press to select a track or music file Press to fast forward or fast reverse track or music file Pre...

Страница 22: ...screen touch the touch switch lightly with your finger When there is no response from switch remove your finger from the screen and touch again Disabled touch switches have their color toned down When the switch function is enabled the switches return to brighter colors Touch the touch switches with your finger Operating touch switches with the point of hard objects such as ballpoint pens or mecha...

Страница 23: ... a language touch I Agree to display the Navigation screen Turn off the audio Touch on the Menu screen If you are on the Navigation screen switch to the Menu screen to do this ATTENTION To turn off the audio power when the Navigation screen is displayed first switch to the Source screen When the audio power is turned off touch the source you wish to change to on the Source screen For details see S...

Страница 24: ... in an automatic transmission car or 1 3 5 or r in a manual transmission car or when a bottle or a similar object is placed in the cup holder To open or close the display safely set the gearshift lever to N automatic transmission car or to the Neutral position manual transmission car in advance or empty the cup holder Make sure that the car is not in motion by applying the parking brake and approp...

Страница 25: ...hen the shift lever is in the P position shift it to the N position If your car has a column shift lever shift it to the P or N position Manual transmission MT car If it is difficult to unload disc when the shift lever is in 1 3 5 or r position shift it to the Neutral position Take care NOT to close the display when the ejected disc remains in the slot If this caution is not observed this receiver...

Страница 26: ...play may fail Do not load a disc when the display is tilted If this caution is not observed this receiver or the disc may be scratched When adjusting the display angle use the following notes Automatic transmission AT car Adjust the display angle so as not to get in the way when shifting the AT lever to any of the P r or N positions If the lever shift is interfered with do not tilt the display Man...

Страница 27: ...you tilt the display and turn the ignition key OFF the display will return to the upright position However when you turn the ignition key to the ACC or ON position the display returns to the preset angle SD memory card slot of this unit is used for map update Once all our map update service are set we will announce it on our homepage ATTENTION SD Logo is a trademark 1 Press 2 Touch or of the angle...

Страница 28: ...ay navigation menu screen Set destination guidance 2 Audio press Receive AM FM radio Receive HD Radio Receive SIRIUS XM satellite radio CD MP3 WMA player operations Bluetooth audio player operations DVD player operations Display VTR video iPod operations Picture quality adjustment 3 Main menu press Displays audio menu Change audio source Displays information menu Steering mode switch setting Rear ...

Страница 29: ...Switching the Audio Source on page 121 2 Displayed when audio function is OFF About screen display If DISC is loaded or USB or iPod is connected while the Navigation screen is displayed the screendisplay will appear After a short time the screen display disappears automatically ATTENTION When the iPod is disconnected a screen corresponding to the audio source of the preceding mode is displayed Sta...

Страница 30: ...peration Conditions of this Receiver Function Engine switch Display open Turns OFF ACC ON vehicle at rest 1 ON vehicle in motion Navigation settings and information c c When the vehicle is in motion some functions become inoperable for safety reasons 2 Audio function c c When the vehicle is in motion some functions become inoperable for safety reasons Video function c c When the vehicle is in moti...

Страница 31: ... Setting See page 32 VTR Input Setting See page 32 Steering Remote Setting See page 202 Screen Adjustment and Setting See page 33 Set the camera to the AUTO or MANUAL operation mode AUTO is to switch to the camera picture when back gear is selected MANUAL is to switch to camera picture when is touched On completion touch to store the setting and return to the immediately preceding screen Camera Se...

Страница 32: ...mpletion touch to store the setting and return to the immediately preceding screen ATTENTION The guide tone is outputted from all speakers You can set the color pattern of the screens Guide Tone Setting 1 Press 2 Touch 3 Touch Info Setting 4 Touch either or mute to set the guide tone Color Pattern Setting 1 Press 2 Touch On Off Done Info ...

Страница 33: ...tore the setting and return to the immediately preceding screen You can set the button illumination 3 Touch 4 Touch or to set the color pattern Setting 1 2 3 4 5 Done Button Illumination Setting 1 Press 2 Touch 3 Touch Info Setting ...

Страница 34: ...e Right or Left navigation voice channel On completion touch to store the setting and return to the immediately preceding screen Set the video signal Auto automatically selects NTSC or PAL 4 Touch or Navi Voice Output Setting 1 Press 2 Touch Blue Red Done Info 3 Touch 4 Touch or VTR Input Setting 1 Press Setting Front L Front R Done ...

Страница 35: ... Night Picture quality adjustment screen display CHECK The Picture quality adjustment screen can be opened from the Navigation screen the Audio operations screen or the Video screen For adjustments see Picture quality adjustment on page 34 When no operation is performed for around 20 seconds this receiver selects a setting automatically and returns to the preceding screen For the Navigation screen...

Страница 36: ...just the day picture and night picture independently For the Navigation screen and Audio screen For the Video screen Brightness The initial setting for when the lights are switched off is the maximum value brightest state Color balance only applies to Video screen Color density only applies to Video screen 1 When night picture is displayed touch 1 Touch on the Picture quality adjustment screen Day...

Страница 37: ...echnology for connecting cell phones computers and other such devices Bluetooth is a registered trademark of Bluetooth SIG Inc a Reception indicator b Battery indicator Hands free screen display The hands free screen is displayed When a call is in progress finish the call before pressing Hands free screen Registering a cell phone IMPORTANT Register a cell phone on this receiver Cell phones can be ...

Страница 38: ...reen displayed Device information screen Registration of the cell phone is now complete Register by searching for cell phone on this receiver Searching is displayed 1 Touch on the Hands free screen 2 Touch 3 On the cell phone enter PIN CODE for this receiver Pairing Allow Connect 4 Bluetooth Connection Successful is displayed on completion of registration 1 Touch on the Hands free screen 2 Touch P...

Страница 39: ...our cell phone Deleting cell phone registration Delete a cell phone registered on this receiver Deletion of the cell phone is now complete ATTENTION When a cell phone registration is deleted all call histories and contact data stored on this receiver are also deleted 3 Select the device name of the cell phone you wish to register 4 Enter the PIN CODE on the cell phone 5 Bluetooth Connection Succes...

Страница 40: ...Note that you cannot connect unregistered cell phones Cancelling a cell phone connection Connection cancelation for the cell phone is now complete The reception indicator and battery indicator disappear from the screen 1 Touch on the Hands free screen 2 Select the cell phone for connection 3 Touch 4 Bluetooth Connection Successful is displayed on completion of connection Select Connect 1 Touch on ...

Страница 41: ...l phone that has not been connected Entering the telephone number to make the call You can enter telephone numbers of up to 24 digits Touch to delete single digit of the entered number A call is made to the entered number Calling from call history Touch to delete the list data of display mode Do not make a call while driving Be sure to park the vehicle in a safe location and make a call 1 On the H...

Страница 42: ...ith the corresponding numbers Touch to transfer the telephone book to this receiver Touch to cancel data transfer Makes a call to number of selected person ATTENTION The incoming and outgoing call histories can store 10 calls for each registered cell phone For more than 10 calls the oldest call is deleted 3 Select name or telephone number to call from history 4 Touch 1 Touch on the Hands free scre...

Страница 43: ...call will end Calling screen ATTENTION Refused calls are stored in the incoming call history Adjusting the ringtone volume CHECK Make adjustments to the ringtone during ringing Increase ringtone volume Decrease ringtone volume ATTENTION Sound is not emitted unless the ringtone is set to ON Adjusting the talking volume CHECK Make adjustments to the talking volume when talking Increase talking volum...

Страница 44: ...eiver PIN Code setting For changing the PIN CODE Each touch of deletes a single character 1 Touch on the Hands free screen 2 On the Phone setting screen you can perform the following settings using the settings switches Item Function Auto Answer For setting automatic call acceptance Ringtone For setting ringtone Auto Connect For setting automatic connection between registered cell phone and this r...

Страница 45: ...the full functionality of Navigation Switching from Simple mode to Advanced mode From the start screen Navigation menu touch Settings Advanced Mode Switching from advanced to Simple mode From the start screen Navigation menu touch Settings Simple Mode Screen switches and other operations When using Navigation you usually touch the switches on the touch screen You only need to confirm selections or...

Страница 46: ...ages by touching the switches of c Slider d When a feature has several different unnamed values Navigation shows an indicator on a gauge for displaying and setting a value from a range Drag the handle to move the slider to its new position Touch position of handle on slider Move your finger Check switch e When there are only two options a checkmark shows whether the feature is enabled Touch to tur...

Страница 47: ...tion Map Map The Map screen Find Find Select destination for example an address or a POI or use the search engine of Navigation for any other reason for example to look for the phone number of a POI Route Route Manage an active route obtain information relating to route modify or delete route or part of route Also plan route without GPS reception Manage Manage Manage user data such as saved locati...

Страница 48: ...se the voice guidance profile you prefer 52 Warnings You can enable some useful warnings and disable the touch screen in a moving vehicle with Safety Mode 53 Menu You can modify the look and behavior of the Menu screens 54 Track Logs You can set up automatic Track Log saving and fine tune related settings 54 Traffic INFO You can check connecting information of SIRIUS Traffic 55 About This screen h...

Страница 49: ... and hold 3D buildings can be displayed on the map Use this switch to suppress them temporarily Opens 3D settings Turn Track Logs on and off This function can also be controlled from the Manage Track Logs screen Opens Manage Track Logs screen GPS Opens the GPS Data screen which includes satellite information data coming from the GPS receiver and a shortcut to the GPS Setting screen if needed No ac...

Страница 50: ...nts and destination If you later decide that you need the same route you will have to rebuild it from scratch 99 Settings Opens the Route settings screen with controls to modify the road types used for route calculation and the route calculation method 50 Fly Over You can run a demonstration of the route at high speed 101 Simulate You can run a demonstration of the route at normal speed 101 Touch ...

Страница 51: ...rn to their factory defaults but no user data will be deleted This unit will restart Touch switch Description 3D Settings Use 3D settings to determine which of the present 3D objects are shown on the map and adjust the level of 3D visual detail The options are as follows Landmarks Landmarks are 3D artistic or block representations of prominent or well known objects 3D landmarks are only available ...

Страница 52: ...n can only be accessed using some of the excluded road types they will be used but only as much as necessary In this case a warning icon will be shown on the Route Information screen and the part of the route not matching your preference will be displayed in a different color on the map Route Calculation Method You can choose from different route types The routing method can be changed temporarily...

Страница 53: ...ion by default Pre use Toll By default Navigation includes toll roads pay roads where there is a per use charge in the routes If you disable toll roads Navigation plans the best toll free route Period Charge Charge roads are pay roads where you can purchase a pass or vignette to use the road for a longer period of time They can be enabled or disabled separately from toll roads Carpool HOV This con...

Страница 54: ... disable this feature Restore Lock to Position If you have moved or rotated the map during navigation this feature moves the map back to your current GPS position and re enables automatic map rotation after the given period of inactivity Automatic Overview This feature switches the map view to Overview mode when the next route event is far away Overview is a zoomed out 2D view to let you see the s...

Страница 55: ...e provided by the GPS receiver Use Auto Time Zone Use this feature to synchronize the time zone of the clock of your device to the time zone based on your current GPS position This is useful if you travel abroad Set Time Zone Set time zone manually if you do not want to synchronize the time zone automatically This allows you to use Auto Time Correction and apply a time zone offset to obtain the de...

Страница 56: ... Map screen Touch switch Description Animation You can activate and deactivate the Menu animations When animation is turned on switches on Menu and keyboard screens are animated Background You can choose the image to be used as the menu background image Touch switch Description Update Interval This determines how often track points will be saved Position information is normally received once a sec...

Страница 57: ...pen the screen all route data fields contain information about reaching your final destination Touch Next Via Point to have the fields relating to your route display data for the next via point Touch the switch repeatedly to toggle between the two options You have the following data and functions on this screen Name Description Function Shows whether the route data fields are displaying informatio...

Страница 58: ... remaining segments of the route The calculation cannot take into account traffic jams and other possible delays Touch this field to show it on the Map screen in one of the Trip Data fields GPS Time Shows the current time corrected with time zone offset The accurate time comes from the GPS satellites and the time zone information either comes from the map or is set manually in Regional settings To...

Страница 59: ...e is not shown on the Map screen This value appears on the Map screen in the Trip Data area This is the value at the top This value appears on the Map screen in the Trip Data area This is the value in the middle This value appears on the Map screen in the Trip Data area This is the value at the bottom Name Description Pause Pauses the trip currently shown on the screen Values on the screen stop ch...

Страница 60: ...ge objects such as surface waters or forests and empty areas between roads become black However roads and streets keep their original colors from the daytime or night color scheme currently in use After leaving the tunnel the original colors return Volume settings You can adjust the sounds of Navigation Touch the following switches Menu Settings Sound Screen Adjustment and Setting Touch switch Des...

Страница 61: ...the last known GPS position as the start point When you are using a saved route Navigation asks you if you want to use your GPS position or the first point in the saved route as the start point You can also modify the start point in the Cursor menu If you do so automatic off route recalculation needs to be turned off to keep the selected point as the start point If automatic off route recalculatio...

Страница 62: ...the active leg is the section of the route from the present location to the next route point the next via point or the final destination if there are no more via points Inactive leg of the route Upcoming sections of the route Each of these becomes active when you arrive at the corresponding via point Streets and roads that are excluded from the navigation You can select whether or not to use certa...

Страница 63: ...ve the results and choose one of the routes to navigate Set as Start The Cursor becomes the start point of the route This means that the route is not started from the current GPS position and Automatic Off route Recalculation needs to be turned off to keep the selected point as the start point Remove Start When the cursor is at the start point or nearby this switch replaces the previous switch and...

Страница 64: ...cting it on the map It is even easier if you select the desired point in the Find menu Then the Cursor menu opens automatically Just touch Info 1 Check the bottom line of the map It shows the current street and house number information 2 For details touch Position to open the Position menu 3 Touch Info The address coordinates and a list of nearby POIs are displayed 1 Touch the map anywhere to open...

Страница 65: ...turn to the GPS position Opening closing map control switches Touch this switch to show or hide the following map control switches Zoom in out Rotate left right 3D map only Tilt up down 3D map only Zoom preset switches 2D map only Tilt and zoom preset switches 3D map only Return to GPS position switch Smart Zoom Zooming in and out Changes how much of the map is displayed on the screen Navigation u...

Страница 66: ...to switch to 2D mode In 2D mode is displayed Touch to switch to North up mode In North up mode is displayed Touch to switch to 3D mode Smart Zoom Navigation can automatically rotate scale and tilt the map and give you the optimal view When you approach a junction it will zoom in and raise the view angle to let you easily recognize your maneuver If the next junction is at a distance Navigation zoom...

Страница 67: ... Map scale Navigation shows the scale of the map in 2D mode Fit to screen Fit to screen This switch is not shown on the Map screen It is available on the following screens Plan on map screen When you have an active route you can display it in its full length on the map Track information screen A Track Log can be displayed in its full length on the map Icon Information Details Action There is no ac...

Страница 68: ...this symbol appears here Touch this area to open the GPS Data screen to check the signal status or the connection settings Traffic restriction When GPS position is available but there is no route to be navigated any traffic restrictions at upcoming intersections are shown here Nothing happens if you touch this area of the screen Second route event maneuver after next maneuver When GPS position and...

Страница 69: ...og recording TMC status Nothing happens if you touch this area of the screen Navigation records a Track log when GPS position is available Track log recording is disabled No SIRIUS Traffic receiver is connected or SIRIUS Traffic is turned off A SIRIUS Traffic receiver is connected and a SIRIUS Traffic data is received There are new unread Traffic events A part of the route is bypassed based on Tra...

Страница 70: ...he circle but only for the next turn Enter freeway Exit freeway Board ferry Leave ferry Approaching the next via point Approaching the destination Icon Type More information Compass Shows the direction of your heading both when the map is automatically rotated 3D and when the map is always facing North 2D Speed information There are speed values that can be shown Current speed Speed limit on the c...

Страница 71: ...itude Icon Description GPS receiver not connected GPS navigation is not possible Navigation is connected to the GPS receiver but the signal is too weak and the receiver cannot determine the GPS position GPS navigation is not possible GPS navigation is not possible Only a few satellites are received Position information is available but elevation altitude cannot be calculated GPS navigation is poss...

Страница 72: ...Shows the different routes calculated by the available routing methods Choose the one that best suits your needs available in Advanced mode only Set as Start On an active route use the Cursor as the start point by resetting the current GPS position available in Advanced mode only Continue On an active route use cursor as destination with previous destination as via point only available in Advanced...

Страница 73: ...or menu When the Cursor menu is open a special icon shows the Cursor position the menu was opened You can move and zoom the map and reposition the Cursor The usual Cursor appears and the switches of the Cursor menu initiate actions for this new location To return to the original Cursor position tap The map jumps back to the position it held when the Cursor menu was opened and the icon reappears Sw...

Страница 74: ... can be recorded renamed swapped shown on the map exported to a memory card in GPX format and deleted See page 100 You can instruct this unit to record native GPS data received from the GPS device independently of the normal Track Log These logs are saved as separate text files on a memory card and they cannot be shown or replayed in this unit To turn on NMEA SIRF log saving touch the following sw...

Страница 75: ...ording Simulating a Track Log on the map 1 Start driving 2 Touch the following switches Menu Settings Track Logs 3 Start recording Touch Record 4 Repeat the above steps then touch Stop Recording to stop the recording 1 Touch the following switches Menu Settings Track Logs 2 Locate the desired Track Log and then touch next to it 3 The map returns and the Track Log simulation a life like replay begi...

Страница 76: ...rmation is used to recalculate the new route If you updated your map since you first saved the route Navigation recognizes the change and recalculates the driving instructions according to the latest available map information During navigation Navigation deletes via points that you already left behind together with the road segments used to reach it If you wish to save the route you need to do so ...

Страница 77: ... However Navigation provides much more than regular paper maps You can customize the look and the content of the map The most important and most often used screen of Navigation is the Map screen 1 Touch the following switches Menu Route Load Route 2 Touch the route you wish to navigate 3 In the very likely case that the start position of the saved route is different from the current GPS position y...

Страница 78: ...76 76 Navigation Overview Operation 15 12 13 17 11 8 21 9 14 19 7 16 10 ...

Страница 79: ...nd North up mode 8 Menu Opens the Navigation menu 9 Detour Opens the Detour screen There are two ways to modify your route The list of saved Search Criteria A switch to avoid parts of the route 10 Position menu appears when navigating a route Opens the Position menu 11 Cursor menu appears when there is no GPS position or the Cursor is not at the current GPS position Opens the Cursor menu 12 Opens ...

Страница 80: ...eset switch once to set the zoom level to a fixed predetermined value Smart Zoom is disabled These switches are available in 2D mode Touch and hold the desired switch to set the zoom value as the current zoom level or reset to an original value 17 Tilt preset switch available in Advanced mode only Touch one of the preset switches to set the tilt and zoom level to fixed predetermined values Smart Z...

Страница 81: ... roads Complex intersections and vertically isolated roads such as overpasses or underground tunnels are displayed in 3D 3D buildings Full 3D city building data that represents actual building size and position on the map Building data is limited to the city centers of major cities in the US and Europe 3D terrain 3D terrain map data shows changes in terrain elevations or depressions in the land wh...

Страница 82: ...roups Subgroups under the edited POI group will inherit the visibility settings of the POI group Switch including icon of POI group Touch this switch to select a new icon for the POI group Rename Rename edited POI groups Remove Delete edited POI groups Created POI groups can only be deleted Touch switch Description Switch including name of POI group Touch this switch to rename the POI Switch inclu...

Страница 83: ...he middle Touch switch Description Any of the list items Opens the map with the selected maneuver in the middle Mode Changes the detail level of the Itinerary The levels are as follows Detailed Instructions All intersections are listed Itinerary Only significant intersections the ones announced in voice guidance are listed Roads list The list of the roads used while navigating the route Moves betw...

Страница 84: ...ches from the Navigation menu Route Route Info In the top section of the screen you see information about the current route The fields on this screen are continuously updated while the screen is open When you open the screen all fields contain information about reaching your final destination Touch switch Description The selected point moves up in the list becomes a via point to be reached earlier...

Страница 85: ...ontent of all data fields to via point information Time Left Shows the time needed to reach the final destination of the route based on information available for the remaining segments of the route The calculation cannot take into account traffic jams and other possible delays Touch this field to change the content of all data fields to via point information Method This field shows how the route w...

Страница 86: ...lowing switches Cursor More Options Save as POI Managing POIs You can select which POI groups to show and which ones to hide on the map and from which zoom levels POI icons are visible At the same place you can manage your saved POIs A saved POI can be renamed moved to a different POI group its icon can be changed or a phone number and additional information can be added to it Touch the following ...

Страница 87: ...ect it from the list of available keyboard types Navigation remembers your last keyboard choice and offers it the next time you need to enter data Correcting an entry on the keyboard Delete an unwanted character Touch Touch and hold the switch to delete the entire string Entering a space for example between a first name and a family name or in multi word street names Touch Space Entering lowercase...

Страница 88: ... case there in not need to select a city name This will speed up the search for a street name Use coordinates See page 95 A Favorite See page 93 A POI See page 93 From a history of set destinations and intermediate points See page 95 CHECK If you are going to use a route later save it before you start navigating Touch the following switches Menu Route Save Route ATTENTION When you wish to use the ...

Страница 89: ...ame on the key board After entering a couple of characters the names that match the string appear in a list Touch Done to open a list of results before one appears automatically Setting from Address 1 Touch the following switches Find Address Advanced mode 2 By default Navigation proposes the country state and city where you are If needed touch the switch with the name of the country on it and sel...

Страница 90: ...h Start entering the city name on the key board After entering a couple of characters the names that match the string appear in a list Touch Done to open a list of results before one appears automatically 7 Touch Street Name 8 Select the street from the list 9 Touch House Number 10 Touch Done to finish entering the address 11 The map appears with the selected point in the middle From the Cursor me...

Страница 91: ...tring appear in a list Touch Done to open a list of results before one appears automatically 6 Touch Street Name 7 Select the street from the list 8 Touch House Number 9 Touch Done to finish entering the address 10 A list appears with the matching addresses Touch the desired one 11 The map appears with the selected point in the middle From the Cursor menu touch Set as Destination Advanced mode The...

Страница 92: ...cally 6 Touch Street Name 7 Instead of selecting one of the streets touch Search in All 8 Touch House Number 9 Touch Done to finish entering the address 10 A list appears with the matching addresses Touch the desired one 11 The map appears with the selected point in the middle From the Cursor menu touch Set as Destination Advanced mode The route is then automatically calculated and you can start n...

Страница 93: ... select the city from the list of recently used ones touch the switch Start entering the city name on the keyboard After entering a couple of characters the names that match the string appear in a list Touch Done to open a list of results before one appears automatically 6 Touch Street Name 7 Select the street from the list 8 Touch Intersection 9 Touch the desired intersecting street in the list 1...

Страница 94: ...n the keyboard 6 Touch City Center 7 The map appears with the selected point in the middle From the Cursor menu touch Set as Destination Advanced mode The route is then automatically calculated and you can start navigating 1 Touch the following switches Find Find Address Advanced mode 2 By default Navigation proposes the country state and city where you are If needed touch the switch with the name...

Страница 95: ...t faster if you enter the first letter of the street type For example enter Pi A to obtain Pine Avenue and skip all Pine Streets and Pickwick Roads You can also search in ZIP codes This is useful when a street name is common and it is used in several districts of a city You can select a location that you have already saved as a Favorite to be your destination Selecting from facility information Yo...

Страница 96: ...Motel To find the POI by its name touch Search and use the keyboard to enter a part of the name To list all POIs in a given group touch List All in this Group Order by Name Sort the list alphabetically available when you search around a single location Order by Distance Sort the list by the straight line distance from your present position available when you search around a single location Order b...

Страница 97: ...t as Destination Advanced mode The route is then automatically calculated and you can start navigating Setting from History 1 Touch the following switches Find History Advanced mode 2 If necessary move between pages with to see past destinations 3 Touch the desired item 4 The map appears with the selected point in the middle From the Cursor menu touch Set as Destination Advanced mode The route is ...

Страница 98: ...on will immediately be used in route planning The moment unit receives traffic information that may affect your route the program will warn you that it is recalculating the route and this unit will continue with a new route that is optimal based on the most up to date traffic conditions Touch the following switches Menu Settings Traffic INFO Search Menu Touch switch Description Reference Find Addr...

Страница 99: ...e of the ways of expanding the route is to keep the destination and to add via points intermediate destinations This feature is available in Advanced mode only To add more points to the route repeat the above steps as many times as you like When you insert via points in a routes which already includes multiple points the Edit route screen appears automatically From this screen you can decide the p...

Страница 100: ...tch will make this point the start point The selected point moves down in the list becomes a via point to be reached later Repeatedly touching this switch will make this point the final destination Reverses the route The start point becomes the destination the destination becomes the start point and the order of the via points is reversed Optimize The route is optimized The start point and the des...

Страница 101: ...arting from the next intersection touch this switch and select a distance to bypass Delete Avoids If you have used the above function touch this switch to clear the restrictions from the map Managing history You can manage the list of recently used locations Touch the following switches Menu Manage History Deleting active route The simplest way to delete an active route is to touch the Turn Previe...

Страница 102: ...g a Track Log in the Quick menu Stop Recording Stops the ongoing Track Log recording You can also start recording a Track Log in the Quick menu Switch with the name of the Track Log Shows the details of the selected Track Log Starts a simulated playback of the selected Track Log on the map Turns the page to view further items on the list Touch switch Description Switch withthe name of the Track Lo...

Страница 103: ...dvanced mode only The procedure is explained starting from the Map screen Touch Fly Over to run the simulation at high speed to give you a quick overview of the route Touch Simulate to run the simulation at normal speed and with voice guidance instructions announced This option is for demonstration purposes or for checking difficult parts of the route in advance Demonstration Demo 1 Touch the foll...

Страница 104: ...he following switches Menu Manage Favorites Managing Favorites Touch switch Description Switch with name of Favorite Opens the selected Favorite for editing Deletes the selected item from the list of Favorites Clear All Clears the list of Favorites Turns the page for view other items on the list ...

Страница 105: ...avigation is connected to the GPS receiver but cannot obtain GPS position information Red Navigation has no connection to the GPS receiver Green blinking GPS connection quality indicator Navigation is connected to the GPS receiver Yellow blinking Navigation has no connection to the GPS receiver but it is still trying to establish a connection Red blinking Navigation has no connection to the GPS re...

Страница 106: ...elected guidance profile The location of a Road Safety Camera is a special POI These cannot be searched like other POIs and there is a special proximity warning for cameras Saving road safety cameras To save a Road Safety Camera location place the Cursor at the desired location then touch the following switches Cursor More Options Save as Camera n a Coordinates Your current GPS position in WGS84 f...

Страница 107: ...e different types of Road Safety Cameras Symbol Type Description Fixed Some speed cameras stand by the roadside looking in one direction measuring traffic in one or both directions They measure your current speed For these speed cameras you can specify the controlled traffic direction and the speed limit Navigation warns you when you approach these speed cameras in the measured direction If your s...

Страница 108: ...ion The warning continues as you pass the camera and your average speed up to the other of the two cameras is measured If your average speed exceeds the speed limit between the two speed cameras you receive the same special warning sound as with the other speed camera types In the rare case Navigation cannot register the moment you pass the second speed camera for example it is placed at the exit ...

Страница 109: ...a solid object Doing so may displace the camera position or installation angle resulting in the rear view camera malfunctioning The camera unit has a waterproof structure Do not remove disassemble or remodel the camera unit Doing so may result in the rear view camera malfunctioning If you rub or polish the camera cover strongly with an abrasive or brush with hard bristles it may result in the cove...

Страница 110: ...ese phenomena are caused by the CCD characteristics The rear view camera is equipped with a special lens therefore distances perceived through viewing the video screen will be different from actual distances When camera is set to AUTO This changes to the rear view camera screen When you shift out of the back gear the screen that was being displayed before the rearward images returns When camera is...

Страница 111: ...lowing cases it may be difficult to watch the screen but it is not an error In dark places at night etc The temperature near the lens is high or low When there are water drops on the camera or when humidity is high during rain showers etc When foreign substances mud etc have become attached to locations near the camera The camera lens has been exposed directly to sunlight or the rays of headlights...

Страница 112: ...n status information screen will open When Navigation is not correctly installed accurate information cannot be displayed Display of Connection Status Information 1 Press 2 Touch 3 Touch Info System Check Item Content GPS information ON GPS information being received OFF GPS information not being received Parking signal ON Parking brake is on OFF Parking brake is off Reverse signal ON Currently in...

Страница 113: ... or the like exists on or in the vicinity of the GPS antenna it may not be possible to receive signals from the satellites CHECK Since the GPS satellites orbit the earth the reception of signals at a given position varies with time Note also that signals from satellites close to the horizon are susceptible to the effects of obstructions GPS satellites are managed by the US Department of Defense an...

Страница 114: ...nts and satellite measurements However since some error in the present location is unavoidable the present location will sometimes differ from your actual position even after correction by map matching The vehicle mark may also leave the road you are driving on when it differs in form to the map data ATTENTION Since this receiver does not operate in a stable manner when first switched on the vehic...

Страница 115: ...esent location appears misaligned when driving on steep roads The present location appears misaligned when driving on a continuous curve in the same direction The present location appears misaligned when meandering such as changing lanes The present location appears misaligned when the vehicle is rotated on a parking structure turntable with the ACC turned OFF The present location appears misalign...

Страница 116: ...the voice guidance instructions Transit point Search reinitiated When searching for a route the route provided may include a detour The route guidance may instruct a U turn When driving on a straight road the route guidance may instruct you to go straight in cases where the shape of intersections is difficult to determine No route guidance may occur even if turning at an intersection When driving ...

Страница 117: ...ot be displayed Toll roads are not necessarily used even when you have selected to prioritize toll them In the same way toll roads may appear on the route even when you have selected to not prioritize them Prioritize do not prioritize toll roads sets which type of road to use when both toll roads and normal roads are available When searching for a route the route display may not appear in time for...

Страница 118: ... the power immediately Immediately turn off the audio in such situations Exercise caution regarding the temperature inside the vehicle The temperature inside the vehicle can increase during hot weather Wait for the temperature inside the vehicle to drop before using this receiver Otherwise damage may result Do not disassemble or modify this receiver The main unit has a precisely designed structure...

Страница 119: ... is being retracted into place Interference can cause an injury or damage the main unit When removing a disc or SD memory card from this receiver remove it horizontally Do not pull up or press down forcibly while removing Improper removal may result in the disc becoming scratched causing the receiver to emit unusual noises Improper removal of the SD memory card may damage it ...

Страница 120: ... video recording VR mode and audio mode cannot be played The Dolby Digital format is supported and a disc having the following logo can be played This product is manufactured under license from Dolby Laboratories Dolby and the double D symbol are registered trademarks of Dolby Laboratories It is possible that a CD R CD Recordable or CD RW CD ReWritable disc will not play on the main unit due to th...

Страница 121: ...s Otherwise discs may warp and fail to play Do not apply paper based tape to either the recording side or label side of a disc Damage could result Do not use cracked or badly warped discs Damage could result Do not touch the recording area the rainbow colored side of a disc Otherwise the disc may become dirty and playback may be intermittent If you play a dirty disc the disc surface may be scratch...

Страница 122: ...d Do not play this type of disc even with an adapter Damage to the player could result Do not use accessories stabilizers protective seals laser lens cleaners etc sold for improving sound performance or protecting CDs The changes in CD thickness or outside dimensions made by these accessories may cause problems in the player Please be sure NOT to attach any ring shape protector or other accessory ...

Страница 123: ... you were receiving the music you were playing or the video you were playing when you stopped the radio Switching the Audio Source 1 Press 2 Select the Audio mode you wish to use Display of Audio Operations Screen 1 Press Stopping audio mode 1 Press 2 Touch Audio Off Audio Off ...

Страница 124: ...creen The Source operations screen appears as follows Radio AM screen Radio FM screen HD Radio screen optional Satellite radio XM screen optional Satellite radio SIRIUS screen optional Bluetooth audio screen CD Player screen MP3 WMA screen ...

Страница 125: ...VD screen VTR screen iPod screen optional USB screen ATTENTION Operation screen will be cancelled automatically when no operation is performed for 6 seconds in the visual operation screens DVD iPod Video and VTR ...

Страница 126: ...st one second will continue to decrease the volume aVolume switch ATTENTION Adjust the volume level that does not affect on your safety driving You can control the volume level from 0 to 80 The actual sound level may vary when you have switched the audio source Adjust the sound level appropriately according to the audio source you select Main Volume Control 1 Press the VOL switch ...

Страница 127: ...ne adjust touch any of the balance switches to change the corresponding value by 1 When you touch and hold one of the balance adjusting switches or the balance will continue to change but stop at the center value To continue to change the balance touch one of the balancing switches again Touch to cancel the fader balance settings value and return to the center values On completion touch to store t...

Страница 128: ...e same frequency bands as the sound from the front rear speakers and cancellation can occur under some in vehicle conditions Switch the phase of the sub woofer to prevent this phenomenon You can set the phase in according to the in vehicle conditions Sets the output timing of the speakers and sub woofer to be the same Staggers the output timing of the speakers and sub woofer After completing the s...

Страница 129: ...ting the setting touch to store the setting and return to the immediately preceding screen You can correct for the lack of satisfaction at high and low frequencies when listening at low volume to give better modulated sound On completion touch to store the setting and return to the immediately preceding screen 1 Touch or Setting Loudness 1 Touch on the Settings screen ON OFF Done Loudness Done ...

Страница 130: ...me level differences in a range of 10 to 20 Setting Source Volume Control 1 On the Audio settings screen touch the or Audio mode FM AM CD USB BT Audio Initial value Volume level Reference 40 0 40 0 40 0 40 0 40 SVC Setting Volume level Reference 40 SVC setting value 15 55 SVC setting value 10 30 SVC setting value 5 45 SVC setting value 5 35 When volume level is adjusted from 40 J 45 in FM mode 45 ...

Страница 131: ...rred level by touching the screen The maximum adjustment is 6 and the minimum adjustment is 6 On completion touch to store the setting and return to the immediately preceding screen Storing sound quality You can store the adjusted sound quality On completion touch to store the adjustment and return to the immediately preceding screen Adjusting Sound Quality 1 Touch 2 Touch or EQ Setting Bass Mid T...

Страница 132: ...nd quality Operation Use a preset sound quality To reset the sound quality touch 1 Touch 2 Touch Low band enhancement High band enhancement Mid band enhancement or User preset value EQ Setting Power Sharp Vocal Custom Flat ...

Страница 133: ...e with a 3 vertical by 4 horizontal aspect ratio normal TV screen proportions is uniformly expanded in the left and right directions Wide2 A picture with a 3 vertical by 4 horizontal aspect ratio normal TV screen proportions is uniformly expanded in the up down left and right directions ATTENTION The user should not experience any problems when watching a video on the wide screen on a personal bas...

Страница 134: ...y is disconnected for repairs to the vehicle or for removing the main unit all the stations held in the memory will be lost In such a case set stations in the memory again At times it may be difficult to maintain optimum reception because the antenna affixed to your vehicle is in motion constantly relative to the broadcast antenna and encounters continuous variation in the strength of received rad...

Страница 135: ...received signal is weak Selecting from preset switch The registered preset channel will be selected and the corresponding station will be received CHECK You can switch the receiving band of FM radio when in FM radio mode Each touch of switches to next receiver band FM1 J FM2 J FM3 J FM1 J 1 Press or and hold for at least 1 second 1 Touch a preset switch stored in memory Selecting Radio Band 1 Touc...

Страница 136: ...ressively higher frequencies and stations with sufficiently strong reception will be memorized for preset registration numbers 1 to 6 The registration procedure has been completed a beep sounds twice and the station memorized last i e the one memorized for P6 will continue to be received Subsequently when you listen to the radio you will be able to select stations by calling up preset numbers Savi...

Страница 137: ...ng a digital station DIGITAL appears When an HD Radio tuner is connected is enabled By repeatedly touching you can cycle through the receiving modes as follows AUTO1 J AUTO2 J OFF J AUTO1 J AUTO1 Receive while giving priority to digital stations AUTO2 Receive while giving priority to digital stations limit SEEK to digital stations OFF Receive analog stations The HD Radio logo is a registered trade...

Страница 138: ...s to next receiver band FM1 J FM2 J FM3 J FM1 J Select Desired Station If the vehicle s battery is disconnected for repairs to the vehicle or for removing the main unit all stations in memory will be lost In such a case set stations in the memory again At times it may be difficult to maintain optimum reception because the antenna affixed to your vehicle is in motion constantly relative to the broa...

Страница 139: ...r frequencies and stations with sufficiently strong reception will be memorized for preset registration numbers 1 to 6 On completion of the registration procedure a beep sounds once and the station memorized last i e the one memorized for P6 will continue to be received Subsequently when you listen to the radio you will be able to select stations by calling up preset numbers Saving Station in Memo...

Страница 140: ...roadcast you can acquire it When an iPod connected the Tag information is transferred to it When an iPod is not connected the Tag information is stored by the HD radio tuner and automatically transferred to the iPod when it is next connected Displaying title information 1 Touch 2 Touch to return to the Radio preset screen Title Preset Obtaining Tag Information 1 Touch Tag ...

Страница 141: ...39 139 You can receive a sub channel broadcasts when they are available from the station being received Touch repeatedly to cycle through the sub channels Receiving Sub channel Broadcasts 1 Touch Sub ch ...

Страница 142: ...irect switch e AV button f Band switch g Title switch With SIRIUS satellite radio over 100 channels are available including music news and entertainment programs You can select the channel you want from categories such as POP and ROCK or you can select a channel by directly entering it SIRIUS satellite radio is a subscriber service Using SIRIUS satellite radio Listening to SIRIUS Satellite Radio 1...

Страница 143: ...e radio tuner is connected A 12 digit numerical code is displayed The BAND changes as follows SIRIUS1 J SIRIUS2 J SIRIUS3 J SIRIUS4 J SIRIUS1 J Selecting from category Checking SIRIUS ID 1 Touch 2 Enter 3 Touch Direct 0 Done Changing SIRIUS Band 1 Touch Selecting Channel to Listen to 1 Touch Band Category ...

Страница 144: ...Selects a lower channel Automatically selecting channel Searches for channels in the currently selected category ATTENTION Auto tuning may fail in districts where the received signal is weak Selecting a channel by entering it directly Each touch of deletes a single character 2 Touch the category you wish to listen to 1 Press or 1 Press or and hold for at least 1 second 1 Touch 2 Enter a channel 3 ...

Страница 145: ...s The station preset to the selected touch switch is received Saving Channels If the vehicle s battery is disconnected for repairs to the vehicle or for removing the main unit all channels in memory will be lost In such a case set channels in the memory again 1 Tune into the station to be saved 2 When you have tuned in to the station you wish to save touch and hold the preset switch for at least 1...

Страница 146: ... receiving a SIRIUS broadcast you can display information about the current broadcast such as the channel category track title artist and channel number Displaying Information about Current Broadcast 1 Touch 2 Touch to return to the Radio preset screen Title Preset ...

Страница 147: ...d Direct switch e AV button f Band switch g Title switch With XM satellite radio over 100 channels are available including music news and entertainment programs You can select the channel you want from categories such as DANCE and ROCK or you can select a channel by entering it directly XM satellite radio is a subscriber service Using XM Satellite Radio Listening to XM satellite radio 1 Press 2 To...

Страница 148: ...ssigned each time the XM satellite radio tuner is connected An 8 digit numerical code is displayed The BAND changes as follows XM1 J XM2 J XM3 J XM4 J XM1 J Selecting from category Checking RADIO ID 1 Touch 2 Touch 3 Touch Direct 0 Done Changing XM Band 1 Touch Selecting Channel to Listen to 1 Touch Band Category ...

Страница 149: ...tomatically selecting channel Searches for channels in the currently selected category ATTENTION Auto tuning may fail in districts where the received signal is weak Selecting a channel by entering it directly Each touch of deletes a single character 2 Touch the category you wish to listen to 1 Press or 1 Press or and hold for at least 1 second 1 Touch 2 Enter a channel 3 Touch Direct Clear Done ...

Страница 150: ...cast you can display information about the current broadcast such as the channel number channel artist feature track and program title Saving Channels If the vehicle s battery is disconnected for repairs to the vehicle or for removing the main unit all channels in the memory will be lost In such a case set channels in the memory again 1 Tune into the station to be saved 2 When you have tuned in to...

Страница 151: ...149 149 2 Touch to return to the Radio preset screen Preset ...

Страница 152: ... once Returns to the beginning of the track being played Left pressing more than two times Returns to the previous track Using CD Player Listening to CD Do not press the e OPEN EJECT button when you are inserting a CD into disc slot This may cause a personal injury or damage the front panel Do not drive your vehicle while the front panel of this receiver is open The panel may cause personal injury...

Страница 153: ...ue to play The track repeats When you touch the track repeats until this function is cancelled Touch again to cancel the repeat play The tracks of the current CD are played in random order When you touch the random play continues until you cancel it When you touch again the random play is cancelled Fast Forwarding Rewinding 1 Press or and hold for at least 1 second Finding Desired Track 1 Touch Sc...

Страница 154: ...r damage the front panel Do not drive your vehicle while the front panel is open The panel may cause personal injury in the case of a sudden stop or similar event Do not attempt to close the front panel by hand Doing so may damage the panel If a non MP3 WMA file has the mp3 or wma file extension it may be recognized erroneously as an MP3 WMA file When such a file is played noise of large magnitude...

Страница 155: ...folder name If you try to create a non MP3 WMA format file NO SUPPORT warning is displayed You can select a desired folder from the disc Selecting from folder list Plays first track in folder When the following screen is displayed touch or to change between items Touch to return to the immediately preceding screen 1 With a CD R RW inserted press 2 Touch DISC Selecting desired folder 1 Touch 2 Touc...

Страница 156: ... folder name are displayed You can select a desired music file from the folder Selecting from file name switch When the following screen is displayed touch or to change between items Touch to return to the immediately preceding screen This plays the selected music file When the following screen is displayed touch or to change between items Touch to return to the immediately preceding screen 1 Pres...

Страница 157: ...an Plays the first 10 seconds of each folder When you touch the current track continues to play 1 Press or Fast Forward Rewind 1 Hold down or for 1 or more seconds Finding Desired Music File To continue playing a desired track or file turn the Scan function OFF The entire disc is scanned once and normal playback starts from the position where you started to scan When you have selected any of scan ...

Страница 158: ...ts Repeating Music File When you have selected any of scan folder scan repeat folder repeat random or folder random a corresponding message of Scan F Scan Repeat F Repeat Random or F Random will appear to allow you to confirm the selected function 1 Touch for repeat Touch and hold for at least 1 second for folder repeat Repeat Repeat Random Play When you have selected any of scan folder scan repea...

Страница 159: ...EG Audio Layer 3 MPEG1 Audio Layer III MPEG2 Audio Layer III MPEG2 5 Audio Layer III Supported sampling frequencies 8 11 025 12 16 22 05 24 32 44 1 48 kHz Supported bit rates 8 16 24 32 40 48 56 64 80 96 112 128 144 160 192 224 256 320 Kbps Supports VBR Does not support free format Supported channel modes Stereo Joint Stereo Dual channels Monaural About supported WMA file standards Supported stand...

Страница 160: ...commonly used for music discs CD R and CD RW discs are fragile in high temperature high humidity environments and one section of the CD R CD RW may become incapable of playback Fingerprints or scratches on the disc may prevent playback or cause skipping during playback Sections of CD R CD RW may deteriorate if left inside a vehicle for long periods of time We recommend that you store UV sensitive ...

Страница 161: ... with the mp3 or wma extension is recognized as an MP3 or WMA file Always save an MP3 WMA file with the mp3 wma extension The mp3 or wma file extension must be single byte uppercase letters ATTENTION If a non MP3 WMA file has the mp3 or wma file extension it may be recognized erroneously as an MP3 WMA file When such file is played noise of large magnitude is output and speakers may be damaged Do n...

Страница 162: ...ta in a single session as the system takes a longer time to read the CD control information of a multi session disc About MP3 WMA playing time display It is possible that playing time will not be correct depending on the writing condition of the MP3 WMA file It is possible that playing time will not be correct when VBR Fast Up Down is operated The making of MP3 WMA files by recording from sources ...

Страница 163: ...OM XA mode2 for the disc format Playing back CD R RW Insert a CD R RW disc having recorded MP3 WMA files When you load a disc the system automatically determines whether it is a music CD or a CD R RW disc having MP3 WMA files and plays it correctly However depending on the type of disc being used the disc may not play CAUTION The 128K bps fixed bit rate and 44 1 kHz sampling frequency are recommen...

Страница 164: ...switch CAUTION IMPORTANT Playback will begin Using USB Music File Player Playing USB Music Files Connect the USB cable correctly so that it does not interfere with safe operation of the vehicle When a USB memory device is attached the receiver may take time to scan and read the file tag information To shorten this scan time try to store only MP3 WMA files in the USB memory and reduce the number of...

Страница 165: ...rn to the immediately preceding screen Select from linked folders Goes to folder one level higher and plays the first track in this folder Goes to folder on level lower and plays the first track in this folder ATTENTION If no MP3 files exist in the folder NO DATA will appear in the section where the file name and folder name are displayed Selecting Desired Folder 1 Touch 2 Touch List Play 1 Press ...

Страница 166: ...eding screen This plays the selected music file When the following screen is displayed touch or to change between items Touch to return to the immediately preceding screen Select from linked files To the right Advances to the next file To the left Returns to the previous file The selected track file will be played Selecting Desired Music File 1 Touch 2 Select the folder you wish to use List 3 Touc...

Страница 167: ... cancelled Touch again to cancel the repeat Fast Forward Rewind 1 Hold down or for 1 or more seconds Finding Desired Music File When you have selected any of scan folder scan repeat folder repeat random or folder random a corresponding message of Scan F Scan Repeat F Repeat Random or F Random will appear to allow you to confirm the selected function If you disconnect the USB memory from this recei...

Страница 168: ...ort USB mass storage such as an external HDD is supported Supported MP3 file standards Supported standards MPEG 1 MPEG 2 and MPEG 2 5 Supported sampling frequencies MPEG 1 32 44 1 MPEG 2 16 22 05 24 MPEG 2 5 8 11 025 12 Supported bit rates 8 to 320 Kbps Supported VBR 8 to 320 Kbps Does not support free format Supported channel modes Monaural Stereo Joint Stereo Dual Channel USB hub and multi card ...

Страница 169: ...ile name and 3 character file extension File name characters that you can use A to Z 0 to 9 and underscore _ Range of alpha numeric ISO 8859 1 Max number of files that can be stored in a single memory 3000 files A total of 3000 files can be created within a single USB memory Files aside from MP3 WMA files Example 004 txt are included in the 3000 files 001 mp3 005 mp3 004 txt 003 mp3 002 mp3 1498 m...

Страница 170: ... the audio language to the desired one The user s ability to change the audio language depends on the DVD Multi Angle Function Some DVDs support the multi angle function that enables you to play the same video scene with multiple angles and change to the desired angles while playing The user s ability to view multiple video angles depends on the DVD The video angle changes Subtitle Display Functio...

Страница 171: ...read the user s guide that comes with the disc to be played Region Code of Playable Disc region code which is indicated on some DVDs represents areas they can be played in This receiver cannot play discs that do not have 1 or ALL indicated on this mark If you attempt to play such a disc the message Region code error will appear Note also that some discs may be subject to regional restrictions mean...

Страница 172: ...ber of audio tracks Indicates the number of subtitles Indicates the number of angles Indicates the image aspect ratio ratio between the height and width of the TV screen able to be selected 16 9 indicates a wide screen and 4 3 indicates a standard screen Indicates by use of a number regions where the disc can be played ALL indicates that the disc can be played anywhere in the world and the number ...

Страница 173: ... only in general households and other limited viewing environments except when expressly permitted by Macrovision Corporation Remodeling or disassembly of this machine is prohibited The section explains how to operate the DVD player or search for images or default settings Touching touch switches displays the operation screens shown below Products equipped with Macrovision Operation Flow DVD opera...

Страница 174: ...tch fast forward rewind button b MENU button c AV switch Insert a DVD into the disc slot and it will start playing The disc starts to play If the operation switches touch switches are not being displayed touch the screen If you try to play an unsupported DVD Cannot read disc Please check disc appears If the travel is regulated a DVD is automatically played on the rear monitor after 5 seconds has e...

Страница 175: ...fast forward rewind the video until the switch is released Pausing a Video When video is paused and when you short touch the Slow Play starts When you touch the frame by frame play starts Video Operations The touch switches and other operation icons are shown approximately 6 seconds Touching the screen will display them again Depending on the disc automatic playback may not function or playback ma...

Страница 176: ...the inserted disc therefore functions may not operate as intend You can search for the desired video with a title chapter or menu number number assigned for each content Finding by Chapter To the right When selecting the next chapter To the left When selecting the cue or previous chapter 1 Touch Disc Menu Operations 1 Touch 2 Touch Next 3 Touch and select the play back menu 4 Touch Finding a Desir...

Страница 177: ...tle number is decremented or incremented by 1 If you touch or the title number is decremented or incremented by 10 Finding by chapter number 1 Touch 2 Touch or and enter the title number 3 Touch Search 10 10 10 10 Enter 1 Touch 2 Touch 3 Touch Next Number ...

Страница 178: ...an change or hide the touch switch display while playing Hiding the Touch Switch Touching the screen will display the touch switches again Relocating the Touch Switch Display The touch switch display moves up or down each time you touch them 4 Touch or and enter the menu number 5 Touch Changing the Touch Switch Display 1 Touch 10 10 10 10 Enter Off 1 Touch 2 Touch 3 Touch Next Position ...

Страница 179: ...e currently displayed angle Each time you touch the angle number is changed and the angles recorded on the disc are toggled in sequence Changing the Subtitle Language If the target disc supports multiple subtitle languages you can change them to display a video IMPORTANT Changing the Screen Display and Audio Mode 1 Touch 2 Touch Next Angle 3 Touch Depending on the disc it may only be possible to c...

Страница 180: ... 3 Touch Subtitle Change subtitle Change subtitle Depending on the disc it may only be possible to change audio languages from the top menu This receiver does not support the dts digital theater system format therefore no audio will be emitted when dts audio is selected for a disc that contains dts audio If audio is securely recorded on the DVD video with no audio emitted select Dolby Digital audi...

Страница 181: ...9 vertical by 16 horizontal aspect ratio normal TV screen size is uniformly expanded in the left and right directions The screen with the 3 vertical by 4 horizontal aspect ratio normal TV screen size is uniformly expanded in the up down left and right directions It will return to previous screen by touching the 3 Touch Switching DVD setting display 1 Touch 2 Touch Change audio Change audio Next Se...

Страница 182: ... Next Set Setup 4 If you touch each touch switch you can configure the following setting Touch switch Function Page Specifies the audio language of a video to be played 181 Specifies the subtitlelanguage of a video to be played 182 Specifies the language used to display the menu 183 Specifies the display of the multi angle mark 184 Limits DVD videos that can be played 184 Specifies the screen size...

Страница 183: ...guage code see Language Code List on page 186 Touch to return to the previous page ATTENTION If the selected language is not compatible with the disc you will not be able to change to that language 1 Touch on the initial setting screen 2 Touch the desired language 3 Touch Audio Language Other Done 1 Touch on the preferential audio language setting screen 2 Enter the desired language code 3 Touch O...

Страница 184: ...ing subtitle on the screen Entering the Code For the language code see Language Code List on page 186 Touch to return to the previous page ATTENTION If the selected language is not compatible with the disc you will not be able to change to that language 1 Touch on the initial setting screen 2 Touch the desired language 3 Touch Sub Title Other Off Done 1 Touch on the preferential subtitle language ...

Страница 185: ... For the language code see Language Code List on page 186 Touch to return to the previous page ATTENTION If the selected language is not compatible with the disc you will not be able to change to that language 1 Touch on the initial setting screen 2 Touch the desired language 3 Touch Menu Language Other Done 1 Touch on the menu language setting screen 2 Enter the desired language code 3 Touch Othe...

Страница 186: ...or children for example adult themed or violent scenes The parental screening levels can be specified in stages depending on levels CHECK This function is not available for discs that do not support the parental screening level function If the code number is omitted is displayed in the upper field Touch to return to the previous page If you have entered an incorrect code number eject the disc once...

Страница 187: ...h a black strip on the upper and the lower edges DVDs recorded with the 4 3 ratio are displayed in the original ratio which fits the screen perfectly 4 3 LETTER BOX Displayed in the usual wide size mode DVDs recorded with the 4 3 ratio are displayed with a black strip on the left and the right edges or in a horizontally spread proportion 4 3 PAN SCAN The left and the right edges of the video image...

Страница 188: ...jabi Polish Pashto Portuguese Quechua Rhaeto Romance Kirundi Romanian Kinyarwanda Sanskrit Sindhi Sangho Serbo Croatian Sinhalese Slovak Slovenian Samoan Shona Somali Albanian Serbian Siswati Sesotho Sundanese Swedish Swahili Tamil Telugu Tajik Thai Tigrinya Turkmen Tagalog Setswana Tonga Turkish Tsonga Tatar Twi Ukrainian Urdu Uzbek Vietnamese Volapuk Wolof Xhosa Yoruba Zulu Code Language Code La...

Страница 189: ...ion becomes active a Wide switch b MENU button c AV button The VTR screen appears Touch the screen to change to the VTR operation screen Changing to the VTR operation screen displays each touch switch for approximately 6 seconds ATTENTION Whether or not the video is displayed correctly depends on the connected equipment VTR mode is not available when the iPod is connected using the iPod cable iPC ...

Страница 190: ...16 horizontal aspect ratio normal TV screen size is uniformly expanded in the left and right directions The screen with the 3 vertical by 4 horizontal aspect ratio normal TV screen size is uniformly expanded in the up down left and right directions It will return to previous screen by touching the Changing the VTR Setting Screen 1 Touch 2 Touch or Wide Normal Wide1 Wide2 Normal Wide1 Wide2 ...

Страница 191: ...PC 709 See the ECLIPSE Website http www eclipse web com us ipodcompatibility index html for details on applicable phone models To ensure driving safety you cannot watch a video while driving Listening to the iPod Disconnect headphones and other accessories from the iPod before connecting it to this receiver Failure to do so may make it impossible to operate the iPod from this receiver If the iPod ...

Страница 192: ...d song or video To the right Advances to the next file To the left Returns to the beginning of the file being played Left Press more than two times Returns to the previous file The selected song or the video file will be played CAUTION 1 Press 2 Touch Fast Forward Rewind 1 Hold down or for 1 or more seconds iPod Selecting the Desired Music or Video File 1 Press or Finding a Desired Music File If t...

Страница 193: ... screen J artist screen J album screen J track screen This plays the selected music file When or appears touch them to change the page of the music file list You cannot operate the and switches when your car is running Music file in the list is played from the beginning by touching the Touch and the menu screen is displayed Touch to return to the immediately preceding screen 2 To select a track or...

Страница 194: ...deo screen is displayed Video file in the list is played from the beginning by touching the Page will switch by touching or if there is next page Touch and the menu screen is displayed Touch to return to the immediately preceding screen Setting to the iPod Video Mode If the iPod is disconnected from this receiver while playing a video file on the iPod you will return to the previously selected mod...

Страница 195: ...ay Touch to resume playing This repeatedly plays the currently played music file Once you touch the selected music file will be repeated until the repeat function is released Touch again to cancel the repeat play The list to playback will be repeatedly played back when the Repeat is cleared 5 Touch on the video file to view Pausing 1 Touch Menu Repeatedly Playing the Same Music File 1 Touch Repeat...

Страница 196: ...ancel the random playback of all files in the playlist Listen to an album randomly The selected album can be played back randomly However the music files in the album will be played back in order from the beginning Once you touch the random play continues until you cancel it When you touch again the random play for the album is cancelled Random Play of Music Files 1 Touch Shuffle Shuffle Shuffle 1...
Страница 197: ...andomly Once you touch the random play continues until you cancel it Touch again to cancel the random play ATTENTION When the iPod is taken off with the unit set to Shuffle All setting of the iPod will be changed to shuffle playback 1 Touch Shuffle All Shuffle All Shuffle All ...

Страница 198: ...s Bluetooth is a registered trademark of Bluetooth SIG Inc ATTENTION This unit can be used with Bluetooth compatible portable devices See the operation manual of the portable device regarding the operation of Bluetooth The connection status may become bad and operation with this unit may not be possible for the Bluetooth audio depending on the surrounding environment Registration of portable devic...

Страница 199: ...istration of the portable device is now complete Register by searching for a portable device on this receiver Searching is displayed 4 Touch 5 On the portable device enter PIN CODE for this receiver 6 Bluetooth Connection Successful is displayed on completion of registration Allow Connect 1 Press 2 Touch 3 Touch 4 Touch Bluetooth Audio Pairing Device Search ...

Страница 200: ...th your portable device Connection of the portable device Connect a portable device registered on this receiver Connection of the portable device to this receiver is now complete ATTENTION When connection fails Bluetooth Connection Failed is displayed In this case repeat the connection operations Note that you cannot connect unregistered portable devices 5 Select the device name of the portable de...

Страница 201: ...ed is displayed In this case repeat the connection operations Listening to the portable device a Random switch b File UP DOWN Fast UP DOWN button c Repeat switch d MENU button e Play switch f AV button g Stop switch 1 Press 2 Touch 3 Touch 4 Bluetooth Connection Successful is displayed on completion of cancellation Bluetooth Audio Disconnect 1 Press 2 Touch Bluetooth Audio ...

Страница 202: ...e playback touch Selecting a Desired Music Right Advances to the next music Left pressing once Returns to the beginning of the music being played Left pressing more than two times Returns to the previous music Fast forward rewind Repeating the Same Track The track repeats to play When you touch the track repeats to play until you cancel it Touch again to cancel the repeat play 3 Touch 1 Touch 1 Pr...

Страница 203: ...andom Play All titles of the Bluetooth Audio are played in random order When you touch the random play continues until you cancel it When you touch again the random play is cancelled 1 Touch Random Random Random ...

Страница 204: ...y not be available depending on the vehicle type You can manually assign the desired functions to every steering wheel switch buttons IMPORTANT Audio is turned OFF when is touched Touch to return to the immediately preceding screen Manual setting of steering wheel switch functions Your manual setting may fail due to the ambient environments including the outdoor temperature 1 Press 2 Touch Info 3 ...

Страница 205: ...y preceding screen Touch to return to the immediately preceding screen ATTENTION If Error try once again is shown on the display once again select a desired function to set 5 Touch until the Command Select screen is displayed 6 Touch the command you wish to set 7 While pressing the steering switch button to record touch the until a beep sounds Store Store 8 Assign the desired functions to the stee...

Страница 206: ...s in the following order FM AM J SIR J XM J DISC CD DVD or MP3 WMA J USB J BT Audio J iPod J VTR J return to FM AM When the power is on the mode changes each time MODE is pressed POWE R Power switch Turn on or off the power Turn on or off the power by short press MUTE Mute This will mute This will mute by short press Radio operations u d Channel selection switch Selects the next or previous channe...

Страница 207: ...previous track Press and hold u or d longer to fast forward or rewind a track Operation of iPod and BT Audio u d Track selection switches Selects the next track or previous track or beginning of the current track Fast forward or rewind Press u or d briefly to select the next or previous track Press and hold u or d longer to fast forward or rewind a track Function DVD operations u d Chapter selecti...

Страница 208: ...ck enabled Viewing restrictions are enabled Change the setting for viewing restrictions and start again See page 184 Currently this function is disabled A function that has been disabled was selected with the menu Follow the directions on the screen and start again Currently this function is disabled A function that cannot be used while the vehicle is in motion was selected Stop the vehicle and se...

Страница 209: ... it can receive the sub channels In SIRIUS mode Antenna error The SIRIUS antenna is disconnected Check the connection of the SIRIUS antenna Acquiring signal Displayed when the SIRIUS satellite radio signal is lost during access Try receiving the signal again in the place where there are no obstacles Call 888 539 SIRIUS You are tuned to a valid SIRIUS channel but you are not subscribed to that chan...

Страница 210: ...on of the XM tuner Ch unavailable Displayed when tuned to the XM channel no permission Tune to channels currently on air Ch unauthorized Displayed when tuned to the XM channel Adjust to the channel that can be received Ch unauthorized This is displayed when the encryption code is updating Please wait In iPod mode Error1 Communication error Playback failed communication problem Reconnect the iPod R...

Страница 211: ...ound comes out of only one side left or right front or back A speaker wire is disconnected Check the connections of the speaker wires Volume is poorly adjusted Check the balance and fader adjustments Sound quality does not change even after making adjustments The adjusted audio quality is not included in the radio broadcast or disc Check by changing the radio station or disc A CD DVD will not go i...

Страница 212: ... vehicle ignition switch has not been turned on Turn the vehicle ignition switch to ACC or ON The connection wires and cables are not completely connected Check the connections to each connection wire and cable There is a point of light on the display At least 99 99 of the pixels on the TFT panel are effective but it is possible that 0 01 of the pixels may not light or may stay lighted This is not...

Страница 213: ...PS position quality is displayed at left lower The more bars light the more extreme precision GPS position quality is 2 dimensional measurement and 3 dimensional measurement GPS calculates the position using the triangulation Distance to the satellite can be determined when the radiowave from that satellite is received and current location can be measured by receiving radiowave from 3 satellites H...

Страница 214: ...80 H 272 V 3 Active pixel rate Over 99 99 Display format Transmissive color filter format Drive system TFT thin film transistor active matrix format Usage temperature range 20 C to 60 C Storage temperature range 40 C to 70 C Reception frequency AM 530 to 1710kHz 10kHz step FM 87 75 to 107 9MHz 200kHz step Practical speed AM 22µV S N20dB FM 12 dBf IHF Frequency characteristic 30 to 15 000 Hz FM Ste...

Страница 215: ...P Object Push Profile Ver 1 1 A2DP Advanced Audio Distribution Profile Ver 1 0 AVRCP Audio Video Remote Control Profile Ver 1 0 Rated output 15 W 4 1 kHz 1 4 Ω EIAJ Maximum output 50 W 4 test voltage 14 4 V Suitable load impedance 4 Ω each channel Power source voltage 13 2 V DC 11 to 16 V Grounded Power consumption 0 5 W 4 output time approx 3 7 A Approx 15 A max Exterior dimensions 180 mm W 100 m...

Отзывы: