background image

48 / 97

6.4

Machine constants file

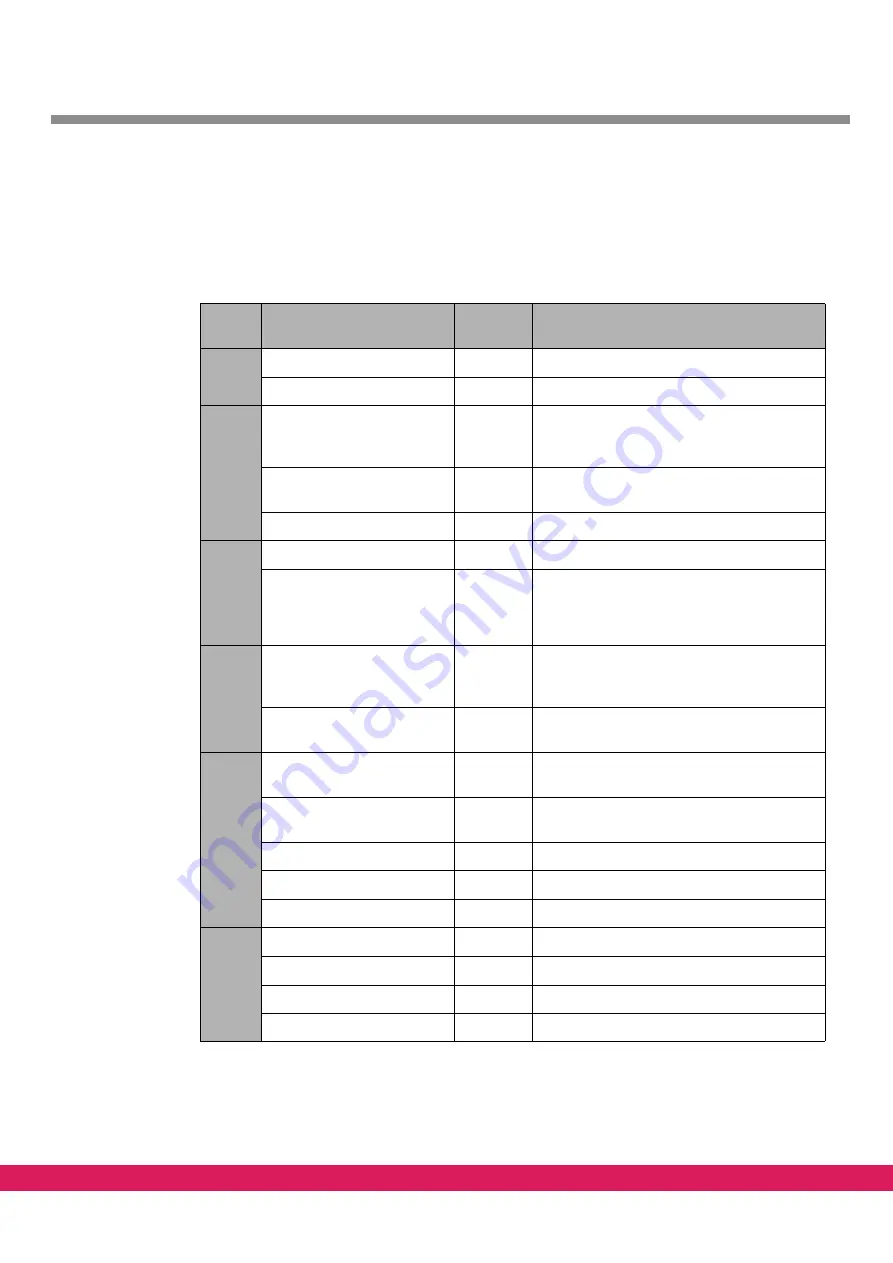
The machine constants file is loaded into the controller during the start-up of the StdHMI.

The following example of machine constants for 16 axes is a section of the file with preset 
machine constants that are to be adapted for the specific case of application.

Tabelle 20:

Table 20:

Machine constants file

MK

Number 

values

Values

Te

st

se

t-up

MK_TEST_OHNEMECHANIK

1

0

MK_SPS_DUMMY

1

0

H

ardwa

re 

co

nfig

urati

o

n

MK_CANDRIVES

48

 0, 1,-1,-1,-1,-1,-1,-1,-1,-1,-1,-1,-1,-1,-1,-1,

-1,-1,-1,-1,-1,-1,-1,-1,-1,-1,-1,-1,-1,-1,-1,-1,

-1,-1,-1,-1,-1,-1,-1,-1,-1,-1,-1,-1,-1,-1,-1,-1

MK_APPLACHSIDX

18

0, 1, 2, 3, 4, 5, 6, 7, 8, 9, 10, 11, 13, 14, 15, 
16, 17

MK_ACHSENART

16

0, 0, 0, 0, 0, 0, 0, 0, 0, 0, 0, 0, 0, 0, 0, 0

Softwar

e

confi

guration

MK_CANOPEN_BAUDRATE

2

0, 1000   

MK_DELTAT

1

4

Setting of

the axes

MK_IMPULSE

16

4096, 4096, 4096, 4096, 4096, 4096, 4096, 
4096, 4096, 4096, 4096, 4096, 4096, 4096, 
4096, 4096

MK_WEG

16

10, 10, 10, 10, 10, 10, 10, 10, 10, 10, 10, 10, 
10, 10, 10, 10

Axis-r

elated

limi

t values

MK_MODVMAX

16

10, 10, 10, 10, 10, 10, 10, 10, 10, 10, 10, 10, 
10, 10, 10, 10

MK_VMAX

16

20, 20, 20, 20, 20, 20, 20, 20, 20, 20, 20, 20, 
20, 20, 20, 20

MK_BESCHL

16

2, 2, 2, 2, 2, 2, 2, 2, 2, 2, 2, 2, 2, 2, 2, 2

MK_BREMS

16

2, 2, 2, 2, 2, 2, 2, 2, 2, 2, 2, 2, 2, 2, 2, 2

MK_T_BESCHL

16

0, 0, 0, 0, 0, 0, 0, 0, 0, 0, 0, 0, 0, 0, 0, 0

P

a

th-relate

d

limit value

s

MK_VBAHNMAX

1

20

MK_BAHNBESCHL

1

2

MK_BAHNBREMS

1

2

MK_T_BAHNBESCHL

1

0

Laden einer Datei mit Maschinenkonstanten in die Steuerung

Содержание E-Control CNC

Страница 1: ...PRODUCT DOCUMENTATION eckelmann de ECKELMANN AG WIESBADEN eckelmann de FERROCONTROL GMBH CO KG HERFORD E Control CNC Introduction Manual ENC66 ...

Страница 2: ...Eckelmann AG Berliner Straße 161 65205 Wiesbaden Fon 49 0 611 7103 0 Fax 49 0 611 7103 133 E Mail info eckelmann de Internet http www eckelmann de ...

Страница 3: ...tion of the controllers is explained for an effective commission ing Copyright protection All rights to any use whatever utilisation further development forwarding and creation of copies remain with the ECKELMANN AG company In particular neither the contract partners of ECKELMANN AG nor other users have the right to distribute or market the IT programs program parts or modified or edited versions ...

Страница 4: ... 3 Version Chapter Date edited by Amendment 1 All 23 09 2010 Martin Kellner First release based on the introduc tion manual of the ENC55 2 1 4 6 2 29 03 2011 Martin Kellner E108 and F703 added Data blocks corrected for diagnostic address of the LBM modules ...

Страница 5: ...ion 22 2 3 Serial connection 24 2 4 Connection via Ethernet 24 2 4 1 Connection via Ethernet local connection 25 2 4 2 Connection via Ethernet network 25 3 Monitor interface of the controller 26 3 1 Running the terminal program 26 3 1 1 Configuration of the terminal program 26 3 2 Calling of the monitor interface 28 3 3 Configuration of an Ethernet connection 30 3 4 Important monitor commands 32 3...

Страница 6: ...ne constants into the controller 49 6 6 Synchronized and gantry axes 50 6 6 1 Example of synchronized axes at the CAN Bus 50 6 6 2 Example of synchronized axes with analog interface 52 6 6 3 Example of a gantry axis with CAN Bus 53 7 CNC programming as per DIN 66025 54 7 1 G functions 54 7 2 M functions 56 8 StdHMI 57 8 1 Installation StdHMI 57 8 2 Starting the StdHMI 57 8 3 Modifying machine cons...

Страница 7: ...3 1 Add and configure LBM modules 75 9 5 Task configuration 77 9 6 Changing of the language german english 77 10 Sample PLC program 79 10 1 Sample program CNC Test 79 10 2 Required libraries 79 10 3 System variable and data block 79 10 4 Task for the M functions M14 and M15 80 10 5 Calling of the program 81 10 6 Sequential function cart 81 10 7 Definition of inputs and outputs 82 10 8 Function STA...

Страница 8: ...ting of the CNC and PLC program 90 11 1 Connection of the controller inputs 90 11 2 Loading and starting the PLC program 90 11 3 Loading and starting of the CNC program 90 11 4 Error messages of the CNC program 91 ...

Страница 9: ...ions General notes A general note is composed of three parts 1 The letter i 2 A blue bar with the word Note 3 The text of the note below the bar Example x Note Please observe that the extended interface generates a bus load which is higher by approx 50 ...

Страница 10: ...g prior to open the housing Do not put objects in the venting slots during operation The danger levels are described in the following table Tabelle 1 Table 1 Warning levels Marking bar Warning level Severe consequential damage such as death or irreversible injuries Imminent hazardous situation if the precautions are not observed Severe consequential damage such as death or irreversible injuries Po...

Страница 11: ...ervance of the warning may cause death or most severe injuries Warning of hot surfaces Nonobservance of the warning may cause burning of the skin Warning of contusions Nonobservance of the warning may cause contu sions or bone fractures Warning of damage to the electronics Nonobservance of the warning may destroy elec tronic components in the system due to ESD elec trostatic discharge overload or ...

Страница 12: ...5 different technical manuals for FBM modules Diverse 6 E CNC configuration manual 7 E CNC programming instruction manual 8 E CNC configurations instructions interface PLC NCR 9 Technical manual for LBM modules This document also makes reference to the following technical descriptions of the control lers Tabelle 4 Table 4 List of technical descriptions Manual A ExC66 Technical Description B ExC55 ...

Страница 13: ...n of the order number and is part of the type label The type label is on the bottom side of the ENC66 Figure 1 ENC66 The controller has the following features Numerical controller CNC for 2 to 16 axes depending on the ordered configura tion CNC programming as per DIN 66025 Integrated PLC function programming as per IEC 61131 3 2 to 4 CAN busses depending on the ordered configuration Usage of local...

Страница 14: ...aded from the PC after the starting of the StdHMI by means of the bootloader The NC firmware is installed by the bootloader into the control ler FPROM memory Behaviour of the con troller after the appli cation of the voltage Upon application of the voltage the controller waits for the load ing of the NC firmware via the PC Upon application of the voltage the controller starts automati cally the bo...

Страница 15: ...e operating state In current operation the 7 segment indicator is used as status information In case of a soft ware error the occurring error is indicated in the form of a defined string of characters The green LED indicates the watchdog function and is lit if no malfunction occurs The two other LED are used to indicate the CAN1 state In case of the 7 segment indication a distinc tion is made betw...

Страница 16: ...D1 Off Not used CAN1 LED2 Off Not used CAN2 yellow Off Not used CAN2 green Off Not used RS232 green Off or flashing light RS232 TX state indicates transmitting of data RS232 green Off or flashing light RS232 RX state indicates receiving of data ETHERNET yellow Flashing light Ethernet activity status ETHERNET green Off or on Ethernet connect status CAN3 green Off Not used CAN3 green Off Not used CA...

Страница 17: ...during start of the firmware ENC66 7 segment indicator Meaning 0 Initialization of processor 1 Initialization of software 2 Initialization of operating software 3 Initialization of task and mailbox 4 Initialization of I2C hardware 5 Initialization of file system 6 Initialization of local bus 7 Hardware check Flashing light of segment Normal state acc to description in A Continuous error number Err...

Страница 18: ...s corresponds to the computing load of the single tasks in the system The assignment is as follows Abbildung 2 a b c d e f g h Figure 2 7 Segment indicator Tabelle 10 Table 10 Status information in normal operation ENC66 Segment Meaning a PLC PLC program b SRV Services c AXE fine interpolator d ZST central controller e INT interpreter f POS interpolator g NET Ethernet communication h dot Pulses in...

Страница 19: ...Status ok TX Error Counter 13 CAN2 to CAN4 yellow Flashing light Flashing at 2 Hz TX Status ok TX Error Counter 13 CAN2 to CAN4 green Flashing light Flashing at 2 Hz RX Status ok RX Error Counter 13 CAN2 to CAN4 green and yellow synchronous Synchronous flashing at 1 Hz Synchronous flashing at 0 5 Hz State error passive State bus off RS232 yellow Flashing light Transmitting of data TX Status RS232 ...

Страница 20: ... rection shows that the boot monitor is active The boot monitor is activated either by the user or by the boot loader if the start of the operating system has not been made successfully after E06 and E07 1 4 6 2 Error indication in normal operation Probable errors are signalled by the following indication pattern The indication shows the pattern sequentially with 2 characters sec The indication is...

Страница 21: ...initialization PLC task stage 1 F302 PLC Error during initialization PLC task stage 2 F303 PLC Recursive PLC_PRG call F701 MISC Error during initialization LPDMA task F702 MISC Error during initialization NET task F703 LBM Initialisation of the LocalBus Task failed H202 UTI Battery for CMOS and RTC buffering running out warning repeated in 10 sec interval E88xx yyyyyyyy zzzzzzzz Processor exceptio...

Страница 22: ...1 R EL R EL LI FE DC OM AO 1 AC OM 24V 24 V 0 V 0V E LBM AIO 22 AI2 0 V 24 V SHLD AI1 AI1 LIFE AI2 SHLD 24V 0 V OCOM AO1 SHLD 10 V 10 V PE SHLD AO 2 OCOM SHLD 24 V 24 V 0 V 0 V E LBM DOM 16 LIFE E Motors Figure 3 Example of a structure with the ENC66 controller Abbildung 4 2 2 Controller connection This chapter refers to the documentation A 5 and 9 The controller has 4 separated CAN busses E A mod...

Страница 23: ...1 LIFE AI2 SHLD 24V 0V OCOM AO1 SHLD 10V 10V PE SHLD AO2 OCOM SHLD 24V 24V 0V 0V E LBM SER02 LIFE CAN1 Watchdog CAN3 CAN4 CAN2 Ethernet RS 232 Figure 5 Wiring of an ENC66 controller The connection of the controller and a PC can be made in three different ways Tabelle 14 Table 14 Type of connections between controller and PC Type of connection Connection via IP address of the controller Serial conn...

Страница 24: ...etween the PC and the controller a zero modem cable and the fol lowing adaptor RJ 45 connector to 9 pole D Sub male plug are required Abbildung 7 Pin 8 RTS Pin 7 CTS Pin 6 TX Pin 5 RX Pin 4 GND Pin 3 DTR Pin 2 DCD Pin 1 DSR 1 2 3 4 5 6 7 8 6 1 4 5 2 3 8 7 9 nc ExC66 PC Figure 7 Connecting cable controller PC 2 4 Connection via Ethernet For the communication between the PC and the controller the co...

Страница 25: ...connection An Ethernet crossover patch cable STP Cat5 is required for a local connection between the controller and the PC 2 4 2 Connection via Ethernet network An Ethernet crossover patch cable STP Cat5 is required for a connection between the con troller and the PC via the network ...

Страница 26: ...m makes the communication between the PC and a controller via a serial interface possible In a standard Windows installation for example Windows 2000 and XP a terminal pro gram is available under Programs Accessories Communication Hyper Terminal Al ternatively any other terminal program can be used 3 1 1 Configuration of the terminal program After the start of the program first input a name e g EN...

Страница 27: ...connection cable is connect ed to the controller e g COM1 Input the following values as interface parameters Tabelle 15 Table 15 connection parameters Parameter Value Baudrate 115200 Baud Number of Data bits 8 Parity no Stop bits 1 Flow control no The dialog box looks like this Abbildung 10 Figure 10 Dialog box with connection parameters After the parameterization the terminal window opens as foll...

Страница 28: ...ch the monitor interface Start the PC Connect the controller to the PC apply the power supply voltage to start the controller The green LED Watchdog is on Start the terminal program with correct connection parameters Two adjacent segments rotate in clockwise direction on the 7 segment display As the last message Wait Boot Loader is displayed if a boot project is available on the controller Abbildu...

Страница 29: ...29 97 Introduction Manual ENC66 eckelmann de Abbildung 13 Figure 13 Prompt of monitor interface Monitor interface is active ...

Страница 30: ...bbildung 14 Figure 14 Naming a connection To connect to the monitor interface of the controller via the ethernet port the configured IP address must be known In this case an TCP IP connection can be made to the port 23 Abbildung 15 Figure 15 Configuring a telnet connection If the IP address is unknown it can be configured as described in chapter 4 Setting of the IP address in the controller After ...

Страница 31: ...activates the monitor interface showing the prompt Abbildung 17 Figure 17 monitor interface via telnet Note A Firmware update can only be done via the serial interface The Ethernet interface can t be used for this purpose For further information see chapter 5 Update of the firmware via the boot monitor ...

Страница 32: ...ossible e g din del dr pattern Clears the specified files on the specified device Also in this case the flash disk sd is preset cd dr Changes the currently selected device or displays it The flash disk sd is preset reboot Resets the controller For an activation of the bootmonitor a subsequent pressing of key is required until the bootmonitor identifies itself may last 3 4 seconds help Displays a h...

Страница 33: ...tween pins 2 and 3 at the cable socket that is connected to the controller Subsequently the terminal program is called as before and optional letters are input via the keyboard If the input keyboard characters are correctly displayed on the screen of the terminal program due to the bridge the characters are transmitted back in the form of an echo the cable is to be checked for a mixed up pin assig...

Страница 34: ...ess via the monitor interface serial interface The IP address can be set via the activated monitor interface by means of command ipconf Activate monitor interface see chapter 3 2 Calling of the monitor interface Abbildung 18 Figure 18 Activated monitor interface The current address setting of the controller is displayed upon input of the com mand ipconf Check the IP address of the controller for t...

Страница 35: ...ddress of the CNC controller The program is required only for the configuration of the IP address Afterwards it is no longer needed The controller uses its stored IP address until it is changed Note The Eckelmann controllers accept only addresses that are assigned by the program NetConf in order to avoid possible conflicts with other BootP or DHCP servers The configurations of other DHCP and BootP...

Страница 36: ...can be modified with the menu entry Edit Edit Item Alternatively you can reach this function with a right mouse button click on the controller The entered IP address is stored in the controller with the appropriate MAC address and overwrites the previously stored IP address Abbildung 21 Figure 21 Modifying an IP address with NetConf The controller has to be restarted after this procedure All chang...

Страница 37: ... 22 Modify Gateway and Subnet Mask in NetConf Note In case of a local connection the gateway address is not relevant and an optional input is therefore possible not 0 0 0 0 4 2 4 Add a controller in NetConf manually Additionally a controller can be configured without an existing entry in the controller list The following steps have to be performed With the menu entry Edit New Item you add a contro...

Страница 38: ...s Leave the dialog with the ok button A reset of the respective controller is required for the accepting of the configura tion If the new configuration has been accepted successfully by the controller a dis play is made in the screen with time and Ok 4 2 5 MAC address Each Ethernet controller is equipped by the manufacturer with a unique and worldwide un ambiguous physical Ethernet address also ca...

Страница 39: ...he green watchdog LED of the PLC is on Procedure Start the terminal program as previously described activate the monitor prompt with Enter the monitor command reboot Keep pressed during the current rebooting process The following screen is dis played Abbildung 25 Abbildung 26 Figure 26 Boot monitor of the ENC66 in the terminal program The input in the bootmonitor of the controller is active as soo...

Страница 40: ...66 For this variant an already installed firmware has to be removed also see chapter 5 4 Remove a firmware Abbildung 27 Figure 27 Displaying the version of the bootloader 5 2 2 Variant Stand Alone In addition to the bootloader a firmware has to be installed for the stand alone operation So both versions are displayed after entering the ver command Abbildung 28 Figure 28 Displaying the version of t...

Страница 41: ...sing the file transfer function in the terminal program Select Z modem as the protocol and start the transfer with the send button Abbildung 30 Figure 30 Selecting the zmodem protocol A dialog box shows the progress of the file transfer Abbildung 31 Figure 31 Transferring the firmware to the controller The loading procedure takes several seconds Two adjacent segments rotate in clock wise direction...

Страница 42: ...d first to be able to use the controller with the StdHMI Perform these steps to remove the firmware Activate the monitor interface Type the reboot command Keep pressed during the current rebooting process Type the delfirm command Answer the question Are you sure to erase firmware from flash y n with y The terminal window should now look like the figure below Abbildung 33 Figure 33 Removing the fir...

Страница 43: ...ns of the Z modem rz After the selection of Send files this command is transmitted implicitly to the controller by the connected terminal program and is used for the transmission of the firmware or the bootloader to the controller For transmitting the proto col ZMODEM is to be selected quit Terminates the bootmonitor and starts the loaded firmware reboot Resets the controller help Displays the com...

Страница 44: ...tory for the operation of a drive Referred to the drives they represent only a subset of the necessary parameterization Further details regarding a complete parameterization are included in 9 Via its machine constants the controller only initializes parameters that are necessary for the communication with the drives The control parameters the safety functions of the drives and the parameters of th...

Страница 45: ...ration MK_CANDRIVES 48 1 0 5 Assigning of the axis number 0 15 to the CAN node address in the order of the CAN node address 1 48 1 no axis number is assigned to the node address 0 15 an axis number is assigned to the node address MK_HARDKONF 16 1 0 5 Assigning of the axis number 0 15 to the analog axes in the order of the axis inter faces 1 16 1 no axis number is assigned to the axis interface 0 1...

Страница 46: ...of rotation with absolute positioning Modulo 360 axis Sign indicates the direction Modulo 360 axis Shortest travel is made Bit 6 Gantry axis Normal axis Gantry axis Synchronized axis with mechanical coupling Bit 7 Hand wheel Normal Axis Hand wheel Bit 8 Selection reference switch type for analog axis normally open nor mally closed Reference switch type is normally open Reference switch type is nor...

Страница 47: ...MODVMAX 16 Modal axis speed manual traversing m min or rpm in the order of the axis number 0 15 MK_VMAX 16 Max axis speed m min or rpm in the order of the axis number 0 15 MK_BESCHL 16 Acceleration ramp m sec 2 or r sec 2 in the order of the axis number 0 15 MK_BREMS 16 Brake ramp m sec 2 or r sec 2 in the order of the axis number 0 15 MK_T_BESCHL 16 Damping time constant for acceleration and brak...

Страница 48: ...8 0 1 2 3 4 5 6 7 8 9 10 11 13 14 15 16 17 MK_ACHSENART 16 0 0 0 0 0 0 0 0 0 0 0 0 0 0 0 0 Software configuration MK_CANOPEN_BAUDRATE 2 0 1000 MK_DELTAT 1 4 Setting of the axes MK_IMPULSE 16 4096 4096 4096 4096 4096 4096 4096 4096 4096 4096 4096 4096 4096 4096 4096 4096 MK_WEG 16 10 10 10 10 10 10 10 10 10 10 10 10 10 10 10 10 Axis related limit values MK_MODVMAX 16 10 10 10 10 10 10 10 10 10 10 1...

Страница 49: ...chine constants stored in the con troller up to the max number An error message is generated for each file parame ter not accepted Number of parameters in the file is less than the max number in the operating sys tem The file parameters overwrite the machine constants stored in the controller The missing machine constants are completed up to the max number by the entries already available in the c...

Страница 50: ...hronized axis The two axes have a mechanical compulsory coupling Therefore the Gantry axis X is not entered in the machine constants a synchro nized axis with its values as axis of its own but only as reference to axis X There is only one set of parameters for the master and the slave axis MK_IMPULSE MK_ACHSENART etc 6 6 1 Example of synchronized axes at the CAN Bus The drive setup consists of thr...

Страница 51: ...constants MK Numb er val ues Values Test set up MK_TEST_OHNEMECHANIK 1 0 MK_SPS_DUMMY 1 0 Hardware configuration MK_CANDRIVES 48 1 1 1 1 1 1 1 0 1 1 1 1 1 1 1 1 1 1 1 1 1 1 1 1 1 1 1 1 1 1 1 1 1 1 1 1 1 1 1 1 1 1 1 1 1 1 1 1 MK_APPLACHSIDX 18 1 1 1 0 1 1 1 1 1 1 1 1 1 1 1 1 1 1 MK_ACHSENART 16 1 0 0 0 0 0 0 0 0 0 0 0 0 0 0 0 Software configuration MK_CANOPEN_BAUDRATE 2 0 500 Setting of the axis MK...

Страница 52: ...The file of the machine constants for the described drive configuration is to be as follows Tabelle 24 Table 24 Example of synchronized axis machine constants MK Numb er val ues Values Test set up MK_TEST_OHNEMECHANIK 1 0 MK_SPS_DUMMY 1 0 Hardware configuration MK_CANDRIVES 48 1 1 1 1 1 1 1 1 1 1 1 1 1 1 1 1 1 1 1 1 1 1 1 1 1 1 1 1 1 1 1 1 1 1 1 1 1 1 1 1 1 1 1 1 1 1 1 1 MK_HARDKONF 16 0 1 1 1 1 1...

Страница 53: ...Resolution pulses 4096 8192 as drive 2 The file of the machine constants for the described drive configuration is to be as follows Tabelle 26 Table 26 Example of gantry axis machine constants MK Numb er val ues values Test set up MK_TEST_OHNEMECHANIK 1 0 MK_SPS_DUMMY 1 0 Hardware configuration MK_CANDRIVES 48 1 1 1 1 1 1 1 0 1 1 1 1 1 1 1 1 1 1 1 1 1 1 1 1 1 1 1 1 1 1 1 1 1 1 1 1 1 1 1 1 1 1 1 1 1...

Страница 54: ...alue G number parameter value parameter value The following examples show some of the G functions Tabelle 27 Table 27 Examples for G functions G Meaning Parameter example with parame ters and value 00 Straight line interpo lation in rapid speed AXES R D F E L G1 X0 Z10 C0 F2 01 Straight line interpo lation 02 Circle interpolation in clockwise direction AXES D I J K R F E L G3 X40 Y40 R100 D 60 K2 ...

Страница 55: ...on the path G31 or each axis G30 also for all following linear interpolations E L Selection of the feeding speed via the number of revolutions E and the step size L F E L Tabelle 29 Parameter Meaning AXES Target point coordinates of the three linear master axes default X Y Z as well as start and or target point coordinates of the three rotative slave axes Default A B C D Change of radius when the ...

Страница 56: ...rtant M functions Tabelle 30 Table 30 Important M functions M Meaning in the CNC 14 Start of contour activates the summing up of the path length in the parameter field P551 When using M14 in an online program program with reloading of program components the execution of the program is blocked until the end of the contour is in the storage M15 M16 M21 15 End of contour deactivates the summing up of...

Страница 57: ...the field may be left empty The IP address is then to be input later in the StdHMI For further details regarding the installation of the StdHMI please check 2 8 2 Starting the StdHMI The StdHMI can be started at the folder Start Programme ECKELMANN E_CONTROL Standard HMI With connected controller The NC firmware is loaded the file to be loaded is defined in delphmmi ini section Download The file o...

Страница 58: ...onstants Tabelle 31 Table 31 Modifying machine constants Steps in the stdHMI Description Diagnose F12 Machine constants F6 MC change F6 A mask is opened in which machine constants can be changed Change machine constants in compliance with the presetting of the drives see chapter Machine constants Save and download F1 The changed machine constants are accepted in the file NCR mk and are loaded in t...

Страница 59: ...ve to be set as follows Tabelle 32 Table 32 Setup machine constants for testing MK Number values Values Test set up MK_TEST_OHNEMECHANIK 1 1 MK_SPS_DUMMY 1 1 8 4 Checking the drives The parameterized and connected drives can be checked in the diagnosis on the basis of their position lag after the adapting of the machine constants In case of correctly parameterized drives the position lag toggles a...

Страница 60: ...F2 Axis setting F1 Modal travel F1 A single drive is selected the selected drive can be recog nized by the green highlighted command value Travel S3 Selected drive turns in jogging mode in positive direction Travel S4 Selected drive turns in jogging mode in negative direction Axis S5 Axis change over is recognized by the change over of the green command value display Override S6 S7 The drive speed...

Страница 61: ...neu tmp can be found in the cfg folder of your StdHMI installation The editor supports programs that are in a cartesian plane orthogonal axes The screen is divided into three parts The program listing the Input for G functions can be hidden with The graphical display of the program zoom can be changed with the mouse A DIN program is displayed both in text and graphically after the editor is opened...

Страница 62: ...0000 Determination of traversing speed G17 Determination of plane G0 X10 Y10 Traversing to the starting point at rapid speed Generates a straight line from the zero point to the starting point G2 X20 Y20 R10 Following of a section of the square contour Generates a quarter circle G1 X30 adds a straight line G2 X40 Y10 R10 adds a quarter circle G1 Y0 adds a straight line G2 X30 Y 10 R10 adds a quart...

Страница 63: ... in stdHMI Description Save as F4 The screen displays a dialog screen Input Quad1 din in the dialog screen Save program as Quad1 din 8 6 4 Loading a program into the controller The stored program test din is to be loaded into the controller Starting point Program editor is active Tabelle 36 Table 36 Load a DIN program into the controller Steps in stdHMI Description Program to NC F7 The screen disp...

Страница 64: ...achine constants for test set up MK Number values Values Test set up MK_TEST_OHNEMECHANIK 1 0 MK_SPS_DUMMY 1 0 Tabelle 38 Table 38 Starting of the program in the controller Steps in stdHMI Description Automatic F10 Change the mode of StdHMI to Automatic Start S1 Start drives the figure is followed with activated graphics without activated graphics the numbers of command and actual positions change...

Страница 65: ...nctions M14 and M15 that lift and lower the tool only in case of a following of the contour The M functions are programmed in a separate PLC program Tabelle 39 Table 39 The M functions for the example M function Command function Programming in a separate PLC program M14 Lift tool An output for the lifting of the tool is to be set Switching to the next command only upon response of the upper limit ...

Страница 66: ...Accept the selection with F7 Abbildung 41 Figure 41 Loaded program in textual and graphical view Insert the M function in compliance with the follow ing table Save program F3 Tabelle 41 Input in the left input field Meaning Graphical display 1 G1 F10000 G17 M15 Lift tool G0 X10 Y10 M14 Lower tool Table 41 program example with M functions ...

Страница 67: ...hown in the StdHMI Save the program by means of Save program Now the program can be transferred to the controller and started G2 X20 Y20 R10 G1 X30 G2 X40 Y10 R10 G1 Y0 G2 X30 Y 10 R10 G1 X20 G2 X10 Y0 R10 G1 Y10 M15 Lift tool G0 X0 Y0 M30 Input in the left input field Meaning Graphical display Table 41 program example with M functions ...

Страница 68: ...er language Leave page leave the Edit configuration dialog with the green check mark 8 9 Changing the colour setting of the graphical display In the default program setting a dark background and light letters are set The colour set tings are included in file interpreter ini and can be changed For reasons of printing technique the screen shots included in these instructions are pre pared in dark le...

Страница 69: ...69 97 Introduction Manual ENC66 eckelmann de Abbildung 43 Figure 43 Changing the colour setting of the graphical display ...

Страница 70: ...roller and the generation of the program in compliance with IEC 61131 can be carried out 9 1 Programming Software ETOOLS PLC 2 The following software package on CD is required for the programming of the controller CD Program package Supported operating system ETOOLS PLC 2 ETOOLS PLC 2 CoDeSys programming soft ware Windows 2000 XP Vista 32 Bit See 1 for more details 9 2 Installation ETOOLS PLC 2 Co...

Страница 71: ... example The 24V voltage is connected with the modules LBM PWR04 LBM DOM16 and LBM DIM16 A signal Tool down I_ToolDown of the tool is connected with the input I1 of the LBM DIM16 A signal Tool up I_ToolUp of the tool is connected with the input I2 of the LBM DIM16 A signal Emergency stop circuit I_NoEStop of the drives is connected with the input I3 of the LBM DIM16 A switch Lower Tool O_ToolDown ...

Страница 72: ...Abbildung 45 Figure 45 Select the target settings in E Tools PLC 2 Acknowledge the presetting A screen for the first block is displayed The name can be freely assigned e g PLC_PRG As first block a program is generated in the presetting in the language ST structured text Abbildung 46 Figure 46 Naming the first block acknowledge by clicking OK Upon saving of the new project by clicking on File Save ...

Страница 73: ...ules All used LBM modules must have entries in the CoDeSys PLC configuration The following modules that are automatically handled by the controller are excluded Analog axes that are realized with LBM ARI01 modules for CNC or motion applica tions Communication interfaces that are realized with LBM SER02 modules Modules that have no corresponding entry in the PLC configuration are ignored by the con...

Страница 74: ... categories Digital IO modules Analog IO modules Axis interface modules 9 4 3 PLC configuration You can setup a PLC configuration with the following steps Select the tab Resources on the lower left side of the screen Open the entry PLC configuration with a double click Entry ENC66 gets visible ...

Страница 75: ...49 Figure 49 Opening the PLC configuration You can add a LBM module with clicking the right mouse button on the corresponding cat egory Abbildung 50 Figure 50 Adding a LBM module Insert a LBM DOM16 for the example In E Tools PLC 2 the result looks like this ...

Страница 76: ... from the PLC program is possible by means of the di agnostic address to be specified in the controller configuration for each module You can find out the following states of the modules Operation state of the modules Availability of the 24V process voltage State of the watchdog triggering via the local bus The bus communication prevents the watchdog from triggering Otherwise the outputs are switc...

Страница 77: ...6 module in the same way This module also uses one input and one output word Abbildung 53 Figure 53 The added LBM DIM16 module 9 5 Task configuration A task configuration via tab Resources is only required if system variables are used by data block _0 For details please check 1 Abbildung 54 Figure 54 Task configuration 9 6 Changing of the language german english A switch of the language in CoDeSys...

Страница 78: ... Optionen Arbeitsbereich Sprache englisch A switch of the language in CoDeSys from english to german occurs by Project Options Desktop Language german Abbildung 55 Figure 55 Changing of the language in E Tools PLC 2 ...

Страница 79: ...M pro for ENC66 10 2 Required libraries The program requires the libraries enc66 lib and standard lib These libraries are probably to be newly included via the tab Resources Library Manag er Abbildung 56 Figure 56 library selection for the sample project 10 3 System variable and data block Communication between the CNC controller and the PLC program is made via the variable of data block 1 while c...

Страница 80: ...al traversing StdHMI codes as per bit for 16 drives DB1_SPS2NC_VERFAHRTASTENFREIGABE_MINUS_ W MW1 4 Keys manual traversing StdHMI codes as per bit for 16 drives DB1_SPS2NC_REGLERFREIGABE_W MW1 5 Enabling CNC DB1_SPS2NC_EINLESEFREIGABE_BIT MX1 7 0 Enabling CNC DB1_SPS2NC_PROGRAMMSTART_B MB1 9 0 StdHMI DB1_SPS2NC_PROGRAMMSTOP_B MB1 12 0 StdHMI DB1_NC2SPS_BETRIEBSBEREIT_2_BIT MX1 128 1 Monitoring CNC...

Страница 81: ...unction chart SFC with the two steps Init and Main Abbildung 58 Figure 58 Sequential function chart in E Tools PLC 2 10 6 Sequential function cart A program in the language sequential function chart comprises the principle elements step transition and branching In this language elements can be included by means of the right mouse key The program CNC_Test comprises an initialization block with 2 st...

Страница 82: ...uts are defined as bits in the respective words of the process image Step Main Block START_STOP Evaluation of the system variables for Start and Stop Block M_FUNCTIONS Editing of the M function Block RELEASE_SIGNAL_HAN DLER Enabling of the system variant Evaluation of the input Emergency stop cir cuit I_NoEStop Transition False No switching to the next step since FALSE The program remains in step ...

Страница 83: ...S2NC_REGLERFREIGABE_W DB1_NC2SPS_BETRIEBSBEREIT_2_BIT These variables set the enabling and the monitoring signals in the controller 10 10 Function M_FUNCTIONS In the following table the contents of the function block M_FUNCTIONS is explained The block recognized by means of the two system variables DB1_NC2SPS_MFKT_STROBE_BIT DB1_SPS2NC_MFKT_QUITT_BIT whether a new M function has been ordered and b...

Страница 84: ...TOP TRIG_STARTBUTTON Q OR START_STOP TRIG_STOPBUTTON Q THEN M_M0_bit FALSE END_IF END_IF optionally stop IF M_M1_bit THEN IF START_STOP TRIG_STARTBUTTON Q OR START_STOP TRIG_STOPBUTTON Q THEN M_M1_bit FALSE END_IF END_IF db2_hint_optionallystop_active_bit M_M1_bit 84 97 Upon the recognition that the new M function is M14 or M15 the follow up program part is jumped to M14 The output O_ToolDown is s...

Страница 85: ...s switched otherwise an error message occurs tool up TRIG_M15 CLK M_M15_bit IF M_M15_bit THEN IF TRIG_M15 Q THEN TIMER_M15 IN FALSE O_ToolDown FALSE ELSE TIMER_M15 IN TRUE PT t 5s IF I_ToolUp THEN M_M15_bit FALSE ELSIF TIMER_M15 Q THEN M_M15_bit FALSE SPSERROR F_TOOL_DOWN_KI 3 0 END_IF END_IF END_IF 10 11 Loading of the program into the controller A connection between PC and the controller can be ...

Страница 86: ...face e g COM1 with baud rate parity and stop bit are to be input By a double click the parameters are included into the respective win dow pane Since the controller includes a Motorola proces sor the entry Motorola byteorder is to be set to Yes Figure 61 Configuration of the serial connection 10 11 2 Network connection Select online communication parameters This connection includes a name e g netw...

Страница 87: ... this case two connections Local_ and Network are displayed The current setting is the setting that is displayed in the right window pane prior to the clicking on OK This setting is used for login 10 11 3 Loading of the program The program is loaded into the controller via Online Login The program can be started see the following chapter The successful start of the program is indicated by the pass...

Страница 88: ...ogin to the controller with Online Login the data memory can be reset to the start values with Online Reset 10 11 7 Permanent storage of the program in the controller boot project If the controller is used in the standalone mode a project can be automatically started when the controller is booting Perform the following steps to set it up Upon login to the controller with Online Login the current p...

Страница 89: ... StdHMI into the controller the PLC program isn t stored in the controller Only the file that was loaded via the StdHMI is replaced on the harddisk 10 11 8 Termination of communication with the controller Upon login to the controller with Online Login the controller can be exited with Online Logout The program in the controller maintains the status last selected ...

Страница 90: ...est setting MK_TEST_OHNEMECHANIK 1 0 MK_SPS_DUMMY 1 0 11 1 Connection of the controller inputs Make the following wiring for the described hardware set up Set input Emergency stop circuit to 24V The two inputs Tool up and Tool down are to be set in compliance with the pro gram progress M14 M15 Therefore the inputs are to be set firmly to 24V or are to be deactivated 11 2 Loading and starting the P...

Страница 91: ...llowing error message is displayed in a red box This error message is generated upon elapsing of the timer of 5 s via the function SPSERROR in the module M_FUNCTIONS The text pertinent to the error number is included in the file sps_fehl db English version sps_erro db This file is stored in the directory cfg of the StdHMI The screen displayed below indicates an error of the controller 2 of the mod...

Страница 92: ...92 97 Abbildung 66 Figure 66 Controller error message in the StdHMI ...

Страница 93: ...inal program 39 Displaying the version of the bootloader 40 Displaying the version of the boot loader and the CNC firmware 40 Accessing the file transfer function in the terminal program 41 Selecting the zmodem protocol 41 Transferring the firmware to the controller 41 Transfer of the CNC firmware finished 42 Removing the firmware from a ENC66 controller 42 Representation of a G function 55 Start ...

Страница 94: ...tial function chart in E Tools PLC 2 81 Sequential function charts with opened steps 82 Definition of inputs and outputs 83 Configuration of the serial connection 86 Configuration of the network connection 87 Status line 87 Current values of the variables in E Tools PLC 2 Online mode 88 Loaded DIN program in the StdHMI 91 Controller error message in the StdHMI 92 ...

Страница 95: ...nized axis machine constants 51 Example of synchronized axis drive configuration 52 Example of synchronized axis machine constants 52 Example of gantry axis drive configuration 53 Example of gantry axis machine constants 53 Examples for G functions 54 Parameters for G00 and G01 55 Parameters for G02 and G03 55 Important M functions 56 Modifying machine constants 58 Setup machine constants for test...

Страница 96: ...96 97 ...

Страница 97: ...Technical modifications and errors reserved Current to März 2011 CNC_EB_CNC66_DE 2011 ECKELMANN BERLINER STRASSE 161 65205 WIESBADEN FON 49 0 611 7103 0 FAX 49 0 611 7103 133 eckelmann de 97 97 ...

Отзывы: