background image

ASSEMBLY

PB-8010 H/T

20

X7501200001

© 11/2018 ECHO Inc.

5.

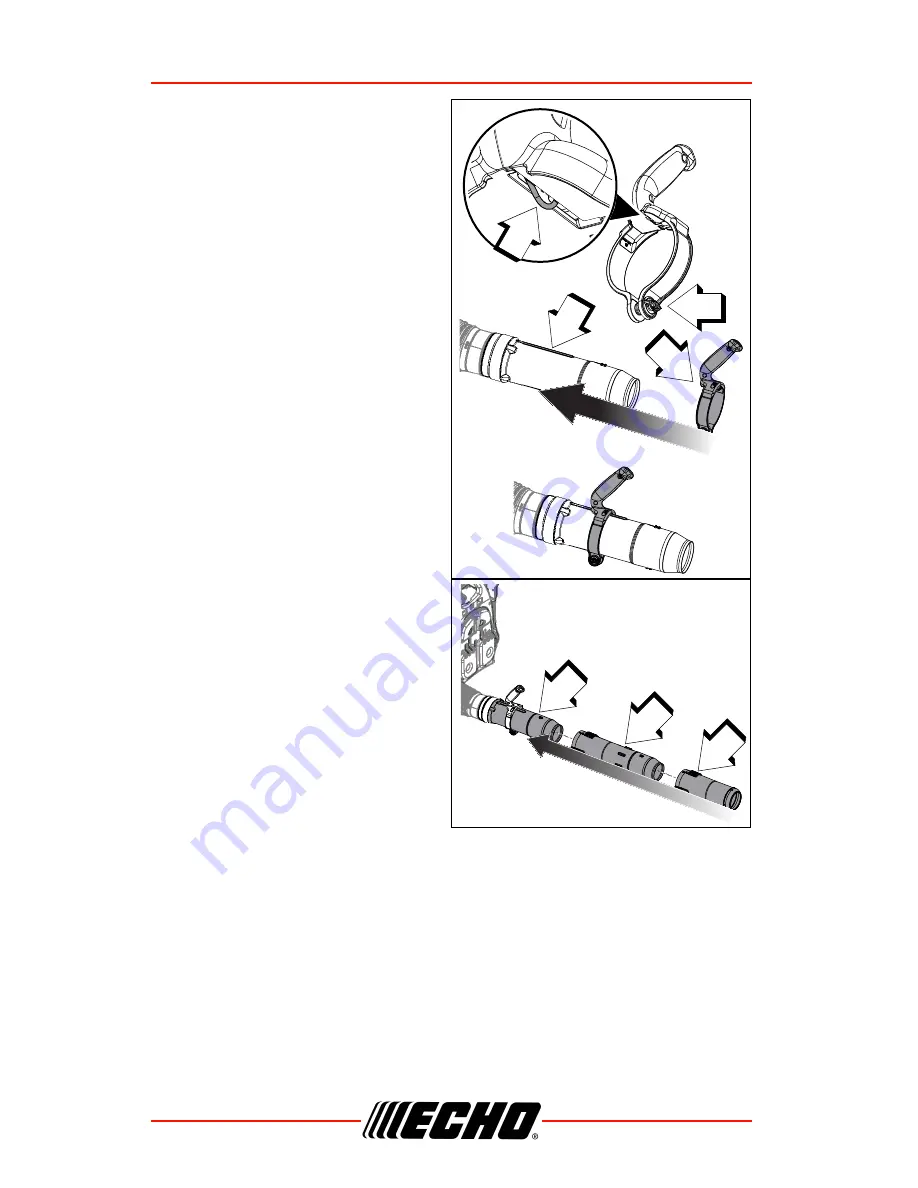
Loosen knob (E) completely 
and expand stick handle clamp. 
Align wire (G) in handle with 
grounding strip on swivel pipe 
(C).

6.

Slide stick handle onto swivel 
pipe (C). Stick handle (F) 
should be angled away from 
operator.

7.

Position stick handle (F) for 
comfortable operation. Tighten 
knob (E).

8.

Assemble straight pipe (J) onto 
swivel pipe (C), until you feel 
light resistance. Hold swivel 
pipe and turn straight pipe 
clockwise, engaging positive 
locking channels, until 
connection is firm. Do not force 
connection.

9.

Assemble end pipe (K) to 
straight pipe (J) the same as in 
step 8.

Note:  Blower use will eventually 

loosen pipe connections. 
Exclusive positive locking system allows pipes to be 
tightened. If loosening occurs, remove two pipes and install 
according to steps 8 and 9.

E

G

C

F

J

C

K

Содержание PB-8010 H

Страница 1: ...exhaust from this product contains chemicals known to the State of California to cause cancer birth defects or other reproductive harm Read and understand all provided literature before use Failure to...

Страница 2: ...Evaporative 13 CARB And EPA Emissions Control Information 13 Description 14 Contents 18 Assembly 19 Install Blower Pipes and Stick Handle 19 Install Blower Pipes 21 Operation 23 Fuel 24 Starting Cold...

Страница 3: ...ation maintenance storage and assembly specific to this product Scan QR codes for more information For additional literature including safety manuals where applicable or questions regarding terms used...

Страница 4: ...know the model and serial number of your unit Product Registration Register your ECHO equipment on line at www echo usa com or by filling out the product registration sheet included in this manual Re...

Страница 5: ...ition which may lead to minor or moderate personal injury if not avoided The enclosed message provides information necessary for the protection of the unit Note This enclosed message provides tips for...

Страница 6: ...ed Finger severing Primer Bulb DO NOT Allow Flames or Sparks Near Fuel Ignition ON OFF DO NOT Smoke Near Fuel Choke Control COLD START Position Choke Closed Choke Control RUN Position Choke Open Wear...

Страница 7: ...lear of exhaust and muffler area otherwise serious personal injury may occur Users of this product risk injury to themselves and others if the unit is used improperly and or safety precautions are not...

Страница 8: ...tection whenever unit is used Breathing Protection Operators who are sensitive to dust or other common airborne allergens may need to wear a dust mask to prevent inhaling these materials while operati...

Страница 9: ...instructions to minimize risk of injury Failure to follow instructions may result in painful wrist hand arm injuries It is believed that a condition called Raynaud s Phenomenon which affects the fing...

Страница 10: ...the following Avoid using your wrist in a bent extended or twisted position Instead try to maintain a straight wrist position Also when grasping use your whole hand not just the thumb and index finger...

Страница 11: ...f injury from thrown objects Bystanders should be encouraged to wear eye protection If you are approached stop the engine Avoid blowing debris towards people pets open windows or vehicles when using u...

Страница 12: ...parts can amputate fingers or cause severe injuries Keep hands clothing and loose objects away from all openings ALWAYS stop engine disconnect spark plug and make sure all moving parts have come to a...

Страница 13: ...tank fuel line emission control system is EVAP evaporative emissions Evaporative emissions for California models are only applicable to fuel tanks An Emission Control Label is located on the engine Th...

Страница 14: ...l s on your unit Make sure the decal s is legible and that you understand and follow the instructions on it If a decal cannot be read a new one can be ordered from your ECHO dealer The safety decal is...

Страница 15: ...rk Plug 3 Spark Arrestor Muffler with or without Catalyst 4 Recoil Starter Handle 5 Air Cleaner 6 Fuel Tank Cap 7 Shoulder Harness 8 Choke 9 Purge Bulb 10 Throttle Position Lever stop Switch 11 Handle...

Страница 16: ...your unit Make sure the decal s is legible and that you understand and follow the instructions on it If a decal cannot be read a new one can be ordered from your ECHO dealer The safety decal is for ex...

Страница 17: ...Spark Plug 3 Spark Arrestor Muffler with or without Catalyst 4 Recoil Starter Handle 5 Air Cleaner 6 Fuel Tank Cap 7 Shoulder Harness 8 Choke 9 Purge Bulb 10 Handle 11 Throttle Position Lever 12 Thro...

Страница 18: ...ur retailer or ECHO Dealer of damaged or missing parts Use the contents list to check for missing parts PB 8010 H PB 8010 T 1 Power Head 1 Flex Pipe 1 Swivel Pipe 1 Straight Pipe 1 End Pipe 1 Operator...

Страница 19: ...ult Install Blower Pipes and Stick Handle 1 Assemble clamps A onto both ends of flexible pipe B 2 Insert anti static wire through flex tube into swivel pipe 3 Assemble swivel pipe C into flexible pipe...

Страница 20: ...eration Tighten knob E 8 Assemble straight pipe J onto swivel pipe C until you feel light resistance Hold swivel pipe and turn straight pipe clockwise engaging positive locking channels until connecti...

Страница 21: ...pe B Note Clamp with cable guide loop G fits elbow end of flexible pipe 2 Insert anti static wire through flex tube Note A light lubricant may be used to ease assembly of flexible pipe to blower elbow...

Страница 22: ...andle E to desired position Tighten knob H 9 Assemble straight pipe J onto swivel pipe until you feel light resistance Hold swivel pipe and turn straight pipe clockwise engaging positive locking chann...

Страница 23: ...edges and hot surfaces Operation of this equipment may create sparks that can start fires around dry vegetation This unit is equipped with a spark arrestor to prevent discharge of hot particles from...

Страница 24: ...ed to extend engine life in all air cooled 2 stroke and 2 4 stroke hybrid engines Two Stroke Oil A two stroke engine oil such as ECHO branded 2 stroke oils meeting ISO L EGD ISO CD 13738 and J A S O F...

Страница 25: ...fuel caps slowly allowing pressure to equalize NEVER refuel a unit when the engine is HOT or RUNNING DO NOT fill fuel tanks indoors ALWAYS fill fuel tanks outdoors over bare ground DO NOT overfill fu...

Страница 26: ...t Return unused fuel to an approved fuel storage container Storage Fuel storage laws vary by locality Contact your local government for the laws affecting your area As a precaution store fuel in an ap...

Страница 27: ...n PB 8010 H T Recoil starter Use short pulls only 1 2 2 3 of rope length for starting Do not allow the rope to snap back in Always hold the unit firmly 1 Throttle Lever Move throttle lever A to IDLE p...

Страница 28: ...and dies proceed to step 6 6 Choke After engine fires or 5 pulls move choke lever back to RUN position then pull starter handle rope until engine starts and runs Allow unit to warm up at idle for sev...

Страница 29: ...the choke 1 Throttle Lever Move throttle lever A to IDLE position 2 Purge Bulb Pump purge bulb C until fuel is visible Pump bulb an additional 4 or 5 times 3 Recoil Starter Pull recoil starter handle...

Страница 30: ...eturn to idle before shutting off engine 2 Throttle Lever Move Throttle Lever A all the way forward to STOP position If engine does not stop when stop switch is moved to STOP position close choke COLD...

Страница 31: ...ild up of carbon on the spark arrestor screen resulting in overheating and engine damage To reduce harmful build up run engine at wide open throttle for at least 5 minutes every hour and inspect clean...

Страница 32: ...patios and drives Use rakes and brooms to loosen debris before blowing 6 Additional speed may be necessary to clean grass and leaves from a lawn or flower bed 7 Higher speed may be necessary to move...

Страница 33: ...ld not be used in temperatures below 15 F 9 C otherwise damage to the fuel lines may occur 1 Remove clips from back cushion Remove back cushion A from frame 2 Install cold weather insert B on frame ov...

Страница 34: ...tten otherwise serious personal injury may result Your unit is designed to provide many hours of trouble free service Regular scheduled maintenance will help your unit achieve that goal If you are uns...

Страница 35: ...mended based on the finding of damage or wear during inspection COMPONENT SYSTEM MAINTENANCE PROCEDURE SKILL LEVEL Daily or Before Use Air Filter Inspect Clean 3 1 Choke Shutter Fuel System Inspect 1...

Страница 36: ...Filter Clean foam pre filter A in water detergent solution and rinse with clean water Wrap the foam pre filter in a clean dry cloth and squeeze do not wring dry Allow to dry completely before reuse D...

Страница 37: ...from tank 3 Remove the filter from the line and install the new filter Note Federal EPA regulations require all model year 2012 and later gasoline powered engines produced for sale in the United State...

Страница 38: ...ding outer electrode 4 Tighten spark plug to 102 153 kgf cm 86 133 in lbf Cooling System Level 2 To maintain proper engine operating temperatures cooling air must pass freely through the cylinder fin...

Страница 39: ...er fins A to allow cooling air to pass freely 4 Install engine cover 5 Connect spark plug lead Exhaust System Spark Arrestor Screen Level 2 Carbon deposits in muffler will cause a drop in engine outpu...

Страница 40: ...ood or plastic scraping tool to clean deposits from cylinder exhaust port Never use a metal tool to scrape carbon from the exhaust port Do not scratch the cylinder or piston when cleaning the exhaust...

Страница 41: ...up to 1 100 ft 335 m above sea level To maintain proper engine operation and emission compliance above 1 100 ft 335 m ASL the carburetor may need to be adjusted by an authorized ECHO service dealer I...

Страница 42: ...ating choke twice to clear air from carburetor chambers 3 Check idle speed and reset if necessary If a tachometer is available idle speed screw A should be set to the specifications found on Specifica...

Страница 43: ...speed adjust throttle cable 1 Loosen handle adjustment knob C and tilt Tube Throttle handle forward to expose Adjustment Screw D 2 Turn Adjustment Screw until Throttle Trigger free play is 4 6 mm 3 1...

Страница 44: ...tor No fuel at carburetor Fuel strainer or fuel line obstructed Clean or replace See your dealer Engine starts hard or Engine does not start Fuel at cylinder No fuel at cylinder Carburetor See your de...

Страница 45: ...uel vent plugged Contaminated fuel Clean or replace Spark plug Plug dirty or worn Normal wear Clean and adjust or replace Carburetor Improper adjustment Vibration Adjust Cooling system Cooling system...

Страница 46: ...umulation of grease oil dirt and debris from exterior of unit 4 Perform all periodic lubrication and services that are required 5 Tighten all the screws and nuts 6 Drain fuel tank completely Press pur...

Страница 47: ...gnition System Flywheel magneto capacitor discharge ignition type Spark Plug NGK CMR7H Gap 0 65 mm 0 026 in Fuel Mixed Gasoline and Two stroke Oil Gasoline Oil Ratio 50 1 Gasoline Use 89 Octane unlead...

Страница 48: ...product on line It s FAST and EASY NOTE your information will never be sold or misused by ECHO Inc Registering your purchase enables us to contact you in the unlikely event of a service update or prod...

Страница 49: ...PB 8010 H T PRODUCT REGISTRATION X7501200001 49 11 2018 ECHO Inc...

Страница 50: ...NOTES PB 8010 H T 50 X7501200001 11 2018 ECHO Inc NOTES...

Страница 51: ...PB 8010 H T NOTES X7501200001 51 11 2018 ECHO Inc...

Страница 52: ...ECHO INCORPORATED 400 Oakwood Road Lake Zurich IL 60047 www echo usa com H P49415001001 P49415999999 T P49515001001 P49515999999 H P48715001001 P48715999999 T P48615001001 P48615999999...

Отзывы: