WIRING
1. Pull field wiring into cover module.
2. Close all unused conduit entries with conduit
plugs provided. To prevent galling and to ensure
water-tightness, lubricate conduit plugs with
Crouse-Hinds HTL lubricant before installing, and secure
wrench-tight with at least five (5) full threads engaged
(42-52 ft.-lb. for 3/4” plugs, and 58-68 ft.-lb. for 1” plugs).
3. Hang LED luminaire on the cover module hinge hook.
See Figure 2a.
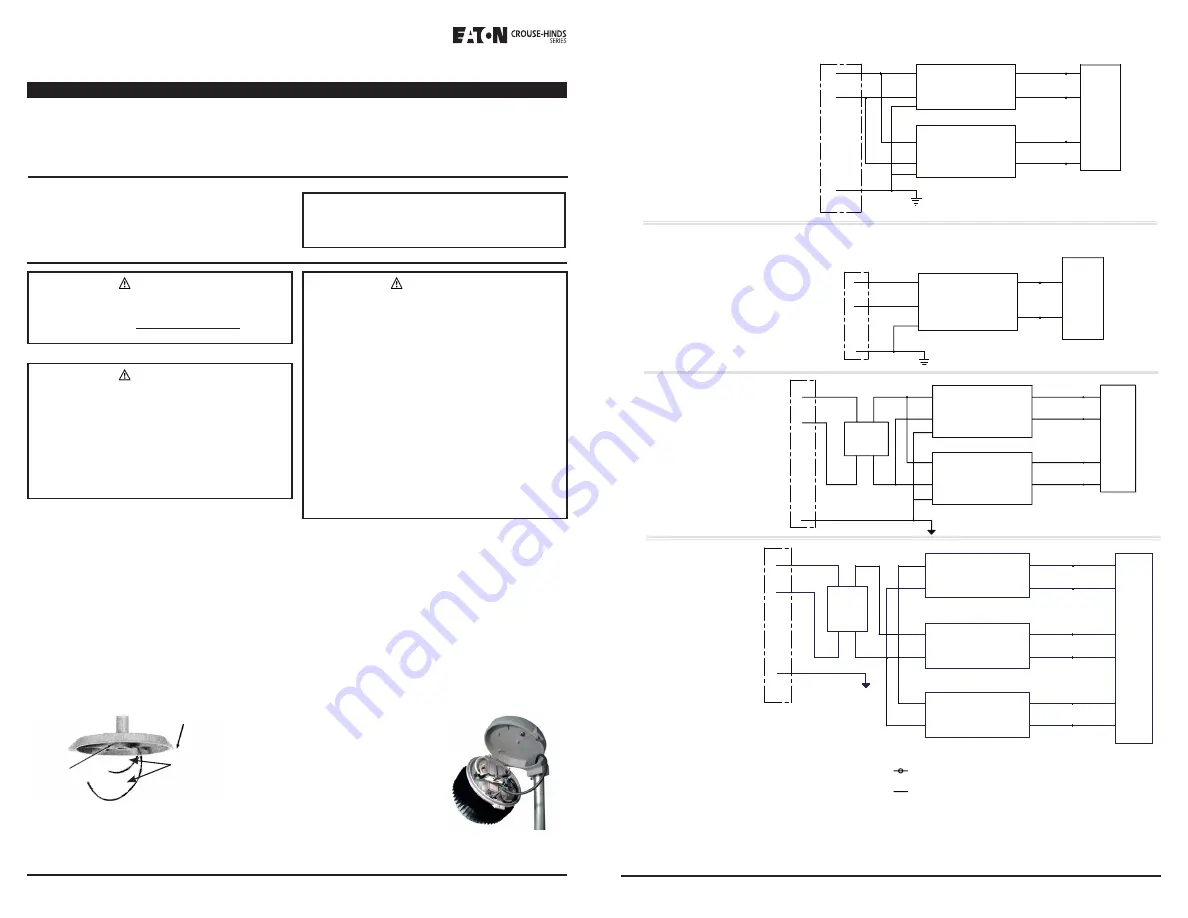
4. Connect supply wires to luminaire wire leads or terminal
block per the attached wiring diagrams using methods
that comply with all applicable codes. See Figure 2b.
Tighten all electrical connections.
5. Close driver housing onto cover module, making sure
that all wires are safely
inside driver housing.
Tighten captive closing
screw to 30 in.-lbs. (3.4
N-m). Ensure two (2)
bosses on driver housing
are in contact with cover
module.
6. Turn power on.
FIGURE 2a
INSTALLATION
MOUNTING
1. Mount the cover module in its support position.
• Ceiling and wall mount: mark and drill desired location
on mounting surface. Secure with 1/4” (6mm) bolts
or lag screws (not provided).
• Pendant, stanchion mount: securely thread onto the
appropriate NPT size conduit. Tighten set screw
located in the conduit hub. See Figure 1.
• Crouse-Hinds HTL thread lubricant must be added to
the conduit threads to prevent water from entering
the fixture.
IF 1628 • 05/22
Copyright © 2022, Eaton’s Crouse-Hinds Division
Page 1
Pro-Champ LED Luminaires
PVM Series Industrial LED Lighting
Installation & Maintenance Information
SAVE THESE INSTRUCTIONS FOR FUTURE REFERENCE
IF 1628
WARNING
To avoid the risk of fire, explosion or electric
shock,
this product should be installed, inspected
and maintained by a qualified electrician only, in
accordance with all applicable electrical codes.
WARNING
To avoid electric shock:
• Be certain electrical power is OFF before and during
installation and maintenance.
• Luminaire must be supplied by a wiring system for
the specific hazardous locations suitable per local
code with an equipment grounding conductor.
To avoid burning hands:
• Make sure LEDs and drivers are cool to touch when
performing maintenance.
Set-screw
Open
Hinge
Ground Wires
FIGURE 1
APPLICATION
Luminaire construction is designed for use indoors and
outdoors in marine and wet locations, where moisture, dirt,
corrosion, vibration, and rough usage may be present.
• Wet location, Type 4X
• UL1598 Luminaires, UL1598A Marine
• IP66
• cUL
FIGURE 2b
IF 1628 • 05/22
Copyright © 2022, Eaton’s Crouse-Hinds Division
Page 2
PVM supplied with a choice of voltages:
• 100-277VAC 50/60 Hz
• 108-250VDC
• 347V
• 480V
TRANSFORMER
GROUND
PE
LINE
VOLTAGE
N
COM
347/480 V
L1
GND (SEE NOTE 4 SHT 1)
GRN
GRN
ACL(BLK)
ACN(WHT)
GND (SEE NOTE 4 SHT 1)
COM
WHT
BLK
INPUT
ACN(WHT)
ACL(BLK)
GRN
WHT
190/270 V
BLK
INPUT
DRIVER # 2
OUTPUT
V-(BLK)
V+(RED)
V-(BLK)
DRIVER # 1
OUTPUT
V+(RED)
GROUND
LINE
VOLTAGE
PE
N
L1
GND
GRN
GRN
ACL(BLK)
ACN(WHT)
WHT
BLK
INPUT
DRIVER
V+(RED)
OUTPUT
V-(BLK)
BLK
RED
DENOTES CONNECTION
CLOSED END CRIMP CONNECTOR
PER BOM
DENOTES WIRE CROSS
OVER, NOT CONNECTION POINT
RED or PURPLE
BLK
BLK
BLK
RED
BLK
RED or PURPLE
RED
PVM9L
PVM7L
PVM5L
PVM3L
BLK
RED
PVM3L
N
PE
L1
BLK
V-(BLK)
ACN(WHT)
WHT
DRIVER
GRN
(GND)
ACL(BLK)
ACN(WHT)
(GND)
GRN
WHT
BLK
GRN
INPUT
V+(RED)
V-(BLK)
OUTPUT
RED or PURPLE
BLK
DRIVER
ACL(BLK)
BLK
INPUT
V+(RED)
OUTPUT
RED or PURPLE
BLK
RED
BLK
PVMV9L
PVM7L
PVM5L
RED
GROUND
VOLTAGE
LINE
5L, 7L & 9L
WIRING DIAGRAM FOR:
DIAGRAM #1:
PVM3L SERIES
WIRING DIAGRAM FOR:
DIAGRAM #2:
347 OR 480 VOLT TRANSFORMER
WIRING DIAGRAM FOR:
DIAGRAM #3:
PE
COM
COM
190/270 V
347/480 V
TRANSFORMER
ACL(BLK)
ACN(WHT)
V+(GREY)
OUTPUT
V-(BLK)
INPUT
V-(BLK)
V+(GREY)
OUTPUT
BLK
BLK
RED
RED
WHT
BLK
DRIVER # 2
DRIVER # 1
ACL(BLK)
INPUT
ACN(WHT)
BLK
WHT
LINE
VOLTAGE
N
PVM11L
BLK
GREY
BLK
GREY
GROUND
L1
GREY
BLK
ACN(WHT)
INPUT
ACL(BLK)
DRIVER # 3
BLK
WHT
V+(GREY)
V-(BLK)
OUTPUT
GRN
BLK
RED
347 OR 480 VOLT TRANSFORMER
WIRING DIAGRAM FOR:
DIAGRAM #4:
ON PVM11L
NOTE: Ground wire must be added to mounting plate
ground lug and to lugs on entry hubs. Ground wire included.
Directive EU 2019/2022
This product contains a light source of energy efficiency
class D or E.
WARNING
To avoid explosion:
• Make sure the supply voltage is the same as the
rated luminaire voltage.
• Do not install where the marked operating
temperatures exceed the ignition temperature of the
hazardous atmosphere.
• Do not operate in ambient temperatures above those
indicated on the luminaire nameplate.
• Use only replacement parts from Crouse-Hinds.
• Use proper supply wiring as specified on the
luminaire nameplate.
• All surfaces must be clean.
• Before opening wiring compartment, electrical power
to the luminaire must be turned off and area must be
free from hazardous atmosphere. Keep tightly closed
when in operation.
• To minimize the risk from electrostatic discharge,
when cleaning, wipe the lens with a clean, damp
cloth.
• LED compartment is non serviceable. Do not open.


