


3 Installation
3.2 Mounting
DX-NET-SWD
06/13 MN04012009Z-EN
www.eaton.com
19
3.2 Mounting
The interface card DX-NET-SWD3 is plugged into the DC1 variable frequency
drive in the degree of protection IP20 at the front on the housing. For this
purpose, two cover plugs must be removed using the flat blade of a screw-
driver.
Figure 7:
Removing the cover plugs
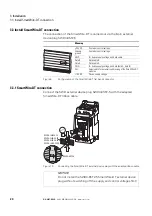
Then the interface card DX-NET-SWD3 can be plugged on. The module
engages on the basic device with the two clips.
Figure 8:
Plug on the interface card DX-NET-SWD3
→
Do not insert tools or other objects into the opened variable
frequency drive.
Ensure that foreign bodies do not enter the opened housing
wall.
L1/L L2/N L3
U
V
W
1
2
3
4
5
6
7
8
9 10 11
4 mm
L1/L L2/N L3
U
V
W
1
2
3
4
5
6
7
8
9 10 11
Ready
I
O
A
Содержание PowerXL DX-NET-SWD
Страница 4: ...II ...
Страница 10: ...0 About this Manual 0 6 Units 6 DX NET SWD 06 13 MN04012009Z EN www eaton com ...
Страница 16: ...1 Device series 1 7 Disposal 12 DX NET SWD 06 13 MN04012009Z EN www eaton com ...
Страница 26: ...3 Installation 3 4 Dismantling 22 DX NET SWD 06 13 MN04012009Z EN www eaton com ...
Страница 64: ...4 Commissioning 4 5 SmartWire DT diagnostics 60 DX NET SWD 06 13 MN04012009Z EN www eaton com ...
Страница 68: ...5 Appendix 5 2 SmartWire DT 64 DX NET SWD 06 13 MN04012009Z EN www eaton com ...


