background image

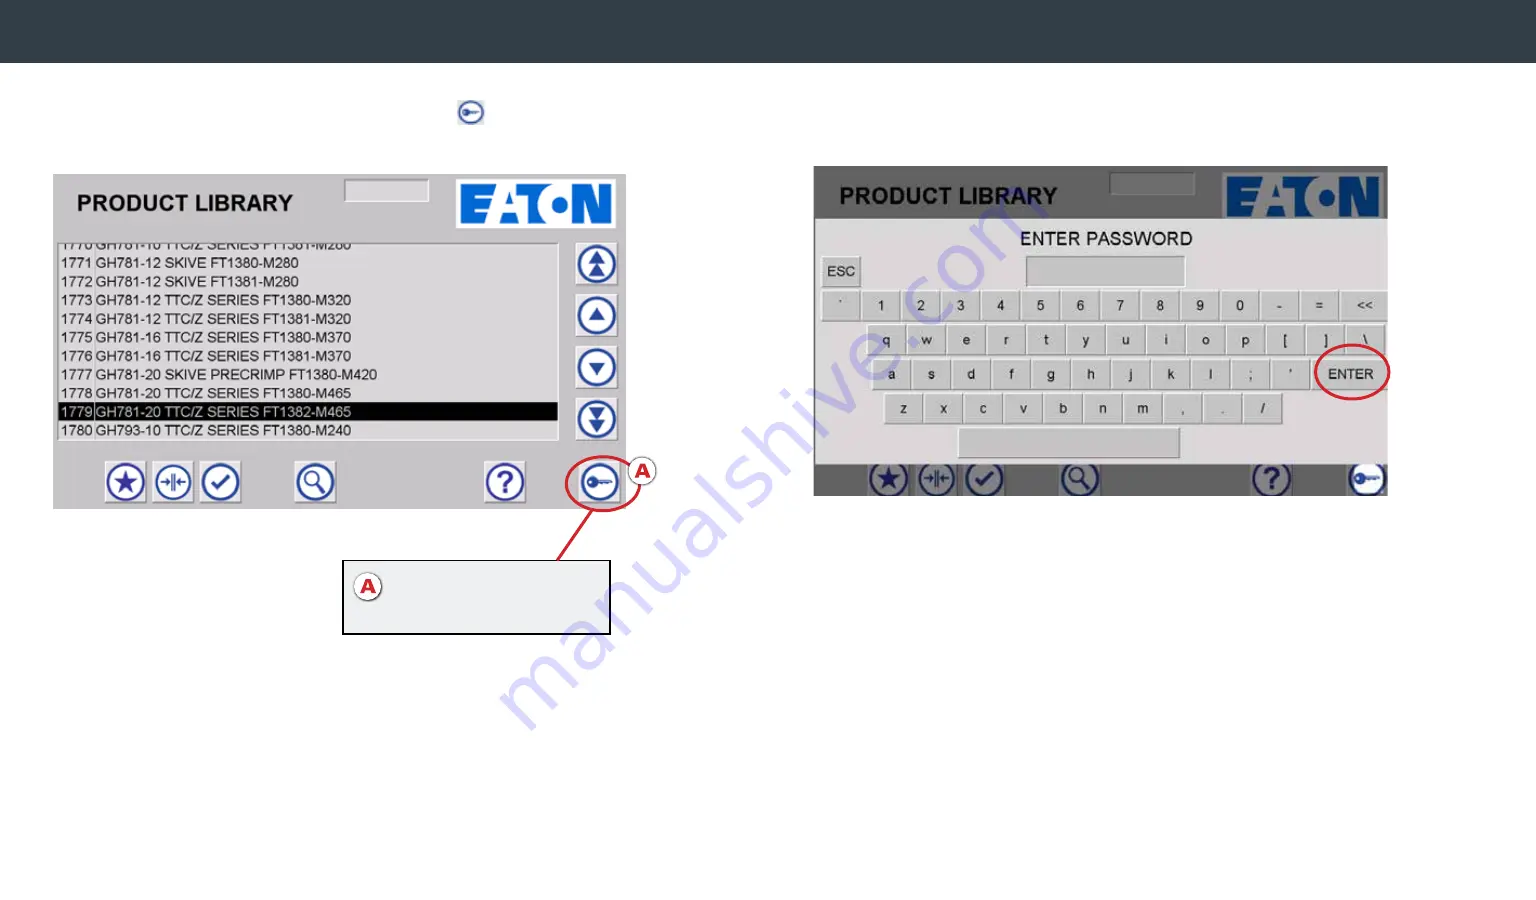
To log in as 

Admin

, press on 

Admin Login

 icon 

.  

Enter the admin password provided and then press “

ENTER

” to  

log in as admin.

A.   Press Admin Login icon
 

• Keyboard pops up

Logging in as Admin 

Содержание FT1380e

Страница 1: ...Eaton Electronic FT1380e Crimp Machine Operator s Manual C R I M P M A C H I N E O P E R AT O R S M A N U A L FT1380E Crimp Machine Operators Manual E HOAS TT005 E...

Страница 2: ...llation Operating Instructions Crimping Procedures Calibration Maintenance Maintenance Intervals Machine Maintenance Procedures Die Cage Maintenance Procedures TroubleshootingTips Crimp Machine Compon...

Страница 3: ...moving parts Do not allow anyone other than the operator close to the equipment while it is in operation 4 Maintain dies with care Dies used in the FT1380e crimp machine are sintered powdered metal o...

Страница 4: ...into the power outlet CAUTION Provide electrical service with a dedicated circuit per the crimp machine electrical requirements to eliminate the possibility of a low voltage situation CRIMP MACHINE P...

Страница 5: ...RS cannot be used in combination with FT1330 XL locators Part number FT1380 XL USB DRIVE Part number FT1380e 1 7 STYLUS Part number FT1380e 1 8 WIPING CLOTH Part number FT1380e 1 9 DIE CAGES Part numb...

Страница 6: ...rol the machine functions This section provides instruction for how to use the touch screen controller Operating instructions Help including owner s manual icon quick reference and tutorial Product Li...

Страница 7: ...nd your spec select the search icon Once the keyboard appears type in the hose series name on the keyboard then hit ENT It will scroll to the first entry for the searched value Scroll up or down using...

Страница 8: ...bration measurements following the calibration procedure steps outlined in this manual Revision level for the HMI and PLC can be found under Revision The Maintenance Screen displays crimp machine cali...

Страница 9: ...e the desired crimp spec Navigate to the Product Library Screen by selecting the Product Library icon Click the Search icon on the bottom of the screen Once the keyboard appears type in the hose serie...

Страница 10: ...g Hit the Load icon Once the Load icon is selected you are able to crimp with this spec via the production screen or navigate to the favorites screen to save the crimp spec as a favorite Loading a hos...

Страница 11: ...con to save as a favorite The spec is now saved as a favorite Note If a location is not selected when the save icon is selected the spec will save in the first available blank favorite row Note If pri...

Страница 12: ...he crimping process by pressing the crimp switch on the machine After crimping measure the achieved crimp diameter to ensure a safe and reliable hose assembly Warning Follow all instructions in this o...

Страница 13: ...instructions in this operator s manual and do not permit anyone to operate this equipment unless they are properly trained and have read and thoroughly understand this manual After crimping measure th...

Страница 14: ...d Use the back button to erase the characters in the current name To save the new name hit ENT To rename a favorite select a spec to rename Then press the Rename Favorite icon A Select spec to be rena...

Страница 15: ...removed by highlighting it and selecting the remove favorite icon You will be prompted to confirm that you do wish to remove the Favorite Removing a Favorite A Select crimp spec to be removed B Select...

Страница 16: ...calculation to be performed The offset value is automatically calculated based on the average of the measurements entered and stored with the Favorites record if the spec was accessed from Favorites...

Страница 17: ...ded after another crimp select the Calculator Icon and enter the four measurements and select Calculate Note The additional offset is calculated and added to original offset value Changing crimp offse...

Страница 18: ...ox next to Offset and a green checkmark will appear This indicates that the offset has been verified Note If unable to select the checkbox the Administrator has not enabled this Offset Verification pr...

Страница 19: ...esired value hit ENT The crimper will now retract to the desired position Note The retract position can be safely entered as values 0 1000 The retract position value is global and all crimps will retr...

Страница 20: ...To log in as Admin press on Admin Login icon Enter the admin password provided and then press ENTER to log in as admin A Press Admin Login icon Keyboard pops up Logging in as Admin...

Страница 21: ...ce screen Admin Auto Log Out There is a Logout button for the Admin on the Maintenance screen In case the Admin forgets to log out there is an auto logout feature This setting can be found and changed...

Страница 22: ...e Favorites menu can now be edited by pressing on them After entering your custom values edit the favorite name by selecting the Rename Favorite icon Then press the Save icon to save the Favorite Caut...

Страница 23: ...MENTS and select the Calculate button The offset value is automatically calculated and stored Note The calculated offset may be adjusted and overwritten by selecting the Offset button and entering a n...

Страница 24: ...orites Offset Entry When enabled allows common user to enter measured crimp diameters and to calculate the offset Remove Favorite When enabled allows common user to remove a favorite Retract Position...

Страница 25: ...ucture is not changed To load the new software to the crimp machine Turn on the machine Locate the USB port which is located on the right side of the machine Remove the port cover and insert the drive...

Страница 26: ...us state Note offsets will need to be re entered and verified PLC Updates In the event that a PLC update is required a micro SD memory card SD or SDHC with a capacity of 128 MB to 32 GB is required To...

Страница 27: ...is fully retracted Select the proper die cage as shown in the PowerSource Crimp Spec tool Use the high efficiency grease provided to grease the outside of each of the die segments and then slide the d...

Страница 28: ...rimp intervals or every six months whichever occurs first Die cages should be free of grease and debris and inspected for worn or damaged components a The sliding surface of the dies should appear smo...

Страница 29: ...oradic operation Check oil level Bleed entire hydraulic system to remove trapped air Noisy operation Air in system Check oil level Bleed entire hydraulic system to remove trapped air Clean pump filter...

Страница 30: ...Plate Casting 1 FT1380 3 13 Crimp Ring 1 FT1380 3 14 Tie Rod 2 FT1380 3 15 Top Block 1 FT1380 3 16 Transducer Mounting Bracket 1 FT1380 3 17 Transducer Rod Bracket 1 222003 6 24S 3 8 16 x 1 50 SHCS 2...

Страница 31: ...2 9 2 FT1381 2 9 3 Front Plate 1 3 FT1330 2 9 13 FT1330 2 9 3 FT1330 2 9 13 Spring Plate 1 4 FT1330 2 9 55 FT1330 2 9 5 FT1381 2 9 55 Cap Screw 4 5 FT1330 2 9 66 FT1330 2 6 6 FT1381 2 9 66 Spacers 4...

Страница 32: ...SEQUENCE 1 Pump on Cylinder advances 2 Valve energized Cylinder retracts 3 Pump and valve de energized Cylinder holds position Hydraulic Schematic FT1380E Crimp Machine Operators Manual E HOAS TT005 E...

Страница 33: ...FT1380E Crimp Machine Operators Manual E HOAS TT005 E...

Страница 34: ...FT1380E Crimp Machine Operators Manual E HOAS TT005 E...

Отзывы: