background image

34

Eaton BladeUPS 5 kVA to 60 kVA (N+1) User’s Guide 164201649—Rev 14

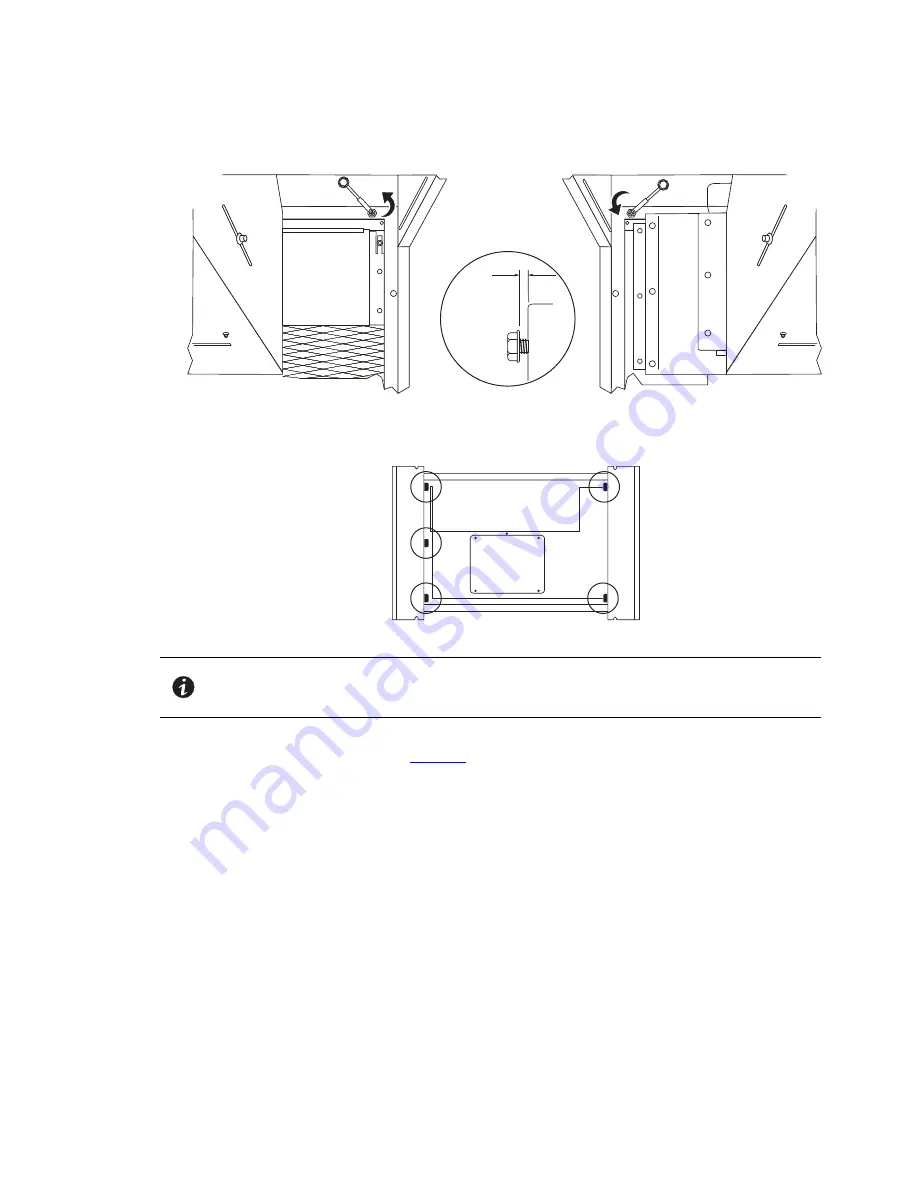
Figure 15. Removing the Cabinet Top Panel Screws

1/8”

  Front Interior View

Back Interior View

Overhead View

 Front 

Screws

  Back 

Screws

NOTE

Use an extension bar on the socket wrench or screwdriver if you need to reach the
screws. You may also need to use a step ladder. Use safety best practices when
standing on a ladder.

5.

With the back doors open, reach up inside the rack and push up the cabinet top panel to lift it off of the
loosened bolts. Retain the panel (see

Figure 16

).

Top Entry Installation

Содержание BladeUPS none

Страница 1: ...p n 164201649 Revision 14 Preassembled and Standard Systems For use with Eaton BladeUPS 5 kVA to 60 kVA N 1 systems User s Guide Eaton BladeUPS ...

Страница 2: ...with the instruction manual may cause harmful interference to radio communications Operation of this equipment in a residential area is likely to cause harmful interference in which case the user will be required to correct the interference at his own expense ICES 003 This Class A Interference Causing Equipment meets all requirements of the Canadian Interference Causing Equipment Regulations ICES ...

Страница 3: ...3 68 EEC Amending Directive 73 23 EEC 89 336 EEC Council Directive relating to electromagnetic compatibility 92 31 EEC Amending Directive 89 336 EEC relating to EMC The EC Declaration of Conformity is available upon request for products with a CE mark For copies of the EC Declaration of Conformity contact Eaton Power Quality Oy Koskelontie 13 FIN 02920 Espoo Finland Phone 358 9 452 661 Fax 358 9 4...

Страница 4: ...tion such as important operating and maintenance instructions Special Symbols The following are examples of symbols used on the UPS or accessories to alert you to important information RISK OF ELECTRIC SHOCK Observe the warning associated with the risk of electric shock symbol CAUTION REFER TO OPERATOR S MANUAL Refer to your operator s manual for additional information such as important operating ...

Страница 5: ...on 30 3 11 Bottom Entry Installation 38 3 12 Installing the Internal Batteries 41 3 13 EBM Installation 45 3 14 Checking the EBM Accessories 45 3 15 Rack Setup for the EBM 46 3 16 Parallel System Initial Startup 54 4 4 S St ta an nd da ar rd d S Sy ys st te em m I In ns st ta alllla at tiio on n 5 57 7 4 1 Standard System Installation 57 4 2 Inspecting the Equipment 57 4 3 Tools Required 57 4 4 Un...

Страница 6: ...g Between Modes 105 5 15 Setting Power Strategy 105 5 16 Configuring Battery Settings 105 5 17 Configuring The UPS For EBMs 105 5 18 Configuring The UPS For Customer Supplied External Batteries 106 5 19 Setting the Battery Low Level Alarm 106 5 20 Running Automatic Battery Tests 107 6 6 C Co om mm mu un niic ca at tiio on n 1 10 09 9 6 1 Communication 109 6 2 Installing Communication Options and C...

Страница 7: ...Batteries 126 7 9 Replacing the Electronics Module 126 7 10 Replacing a UPS in a Parallel System 128 7 11 Recycling the Used Battery or UPS 129 7 12 Updating the UPS Firmware 130 8 8 S Se er rv viic ce e a an nd d T Tr ro ou ub blle es sh ho oo ot tiin ng g 1 13 31 1 8 1 Service and Support 131 8 2 Typical Alarms and Conditions 131 8 3 Silencing the Alarm 136 9 9 S Sp pe ec ciif fiic ca at tiio on...

Страница 8: ...viii Eaton BladeUPS 5 kVA to 60 kVA N 1 User s Guide 164201649 Rev 14 Table of Contents ...

Страница 9: ...lock 36 Figure 19 Bottom Entry Wiring Installation 38 Figure 20 BladeUPS Module Rear Panel 39 Figure 21 Removing the Wireway Access Cover Bottom Entry Rack Shown 39 Figure 22 Removing the Conduit Landing Plate 40 Figure 23 BladeUPS Bar Terminal Block 40 Figure 24 BladeUPS Module Rear Panel 42 Figure 25 Removing the UPS Front Cover 42 Figure 26 Removing the UPS Battery Cover Plate 43 Figure 27 Inst...

Страница 10: ...mple EBM Installations in Parallel Systems 73 Figure 60 BladeUPS Module Rear Panel Standalone UPS Shown with IEC 309 60A Output Power Cord 75 Figure 61 Removing the Input Output Box Access Cover 76 Figure 62 BladeUPS Hardwired Terminal Block 77 Figure 63 BladeUPS Module Rear Panel Standalone UPS Shown with Hardwired Terminal Block 78 Figure 64 Powerware Hot Sync CAN Bridge Card 79 Figure 65 Instal...

Страница 11: ...gure 83 Removing the UPS Front Cover 123 Figure 84 Removing the UPS Battery Cover Plate 124 Figure 85 Installing the UPS Battery Trays Two Battery Strings 124 Figure 86 Installing the UPS Single string Battery Trays for BladeUPS 5 0 kVA 125 Figure 87 Replacing the UPS Front Cover 125 Figure 88 Removing the UPS Front Cover and Electronics Module 127 Figure 89 Replacing the UPS Front Cover 128 List ...

Страница 12: ...xii Eaton BladeUPS 5 kVA to 60 kVA N 1 User s Guide 164201649 Rev 14 List of Figures ...

Страница 13: ...ons 97 Table 13 User Settings 97 Table 14 EBM Selection for UPS Configurations 105 Table 15 Suggested Battery Low Alarm Level Settings 107 Table 16 Supported Communication Devices 110 Table 17 Communication Port Pin Assignment 111 Table 18 Programmable Signal Inputs 113 Table 19 Troubleshooting Alarms and Conditions 132 Table 20 Model List 137 Table 21 Weights and Dimensions 138 Table 22 BladeUPS ...

Страница 14: ...xiv Eaton BladeUPS 5 kVA to 60 kVA N 1 User s Guide 164201649 Rev 14 List of Tables ...

Страница 15: ... an optional Extended Battery Module EBM Figure 1 The BladeUPS Module with Optional EBM Providing outstanding performance and reliability unique BladeUPS benefits include the following High density three phase input three phase output UPS Scalability to 60 kW redundant N 1 configuration by connecting up to six additional BladeUPS modules A standalone UPS converts to a parallel UPS by changing the ...

Страница 16: ...nd power factor correction ABM technology that uses advanced battery management to increase battery service life optimize recharge time and provide a warning before the end of useful battery life Hot swappable electronics module and batteries that simplify maintenance by allowing you to replace them safely without powering down the critical load Emergency shutdown control through the remote emerge...

Страница 17: ...ntime NOTE Install up to four EBMs per UPS Each EBM includes a 0 9m 3 ft connector cable A 0 9m 3 ft battery extension cable is also available X Slot cards with enhanced communication capabilities for network connectivity with monitoring and control The BladeUPS Bar for parallel systems mounted in the rear of an Eaton rack provides the required input and output connections for the paralleled UPSs ...

Страница 18: ...aton BladeUPS 5 kVA to 60 kVA N 1 User s Guide 164201649 Rev 14 Figure 3 Example of a BladeUPS Parallel System BladeUPS Module BladeUPS Module Bottom Entry Wireway BladeUPS Bar BladeUPS Module Introduction ...

Страница 19: ...s removed in an adjacent rack to the left or right of the rack containing the UPS The EBMs for a parallel system can be mounted in an adjacent rack to the left or right of the rack containing the UPS rack side panels removed When configured with EBMs each UPS in a parallel system must have the same number of EBMs installed BladeUPS requires input phase rotation of A B C clockwise Some load equipme...

Страница 20: ...6 Eaton BladeUPS 5 kVA to 60 kVA N 1 User s Guide 164201649 Rev 14 Introduction ...

Страница 21: ...re connect only to a circuit provided with branch circuit overcurrent protection in accordance with the National Electrical Code NEC ANSI NFPA 70 See page 80 standalone UPS or page 85 parallel system Output overcurrent protection and disconnect switch must be provided by others To comply with international standards and wiring regulations the sum of the leakage current of the UPS and the total equ...

Страница 22: ...emmelser for el installation må det udstyr der er forbundet til udgangen af denne UPS tilsammen ikke overskride en jordafdelingsspænding på mere end 3 5 milliampere ADVARSEL Batterierne kan give risiko for elektrisk stød eller brandsår forårsaget af høj kortslutningsstrøm Overhold gældende forsigtighedsregler Servicering skal udføres af kvalificeret servicepersonale med kendskab til batterier og g...

Страница 23: ...voorschriften te voldoen mag de gehele apparatuur die op de uitgang van deze UPS is aangesloten geen aardlekstroom van meer dan 3 5 milliampère hebben OPGELET Batterijen leveren gevaar op voor elektrische schokken en kunnen brandwonden veroorzaken door een grote kortsluitstroom Neem de juiste voorzorgsmaatregelen in acht Het onderhoud moet worden uitgevoerd door bevoegde onderhoudsmonteurs die ver...

Страница 24: ... milliampeeria mA VARO Akut voivat aiheuttaa sähköiskun tai palovammojen vaaran johtuen suuresta oikosulkuvirrasta Noudata kaikkia asianmukaisia varotoimia Laitteen saa huoltaa vain ammattitaitoinen huoltohenkilökunta joka tuntee akut ja niihin liittyvät varotoimet Älä päästä valtuuttamatonta henkilöstöä lähelle akkuja Akusto täytyy hävittää säädösten mukaisella tavalla Noudata paikallisia määräyk...

Страница 25: ...courant de fuite à la terre de la totalité du matériel branché sur la sortie de l onduleur ne doit pas dépasser 3 5 mA ATTENTION Les batteries peuvent présenter un risque de choc électrique ou de brûlure provenant d un courant de court circuit haute intensité Observez les précautions appropriées L entretien doit être réalisé par du personnel qualifié connaissant bien les batteries et les précautio...

Страница 26: ...lossenen Geräte zusammen einen Erdableitstrom von insgesamt 3 5 Milliampere nicht überschreiten VORSICHT Batterien können das Risiko eines elektrischen Schlags bergen oder durch hohen Kurzschlussstrom in Brand geraten Die richtigen Vorsichtsmaßnahmen beachten Die Wartung muss von qualifiziertem Wartungspersonal durchgeführt werden das im Umgang mit Batterien geübt ist und über gute Kenntnisse der ...

Страница 27: ...onali e con le norme in merito al cablaggio tutta l apparecchiatura collegata con l uscita del gruppo statico di continuità non deve avere una corrente di dispersione di terra superiore a 3 5 milliampere ATTENZIONE Le batterie possono comportare un rischio di scossa elettrica o di ustione in seguito a un elevata corrente di corto circuito Osservare le dovute precauzioni L assistenza deve essere es...

Страница 28: ...5 milliampere for v re i overensstemmelse med internasjonale standarder og forkablingsbestemmelser CAUTION Batterier kan utgj re en fare for elektrisk st t eller branns r pga h y kortsluttingsstr m Treff passende forholdsregler Service b r utf res av kvalifisert servicepersonale med kjennskap til batterier og n dvendige forholdsregler Hold uautorisert personale borte fra batteriene Batterier m fje...

Страница 29: ...podem oferecer risco de choque elétrico ou queimadura ocasionados por alta tensão com possibilidade de curto circuito Tome as precauções adequadas A manutenção deve ser realizada por pessoal qualificado com conhecimento sobre baterias e ciente das precauções exigidas Mantenha o pessoal não autorizado afastado das baterias Siga as instruções apropriadas ao desfazer se das baterias Consulte os códig...

Страница 30: ...ðòîâ è òðåáîâàíèé ê ðàçâîäêå ýëåêòðè åñêèõ öåïåé ñóììàðíàÿ âåëè èíà òîêà óòå êè íà çåìëþ âñåãî îáîðóäîâàíèÿ ïîäêëþ åííîãî ê âûõîäó ÈÁÏ íå äîëæíà ïðåâûøàòü 3 5 ìèëëèàìïåðà ОСТОРОЖНО Âûñîêîå íàïðÿæåíèå âûçâàííîå êîðîòêèì çàìûêàíèåì â áàòàðåå ìîæåò ïðèâåñòè ê ïîðàæåíèþ ýëåêòðè åñêèì òîêîì èëè îæîãó Ñîáëþäàéòå ìåðû ïðåäîñòîðîæíîñòè Òåõíè åñêîå îáñëóæèâàíèå äîëæíî îñóùåñòâëÿòüñÿ êâàëèôèöèðîâàííûì ïåðñî...

Страница 31: ...a utrustning som anslutits till uttagen p denna UPS enhet ha l cksstr m som verstiger 3 5 milliampere VITKTIGT Batterierna kan inneb ra en risk f r elektrisk st t eller br nnskada fr n kortsluten starkstr m Iakttag l mpliga f rsiktighets tg rder Service ska utf ras av utbildad servicepersonal med kunskap om batterierna och n dv ndiga f rsiktighets tg rder H ll ej beh rig personal borta fr n batter...

Страница 32: ... Consulte la página 70 o la página 46 La protección contra sobrecorriente de salida y el conmutador de desconexión debe suministrarse por parte de terceros Para cumplir con los estándares internacionales y las normas de instalación la totalidad de los equipos conectados a la salida de este SIE no debe tener una intensidad de pérdida a tierra superior a los 3 5 miliamperios PRECAUCIÓN Las baterías ...

Страница 33: ...ructions on how to connect or to fully install the optional MBM refer to the Eaton BladeUPS Maintenance Bypass Module User s Guide 3 3 2 2 I In ns sp pe ec ct tiin ng g t th he e E Eq qu uiip pm me en nt t If any equipment has been damaged during shipment keep the shipping cartons and packing materials for the carrier or place of purchase and file a claim for shipping damage If you discover damage...

Страница 34: ...lb 6 1202 0 kg 2650 lb 1035 1 kg 2282 lb NOTE When adding an MBM to the cabinet cabinet weight will increase by 34 5 kg 76 lb 3 3 5 5 M Mo ov viin ng g t th he e S Sy ys st te em m a an nd d B Ba at tt te er ry y P Pa alllle et ts s The system is bolted to a wooden pallet supported by wood skids The batteries are stacked on a separate pallet and are held in place with strap binding To move the sys...

Страница 35: ...and the pallet see Table 1 for weight 5 Insert the forks of the forklift or pallet jack between the skids on either side of the pallet to move it WARNING The forklift jacks must be inserted between the skids of the pallet see Figure 5 If unloading instructions are not closely followed moving the batteries may cause serious injury 6 Use a forklift or pallet jack to move the battery pallet close to ...

Страница 36: ...on 3 6 Installing the Ramp 3 3 6 6 I In ns st ta alllliin ng g t th he e R Ra am mp p To install the ramp 1 Remove the outer plastic wrap and the four protective cardboard corners from the system 2 Discard or recycle the packaging in a responsible manner or store it for future use 3 Locate the ramp on the back of the cabinet Hold the ramp in place while you cut the strap that binds it to the syste...

Страница 37: ...ntil ready to connect ramp Ramp Wooden Mounting Guides 2 pieces DO NOT REMOVE Pallet Front 4 Lift the ramp from the back of the cabinet Attach it to the pallet by inserting the left and right ramp pins tee nuts into the pre drilled holes at the rear of the pallet see Figure 7 5 Continue to section 3 7 Unloading the System Installing the Ramp ...

Страница 38: ...p Pre drilled hole Tee nut 3 3 7 7 U Un nllo oa ad diin ng g t th he e S Sy ys st te em m CAUTION The system is heavy See Table 1 for system weight If unloading instructions are not closely followed the system can cause serious injury CAUTION Do not tilt system more than 10 sideways from vertical To unload the system Unloading the System ...

Страница 39: ...emoved before unloading the system 1 Remove the four shipping bolts securing the front stabilizing bracket see Figure 8 2 Remove the four shipping bolts securing the rear stabilizing bracket 3 Remove the brackets Figure 8 Removing the Stabilizing Brackets Pallet Rear Four Shipping Bolts Bracket 4 If the leveling feet are not fully retracted turn the leveling feet clockwise until they are retracted...

Страница 40: ...s heavy See Table 1for system weights CAUTION To prevent possible injury do not stand in the path of the system when unloading the system from the pallet Unloading the system requires three people one behind the system and one on each side If unloading instructions are not closely followed the system can cause serious injury Unloading the System ...

Страница 41: ...10 Figure 10 Unloading the System Pallet Rear Pallet Front 6 Roll the system to the final installation location 7 Continue to section 3 8 Preassembled System Setup 3 3 8 8 P Pr re ea as ss se em mb blle ed d S Sy ys st te em m S Se et tu up p CAUTION Only qualified service personnel such as a licensed electrician shall perform the electrical installation Risk of electrical shock NOTE The BladeUPS ...

Страница 42: ... 125A 6 N 1 System 225A 160A NOTE For ease of wiring access with bottom entry place the rack containing the UPSs on a raised floor 3 3 9 9 P Pr re ep pa ar riin ng g t th he e R Ra ac ck k Preparing the Rack To prepare the rack for wiring 1 Remove the accessory box that is located in the rear of the system behind the rack doors 2 Verify that the following items are in the accessory box UPS documen...

Страница 43: ... of the rack b Reorient the door and hang it on the hinges replace the hinge pins c Move the Eaton logo to the upper part of the door 3 Verify that the leveling feet are long enough to lower to the floor 4 To install the input and output wiring go to one of the following sections For top entry installation see section 3 10 Top Entry Installation For bottom entry installation see 3 11 Bottom Entry ...

Страница 44: ... p E En nt tr ry y I In ns st ta alllla at tiio on n Top Entry Installation Figure 11 Top Entry Wiring Installation To install the parallel system input and output wiring 1 Verify that all battery circuit breakers on all UPSs are in the OFF O position see Figure 12 Top Entry Installation ...

Страница 45: ...ut Breaker Battery Breaker 2 To remove the upper side panels from the cabinet see Figure 13 At the top of the cabinet unlock the upper side panels with the key Remove the left and right upper side panels and set them aside Secure the key so it will be available when you are ready to replace the upper side panels Top Entry Installation ...

Страница 46: ...e the trim on each side of the cabinet top panel see Figure 14 Remove and retain the four interior trim screws located on the inside of the side panel A B C and D Remove and retain the four pairs of outside trim screws located at the top on each rack 1 through 8 Remove and retain the top trim panels Place both top trim panels and all mounting screws together in the same accessible location Top Ent...

Страница 47: ... pieces but do not disassemble it It is attached as one assembly 4 Use a ratcheting socket wrench with a 3 8 inch socket or a screwdriver to loosen the bolts that secure the cabinet top panel Locate the five top panel bolts inside the rack Three bolts are located at the front of the rack and two bolts are at the back of the rack Loosen the bolts but do not remove them Leave them protruding about 1...

Страница 48: ...Screws Back Screws NOTE Use an extension bar on the socket wrench or screwdriver if you need to reach the screws You may also need to use a step ladder Use safety best practices when standing on a ladder 5 With the back doors open reach up inside the rack and push up the cabinet top panel to lift it off of the loosened bolts Retain the panel see Figure 16 Top Entry Installation ...

Страница 49: ...201649 Rev 14 35 Figure 16 Removing the Top Panel Back Screws Front Screws Top Entry Wireway Access Cover Cable Trough Cover 6 Remove the six screws on the conduit landing plate and retain Remove and retain the plate see Figure 17 Top Entry Installation ...

Страница 50: ...ee punch to provide one or more holes in the conduit landing plate to accommodate the input and output wiring for the system 8 Replace the conduit landing plate 9 Replace the top entry wireway access cover Replace the cover in the recessed opening Replace the four bolts that secure the cover Figure 18 BladeUPS Bar Top Entry Terminal Block Ground Top Entry Terminal Block Top Entry Installation ...

Страница 51: ...PS is fed from a 4 pole ATS that interrupts the neutral a delta to wye isolation transformer with its secondary neutral bonded to ground must be placed in line with the bypass input of the UPS This will provide an uninterrupted neutral to the UPS regardless of the position of the ATS neutral contact If an overlapping neutral or make before break ATS switch is used the neutrals must overlap for a m...

Страница 52: ...el Push the panel forward until it is flush with the rack frame Snap the panel into the latches Lock the upper side panels with the key Repeat to install the second panel 14 Five and six UPS preassembled systems only Continue to section 3 12 Installing the UPS Internal Batteries 15 If installing optional EBM s continue to section 3 13 EBM Installation Otherwise go to section 3 16 Parallel System I...

Страница 53: ... 20 Figure 20 BladeUPS Module Rear Panel Load RPM Connector Breaker Input Breaker Battery Breaker 2 Remove the five screws on the bottom entry wireway access cover and retain Remove the cover and retain see Figure 21 Figure 21 Removing the Wireway Access Cover Bottom Entry Rack Shown 3 Remove the six screws on the conduit landing plate and retain Remove the plate and retain See Figure 22 Bottom En...

Страница 54: ...ing from the utility to the BladeUPS Bar 5 Replace the conduit landing plate and attach approved electrical conduit to the plate 6 Pull approved electrical conductors to the system and connect the input output and ground wires to the BladeUPS Bar terminal block and route the three input phases and the input neutral through the mounted or loosened ferrite assembly see Figure 23 Figure 23 BladeUPS B...

Страница 55: ...e isolation transformer with its secondary neutral bonded to ground must be placed in line with the bypass input of the UPS This will provide an uninterrupted neutral to the UPS regardless of the position of the ATS neutral contact If an overlapping neutral or make before break ATS switch is used the neutrals must overlap for a minimum of 50 msec during the transition In these cases a transformer ...

Страница 56: ...tor breaker controls the load connector only not the output power cord 2 Remove the UPS front cover and set it aside see Figure 25 Grasp the fingergrips on both sides of the cover and pull the cover forward firmly Unplug the LCD cable connecting the back of the control panel to the electronics module Figure 25 Removing the UPS Front Cover LCD Cable Installing the Internal Batteries ...

Страница 57: ...27 for two battery string installations or Figure 28 for single string installations Verify that each tray is properly aligned before sliding in the tray NOTE When installing single string battery trays for BladeUPS 5 0 kVA always install the single string trays in the bottom battery compartment 5 When a tray is fully installed tuck the plastic handle on the end of the tray into place Figure 27 In...

Страница 58: ...nnector on the electronics module Use care to loop the LCD cable gently in front of the electronics module Push the top of the front cover firmly into place and then push the bottom firmly into place Figure 29 Installing the UPS Front Cover LCD Cable 8 For six UPS preassembled systems only Repeat Steps 1 through 7 for UPS 6 9 If installing optional EBM s continue to section 3 13 EBM Installation O...

Страница 59: ... assemblies adjust to mount in standard 19 inch racks with front to rear rail distances from 61 to 81 cm 26 to 32 inches deep Figure 30 shows an example EBM installation Figure 30 Example EBM Installations in Parallel Systems Optional Battery Extension Cables 3 3 1 14 4 C Ch he ec ck kiin ng g t th he e E EB BM M A Ac cc ce es ss so or riie es s Verify that the following items are included with th...

Страница 60: ...ged with the UPS to move the UPS NOTE Mounting rails are required for each individual cabinet To install the EBM rail kit 1 Loosen the assembly wing nuts on both rail assemblies and adjust the rail size for the depth of your rack See Figure 31 Figure 31 Adjusting the Rail Depth Rear Front Rail Assembly Assembly Wing Nuts 2 Select the proper holes in the rail for positioning the EBMs in the rack Pl...

Страница 61: ...e UPS and Parallel Wireway with Two EBMs Shown Bottom of Rack Position 37 Position 42 Position 46 Position 51 First Rail Second Rail UPS Wireway Front Rail Screw Positions Rear Rail Screw Positions Bottom of Rack UPS Wireway Position 38 Position 40 Position 47 Position 49 First Rail Second Rail Rack Setup for the EBM ...

Страница 62: ...om of Rack Position 2 Position 4 Position 11 Position 13 First Rail Second Rail 3 Secure the rail to the front of the rack with two hex head screws see Figure 34 Figure 34 Securing the Front Rail 4 Using two clip nuts and two hex head screws attach the rail to the rear of the rack see Figure 34 and Figure 35 The bottom rail uses positions 38 and 40 for the rear hex head screws If you are installin...

Страница 63: ... minimum of two people 7 Place the EBM on a flat stable surface with the front of the EBM facing toward you 8 If the mounting brackets are not already installed align the two mounting brackets with the screw holes on the side of the EBM and secure with the supplied 6 32 flat head screws See Figure 35 9 Attach the EBM front cover Align the pins on the rear of the front cover with the openings in th...

Страница 64: ... 10 Slide the EBM into the rack 11 Secure the front of the EBM to the rack using two hex head screws in each mounting bracket as shown in Figure 37 Figure 37 Securing the EBM Mounting Brackets Hex Head Screws 12 Attach the rear hold down brackets to the rail and slide the brackets into the slots on the EBM rear panel see Figure 38 Rack Setup for the EBM ...

Страница 65: ...s normal and will not harm personnel Insert the EBM cable quickly and firmly into the UPS battery connector 14 Verify that all battery circuit breakers on all UPSs are in the OFF O position 15 Plug the EBM cable s into the battery connector s as shown in Figure 39 Up to four EBMs may be connected to each UPS 16 Parallel system only Repeat Steps 14 and 15 for each UPS with EBM s See Figure 40 and F...

Страница 66: ...eUPS 5 kVA to 60 kVA N 1 User s Guide 164201649 Rev 14 Figure 39 Typical EBM Installation Battery Breakers EBM to EBM Battery Connectors EBM Cable Battery Breaker EBM to UPS Battery Connector Rack Setup for the EBM ...

Страница 67: ...60 kVA N 1 User s Guide 164201649 Rev 14 53 Figure 40 Example EBM Installations in Preassembled Parallel Systems NOTE Systems using the supplied EBM cables and optional 0 9m 3 ft battery extension cables Rack Setup for the EBM ...

Страница 68: ...Pa ar ra alllle ell S Sy ys st te em m I In niit tiia all S St ta ar rt tu up p To start up a parallel system NOTE Verify that the total equipment ratings do not exceed the parallel system capacity to prevent an overload alarm 1 Verify that all circuit breakers on all UPSs are in the OFF O position see Figure 24 Parallel System Initial Startup ...

Страница 69: ...en press the button until the TURN UPS ON OFF menu displays 11 Press the button to display the TURN SYSTEM ON option press the button 12 Confirm the selection Press and hold the button for three seconds until the UPS stops beeping Verify that the indicator illuminates solid on each UPS indicating that the UPS is operating normally and any loads not connected through the load connector are now ener...

Страница 70: ... recommends setting the Date and Time and the Start screen NOTE 2 Verify that the Parallel Operation Settings are set appropriately for your system For example if you know the load will exceed the redundancy level of the system set the Parallel Operation Mode to Capacity Mode to prevent unnecessary alarms see Operation Section 18 If you installed an optional REPO test the REPO function Activate th...

Страница 71: ... I In ns sp pe ec ct tiin ng g t th he e E Eq qu uiip pm me en nt t If any equipment has been damaged during shipment keep the shipping cartons and packing materials for the carrier or place of purchase and file a claim for shipping damage If you discover damage after acceptance file a claim for concealed damage To file a claim for shipping damage or concealed damage 1 File with the carrier within...

Страница 72: ...in a protected area that has adequate airflow and is free of humidity flammable gas and corrosion Avoid placing the cabinet on its side Verify that the air vents on the front and rear of the cabinet are not blocked Allow 1m 3 ft floor space in the front and rear of the rack for safety and access for maintenance If installing a parallel system continue to the Parallel System Setup section If instal...

Страница 73: ...ge rack hardware including M6 clip nuts and screws 10 32 cage nuts and screws 1 4 x 20 rack baying screws and nuts 8 32 attachment screws 3 Verify operation of the rack door handle To open the door pull out on the handle To close the door push in on the handle until it snaps into place 4 Verify that the supplied keys lock and unlock the door 5 Optional You may flip the rack door to allow it to ope...

Страница 74: ...frame i Try closing door If it does not fit properly you may need to loosen the keeper latches and door lock assembly to provide proper fit j Move the Eaton logo to the upper part of the door 6 Optional For ease of installation remove the rack side panels especially the panel on the side nearest the BladeUPS Bar 7 Plan where each cabinet will be located in the rack and determine the U marks to use...

Страница 75: ... ut t a an nd d O Ou ut tp pu ut t W Wiir riin ng g Figure 43 Wiring Entry Options Wiring in a Bottom Entry Rack Wiring in a Top Entry Rack To install the parallel system input and output wiring 1 Remove the five screws on the wireway access cover and retain Remove the cover and retain Installing the Input and Output Wiring ...

Страница 76: ...nding Plate Bottom Entry Rack Top Entry Rack 3 Use a Greenlee punch to provide one or more holes in the conduit landing plate to accommodate the input and output wiring for the system 4 Replace the conduit landing plate 5 Replace the top entry wireway access cover Replace the cover in the recessed opening Replace the four bolts that secure the cover Figure 45 BladeUPS Bar Terminal Block Ground Gro...

Страница 77: ...le ATS that interrupts the neutral a delta to wye isolation transformer with its secondary neutral bonded to ground must be placed in line with the bypass input of the UPS This will provide an uninterrupted neutral to the UPS regardless of the position of the ATS neutral contact If an overlapping neutral or make before break ATS switch is used the neutrals must overlap for a minimum of 50 msec dur...

Страница 78: ...etup section NOTE 1 If you are installing the EBM with a new UPS at the same time use the UPS user s guide to install both the UPS and the EBM NOTE 2 Mounting rails are required for each individual cabinet 4 4 8 8 U UP PS S S Se et tu up p The UPS comes with all hardware required for installation in a standard EIA or JIS seismic rack mount configuration with square and round mounting holes The rai...

Страница 79: ... connectors Redundant signal cable with 2 two position terminal block connectors 2 blue terminating plugs 4 4 1 10 0 R Ra ac ck k S Se et tu up p f fo or r t th he e U UP PS S CAUTION The UPS is heavy Removing the UPS from its carton requires a minimum of two people Use the corrugated lifting sling packaged with the UPS to move the UPS NOTE Mounting rails are required for each individual cabinet T...

Страница 80: ...wn bracket and finger tighten only Assemble the other two nuts to the rail and finger tighten only Repeat for the other rail Figure 47 Installing the Rail Hardware Right Rail Assembly Shown M6 Hex Nuts Front Rear Rear Hold Down Bracket NOTE Verify that the holes in the rail align properly with the hole pattern in the rack If the rack has square holes verify that the studs on the end of the rail al...

Страница 81: ...es in the rail align properly with the hole pattern in the rack If the rack has square holes verify that the stud on the end of the rail aligns within the square hole Figure 49 Securing the Rear Rail Right Rail Assembly Shown Position 2 Position 7 Position 8 Position 1 Bottom of Rack or Top of Other Cabinet Rear M5 Screws Cage Nuts Position 4 Rail Stud 6 Tighten all screws at the front and rear of...

Страница 82: ...face with the front of the UPS facing toward you 10 Remove the electronics module and set it aside Remove the electronics module locking screw at the top left of the electronics module and retain Grasp the ring handle at the middle of the module and pull the module slowly out of the cabinet Pull firmly to unseat the connectors Use two hands to support the module NOTE Treat the electronics module w...

Страница 83: ...ion in the rack for any clearance needed to install the X Slot cards 14 Using four M5 machine screws secure the front of the cabinet to the rack as shown Figure 52 Securing the Front of the UPS Position 9 Position 4 M5 Screws 15 Insert the two rear hold down brackets on the rails into the slots on the rear of the cabinet a If necessary push out on the rack upright to allow the clearance needed to ...

Страница 84: ...nics module locking screw 18 On the UPS rear panel plug in the supplied communication terminal block connectors 19 Optional but recommended Press the two supplied wire saddles into the holes on the rear panel as shown in During wiring installation secure any wires to the connectors within the saddles Figure 54 Installing the Communication Terminal Block Connectors 3 Pin Connector 2 Pin Connector 2...

Страница 85: ...2 Remove the eight screws on the battery cover plate and retain Remove the plate and retain Figure 55 Removing the UPS Battery Cover Plate 3 Slide the battery trays into the cabinet for two battery string installations and for single string installations Verify that each tray is properly aligned before sliding the tray in NOTE When installing single string battery trays for BladeUPS 5 0 kVA always...

Страница 86: ... to loop the LCD cable gently in front of the electronics module Push the top of the front cover firmly into place and then push the bottom firmly into place Figure 58 Installing the UPS Front Cover 7 Parallel system only Repeat the steps starting at the beginning of section for UPS Setup for each UPS to be paralleled 8 If installing optional EBM s see section 3 13 EBM Installation Otherwise conti...

Страница 87: ...llo on ne e U UP PS S I In ns st ta alllla at tiio on n NOTE Do not make unauthorized changes to the UPS otherwise damage may occur to your equipment and void your warranty The UPS requires a dedicated branch circuit that meets the following requirements Circuit with overcurrent protection as follows 50A BladeUPS 12 model 30A BladeUPS 12i or BladeUPS 8 model Standalone UPS Installation ...

Страница 88: ...NEMA L21 20R To install the UPS 1 Switch off utility power to the distribution point where the UPS will be connected Be absolutely sure there is no power 2 Verify that all circuit breakers are in the OFF O position NOTE The load connector breaker controls the load connector only not the output power cord 3 If you are installing power management software connect your computer to the UPS communicati...

Страница 89: ...ng Screw UPS Battery Connector X Slot Communication Bay 1 X Slot Communication Bay 2 Output Power Cord Input Power Cord Surge Protection leave installed NOTE The load connector breaker controls the load connector only not the output power cord 4 4 1 13 3 H Ha ar rd dw wiir re ed d I In ns st ta alllla at tiio on n WARNING Only qualified service personnel such as a licensed electrician shall perfor...

Страница 90: ... not included to the ground bonding screw on the BladeUPS rear panel 3 Switch off utility power at the distribution point where the BladeUPS will be connected Be absolutely sure there is no power 4 Remove the four screws from the Input Output box access cover and retain 5 Slide the access cover off the Input Output box and retain Figure 61 Removing the Input Output Box Access Cover NOTE The pre pu...

Страница 91: ... an input source neutral connected at the bypass input terminals This neutral must be continuous and uninterrupted even if there are no phase to neutral loads connected to the UPS output If the UPS is fed from a 4 pole ATS that interrupts the neutral a delta to wye isolation transformer with its secondary neutral bonded to ground must be placed in line with the bypass input of the UPS This will pr...

Страница 92: ...alllle ell U UP PS S I In ns st ta alllla at tiio on n CAUTION Only qualified service personnel such as a licensed electrician shall perform the electrical installation Risk of electrical shock NOTE Do not make unauthorized changes to the UPSs otherwise damage may occur to your equipment and void your warranty To install two to six UPSs in a new parallel configuration 1 Verify that the UPSs to be ...

Страница 93: ...re Hot Sync CAN Bridge Card in X Slot Communication Bay 2 see Figure 63 leaving Communication Bay 1 available for other types of X Slot cards 6 Remove the X Slot communication bay cover on the UPS and retain the screws 7 Install the Powerware Hot Sync CAN Bridge Card into the open X Slot communication bay 2 on the UPS rear panel Reinstall screws and tighten 8 Repeat step 4 through 7 through to ins...

Страница 94: ... 164201649 Rev 14 Figure 65 Installing the Blue Terminating Plug First UPS Blue Terminating Plug CAN IN 10 Install the second supplied blue terminating plug Figure 66 into the CAN OUT port on the last UPS UPS 3 in New Multiple Parallel UPS Installation ...

Страница 95: ...installed 12 Using the supplied connectors install a CAN Bridge Card cable between each UPS as shown in Figure 67 connecting the CAN OUT port on one UPS to the CAN IN port on the next UPS On startup the parallel system will identify the UPS wired after UNIT 1 as UNIT 2 and so forth NOTE You can configure the parallel system with UPS 1 at the bottom of the rack as shown in Figure 67 or at the top o...

Страница 96: ...larity or wiring is not correct the parallel system does not operate normally For example when shutting down one UPS the remaining UPS transfers the load to bypass instead of supporting the load Verify that all wiring is correct for proper operation 14 Remove the Standalone Parallel terminal block connector from the last UPS UPS 3 in Figure 67 15 Tighten the screws securing each Powerware Hot Sync...

Страница 97: ...ng on the parallel system 20 Connect the parallel input cord from each paralleled UPS as shown in Figure 67 Loosen the two screws on the plug retainer and slide the plug retainer out Gently loop and twist the parallel input cord as shown to minimize stress on the cord The loop and twist for each cord may vary depending on configuration and strain relief to the BladeUPS Bar in the rack Insert the p...

Страница 98: ...he electrical installation Risk of electrical shock NOTE Do not make unauthorized changes to the UPSs otherwise damage may occur to your equipment and void your warranty To install one UPS in a parallel ready configuration 1 Verify that the UPS is installed in a rail kit in a rack containing a BladeUPS Bar 2 Switch off utility power to the distribution point where the parallel ready UPS system wil...

Страница 99: ...lot Communication Bay 2 leaving the X Slot Communication Bay 1 available for other types of X Slot cards 6 Remove the X Slot communication bay cover on the UPS and retain the screws 7 Install the Powerware Hot Sync CAN Bridge Card into the open X Slot communication bay 2 on the UPS rear panel Reinstall screws and tighten 8 Retain both blue terminating plugs for future use Figure 69 Installing the ...

Страница 100: ... parts connect the ground cable not included to the ground bonding screw See Figure 63 for the location of the ground bonding screw 13 You can install an optional REPO circuit that will shut down the entire parallel ready system using a single switch See 6 9 Remote Emergency Power off install the REPO switch before powering on the parallel ready system 14 Connect the parallel input cord from each ...

Страница 101: ...tainer 1 2 3 4 4 1 16 6 P Pa ar ra alllle ell U UP PS S I In ns st ta alllla at tiio on n These installation procedures provide the steps to configure the CAN Bridge cards for parallel operation There are three types of parallel UPS installation Follow the applicable procedure for the type of parallel configuration Parallel UPS Installation ...

Страница 102: ...el such as a licensed electrician shall perform the electrical installation Risk of electrical shock NOTE Do not make unauthorized changes to the UPSs otherwise damage may occur to your equipment and void your warranty Because of the redundant signal cable UPSs can be installed into an existing system without shutting down the system or disconnecting the load if you prefer to remove input power to...

Страница 103: ...existing UPSs The first UPS has a blue terminating plug in the CAN IN port and the last UPS has a blue terminating plug in the CAN OUT port Continue to Step 10 8 Remove and discard the black terminating plug installed in the CAN IN port of the first UPS 9 For each existing UPS remove and discard the Jumper J7 installed in the Powerware Hot Sync CAN Bridge Card a Remove and retain the screws securi...

Страница 104: ...alarms related to reconfiguring the CAN Bridge Cards have cleared 14 Install a redundant signal cable between the For Parallel Use Only and Standalone Parallel terminals on each UPS as shown inFigure 67 Be sure to check correct polarity when installing the cable CAUTION If polarity or wiring is not correct the parallel system does not operate normally For example when shutting down one UPS the rem...

Страница 105: ...status from the front panel to view the active alarms Correct the alarms and restart if necessary 28 If loads are to be connected to the load connector receptacle connect the loads before turning on the load connector breaker 29 Press the ESC button until the Start screen appears 30 If optional EBMs are installed see to set the number of installed EBMs 31 To change any other factory set defaults 3...

Страница 106: ... Verify that the indicator illuminates solid indicating that the UPS is operating normally and any loads not connected through the load connector are now energized If the indicator is flashing do not proceed until all alarms are clear Check the UPS status from the front panel to view the active alarms Correct the alarms and restart if necessary The UPS should be in Normal mode By default Normal mo...

Страница 107: ...eared Verify that no other alarms appear on any UPS front panel display If an indicator is flashing on any UPS do not proceed until all alarms are clear Check the UPS status from the front panel to view the active alarms Correct the alarms and restart if necessary 10 On any UPS press any button on the front panel display to activate the menu options and then press the button until the TURN UPS ON ...

Страница 108: ...07 to set the number of installed EBMs on each UPS 17 To change any other factory set defaults see Operation on page 97 NOTE 1 Eaton recommends setting the Date and Time and the Start screen NOTE 2 Verify that the Parallel Operation Settings are set appropriately for your system For example if you know the load will exceed the redundancy level of the system set the Parallel Operation Settings Para...

Страница 109: ...on ns s The UPS has a four button graphical LCD with backlight It provides UPS load status events measurements current settings and other useful information See Figure 72 Figure 72 BladeUPS Module Control Panel Power On Indicator green On Battery Indicator yellow Bypass Indicator yellow Alarm Indicator red Control Buttons for the LCD Menu Options The Mimic screen shows the internal components of t...

Страница 110: ...ss and hold the first button on the left for approximately five seconds to select the language menu This action is possible from any LCD menu screen 5 5 4 4 D Diis sp plla ay y F Fu un nc ct tiio on ns s The LCD displays the Start screen at startup During operation the Start screen also displays after 15 minutes of inactivity The display is user selectable the default is the Eaton logo but this ca...

Страница 111: ...anges to Go to Normal Mode Start Battery Test Schedules a battery test The battery test may not start immediately Display Test Four different selectable tests for the front panel functions the LEDs cycle through the alarm beep sounds the backlight turns off and on and the pixels scroll through to test the LCD Settings User Settings Options for user defined settings see Table 13 for details Service...

Страница 112: ... Select System for other software System Auto ID Restart Done Restart Select Restart to reinitialize auto identification see Auto identification on page 120 None Battery Setup Number of EBMs 0 through 4 See Configuring for EBMs on page 107 See Configuring the UPS for EBMs on page 104 0 means internal batteries only Battery Low Alarm Level 1 750 through 1 950 volts per cell See Setting The Battery ...

Страница 113: ...s only 0 Zero disables this feature 5 NOTE Delayed rectifier startup increases existing delays for utility outages This will allow a maximum of 50 seconds of additional delay before starting the Rectifier and thus transferring the load to the rectifier feed When the group number is changed the delay is determined by Group Delay Value Delay in seconds An RT unit would return the load to utility aft...

Страница 114: ... to operate on Standard the UPS will lock back into High Efficiency operation for one hour to prevent continuous cycling Battery Mode When the UPS is operating during a power outage the alarm beeps once every five seconds and the indicator illuminates solid When the utility power returns the UPS transfers to Normal mode operation while the battery recharges If battery capacity becomes low while in...

Страница 115: ...NOTE The load connector breaker controls the load connector only not the output power cord 2 Verify that the UPS power cord is plugged in 3 Switch on utility power where the UPS is connected 4 Switch the UPS input circuit breaker to the ON position 5 Wait for the UPS front panel display to illuminate The indicator flashes on the UPS 6 Check the UPS front panel display for active alarms or notices ...

Страница 116: ... panel display on each UPS to illuminate The indicator flashes on each UPS 7 Check each UPS front panel display for active alarms or notices other than Batteries Disconnected Resolve any active alarms before continuing see Troubleshooting on page 135 8 Switch all UPS battery circuit breakers to the ON position 9 If optional EBMs are installed switch all EBM battery circuit breakers to the ON posit...

Страница 117: ...solve any active alarms before continuing see 8 Switch the UPS battery circuit breaker to the ON position 9 If optional EBMs are installed switch all EBM battery circuit breakers to the ON position 10 Verify that the Batteries Disconnected alarm has cleared Verify that no other alarms appear on the UPS front panel display If the indicator is flashing do not proceed until all alarms are clear Check...

Страница 118: ...F and press the button 3 Confirm the selection Press and hold the button for three seconds until the UPS stops beeping The output relays open the UPS transfers to Standby mode and the indicator turns off 4 Switch the UPS battery circuit breaker to the OFF O position 5 If optional EBMs are installed switch all EBM battery circuit breakers to the OFF O position 6 Switch the UPS input circuit breaker...

Страница 119: ... ON and OK to confirm 5 5 1 15 5 S Se et tt tiin ng g P Po ow we er r S St tr ra at te eg gy y To set the power strategy 1 Press any button to activate the menu options then select SETTINGS USER SETTINGS and POWER STRATEGY 2 Select HIGH EFFICIENCY or STANDARD and OK to confirm 5 5 1 16 6 C Co on nf fiig gu ur riin ng g B Ba at tt te er ry y S Se et tt tiin ng gs s The following battery settings ar...

Страница 120: ...n the front panel display to activate the menu options then select SETTINGS USER SETTINGS BATTERY SETUP and EXTERNAL BATTERY CAPACITY 2 Use the or buttons to select the Watts per cell For the correct Watts per cell see the specifications sheet for the customer supplied external batteries 3 Press the button to save the setting 4 Press the ESC button until the Start screen appears NOTE The UPS sets ...

Страница 121: ... un nn niin ng g A Au ut to om ma at tiic c B Ba at tt te er ry y T Te es st ts s Battery tests may rely on backfeeding the utility using the utility as a load If the connected load is above 65 the UPS will only use the load to do the test Some sites may choose to disable battery testing if their source is not capable of being backfed Examples of such sources include generators other UPSs and othe...

Страница 122: ...he front panel display to activate the menu options then select SETTINGS USER SETTINGS BATTERY SETUP and Automatic Battery Tests 2 Use the or buttons to select Disabled 3 Press the button to save the setting 4 Press the ESC button until the Start screen appears Running Automatic Battery Tests ...

Страница 123: ...ls on the UPS Figure 74 Communication Options and Control Terminals Standalone UPS shown DB 9 Communication Port REPO normally closed REPO normally open Signal Input 2 Signal Input 1 X Slot Communication Bay 2 X Slot Communication Bay 1 Relay Output Contacts Standalone Parallel Redundant Signal Wiring For Parallel Use Only 6 6 2 2 I In ns st ta alllliin ng g C Co om mm mu un niic ca at tiio on n O...

Страница 124: ...o on n O Op pt tiio on ns s The BladeUPS has serial communication capabilities through the DB 9 communication port or through an X Slot card in one of the available bays The UPS supports two serial communication devices according to the following table Table 16 Supported Communication Devices Independent Multiplexed X Slot 1 Communication Bay X Slot 2 Communication Bay DB 9 Communication Port Any ...

Страница 125: ...to chassis 6 6 5 5 X X S Sllo ot t C Ca ar rd ds s X Slot cards allow the UPS to communicate in a variety of networking environments and with different types of devices The BladeUPS has two available communication bays for any X Slot card including Relay Interface Card has isolated dry contact Form C relay outputs for UPS status Utility failure Low battery UPS alarm OK or On bypass Modbus Card all...

Страница 126: ...2 programmable REPO Normally Open REPO Normally Closed Normally Open Normally Closed 1 2 Common 3 Relay Output UPS Connectors see Figure 73 Polarity Polarity 2 1 Redundant Signal Wiring For Parallel Use Only Polarity Polarity 2 1 Standalone Parallel NOTE If using a semiconductor switch type pay attention to the proper polarity A relay or other mechanical control is preferred 6 6 7 7 R Re ella ay y...

Страница 127: ...nal Restart is initiated immediately when this signal is inactive 2 charger off If active the battery charge function is disabled In a utility power outage it supports the discharge of batteries 2 1 Program for only one UPS in a parallel system 2 Program for all UPSs in a parallel system The UPS may restart unexpectedly if a logic power reset occurs after the OFF command is given If you need to en...

Страница 128: ...f the REPO function is not needed There are two REPO positions that may be used normally open NO or normally closed NC See Figure 78 on page 114 for REPO locations The pins on the NC REPO connector are connected together When this connection is open the logic circuitry completely shuts down the UPS thus preventing the power from supplying the load If the use of NC REPO operation is desired remove ...

Страница 129: ...l an optional REPO circuit that shuts down the entire parallel system using a single switch To install a REPO switch for a parallel system the selected REPO command NO or NC contacts from each UPS in the system must be in parallel To install a REPO switch for a parallel system 1 Verify that the UPS system is turned off and all power sources are removed See section 5 13 Parallel System Shutdown for...

Страница 130: ... 1 Normally Closed UPS 5 REPO Terminals Polarity Polarity 2 1 Normally Open Polarity Polarity 2 1 Normally Closed UPS 2 REPO Terminals Polarity Polarity 2 1 Normally Open Polarity Polarity 2 1 Normally Closed UPS 3 REPO Terminals Polarity Polarity 2 1 Normally Open Polarity Polarity 2 1 Normally Closed UPS 1 REPO Terminals Polarity Polarity 2 1 Normally Open Polarity Polarity 2 1 Normally Closed R...

Страница 131: ...d UPS 5 REPO Terminals Polarity Polarity 2 1 Normally Open Polarity Polarity 2 1 Normally Closed UPS 2 REPO Terminals Polarity Polarity 2 1 Normally Open Polarity Polarity 2 1 Normally Closed UPS 3 REPO Terminals Polarity Polarity 2 1 Normally Open Polarity Polarity 2 1 Normally Closed UPS 1 REPO Terminals Polarity Polarity 2 1 Normally Open Polarity Polarity 2 1 Normally Closed REPO Switch Normal...

Страница 132: ... system runs unsynchronized and any UPS can transfer to Battery mode as necessary If any UPS must transfer to Bypass mode the redundant signal wiring allows the entire parallel system to transfer to Bypass mode without backfeeding BladeUPS 12model only The redundant signal wiring provides synchronization protection in case of CAN failure in the parallel system The system uses the redundant signal ...

Страница 133: ...splays its own Output value For example in a two unit parallel system with one Anderson load connection for 12 kVA the Load Receptacle current would read 12 kVA on one UPS and zero on the other UPS but the Output measurement would be 6 kVA on each UPS half the total In a standalone UPS the load can be connected from the outlet cord or the Anderson load connector The Output measurement would be the...

Страница 134: ...120 Eaton BladeUPS 5 kVA to 60 kVA N 1 User s Guide 164201649 Rev 14 Metering ...

Страница 135: ...ars to keep units running at peak efficiency 7 7 3 3 S St to or riin ng g t th he e U UP PS S a an nd d B Ba at tt te er riie es s If you store the UPS for a long period recharge the battery every six months by connecting the UPS to utility power The batteries charge to 80 capacity in fewer than five hours However Eaton recommends that the batteries charge for 48 hours after long term storage Chec...

Страница 136: ...ct with any part of a grounded battery can result in electrical shock The likelihood of such shock can be reduced if such grounds are removed during installation and maintenance applicable to equipment and remote battery supplies not having a grounded supply circuit ELECTRIC ENERGY HAZARD Do not attempt to alter any battery wiring or connectors Attempting to alter wiring can cause injury Disconnec...

Страница 137: ...a flat stable surface The battery trays are unsupported when you pull them out of the UPS To replace the battery trays in the UPS cabinet 1 Verify that the battery circuit breaker is in the OFF O position Figure 60 2 Remove the UPS front cover and set it aside see Figure 83 Figure 83 Removing the UPS Front Cover LCD Cable NOTE Disconnecting the control panel from the electronics module automatical...

Страница 138: ...both hands to support the tray as it leaves the UPS cabinet Repeat for each battery tray See 7 11 Recycling the Used Battery or UPS for proper disposal 5 Slide the new battery trays into the cabinet see Figure 85 for two battery string installations and for single string installations Verify that each tray is properly aligned before sliding in the tray NOTE When installing single string battery tr...

Страница 139: ...the LCD cable from the control panel on the front cover into the connector on the electronics module Use care to loop the LCD cable gently in front of the electronics module Push the top of the front cover firmly into place and then push the bottom firmly into place NOTE Reconnecting the control panel to the electronics module automatically transfers the UPS to Normal mode 10 Verify that no alarms...

Страница 140: ...s not protected however the utility power continues to be filtered passively by the UPS If you prefer to remove input power to change the electronics module see section5 11 Standalone UPS Shutdown NOTE DO NOT DISCONNECT the electronics module while the UPS is in Battery mode To replace the electronics module 1 Standalone UPS configurations only Transfer the UPS to Bypass mode Continue to Step 3 Pa...

Страница 141: ...cord the serial number of the replacement module for your warranty If not returning the electronics module for warranty see the following section see 7 11 Recycling the Used Battery or UPSfor proper disposal 5 Insert the replacement module by sliding it carefully into the cabinet Verify that it seats firmly against the rear of the cabinet Reinstall the electronics module locking screw 6 Parallel c...

Страница 142: ...ant signal and CAN Bridge Card cables from the UPS to be replaced For the location of the cables see Figure 67 4 Disconnect any other cables such as REPO signals or serial communications 5 Switch the UPS load connector circuit breaker to the OFF O position 6 If optional EBMs are installed switch the EBM battery breakers to the OFF O position and disconnect the EBM cable from the UPS battery connec...

Страница 143: ... as it leaves the UPS cabinet Repeat for each battery tray See the following section 7 11 Recycling the Used Battery or UPSfor proper disposal 12 Remove the CAN Bridge Card and any optional X Slot card from its X Slot communication bay 13 Remove the UPS from the rack carefully to avoid damage to other equipment or the parallel input cord 14 If not returning the UPS for warranty see the following s...

Страница 144: ...deUPS are registered trademarks of Eaton Corporation or its subsidiaries and affiliates Phillips and Pozidriv are registered trademarks of Phillips Screw Company Copyright 2008 2010 Eaton Corporation Raleigh NC USA All rights reserved No part of this document may be reproduced in any way without the express written approval of Eaton Corporation CAUTION Do not discard waste electrical or electronic...

Страница 145: ...side of the package and on the Bill Of Lading if applicable Use the original packaging or request packaging from the Help Desk or distributor Units damaged in shipment as a result of improper packaging are not covered under warranty A replacement or repair unit will be shipped freight prepaid for all warrantied units NOTE For critical applications immediate replacement may be available Call the He...

Страница 146: ...aker is in the ON position If the condition persists contact your service representative ON BYPASS Yellow LED is on One beep every three seconds The UPS is in Bypass mode The equipment transferred to bypass utility power Battery mode is not available and your equipment is not protected however the utility power continues to be passively filtered by the UPS Check for one of the following alarms ove...

Страница 147: ... LED is on One beep every three seconds Ground wire connection does not exist or the line and neutral wires are reversed in the wall outlet Have a qualified electrician correct the wiring The UPS does not provide the expected backup time The batteries need charging or service Apply utility power for 48 hours to charge the batteries If the condition persists contact your service representative Batt...

Страница 148: ... phase rotation The UPS does not turn off The batteries or electronics module is being replaced Complete the replacement procedure before shutting down the UPS The UPS operates normally but some or all of the protected equipment is not on The equipment is not connected to the UPS correctly Verify that the equipment is plugged into the UPS receptacles Output circuit breaker is in the OFF O position...

Страница 149: ... utility power that may be unstable or in brownout conditions Bypass mode is disabled Check that the bypass user settings are configured appropriately see section 5 5 User Settings Check Parallel Board The UPS is not recognizing another paralleled UPS From the UPS Status menu select the Units on CAN Bus option and verify that all UPSs appear in the list If any UPS is missing verify the Powerware H...

Страница 150: ...lity power was applied Verify the CAN wiring Figure 65 If the condition persists contact your service representative Software Incompatibility Detected The UPS detects a paralleled UPS with a later firmware version Mixing major firmware versions is not supported For minor firmware versions the alarm does not prevent operation but different firmware versions in a parallel system cause conflicts Veri...

Страница 151: ...e EBM Model Number BladeUPS EBM BladeUPS Bar Model Number BladeUPS Bar 4 High For up to 4 UPSs BladeUPS Bar 6 High For up to 6 UPSs NOTE Derated for line cord and nominal line voltage Cord Model Number Description Input Plug Type Length Input Output UPSCord12UL 12 kW UL input IEC 309 60A 3 7m 12 ft UPSCord12ULR 12 kW UL input output IEC 309 60A 1 8 1 2m 6 4 ft UPSCordPUL 12 kW UL parallel Anderson...

Страница 152: ... 19 5 kg 43 lb 400V electronics module 21 8 kg 48 lb 77 kg 170 lb NOTE For weights of preassembled systems see Table 1 on page 20 Table 22 BladeUPS Bar BladeUPS Bar 4 High BladeUPS Bar 6 High Dimensions W x D x H 152 x 145 x 296 mm 6 0 x 5 7 x 51 0 152 x 45 x 1829 mm 6 0 x 5 7 x 72 0 Weight BladeUPS Bar 18 1 kg 40 lb Wireway enclosure 20 4 kg 45 lb Total weight 38 5 kg 85 lb BladeUPS Bar 24 5 kg 5...

Страница 153: ...ting load dependent Standard setting 0 99 Input Mode Three phase Input Source 5 wire with continuous neutral NOTE Contact your Eaton UPS sales specialist for operation with 4 pole ATS switches Table 25 Electrical Output BladeUPS 12 Model BladeUPS 12i Model BladeUPS 8 Model BladeUPS 5 0 Model Nominal Output Voltage 120 208 Vac three phase 230 400 Vac three phase 120 208V three phase 120 208V three ...

Страница 154: ...ANSI C62 41 Category B3 EN 61000 4 6 ANSI C62 41 Category B3 ANSI C62 41 Category B3 Safety Conformance UL 1778 4th edition CSA C22 2 No 107 3 UL 1778 4th edition EN and IEC 62040 1 1 UL 1778 4th edition CSA C22 2 No 107 3 UL 1778 4th edition CSA C22 2 No 107 3 Agency Markings cULus ICES CE cULus CE cULus cULus EMC Class A FCC Part 15 EN 62040 2 FCC Part 15 FCC Part 15 Operating Temperature 0 C to...

Страница 155: ...ll load discharge Table 28 Standalone UPS Battery Runtimes at Full Half Load in Minutes Model kW UPS Internal Batteries 1 EBM 2 EBMs 3 EBMs 4 EBMs BladeUPS 12 12 6 4 7 13 6 9 5 27 17 42 27 60 34 76 BladeUPS 12i 12 6 4 7 13 6 9 5 27 17 42 27 60 34 76 BladeUPS 8 8 4 8 7 23 17 7 41 5 27 9 65 5 43 0 94 1 54 7 120 BladeUPS 5 0 Single battery string 5 0 2 5 6 2 16 1 21 7 45 8 37 2 80 1 59 2 128 79 0 175...

Страница 156: ...depending on the load configuration and battery charge Table 30 Parallel UPS System Battery Runtimes at Full Half Load in Minutes with N 1 Number of UPSs kW UPS Internal Batteries 1 EBM 2 EBMs 3 EBMs 4 EBMs 2 12 6 14 30 27 56 42 89 60 128 76 165 3 24 12 8 7 23 18 42 28 66 43 94 55 120 4 36 18 7 3 20 15 37 24 57 38 82 48 105 5 48 24 6 7 19 2 13 34 23 54 35 77 44 98 6 60 30 6 2 18 4 13 33 22 52 33 7...

Страница 157: ...ranty claim In such case the End User must return at Eaton s expense the defective Warranted Item to Eaton in the same packaging as the replacement Warranted Item received by the End User or as otherwise instructed by Eaton If Eaton does not receive the defective Warranted Item Eaton will either charge the End User s credit card or send the End User an invoice which the End User agrees to pay for ...

Страница 158: ...BILITY The remedies of the End User set forth herein are exclusive and are the sole remedies for any failure of Eaton to comply with its obligations hereunder In no event shall Eaton be liable for any indirect incidental special or consequential damages of any kind or type whatsoever resulting from or in connection with any claim or cause of action whether brought in contract or in tort including ...

Страница 159: ...ates call the Customer Reliability Center 7x24 at 800 356 5737 Outside of the United States contact your local Eaton product sales or service representative For comments or questions about this Warranty write to the Customer Quality Representative 3301 Spring Forest Road Raleigh North Carolina 27616 USA Warranty ...

Страница 160: ...16420164914 164201649 14 ...

Отзывы: