e-ImageData Microfilm ScanPro 1000 Скачать руководство пользователя страница 17

17

SAVE SETTINGS


You can give all the settings for an application (zoom, brightness, button selections, 
etc) a fi le name.  Then, when you return to the same application, CLICK the OPEN 
SETTINGS folder and a single CLICK of that fi le name will restore all of the saved 

settings. Following is a step-by-step procedure for creating a SAVE SETTING and for RESTOR-
ING  a SAVED SETTING.

To use this feature you will need to have the SAVE SETTINGS and RESTORE 

SETTINGS buttons appear on the PowerScan Toolbar.

1] CLICK the 

 BUTTON to open the SETUP PASSWORD WINDOW 

.

2]  ENTER the password 1234 and CLICK OK to OPEN the SETUP WINDOW.
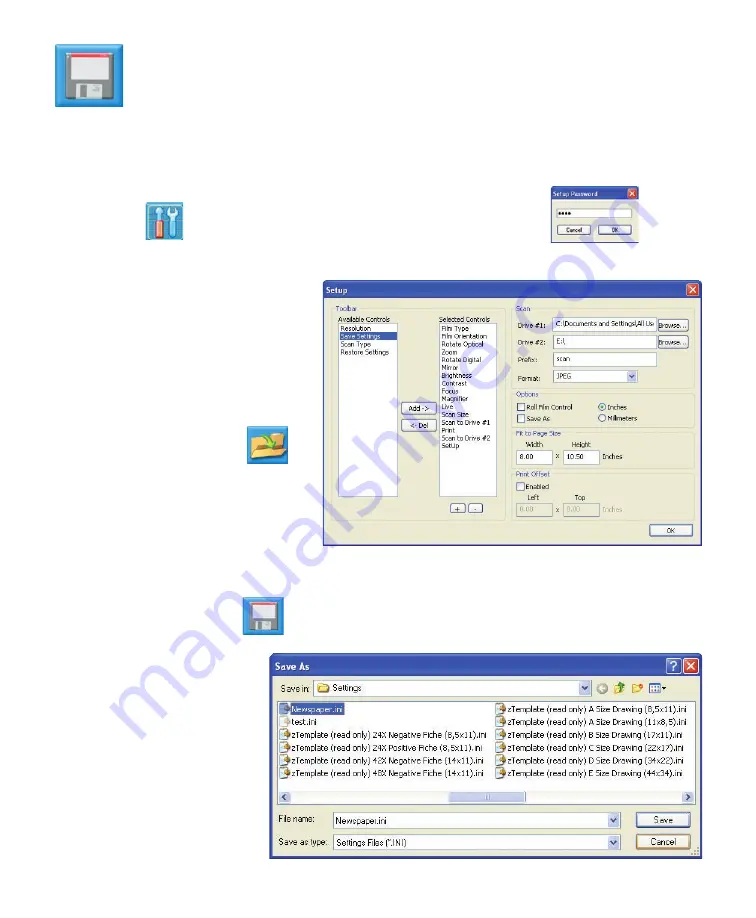
3]  On the Toolbar section of the setup 

window,  in  the “Available  Controls” 
list, click “Save Settings” so that this 
entry is highlighted. 

4]  Click the “Add” button (between 

the Available Controls list and the 
Selected Controls list) to move the 
entry to the Selected Controls list.

If the RESTORE SETTINGS  


BUTTON is not on the SELCECTED 
CONTROLS list, repeat steps 3 and 4 
for the “Restore Settings” BUTTON                                           
5]) Click the “OK” button.

Procedure to Save Settings.


1]   Insert your fi lm in the carrier and optimize all of the settings for that particular fi lm.

2]  Click the “Save Settings”  

 BUTTON. The “Save As” dialog window will open.

3]  Enter a name for these settings that you will easily recognize.
4]  Click “Save”

This  procedure  can  be 

done for as many differ-

ent  fi lm  confi gurations 

as you would like.


Содержание Microfilm ScanPro 1000

Страница 1: ...1 Desktop Compact Film Scanner Operator s Guide Micro lm ScanProTM 1000 2 2007 ScanPro 1000 shown with optional combination che aperture card motorized 16 35mm roll lm carrier...

Страница 2: ...9 Toolbar 10 SCAN to Drive 1 or Drive 2 10 Pre x 10 Format 10 Options 10 ROLL FILM CONTROL 10 SAVE AS 10 INCHES or MILLIMETERS 10 Fit to page size 11 Print Offset 12 GRAPHIC BUTTON CONTROLS 12 FILM T...

Страница 3: ...ts returned to the manufacturer for warranty claims require a RETURN AU THORIZATION NUMBER RA number to be issued by the manufacturer s customer service The RA number must appear legibly on all return...

Страница 4: ...INSERTS Fig 2 ACCESSORIES BOX remove before removing ScanPro Save all packing materials in case you need to move or ship your SCANNER INSERTS Fig 1 Fig 2 Fig 3 Fig 4 GRASP HERE FIRMLY E GRASP Scanner...

Страница 5: ...e cable included with your Micro lm Scanner COMPUTER TO ScanPro1000 CABLE A FireWire IEEE 1394 cable is included with your scanner purchase This cable meets all of the speci cations for connecting you...

Страница 6: ...to work with all types of micro lm OPTICAL ZOOM LENS Your ScanPro 1000 is equipped with a 7X to 54X ZOOM LENS system This lens is factory in stalled OPTIONAL ROLL FILM CARRIER If you have ordered a r...

Страница 7: ...e scan type and resolution High resolution gray scale scans are much more demanding than Half Tone scans for both processing speed and memory Minimum System Requirements when used with Windows 2000 an...

Страница 8: ...it is strongly recommended that you use only this cable Connect the AC DC Power Inverter to the Scanner and to your local AC power source shown below Fig 1 CONNECTING THE SCANNER TO THE COMPUTER Power...

Страница 9: ...hown on the SETUP Window Fig 2 The SELECTED CONTROLS list speci es which controls are shown on the PowerScan TOOLBAR The AVAILABLE CONTROLS list speci es which control buttons are NOT shown on the Pow...

Страница 10: ...a sequential number that is added to the PREFIX The PREFIX name can be set in the SETUP Window by typing a name in the eld titled Pre x Format Speci es the le format if the SAVE AS box is un checked...

Страница 11: ...11 Print Offset Speci es the position a of scan on a printed page for example printing on a preprinted form...

Страница 12: ...the vertical position for a PORTRAIT image and horizontal position for a LANDSCAPE image to take maximum advantage in capturing the image Look at the images on your micro lm and CLICK to SELECT the m...

Страница 13: ...arged view of a portion of the image in the PowerScan Display To use the MAGNIFIER CLICK the MAGNIFIER BUTTON a portion of the image in the PowerScan Display To use the MAGNIFIER CLICK on the TOOL BAR...

Страница 14: ...TYPE BUTTON to toggle between GRAY SCALE and HALF TONE scans HALF TONE scanning provides high quality small le size scans A decision should clarify the justices ruling upholding testing for athletes...

Страница 15: ...the boundaries de ned by the Fit to Page settings in the Setup Window See Page 10 Use the the Fit to Page settings in the Setup Window See Page 10 and the Fit to Page settings in the Setup Window See...

Страница 16: ...t printer preferences MOTORIZED ROLL FILM CON TROL CLICK and drag the button for low speed lm movement CLICK and hold the and buttons for fast speed lm movement speed doubles when the lm carrier is pu...

Страница 17: ...OPEN the SETUP WINDOW 3 On the Toolbar section of the setup window in the Available Controls list click Save Settings so that this entry is highlighted 4 Click the Add button between the Available Con...

Страница 18: ...he settings le was saved If you want to prohibit the user from changing your settings le or saving set tings of their own you will need to remove the Save Settings button from the toolbar PROCEDURE to...

Страница 19: ...High resolution scan in one second SCANNING RESOLUTION Selectable 150 200 300 400 600 FILE FORMATS All common le formats including JPEG PDF TIFF TIFF LZW TIFF Group 4 PDF Multipage TIFF Multipage TIF...

Отзывы: