OPERATING INSTRUCTIONS FOR THE DYNISCO INJECTION
MOLDING TRANSDUCERS - MODEL PT449
Introduction
The Dynisco PT449 Injection Molding Pressure Transducers are
mounted into mold cavities, runner or nozzles in the injection-molding
environment designed to make direct pressure measurements. All
units will operate up to 750˚F (400˚C) and 20,000 psi. These models
incorporate a 350-ohm, bonded foil strain gage Wheatstone Bridge.
This proven technology provides an output of 1.5 to 1.6 mV/V full
scale, proportional to melt pressure (within the specified error band).
Each transducer includes an internal shunt calibration ("R-Cal")
function that is used to simulate a signal of 80% full scale. This
eliminates the need for cumbersome calibrated pressure source when
scaling associated instrumentation.
Mounting Hole Preparation
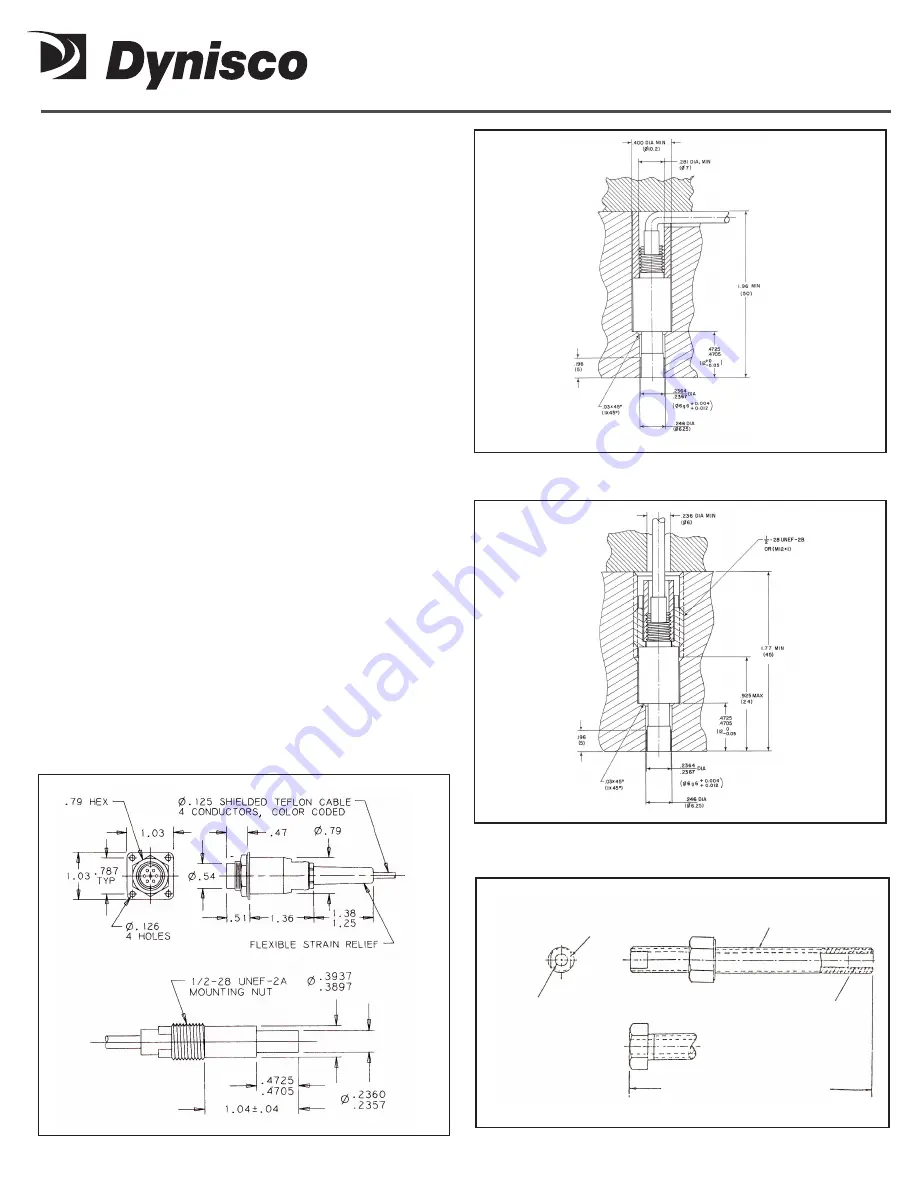
There are two suggested mounting techniques: a compression
mounting with a backing sleeve and a mounting with a free turning
captivated nut. The mounting nut method is preferred so that preload
forces can be maintained by controlled torqueing of the nut (50 lb-in;
50 kg-cm). Convenient transducer withdrawal is completed by
backing it out with the insertion/removal tool (P/N 449910, 3" long;
or 449911, 12" long). Transducer removal without the use of the
mounting nut requires a jacking tool machined to the illustrated
dimensions.
Mount sensitive surface in locations of low shear rate. However, if it
is not possible, then it is advised that it be recessed below the
surface flow. This will help guard the sensitive surface against the
abrasive effects of high shear rate across its delicate surface.
The plane of the sensitive must be parallel to the plane of the parting
line so that the part is drawn away from it during ejection. Avoid
mounting the sensitive surface perpendicular to the plane of the
surface, otherwise discontinuities on the surface will be dragged
across and possibly damage it.
Figure 1:
PT449 Dimensional Drawing
Figure 2:
Compression Sleeve Mounting Diagram
Figure 3:
Free Turning Captive Nut Mounting Diagram
Jacking Screw & Nut
Part No. 449912
Flats
7/32 Drill Thru
Length to Suit Depth of Transducer
M121X1
M6X0.75 Thread
Left Hand
Figure 4:
Jacking Screw & Nut Drawing


