background image

12 Inch Disc Grinding Machine                                                                 Operation 


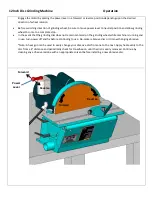
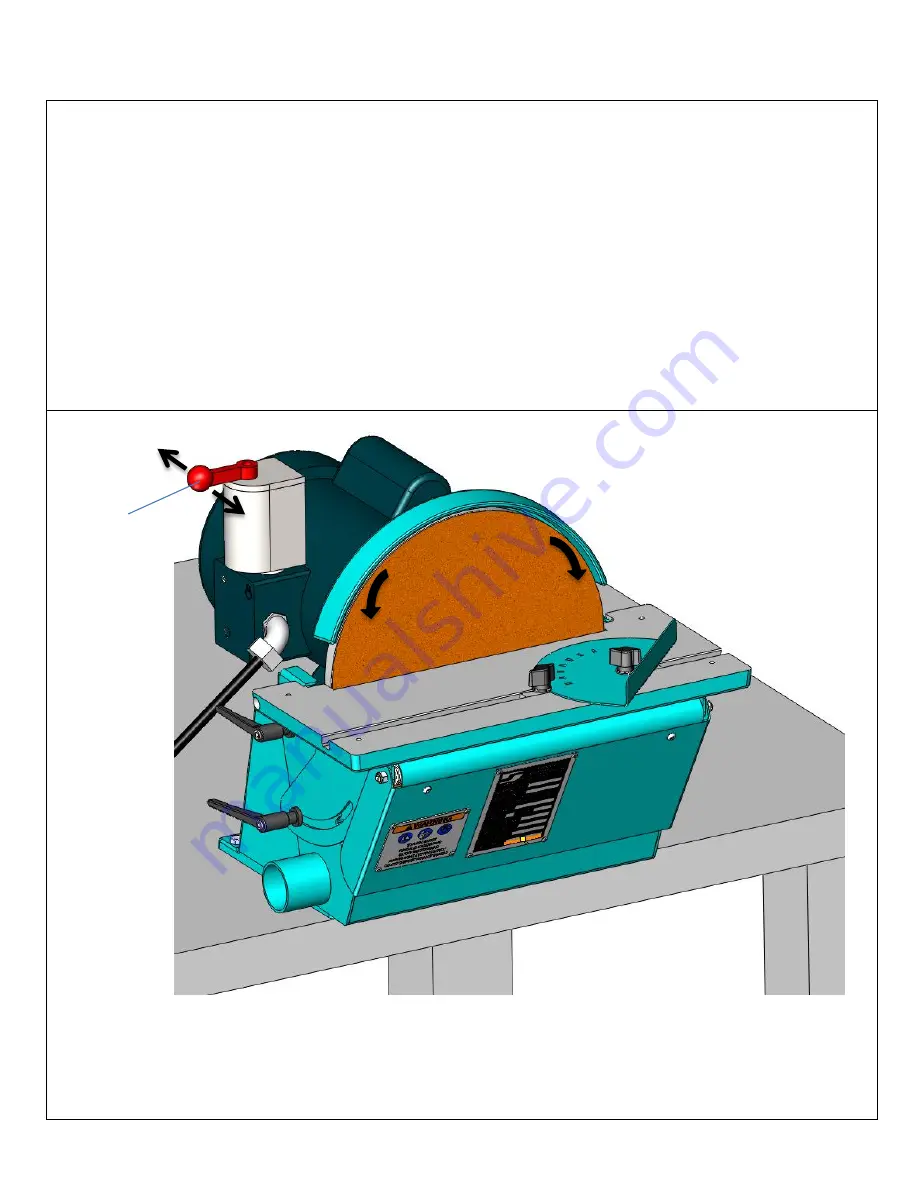
Engage the motor by placing the power lever in a forward or reverse position depending upon the desired 
direction of wheel rotation.   


Before switching direction of grinding wheel, be sure to move power lever to neutral position and allow grinding 
wheel to come to a complete stop. 


In the event that the grinding disc does not remain centered on the grinding wheel while machine is running and 
in use, turn power off and fix before continuing to use.  Re-center abrasive disc or trim overhanging abrasive. 


*Note: A heat gun can be used to easily change your abrasive disc from one to the next. Apply heat evenly to the 
disc from a 4” distance and periodically check for De-adhesion until the disc is easily removed. Continue by 
cleaning any adhesive residue with an appropriate solvent before installing a new abrasive disc. 


Reverse 


Forward 


Forward 


Reverse 


Power 

Lever 


Содержание 67600

Страница 1: ...dinances and or regulations Electric shock hazard Avoid bodily contact with grounded objects bodies of water Do not damage cord set Respiratory protection to be used when exposed to contaminants that exceed the applicable threshold limit values required by law 12 Disc Grinder SAFETY LEGEND Model Number Motor hp FLA Voltage Phase Frequency SFPM SM Min Sound Level Weight Pound Height Inch Width Inch...

Страница 2: ...ks can ignite fumes 19 Do not alter or misuse tool This tool is precision built Any alteration or modification not specified is misuse and may result in a dangerous condition Only these accessories and attachments that are found in this instruction manual are acceptable for use with this tool The use of any other accessory or attachment might present a risk to the operator 20 Replacement parts Whe...

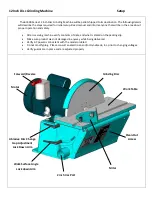
Страница 3: ...chine verify contents of crate and what is stated on the packing slip Make sure product was not damaged in anyway while being delivered Verify AC power is consistent with the model ordered Do not modify plug Please consult an electrician and or Dynabrade Inc prior to changing voltages Verify guards are in place and are adjusted properly Abrasive Disc Change Gap Adjustment Lock Down Arm Work Table ...

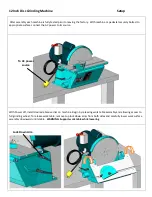
Страница 4: ...connect the AC power to its source With Power off install desired abrasive disc on machine Begin by releasing work table assembly and allowing access to full grinding wheel To release work table remove top lock down arms from both sides and carefully lower work surface assembly downward until stable WARNING Support work table while lowering To AC power source Lock Down Arm ...

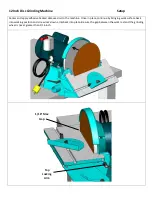
Страница 5: ...d abrasive disc to the machine Once in place continue by bringing work surface back into working position and screw lock down arms back into place Be sure the gap between the work rest and the grinding wheel is never greater than 1 16 inch 1 16 Max Gap Top Locking Arm ...

Страница 6: ...g disc does not remain centered on the grinding wheel while machine is running and in use turn power off and fix before continuing to use Re center abrasive disc or trim overhanging abrasive Note A heat gun can be used to easily change your abrasive disc from one to the next Apply heat evenly to the disc from a 4 distance and periodically check for De adhesion until the disc is easily removed Cont...

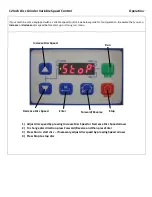
Страница 7: ...se disc speed before start up or during run mode Increase Disc Speed Gap Decrease Disc Speed Gap Run Stop Forward Reverse Enter Gap 1 Adjust disc speed by pressing Increase Disc Speed or Decrease Disc Speed arrows 2 To change disc direction press Forward Reverse and then press Enter 3 Press Run to start disc if necessary adjust disc speed by pressing Speed arrows 4 Press Stop to stop disc ...

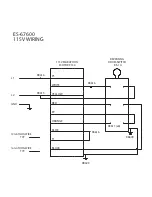
Страница 8: ...600 115V WIRING P1 WHITE YELLOW RED P2 ORANGE BLUE T1 BLACK L1 L2 GND 115V MARATHON MOTOR F134 REVERSING DRUM SWITCH RS 1A 12 GA THHN WIRE TYP 98615 98616 98616 98616 98611 x6 98609 98609 16 GA THHN WIRE TYP ...

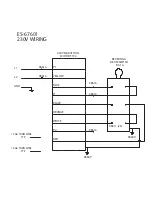
Страница 9: ... 230V WIRING P1 YELLOW BLUE T1 BLACK ORANGE WHITE P2 RED L1 L2 GND 230V MARATHON MOTOR F134 REVERSING DRUM SWITCH RS 1A 12 GA THHN WIRE TYP 98616 98616 98616 98611 x6 98609 98609 16 GA THHN WIRE TYP 98616 98616 ...

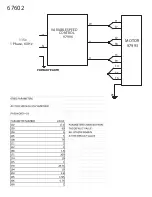
Страница 10: ...67602 PRIMARY EARTH PRIMARY EARTH PE L1 N W V U VARIABLE SPEED CONTROL 97996 T3 T2 T1 T4 T7 T5 T8 T6 T9 MOTOR 97993 115v 1 Phase 60 Hz ...

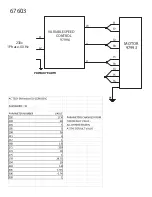
Страница 11: ...67603 PRIMARY EARTH PRIMARY EARTH PE L1 L2 W V U VARIABLE SPEED CONTROL 97996 T3 T2 T1 T4 T7 T5 T8 T6 T9 MOTOR 97993 230v 1 Phase 60 Hz ...

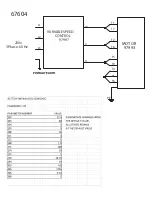
Страница 12: ...67604 PRIMARY EARTH PRIMARY EARTH PE L1 L2 W V U VARIABLE SPEED CONTROL 97997 T3 T2 T1 T4 T7 T5 T8 T6 T9 MOTOR 97993 230v 3 Phase 60 Hz L3 ...

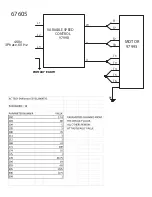
Страница 13: ...67605 PRIMARY EARTH PRIMARY EARTH PE L1 L2 W V U VARIABLE SPEED CONTROL 97998 T3 T2 T1 T4 T7 T5 T8 T6 T9 MOTOR 97993 460v 3 Phase 60 Hz L3 ...

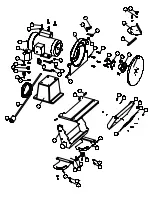
Страница 14: ...6 17 3 4 16 1 2 7 12 9 10 27 11 26 8 5 25 18 15 13 11 19 20 21 23 59 24 4 36 35 37 37 34 34 18 33 28 32 18 15 13 36 37 35 37 43 13 42 38 30 31 29 39 41 40 52 ...

Страница 15: ...PLATE ELECTRICAL DATA 1 29 97177 10 32 LOCKNUT 2 30 97673 10 32 x 1 2 BHSCS 2 31 97370 10 WASHER 2 32 64930 WARNING LABEL EYE PROTECTION 1 33 97062 1 8 ALUMINUM BLIND POP RIVET 8 34 97755 5 16 18 x 1 1 2 SET SCREW 2 35 97748 ADJUSTABLE HANDLE 5 16 18 THREAD 2 36 97747 ADJUSTABLE HANDLE 5 16 18 STUD 2 37 97749 0 2 THK 5 16 WASHER 4 38 98709 90 DEGREE ELBOW 1 39 95082 1 2 CLOSE NIPPLE STEEL 1 40 987...

Страница 16: ......

Отзывы: