5
To print a label
1
Enter text to create a simple label.
2
Press .
3
Press the cutter button to cut
the label.
4
Remove the paper backing from the
label to expose the adhesive, and
then attach the label.
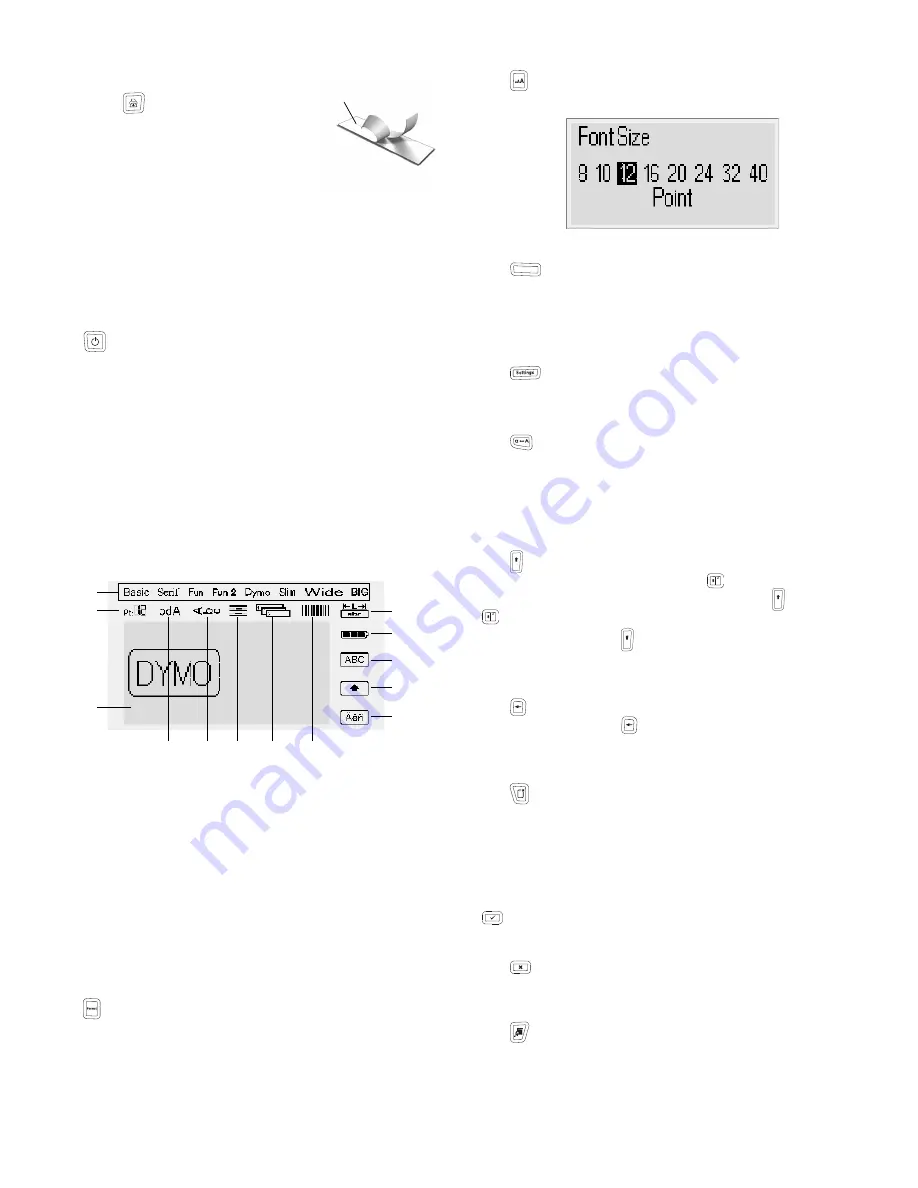
Getting to Know the Label Maker
Become familiar with the location of the feature and
function keys on your label maker. Refer to Figure 1. The
following sections describe each feature in detail.
Power
The
button turns the power on and off. After ten
minutes of inactivity, the power is switched off
automatically. When the printer turns off, the last label
created is remembered and displayed when the power is
turned back on. The previously selected style settings are
also restored.
LCD Display
The display can show four lines of text at a time. The
number of characters displayed on each line will vary due to
proportional spacing.
With DYMO’s exclusive graphical display, most of the
formatting you add is visible instantly.
Feature indicators along the top and right of the LCD
display appear black to let you know when a feature
is selected.
Format
The
key displays the Font, Font Size, Style, Borders,
Mirror, Vertical, Alignment, and Label Length
submenus. These formatting features are described
later in this User Guide.
Font Size
The
key displays the Font Size menu. This formatting
feature is described later in this User Guide.
Insert
The
key allows you to insert symbols, clip art,
barcodes, auto-numbering, the date and time, or saved
text on your label. These features are described later in
this User Guide.
Settings
The
key displays the language, label width, and date/
time submenus.
CAPS Mode
The
key toggles capitalization on or off. When Caps
mode is on, the Uppercase indicator is shown on the
display and all letters that you enter are capitalized. When
Caps mode is off, all letters appear in lowercase. The
default setting is Caps mode on.
Shift
The
key is used to select a symbol printed on a numeric
key. For example, when you press
, the number 8
appears in the display; however, if you press
and then
, an apostrophe (‘) appears in the display.
You can also use the
key to toggle Caps mode on or off
for a single alpha character.
Backspace
The
key removes the character to the left of the cursor.
You can also use the
key to exit from a menu without
making a selection.
New Label/Clear
The
key gives you a choice to clear all label text, just the
text formatting, or both.
Navigation Keys
You can review and edit your label using the left, right, up
and down navigation keys. You can also navigate through
menu selections using the navigation keys, and then press
to make a selection.
Cancel
The
key allows you to exit from a menu without making
a selection or to cancel an action.
Preview
The
key displays a preview of your label layout. The
preview shows how the text will print on the label.
1
Font
8
Barcode
2
Font size
9
Accented character
3
Edit area
10
Shift
4
Mirror text
11
Uppercase
5
Vertical text
12
Battery
6
Text alignment
13
Fixed label length
7
Auto-numbering
Split
backing
Figure 6
1
4
13
12
11
10
9
3
2
5
6
7
8
Insert
Shift
Shift
Shift
Содержание LabelManager 420P
Страница 1: ...LabelManager 420P User Guide...


