DVDO DVDO-Matrix-44-Mini Скачать руководство пользователя страница 4

4                                                                                                         


DVDO-Matrix-44-Mini_V1.0.0 

DVDO-Matrix-44-Mini 4x4 HDMI Matrix with Audio Outputs


User Manual


DVDO


Introduction 

Overview 

The DVDO-Matrix-44-Mini is a 4x4 compact HDMI matrix switcher. In addition to 

basic functions such as cross-point switching and control (IR, RS-232, IP), it also 

features advanced functions like auto-downscaling for each HDMI output when it 

is  connected  to  a  1080p  display.  There  are  SPDIF  audio  breakouts  for  each 

HDMI output, to provide more audio feeds to a multi-zone audio system. 


Features 


4 HDMI Inputs and 4 HDMI Outputs. 


All HDMI inputs and outputs support HDMI with HDR formats including HDR 

10, HLG, DOLBY VISION up to 4K60 444. 


HDCP2.2 compliant. 


With  built-in  4K-1080p  downscaler  for  each  HDMI  Output,  the  matrix  can 

downscale  4K  60Hz  444  to  1080p@60  444.  4K  downscaler  can  work 

automatically when the matrix is connected to a 1080p display or can be set 

to ON/OFF by API commands. 


Each HDMI output has a SPDIF audio breakout, and supports formats up to 

5CH HBR or 2CH PCM audio. 


Supports smart EDID; each input can be assigned to smart EDID mode. 


Supports EDID presets, EDID copy and EDID write. By default, each input 

EDID is set as 4K60 444 HDR with 5.1CH encoded audio. 


Supports audio mute; four SPDIF outputs can be muted separately by API 

commands. 


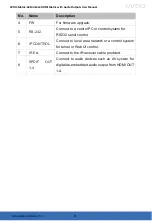
Supports upgrading firmware via both micro-USB and web UI (for MCU and 

web module). 


Rich control options, include RS-232, IR, web UI and front panel buttons. 


Содержание DVDO-Matrix-44-Mini

Страница 1: ...Version V1 0 0 DVDO Matrix 44 Mini 4x4 HDMI Matrix with Audio Outputs User Manual...

Страница 2: ...risk of electric shock or fire hazard due to overheating do not obstruct the unit s ventilation openings with newspapers tablecloths curtains and similar items 4 Do not install near any heat sources...

Страница 3: ...al Table of Contents Introduction 4 Overview 4 Features 4 Package Contents 5 Specifications 5 Panel Description 7 Installation and Wiring 9 Installation 9 Wiring 9 IR Remote Control 11 Access the Web...

Страница 4: ...ng HDR 10 HLG DOLBY VISION up to 4K60 444 HDCP2 2 compliant With built in 4K 1080p downscaler for each HDMI Output the matrix can downscale 4K 60Hz 444 to 1080p 60 444 4K downscaler can work automatic...

Страница 5: ...tput Signal Type HDMI with 4K 60Hz 4 4 4 HDR 10 HLG Dolby Vision HDCP 2 2 Note Dolby vision is not supported in downscaler mode Input Output Resolution Supported VESA 800x6008 1024x7688 1280x7688 1280...

Страница 6: ...ion Human body Model 8kV Air gap discharge 4kV Contact discharge Power Supply DC 12V Power Consumption Max 10 8W Device Dimension W x H x D 215mm x 42mm x 120 2mm 8 46 x 1 65 x 4 73 Without mounting b...

Страница 7: ...Receive IR signals 2 INPUT LED 1 4 On The current HDMI input is selected Off The current HDMI input is not selected 3 OUTPUT SELECTOR Click to select input source for OUTPUT 1 4 Rear Panel 1 2 3 4 5...

Страница 8: ...pgrade 5 RS 232 Connect to a control PC or control system for RS232 serial control 6 IP CONTROL Connect to local area network or a control system for telnet or Web UI control 7 IR Ext Connect to the I...

Страница 9: ...ge separately 2 The bracket is attached to the enclosure as shown 3 Repeat steps 1 2 for the other side of the unit 4 Mount and affix the unit in the rack mount with the mounting screws Wiring Steps f...

Страница 10: ...t panel IR window directly Alternatively connect the IR receiver cable provided to IR Ext of the matrix for IR extension and have its head secured in a place accessible to the matrix remote LAN Web UI...

Страница 11: ...anel Steps for IR Remote Operation 1 Point the matrix IR Remote directly at the IR window on front panel or at the IR receiver connected to the rear panel As shown in the following picture Point the I...

Страница 12: ...rted by Default Matrix Switching Code Code IN1 IN2 IN 3 IN 4 OUT 1 0X80 0X81 0X82 0X83 OUT 2 0X90 0X91 0X92 0X93 OUT 3 0XA0 0XA1 0XA2 0XA3 OUT 4 0XB0 0XB1 0XB2 0XB3 RS232 Control Advanced users may ne...

Страница 13: ...through a browser with latest version e g Chrome Firefox Safari Opera IE10 etc Access the Web Interface 1 Connect the IP Control port of the matrix to the Ethernet switch and connect your PC to the s...

Страница 14: ...tch EDID EDID Read CEC Audio Mute HDCP Preset 1 Switch The Switch section manages distribution of input sources to output displays By default Input 1 corresponds to Output 1 Input 2 corresponds to Out...

Страница 15: ...ction allows you to configure EDID settings of each input port Select the item from the drop down menu then click Apply to take effect Note If EDID copy fails the input EDID will be 4K 30Hz 2 0ch audi...

Страница 16: ...to corresponding Input 4 CEC Output Port Select one OUTPUT 1 4 port or all from the drop down menu to control Note When Output port is set to all the Auto CEC and Delay Time min settings are disabled...

Страница 17: ...of HDMI OUT 6 HDCP HDCP Support allows you to enable or disable HDCP compatibility of each input By default HDCP Support is switched ON at each input and content protected by HDCP standard will be re...

Страница 18: ...the network setting The default setting is DHCP Note When Static is selected please ensure your PC is in the same network segment as the Matrix i e the IP address of your PC should be set as 192 168 x...

Страница 19: ...on the upper left corner of the screen 4 WEB Firmware Upgrade 1 Click Browse for the update file 2 Click Update to start the Web UI upgrade The matrix LAN Module will update and reboot automatically...

Страница 20: ...The matrix will upgrade and reboot automatically when upgrading MCU is completed Please wait for about 3 minutes and then refresh and log in again Note Do not power off the device when upgrading 7 Sy...

Страница 21: ...ts User Manual Note Please wait about 30 seconds to re access Web UI by refreshing the browser To reboot the device Click the Reboot icon the following window will be popped up click Ok to reboot the...

Страница 22: ...22 DVDO Matrix 44 Mini_V1 0 0 DVDO Matrix 44 Mini 4x4 HDMI Matrix with Audio Outputs User Manual DVDO 8 Firmware Version This section allows you to obtain information of the current firmware in use...

Страница 23: ...llegible 2 The warranty has expired 3 The defects are caused by the product being repaired dismantled or altered by anyone not from an authorized service partner 4 The defects are caused by improper u...

Страница 24: ......

Отзывы: