background image

No. 

Item

Description

specifications.

6

Barcode

Tap the  icon  to  enable the  Barcode Scanner function.

7

Mobility

center

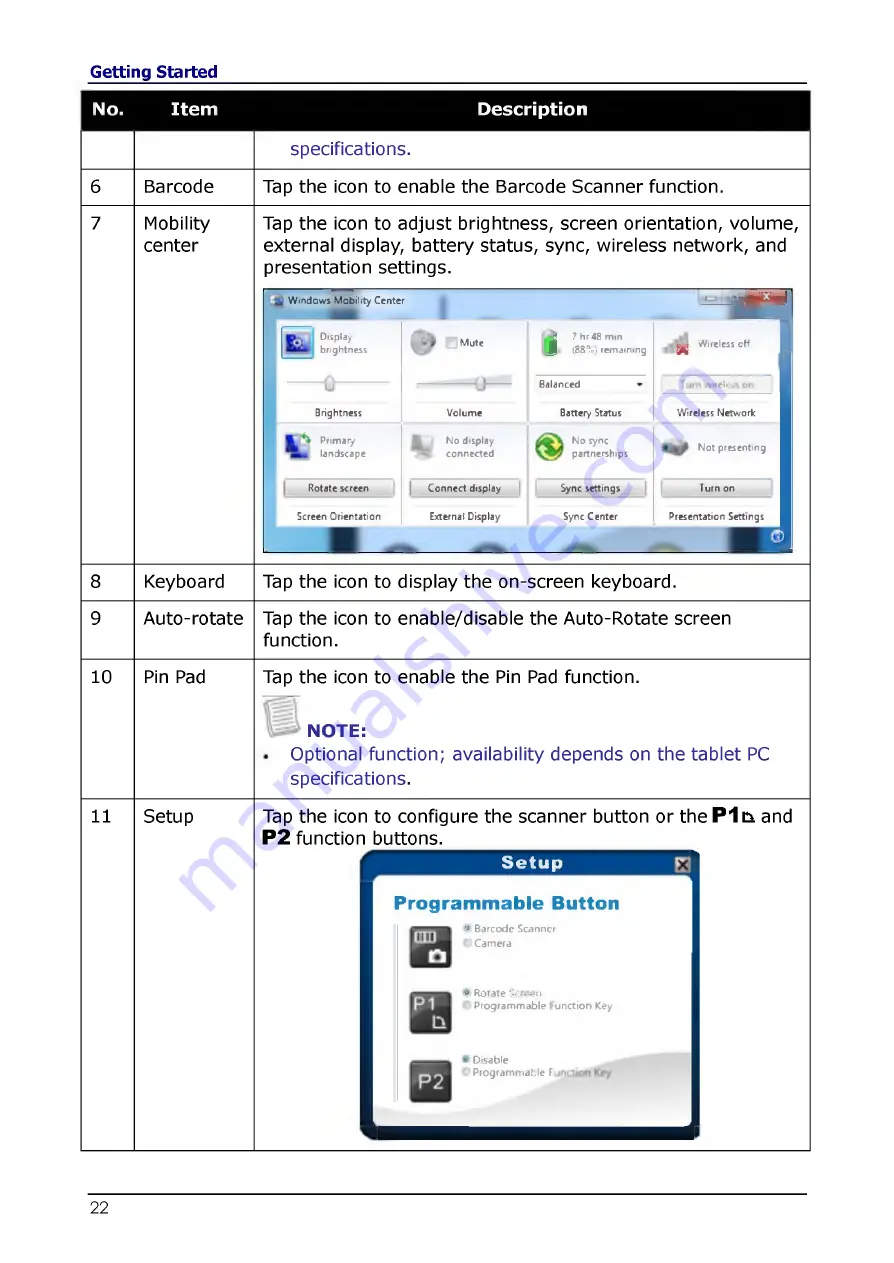
Tap the  icon  to  adjust  brightness,  screen  orientation,  volum e, 

external  display,  battery status,  sync,  w ireless  network,  and 

presentation  settings.

Windows  Mobility Center

wt*

Display

brightness

Brightness

Primary

landscape

Rotate screen

Screen Orientation

Mute

j

7 hr 48  mm 

(88%) remaining

Volume

No  display 

connected

Balanced

Battery  Status

Ж

Wireless  off

nreles

No sync 
partnerships

Connect display

External Display

Sync settings

Sync Center

Wireless Network

Not presenting

Turn on

Presentation  Settings

8

Keyboard

Tap the  icon  to  display the  on-screen  keyboard.

9

Auto-rotate

Tap the  icon  to  enable/disable the Auto-Rotate screen 

function.

10

Pin  Pad

Tap the  icon  to  enable the  Pin  Pad  function.

^  NOTE:

Optional  function;  availability depends  on  the tablet  PC 
specifications.

11

Setup

Tap the  icon  to  configure the scanner  button  or t h e P l b  and 

P2 

function  buttons.

S e tu p

P ro g ra m m ab le   Button

•  Barcode Scanner 

С  Camera

•   Rotate Screen 

®  Programmable  function Key

I D isable

Program m able  Ft,

Содержание CA10

Страница 1: ...к 3519 55 03 13 Москва 495 268 04 70 Мурманск 8152 59 64 93 Набережные Челны 8552 20 53 41 Нижний Новгород 831 429 08 12 Новокузнецк 3843 20 46 81 Новосибирск 383 227 86 73 Орел 4862 44 53 42 Оренбург 3532 37 68 04 Пенза 8412 22 31 16 Пермь 342 205 81 47 Ростов на Дону 863 308 18 15 Рязань 4912 46 61 64 Самара 846 206 03 16 Санкт Петербург 812 309 46 40 Саратов 845 249 38 78 Смоленск 4812 29 41 54...

Страница 2: ...9 Front View 9 Back View 11 Right View 12 Left View 12 Top View 13 Bottom View 13 Status Indicators 14 GETTING STARTED 15 Po w e r in g U p Y o u r Ta b l e t P C 15 Using Battery Power 15 I n s t a l l in g t h e Ba t t e r i e s 15 Charging the Battery 16 Charging Time 16 Checking the Battery Level 17 When to replace the Battery Pack 18 Removing the Batteries 18 S t a r t in g Y o u r Ta b l e t...

Страница 3: ...S e tu p M e n u 24 S ta r tin g th e BIOS S e tu p U t i l i t y 24 N a v ig a tin g a n d E n te rin g In fo rm a tio n in BIOS 25 OPTIONAL DEVICES 26 M a g n e t ic S t r ip e R e a d e r M S R 2 6 MSR Specification 26 SPECIFICATIONS 27 ...

Страница 4: ...n reception which can be determined by turning the equipment off and on the user is encouraged to try to correct the interference by one or more of the following measures Reorient or relocate the receiving antenna Increase the separation between the equipment and the receiver Connect the equipment into an outlet on a circuit different from that to which the receiver is connected Consult the dealer...

Страница 5: ...cause undesired operation of the device Radio Frequency RF Exposure Information The radiated output power of the Wireless Device is below the Industry Canada IC radio frequency exposure limits The Wireless Device should be used in such a manner such that the potential for human contact during normal operation is minimized This device has been evaluated for and shown compliant with the IC Specific ...

Страница 6: ...IDE BATTERY IT MUST BE DISPOSED OF PROPERLY CONTACT LOCAL ENVIRONMENTAL AGENCIES FOR INFORMATION ON RECYCLING AND DISPOSAL PLANS IN YOUR AREA CLASS 1 LASER PRODUCT LASERSCHUTZKLASSE 1 PRODUKT TO EN60825 CAUTION THIS APPLIANCE CONTAINS A LASER SYSTEM AND IS CLASSIFIED AS A CLASS 1 LASER PRODUCT TO USE THIS MODEL PROPERLY READ THE INSTRUCTION MANUAL CAREFULLY AND KEEP THIS MANUAL FOR FUTURE REFERENC...

Страница 7: ... FOR RJ 45 The RJ 45 jack is not used for telephone line connection FCC Warning This device complies with part 15 of the FCC Rules Operation is subject to the following two conditions 1 This device may not cause harmful interference and 2 this device must accept any interference received including interference that may cause undesired operation IC Warning This Class В digital apparatus complies wi...

Страница 8: ...de range of working environments Before you begin using your tablet PC read this chapter to familiarize yourself with the main components installed in the system Package Contents If any of following item is damaged please contact your retailer Stylus Pen Hand strap p g l NOTE The pictures are for reference only actual items may slightly differ Power cord Power adapter ...

Страница 9: ...ebcam Use for video conference 3 Microphone Receive audio input 4 Speaker Emit sound 5 Status Indicators Power Battery Wireless Indicate the corresponding function status See Status Indicators on page 14 6 Quick Menu button Press to launch the Quick Menu 7 Lock button Press to launch the log in menu similar as pressing Ctrl Alt Del on a PC ...

Страница 10: ...Setup on page 22 to program the function button 9 Function PI Rotate button Р1ь By default press this button to rotate the display 90 clockwise Or press this button to launch an assigned application See Setup on page 22 to program the function button 10 Power button Press to power on and off the tablet PC ...

Страница 11: ...k Supply battery power to your tablet PC 4 Battery latch Slide down the latch to release the battery pack from the compartment 5 Battery lock Lock the battery latch 6 Docking connector Connect the tablet PC to a docking station 7 Scanner button Press to trigger the Barcode scan function if the barcode scanner is on It can also be assigned as the camera button in Quick Menu ...

Страница 12: ...ight View Left View With battery pack Without battery pack No Item Description 1 DC in jack Connect the power adapter 2 SIM card slot Use to insert a SIM card for WWAN Gobi 3000 or LTE module connection ...

Страница 13: ...to insert an SD card for external storage 2 USB port Connect USB peripheral devices 3 LAN RJ 45 port Connect to a local area network LAN using an Ethernet cable 4 Serial port RS 232 Connect a peripheral device such as a printer or other device with serial port 5 Kensington lock slot Connect to a Kensington compatible tablet PC security lock ...

Страница 14: ...or the tablet PC is in hibernate mode Green Power is on Blinking Green The tablet PC is in standby or sleep mode a a Battery Indicate the status of battery 1 and battery 2 Green The battery is fully charged with 95 power or above Orange The battery is charging Flashing Orange Charging error Red The battery is low with less than 10 power Off The battery is discharged 0T RF The RF LED lights blue wh...

Страница 15: ...move the AC adapter if plugged Your tablet PC will automatically use the battery power Ш NOTE If your tablet PC is connected to an electrical outlet and the battery is installed your tablet PC uses power from the electrical outlet Installing the Batteries To install the batteries follow the steps below 1 Make sure the battery lock is in the unlock 3 position 2 Slide the battery pack into the compa...

Страница 16: ... the DC in jack of your tablet PC 3 Connect the AC adapter to the power cord 4 Plug the power cord to an electrical outlet Charging Time Number of battery pack Charging duration at 25 C 1 3 5 hours Г 2 1 6 5 hours NOTE The charging time may be longer if you are using your tablet PC while charging the battery CAUTION DO NOT charge the battery if the temperature is below 0 C or higher than 60 C Use ...

Страница 17: ... To check the remaining battery power double tap the battery icon in the system tray The battery screen appears ft i 4 6 2 3PM Г 10 26 2012 i 99 remaining Battery 1 100 remaining Battery 2 99 remaining Select a power plan о Balanced Power saver О Your current brightness setting might reduce battery life Adjust screen brightness More power options ...

Страница 18: ...replace your battery pack after 18 to 24 months of usage Removing the Batteries To remove the batteries follow the steps below 1 Slide the battery lock to the unlock position 2 Press and hold down the battery latch and slide the battery to remove it from the compartment 3 Repeat steps 1 and 2 to remove another battery ...

Страница 19: ... rotate the display orientation to suit your preference Press the P 1 q button to rotate the display 9 0 1 8 0 and 2 7 0 clockwise Р1ь s Ш NOTE You need to disable the Auto Rotate option in the Quick menu before pressing the shortcut button P1 ci to rotate the display Repeatedly press P 1 c i to rotate the display 1 8 0 and 2 7 0 clockwise ...

Страница 20: ... or otn r ntdia si tom itKeih loinei M n 9 vdiodc Hci v Hower Options V С ч л м м Н к С ч п м a xe i ie peM o J M er the сьлфи нтпbnjhum i fc iM rr ie change h r the Oispld 4 l trf W indow s M obility Center w Л 4 д 1 сommonf u d n u b lt y лы Pen and Touch mn j t M pan Слщ 1 П UAlln kj li fi TaWet PC Settings M4 lu u Jl иr 1 чо к е the order of Ю л y o u retr rotate oecrS h en hanoyou л м ith МПK...

Страница 21: ...AN Bluetooth and GPS will be automatically disabled 2 WLAN Tap the icon to enable disable the Wi Fi WLAN function 3 WWAN Tap the icon to enable disable the WWAN GPS function NOTE Optional function availability depends on the tablet PC specifications 4 Bluetooth Tap the icon to enable disable the Bluetooth function 5 RFID Tap the icon to enable the RFID function ffil NOTE Optional function availabi...

Страница 22: ...tus Ж Wireless off nreles No sync partnerships Connect display External Display Sync settings Sync Center Wireless Network Not presenting Turn on Presentation Settings 8 Keyboard Tap the icon to display the on screen keyboard 9 Auto rotate Tap the icon to enable disable the Auto Rotate screen function 10 Pin Pad Tap the icon to enable the Pin Pad function NOTE Optional function availability depend...

Страница 23: ...sion EC version and Quick Menu version inform ation Page Battery Charge Cycles I Battery 1 Battery 2 14 Times 14 Tim es Bios Version r d o EC Version 0 00 20 gu iск Menu Version l 7 0 8 Application 1 7 448 Setup NOTE A gray icon i e indicates the current function is disabled ...

Страница 24: ...the hardware so that it can operate correctly Use the BIOS setup utility to change your tablet PC start up configuration For example you can change the security and power management routines of your system Starting the BIOS Setup Utility You can only enter the BIOS setup utility as the tablet PC is booting that is between the time you turn on the tablet PC and before the Windows interface appears ...

Страница 25: ...previous values F3 Loads optimized default values F4 Saves the changes and exits Setup Esc Exits any section If you wish to exit the BIOS utility without saving changes or go to the main menu then press this key Users are allowed to enter new values to replace the default settings in certain fields and some fields are specified by system default parameters and cannot be modified by users Reverse t...

Страница 26: ...SR can be installed on your Tablet PC as shown below MSR Specification MSR Specification Supported Protocol ANSI ISO 7810 ISO 7811 1 6 7813 JIS X6301 X6302 AAMVA Frequency Two frequency coherent phase F2F recording methods ISO ISO Trackl IATA Track2 ABA and ТгаскЗ THRIFT decoding methods Reading and Encryption Bi directional card reading Supplies 54 byte value Encrypts all track data and the value...

Страница 27: ... in ambient light sensor Digitizer Optional Digitizer with active stylus pen with USB interface battery charger Auto switch between digitizer and touch input Storage SSD mSATA SSD 32 64 128 GB I O Devices Expansion Slot Smart card reader SD card slot SDHC Camera Front facing 1 3M pixel camera Optional rear facing 5M pixel auto focus camera Barcode scanner Optional Barcode scanner support 1D 2D bar...

Страница 28: ... C 45 C Storage Temperature 33 C 71 C Operating Humidity 5 95 Drop 26 drops with 4 feet high to 2 plywood over concrete unit on with SSD Dust Proof Water Sealing IP 4X IP X3 Vibration MIL STD 810G 514 6 Procedure I category 24 Figure 514 6E 1 unit on with SSD Operating System Windows 7 Professional x86 Windows Embedded Standard 7 by customer request Security Computrace Enable BIOS Administrator pa...

Страница 29: ... 81 Магнитогорск 3519 55 03 13 Москва 495 268 04 70 Мурманск 8152 59 64 93 Набережные Челны 8552 20 53 41 Нижний Новгород 831 429 08 12 Новокузнецк 3843 20 46 81 Новосибирск 383 227 86 73 Орел 4862 44 53 42 Оренбург 3532 37 68 04 Пенза 8412 22 31 16 Пермь 342 205 81 47 Ростов на Дону 863 308 18 15 Рязань 4912 46 61 64 Самара 846 206 03 16 Санкт Петербург 812 309 46 40 Саратов 845 249 38 78 Смоленс...

Отзывы: