background image


INSTRUCTION MANUAL


COMPRESSOR WINE COOLER


This  manual  contains  important  information  including  safety  and  installation  instructions  of 
the  appliances.  Please  read  it  carefully  before  use  and  follow  all  safety  information 

instructions.  It  is  recommended  to  keep  this  manual  for  easy  reference  so  that  you  can  be 
familiar with  the operation  of the appliance. 


CONTENTS


IMPORTANT SAFETY INFORMATION ................................................................................................................................ 2


STURCTURE AND INSTALLATION DRAWING ................................................................................................................ 3


ACCESSORY INSTALLATION BEFORE OPERATING .................................................................................................... 6


OPERATING THE WINE COOLER ..................................................................................................................................... 7


CARE AND MAINTENANCE ............................................................................................................................................. 11


TROUBLESHOOTING ....................................................................................................................................................... 13


REVERSE THE DOOR SWING ......................................................................................................................................... 14


Содержание COMPRESSOR WINE COOLER

Страница 1: ...e and follow all safety information instructions It is recommended to keep this manual for easy reference so that you can be familiar with the operation of the appliance CONTENTS IMPORTANT SAFETY INFORMATION 2 STURCTURE AND INSTALLATION DRAWING 3 ACCESSORY INSTALLATION BEFORE OPERATING 6 OPERATING THE WINE COOLER 7 CARE AND MAINTENANCE 11 TROUBLESHOOTING 13 REVERSE THE DOOR SWING 14 ...

Страница 2: ... should be referred to a qualified technician Ensure enough peoples to move and install the appliance to avoid any damage to the appliance or injury to the peoples To ensure proper ventilation for the appliance the front of the unit must be completely unobstructed Locate the unit away from direct sunlight and sources of heat stove heater radiator etc The fuse or circuit breaker size should be 10 a...

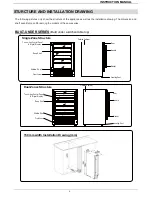
Страница 3: ...odels of the same series BUILT UNDER SERIES Built under a kitchen table top Single Zone Structure Touch key Control Panel Digital Display Deep Shelf Shallow S h e l f Front Louver Outside Cabinet Door Handle Gasket Leveling Foot Dual Zones Structure Touch key Control Panel Digital Display Deep Shelf Shallow Shelf Front Louver Outside Cabinet Door Handle Gasket Leveling Foot 150 mm width Installati...

Страница 4: ...ng mm 595 mm Width Installation Drawing mm BUILT IN COLUMN SERIES Built into a kitchen cabinet Single Zone Structure Touch Key Control Panel Digital Display Deep Shelf Shallow Shelf Outside Cabinet Condenser Door Handle Gasket Leveling Foot Mounting Bar ...

Страница 5: ...t in black which are packed as the accessory to the front bottom of the unit 2 Tighten the 2 screws to fix the mounting bar which has been fixed on the bottom of the unit to the kitchen cabinet See below drawing Mounting Bar Mounting Bar 1 Before inserting the unit into the kitchen cabinet please unscrew the original 4 leveling feet in white and screw the 2 short leveling feet in black which are p...

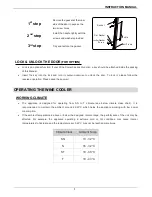
Страница 6: ...ont Louver Shallow Shelf Leveling Foot Lock ACCESSORY INSTALLATION BEFORE OPERATING UNPACKING AND CLEANING THE WINE COOLER Remove the exterior and interior packing materials Let the appliance stand upright for approximately 2 hours before connecting it to the power source which helps to reduce the possibility of a cooling system malfunction from handling during transportation Use a soft cloth to c...

Страница 7: ...tion Please save the key well OPERATING THE WINE COOLER WORKING CLIMATE The appliance is designed for operating from SN to T climate see below climate class chart It is recommended to maintain the ambient around 22 25 C which helps the appliance working with low power consumption If the ambient temperature is above or below the designed climate range the performance of the unit may be affected For...

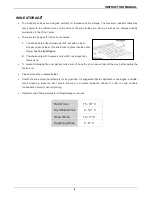
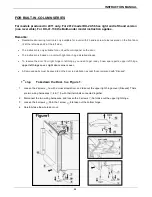
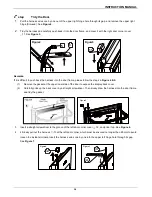
Страница 8: ...alling See the right figure 2 The shelves are with telescopic rails which has stoppers by themselves To prevent damaging the door gasket make sure to have the door opened fully all the way before pulling the shelves out Please store wine in sealed bottles Should the wine cooler be left empty for long periods it is suggested that the appliance is unplugged and after careful cleaning leave the door ...

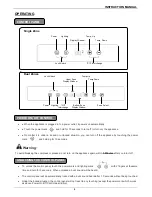
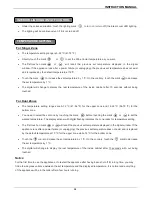
Страница 9: ...ked or unlocked situation you can turn off the appliance by touching the power mark and holding for 10 seconds Warning To avoid breaking the compressor please do not turn on the appliance again within 5 Minutes after you turn it off UNLOCKING THE CONTROL PANEL To unlock the control panel touch the power mark and lighting mark with 2 fingers at thesame time and hold for 3 seconds When unlocked a bu...

Страница 10: ...5 12 ºC 41 54 ºF for the upper zone and 12 22 ºC 54 72 ºF for the bottom zone You need to select the set zone by touching the mark before touching the mark or to set the wanted temperature The display window with digital flashing indicates the zone ready for temperature setting The first touch on mark or will recall the previous set temperature displayed in the digital window If the appliance runs...

Страница 11: ... you have set SELECTING FAHRENHEIT ºF CELSIUS ºC For Single Zone Touch the marks with 2 fingers at the same time and hold for 5 seconds you can interchange the Fahrenheit ºF and Celsius display ºC For Dual Zones Just touch the mark you can interchange the Fahrenheit ºF and Celsius ºC display for both zones at the same time CARE AND MAINTENANCE CLEANING THE WINE COOLER Turn off the power unplug the...

Страница 12: ...own all loose items shelves inside your appliance Turn the adjustable leg up to the base to avoid damage Tape the door shut Be sure the appliance stays secure in the upright position during transportation Also protect outside of appliance with a blanket or similar item ENERGY SAVING TIPS The appliance should be located away from heat producing appliances and away from direct sunlight Ensure that t...

Страница 13: ...osed completely The temperature control is not set correctly The door gasket does not seal properly The lighting does not work Not plugged in The circuit breaker tripped or a blown fuse The lighting is turned off Too much vibration Check to assure that the appliance is level Check to assure no parts inside the cabinet or in the compressor chamber are loose The Wine Cooler seems to make too much no...

Страница 14: ...1 2nd step Carefully remove the door from the upper right hinge and prevent it from scratching Take out the support rod from the door hinge hole See Figure 2 3rd step Pull out the 6 decorating plastic bolts covering the reserved hinge screw holes at the front left corner of the cabinet 4th step Unscrew the upper right hinge 4 Disused and bottom left hinge 6 Disused from the cabinet See Figure 3 5t...

Страница 15: ...oor hinge installed already To reserve the door from right hinge to left hinge you need to get ready 3 new spare parts upper left hinge upper left hinge cover right door corner cover All removed parts must be saved to do the door reinstallation except those remarked with Disused 1st step Takedown the Door See Figure 1 1 Loosen the 2 screws 1a with a cross screwdriver and take out the upper right h...

Страница 16: ...e door frame please follow the steps in Figure 4 5 1 Remove the gasket at the upper inner side of the door to expose the display back cover 2 Carefully prize up the back cover by a straight screwdriver Then slowly draw the harness into the door frame and tidy the gasket 3 Insert a straight screwdriver to the groove of the left door corner cover 12 and prize it up See Figure 6 4 4 Slowly pull out t...

Страница 17: ...e at the bottom left side of the cabinet with 4 screws 3b 4th step Install the Door See Figure 9 1 Install the upper left hinge 14 at the top left side of the cabinet with 3 screws 3a 2 Fix the door to the bottom hinge with a screw 8 3 Connect the two wiring harnesses 13 17 through their terminals 4 Tidy the harnesses and install the upper left hinge cover 16 with the screw 1a Figure8 1b 15 1b 15 ...

Страница 18: ...g the handle to the right side See Figure 10 2 Remove the gasket at the left inner side of the door to expose the 2 handle screws 19 Unscrew them in a counter clockwise direction with a cross screwdriver take out the screws and the washers as well as the handle See Figure 11 3 Install the handle to the outer right side of the door backwards to the steps of taking down the door See Figure 12 4 Inst...

Страница 19: ...cover 2 with a straight screwdriver Take out the upper hinge by loosening the screws 3a and lift up the whole door See Figure 1 2nd step Move the support rod 6 at the bottom of the door from the right to the left side Move the hinge hole cover at the top of the door from the left side to the right side See Figure 2 3 3rd step Pull out the bottom hinge cover 9 and take out the bottom hinge by loosi...

Страница 20: ...to the bottom hinge through a washer 11 and screw the upper hinge which has connected with the door Finally cover the hinges as well as the hinge screw holes See Figure 5 6 5th step Change the door handle from the left to the right side of the front door by following the instructions as mentioned above ...

Отзывы: