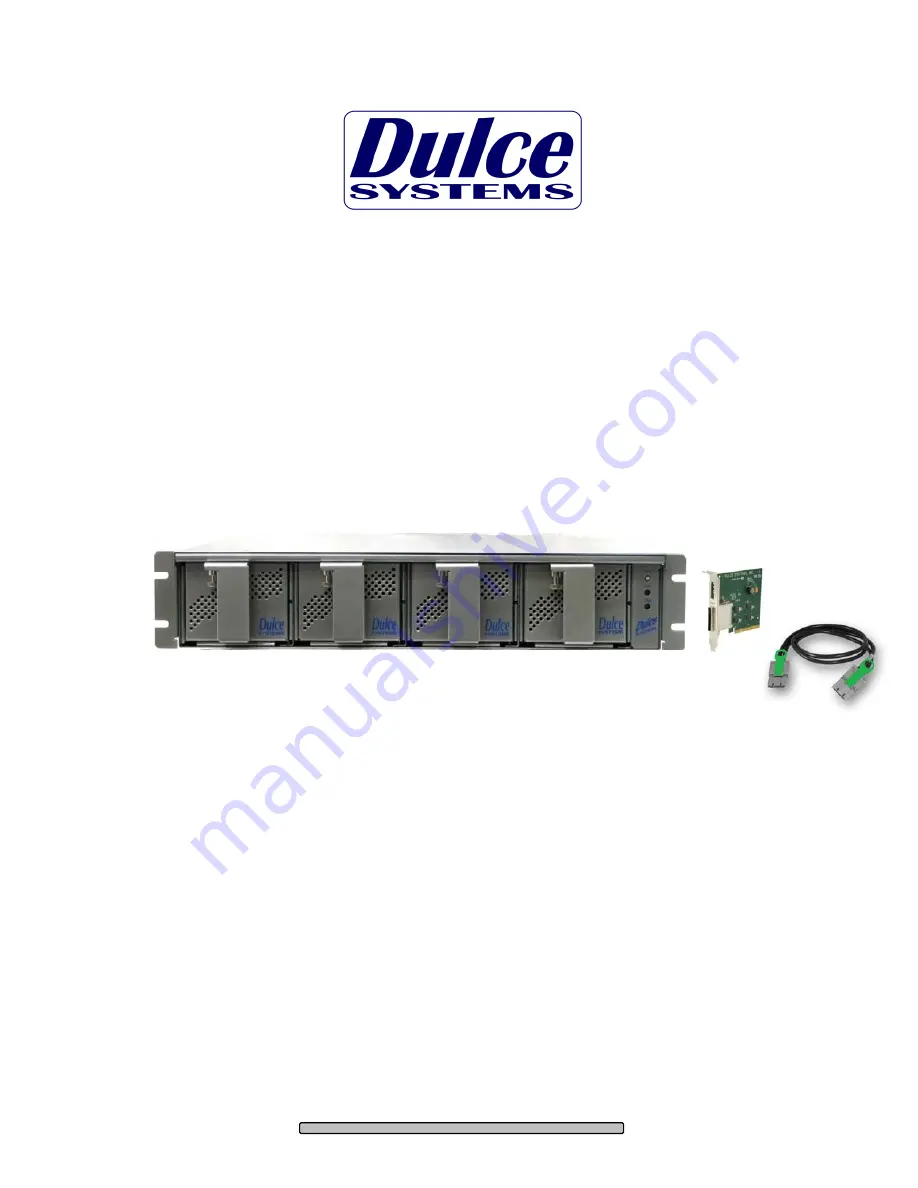
PRO RXmpd
Featuring the
Quad Pack
Installation and User’s Manual
Designed for Video Editing and Content Creation Professionals
Document 900-0029-0
Страница 1: ...PRO RXmpd Featuring the Quad Pack Installation and User s Manual Designed for Video Editing and Content Creation Professionals Document 900 0029 0 ...
Страница 2: ...s 18 4 5 2 Mac Driver Installation 19 4 5 3 Windows XP 2000 Driver Installation 20 4 5 4 Windows Vista Driver Installation 20 4 6 RAID Console Installation 21 4 6 1 Apple Mac RAID Console Installation 21 4 6 2 Windows PC RAID Console Installation 22 4 7 Built in Ethernet Configuration 22 4 8 E mail notification 22 5 RAID Console Operations 23 5 1 Start RAID Console GUI 23 5 1 1 Start Apple Mac RAI...
Страница 3: ...etting your RAID storage system up and running so you can get to work quickly For most typical video editing storage requirements we have preconfigured the PRO RXmpd for a much more streamlined installation Refer to the Pre configuration Sheet for the exact pre configuration of your PRO RXmpd the default configured is for RAID 5 efficient protection mode and pre formatted for Mac OS X Just simply ...
Страница 4: ... or table Unit may fall causing serious injury VENTILATION Do not block front and rear ventilation Proper airflow is required to ensure reliable operation and prevents unit from overheating Do not place unit in an enclosed space where no or insufficient ventilation is available ELECTRICAL Do not defeat the safety purpose of the grounding power plug The power cord should be routed so that it is not...
Страница 5: ...ure sérieuse VENTILATION Ne bloquez pas de devant et élevez la ventilation L écoulement d air nécessaire est tenu de garantir l opération sûre et prévient l unité de sur le chauffage L unité ne peut pas placé dans un espace fermé où aucune ventilation ou dans suffisant n est disponible ÉLECTRIQUE Ne vainquez pas le but de sécurité de la prise de courant de pouvoir de bases La corde de pouvoir devr...
Страница 6: ...erursachen könnte BELÜFTUNG Vordere und hintere Belüftungsöffnungen nicht versperren Das Gerät muss ausreichend be und entlüftet werden können damit es sich nicht während des Betriebs überhitzt Daher darf das Gerät nicht in geschlossenen Räumen aufgestellt werden in denen keine ausreichende Be und Entlüftung gewährleistet ist STROMVERSORGUNG Nicht den Schukostecker modifizieren Das Stromkabel soll...
Страница 7: ...TILACIÓN No bloquee delantero y críe la ventilación El corriente de aire apropiado es requerido asegurar la operación confiable y previene la unidad de sobre la calefacción La unidad no puede colocado en un espacio incluido donde ninguna ventilación o en suficiente está disponible ELÉCTRICO No derrote el objetivo de seguridad del enchufe de poder que da buenos conocimientos La cuerda de poder debe...
Страница 8: ...patible PC with one available PCI e x8 slot Internet connection to download drivers and utilities 1 3 Technical Support Phone 818 435 6007 FAX 818 576 0324 E mail support dulcesystems com Web www dulcesystems com If the product requires service please contact Dulce Systems Technical Support and obtain an RMA number Ship the product properly packaged to Dulce Systems Attn RMA 9620 Topanga Canyon Pl...
Страница 9: ... a small format procedure is needed 2 1 Packaging Please do not discard the boxes and packing materials in case you might need to reuse them later Always ship the product in its original packaging Improperly packaged products will be subjected to shipping damage for which you will be liable for the repair 2 2 Check List Installation and User s Manual Power Cord North America user only A 4 Quad Pac...
Страница 10: ... a front bezel that needs to be removed to access the Disk Modules Packs The Disk Modules Packs are held by a spring loaded Lock Pin that you simply pull down on to release the Disk Module Pack 3 2 Disk Module Pack Disk Module Pack Lock Pin Pull down to unlock during insert and removal Page 10 ...
Страница 11: ...ton Fan Alarm Temp Alarm Quad Pack Drive 1 8 Quad Pack Drive 9 16 Quad Pack Drive 17 24 Quad Pack Drive 24 32 Config Switch Link Status Cable Installed Power On 4 or 8 Lane Uplink Uplink Port Config Switches Management Ethernet port Power Supply Removable Cooling Fans Link Status Cable Installed 4 or 8 Lane Mode Power Supply ...
Страница 12: ...se Windows operation will require a format partition process The PRO RXmpd ships already pre configured in RAID 5 After the driver installation simply run the Windows Disk Management utility to prepare the RAID for Windows usage 4 1 Rack mount Installation The PRO RXmpd can be rack mounted to a standard 19 rack 3u height space is required An optional rack mount kit is available for 24 and 30 depth...
Страница 13: ... Lock Pin to secure Note On a new installation the order in which the Disk Modules Packs are installed does not matter It will matter once the array s are configured DO NOT ship the PRO RXmpd with the Disk Modules Packs installed the Disk Modules packs MUST be packaged separately in a single or multi pack to properly protect them during shipment Slider Rail mounted to rack Page 13 ...
Страница 14: ... in a PCI e equipped computer Some computers support both PCI e and PCI x such as the HP xw series but not Apple Macs 4 3 1 Switch Settings Determine the correct switch settings Set both the HBE and PRO RXmpd to same configuration The HBE Card and the PRO RXmpd enclosure can operate at 1 4 or 8 lane speed configurations The maximum speed will be determined by the capability and selection of the co...
Страница 15: ... are unsure the 4 lane setting is a good place to start PCI express Lanes 8 Off Off 8 Lanes On Off 4 Lanes On On 1 Lane 4 3 2 HBE Card Installation The PCI e HBE Card requires a x8 slot or larger Computers with PCI e slots less than x8 will not physically accommodate the HBE PCI e slots x8 or larger will work Apple Mac Pro Intel and newer versions of Power Mac G5 support PCI e as well as the HP xw...
Страница 16: ...a PCI e Extender Cable This cable carries 8 lanes of the PCI e interface The green tab is up in this orientation To remove pull the tab to unlock the latches and then pull the metal body to remove the connector Switches to left green Tab on top 4 4 2 Mac Connection Mac Pro or Power Mac Green Tab on top Green Tab on top Page 16 ...
Страница 17: ...PRO RXmpd Installation and User s Manual 4 4 3 Windows PC Connection Typical Windows PC Green Tab on Bottom Green Tab on top Page 17 ...
Страница 18: ...nch the Expansion Slot Utility where you can make performance adjustments for the various PCI e slots The utility can be manually started also it can be found at Under my Mac Pro System Library CoreServices Ensure there is at least a x4 speed assignment for the slot where HBE Card is installed making sure also that your video capture playback card and video display card also get a sufficient x val...
Страница 19: ...lder named Dulce MRAID Install will be placed on your desktop Open it and follow the simple steps outlined in the Install Read Me document After driver installation reboot the computer and the PRO RXmpd icon will appear on the desktop Your new storage is now ready to go to work Pre configured for Mac OS X You may proceed to the RAID Console section if you wish to change the configuration or just t...
Страница 20: ...oller click Update Driver click Yes then Next Select Install from a list Advanced click Next Browse to the unzip folder and follow the instructions on screen 4 5 4 Windows Vista Driver Installation For the latest Windows Vista driver please visit our web site and download the most up today driver Download From www dulcesystems com download Unzip the downloaded folder and place the content on the d...
Страница 21: ...ring the driver installation process No additional steps are required to install the RAID Console You may proceed directly to the RAID Console Operation section 4 6 2 Windows PC RAID Console Installation Download the latest RAID Console utility Download From www dulcesystems com download Unzip and run the setup exe to install the RAID Console utility Page 21 ...
Страница 22: ...HCP to acquire and IP Address you may also hardcode the IP address Use RAID Console from the host computer to configure the Built in Ethernet Port The EtherNet Config page is located at System Control EtherNet Config 4 8 E mail notification Setting up an e mail event notification is easy using the built in SMTP mail configuration option For the latest up to day procedure please check the Tech Note...
Страница 23: ... Browser 5 1 1 Start Apple Mac RAID Console GUI F D or optimum results use FireFox web browser instead of Safari ouble click on the Dulce RAID Console icon in the Dulce MRAID Install folder to launch the RAID Console For quicker access you may move the Dulce RAID Console icon to the dock Or manually enter 127 0 0 1 81 on the browser address line to start RAID Console Default login name is admin De...
Страница 24: ...ID Console GUI Start the RAID Console from Start All Programs Areca Technology ArcHttpSrvGUI Areca HTTP Proxy Server GUI The ARCHTTP service will start Double click on the Controller 01 to start the RAID Console Default login name is admin Default password is 0000 four zeros ...
Страница 25: ...and you know the IP address of the PRO RXmpd you can use any computer on the network via any web browser to connect to the RAID Console and manage the PRO RXmpd You can discover the PRO RXmpd IP address by using the local computer that is connected to the PRO RXmpd launch the appropriate RAID Console The Ethernet Configuration page is at System Controls EtherNet Config Page 25 ...
Страница 26: ...anging the RAID mode requires the current RAID Set to be deleted first and then create a new RAID Set with the new RAID mode 5 2 1 Delete the RAID Set From the RAID Console GUI On the left side menu bar click on RaidSet Functions Delete Raid Set Select the Raid Set and check the Confirm box Click Submit to delete the RAID Set Page 26 ...
Страница 27: ...or Windows XP 32 bit with larger than 2TB RAID read next section From the RAID Console GUI On the left side menu bar click on Click on Quick Function Quick Create Change the Select Raid Level as desire Change Greater Two TB Volume Support Set to 64bit LBA Windows XP 32 bit Set to No Volume Initialization Mode Change to No Init Check Confirm the Operation Click Submit Page 27 ...
Страница 28: ...PRO RXmpd Installation and User s Manual No Init allows for immediate RAID Set availability The RAID is ready for the OS format and partition Page 28 ...
Страница 29: ...meSet Functions Select the desired Volume Raid Level Set the Select Volume Capacity to 2199GB Set Greater Two TB Volume Support to No Set Volume Initialization Mode to No Init if applicable Check the Confirm the Operation box Click Submit Repeat this step until all of the space has been assigned By setting the Volume Initialization Mode to No Init will result in immediate availability of the RAID ...
Страница 30: ...ion RaidSet Hierarchy 2 In Windows Disk Management make these volumes as Dynamic Disks and span them together to make one large disk Spanning is recommended as oppose to striping Striping in this configuration requires more system overhead and will actually reduce performance Use Spanning Page 30 ...
Страница 31: ...y pressing the green mute button above the indicators the red indicator remains on until the condition is corrected RAID Controller Alarm Audible Drive Indicators and RAID Console GUI indicator Degraded RAID Set one or more drives not detected or down Temperature RAID Controller detected over heating Mute Alarm RAID Controller Alarm can be muted by the RAID Console Start the RAID Console GUI go to...
Страница 32: ...drive redundant RAID modes 1 3 5 6 we need to identify the downed disk drive See Appendix A at the end of this manual for detailed instructions on replacing a downed disk module In a redundant RAID mode rebuild will start automatically after replacement of a defective disk module Pull the Lock Pin down and pull the Disk Module Pack out that has the downed drive and proceed to Appendix A for detail...
Страница 33: ...r driver installation and reboot Should it be necessary to re format and partition the RAID use the Apple Disk Utility To start Disk Utility move pointer to upper left corner of screen click on Go then click on Utilities Locate and launch Disk Utility 7 1 1 Erase an existing partition Select the RAID on left click on Partition tab select Free Space Click on Partition on lower right Page 33 ...
Страница 34: ...ew partition Select Dulce on the left side drive list click on Partition tab change Volume Scheme to 1 Partition change Name as desired click on Partition on lower right The drive will appear on the desktop after successful completion of the Partition Page 34 ...
Страница 35: ...istrative Tools Computer Management Under Storage If the RAID shows up as Unknown Not Initialized right click on the disk and Initialize it If the drive is larger than 2TB and using Vista right click over the disk and Convert to GPT Disk Windows XP 32 bit does not support larger than 2TB capacity Configure with multiple capacities of 2TB or less Page 35 ...
Страница 36: ...n and User s Manual Right click the unallocated segment and select New Simple Volume Enter the desired Volume Size assign the desired Drive Letter or Path check Perform a Quick Format at the Format Partition screen Page 36 ...
Страница 37: ... redundancy 1 drive used for parity Loses 1 disk drive capacity Well balanced for video requiring performance and redundancy 5 Distributing the parity across all drives Efficient drive redundancy parity distributed to all drives Loses 1 disk drive capacity Well balanced for file server requiring performance and redundancy 6 Striping with two dedicated parity drives Double drive redundancy 2 drives...
Страница 38: ...determining that a defective Product exists to repair or replace a defective Product Our replacement Product under its limited warranty will be manufactured from new or reconditioned parts Your exclusive remedy for any defective Product is limited to the repair or replacement of the defective Product We will return the repaired or replacement Product to you prepaid using the same method of shippin...
Страница 39: ...web site and register online www dulcesystems com register A valid proof of purchase might be required to further validate the Products warranty eligibility the valid proof of purchase document must show the product model serial number purchase date and supplier name If the valid proof of purchase is not available the original manufacturing date of the product will be used to determine the warrant...
Страница 40: ...rive redundant RAID modes 1 3 5 6 we need to identify the downed disk drive The disk drives are recognized by the GUI starting with the top drive in the first Disk Module Pack as noted in the diagram They are numbered counting down the first Disk Module Pack then back to the top of the second Disk Module Pack and down and so on to disk drive 16 Disk Drive 16 Disk Drive 1 In the event of a drive fa...
Страница 41: ...ack out that has the failed disk drive First remove the 4 screws located here using a Phillips screwdriver Remove these 4 screws first 2 screws on top 2 screws on the bottom Lock Pin This screen shot denotes disk drive 4 has failed Disk drive 4 would be the 4th disk drive down in Disk Module Pack 1 ...
Страница 42: ...the last 2 screws needed to remove the downed drive Unscrew the 2 screws one on each side needed to remove the downed drive Remove the final 2 screws needed to remove the downed drive Once you have the downed drive removed insert the new drive and secure it with the 2 screws you just removed before sliding the other half of the Disk Module Pack back in place When you have the other half of the Dis...
Страница 43: ... RXmpd chaise Power on the system In a redundant RAID mode rebuild will start automatically after replacement of a defective disk drive You can monitor the process through the GUI under the Raid Set Hierarchy This screen shot denotes disk drive 4 has begun rebuilding The reconstruction time to complete can vary on a couple factors The size of the disk drive If you continue to work on the array dur...
Страница 44: ...s you might run into the occasional issue that the Disk Modules Packs are set to a conflicting LUN For example you have all 4 Disk Modules Packs installed but Modules 1 and 2 are their own RAID5 and Modules 3 and 4 are their own RAID5 1st Raid 5 Disk Array 2nd Raid 5 Disk Array What it would look like in the RaidSet Hierarchy Notice the LUN Settings Page 44 ...
Страница 45: ...rst RAID 5 which is LUN 0 0 0 to a different PRO RXmpd rack system that already has a LUN 0 0 0 will keep the volume from being mounted At this point we need to go into the GUI to manually change the LUN number for this added disk array In the Main Menu of the Raid GUI you click on the VolumeSet Functions to open the menu Select Modify Volume Set This will allow you to modify the Volume Set Option...
Страница 46: ...me is selected click on the Submit button to bring up the Volume Options Select the LUN number from the 3rd pull down menu Use a LUN number that is not in use from any other array in the PRO RXmpd Once a LUN number has been selected check the Confirm the Operation box and click on Submit Page 46 ...
Страница 47: ...ion and User s Manual In the Main Menu of the Raid GUI you can go back to RaidSet Hierarchy to view the LUN setting to make sure there are no further conflicts You should see the new LUN setting you just selected Page 47 ...
Страница 48: ...Page 48 PRO RXmpd Installation and User s Manual www dulcesystems com ...